文章目录
新增linux系统

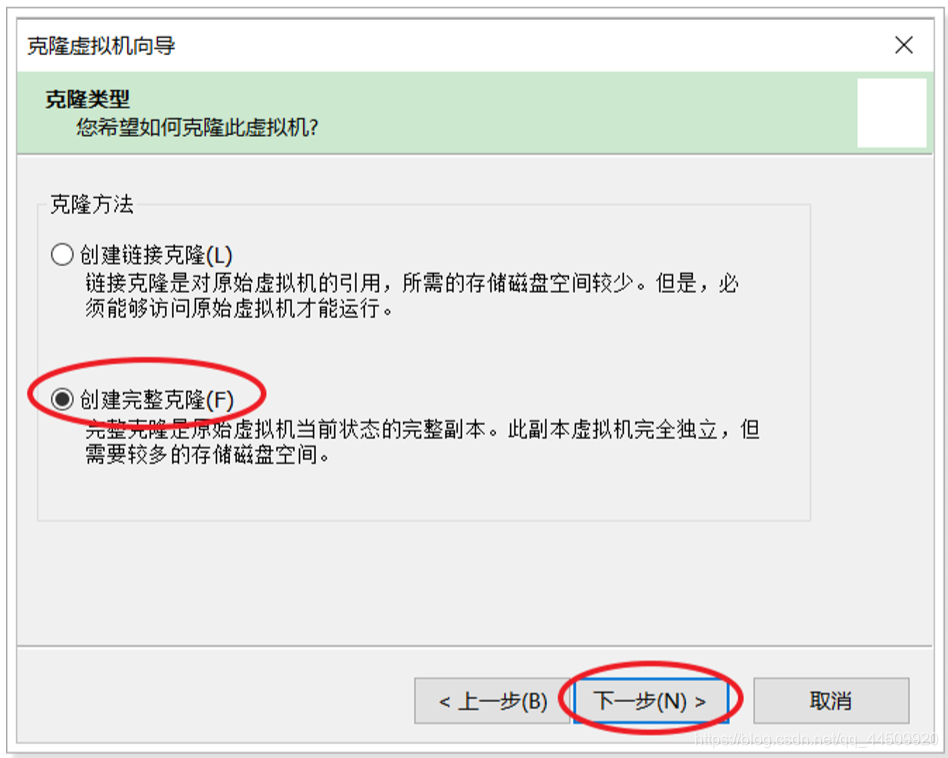
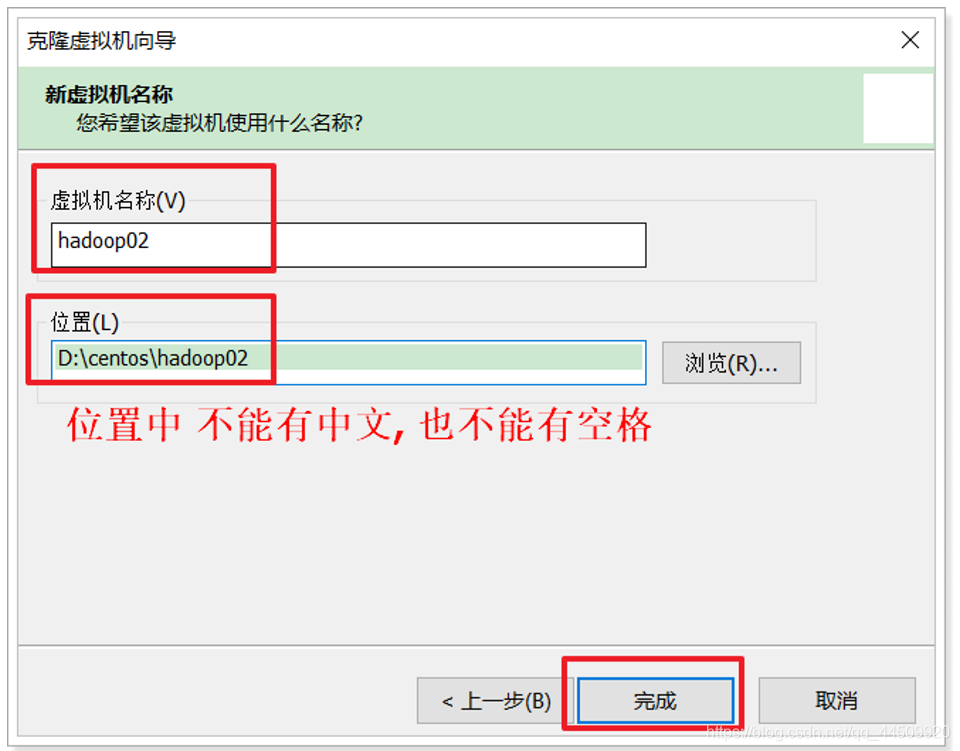
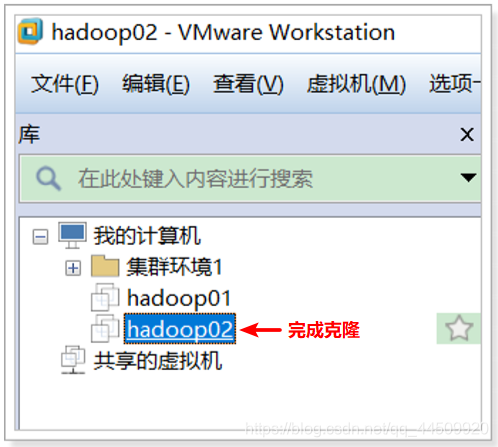
第一步: 克隆虚拟机

第二步: 更改新增系统的mac地址
vim /etc/udev/rules.d/70-persistent-net.rules

第三步: 更改网卡信息 (setup)
vim /etc/sysconfig/network-scripts/ifcfg-eth0

第四步: 重启系统生效
[root@node02 ~]# reboot
三台机器 关闭防火墙
内网环境 安全性比较高, 防火墙开启会影响效率, 所以 关闭防火墙
三台机器执行以下命令(root用户来执行)
service iptables 可选择方式一
/etc/init.d/iptables 可选择方式二
Usage: iptables {start|stop|reload|restart|condrestart|status|panic|save}
# 查看防火墙的状态 status
[root@node02 ~]# service iptables status (方式一)
[root@node02 ~]# /etc/init.d/iptables status (方式二)
iptables:未运行防火墙。
# 启动防火墙服务 start
[root@node02 ~]# service iptables start (方式一)
[root@node02 ~]# /etc/init.d/iptables start (方式二)
# 重启 防火墙 服务 restart
[root@node02 ~]# service iptables restart
[root@node02 ~]# /etc/init.d/iptables restart
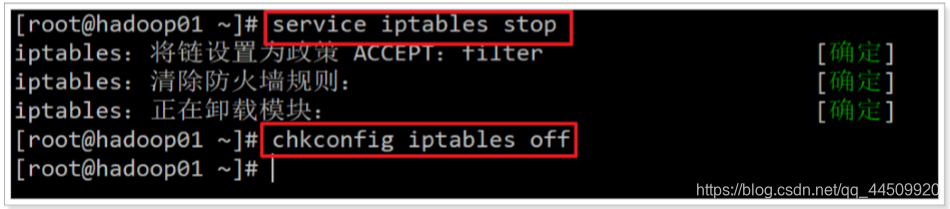
# 停止 防火墙 服务 stop
[root@node02 ~]# service iptables stop
[root@node02 ~]# /etc/init.d/iptables stop
#* 彻底关闭防火墙 off (开机不自起) on (开机自起)
[root@node02 ~]# chkconfig iptables off
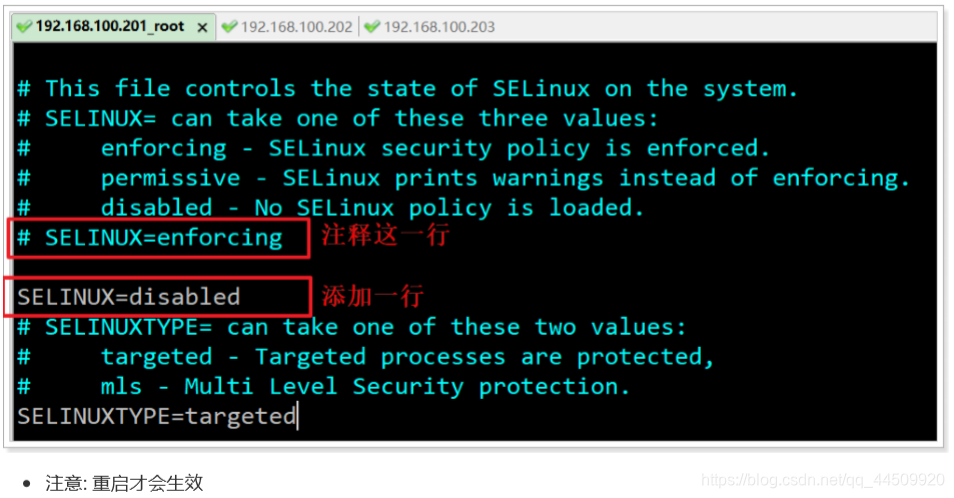
三台机器关闭selinux
进入seLinux编辑 ( vim /etc/selinux/config )
[root@node02 ~]# vim /etc/selinux/config
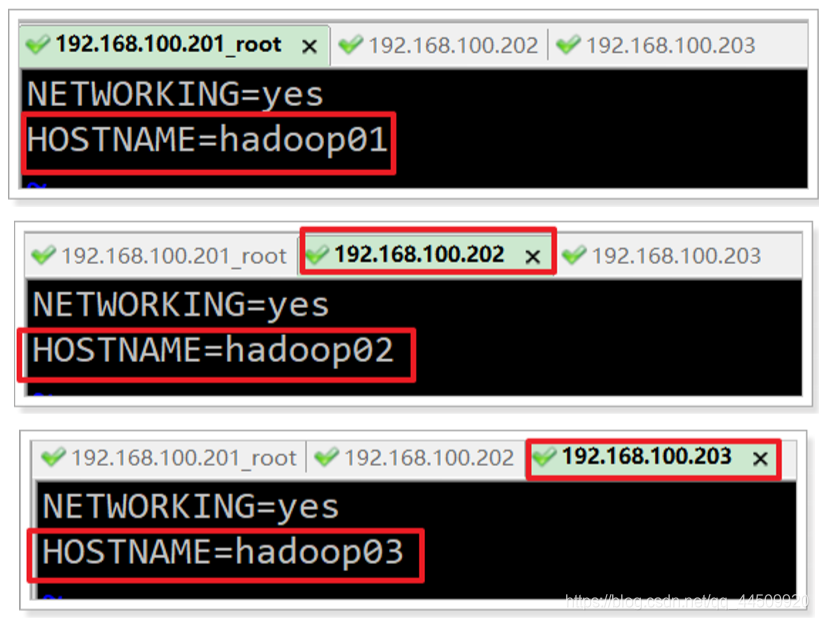
三台机器更改主机名
更改别名 (vim /etc/sysconfig/network )
注意:重启才会生效
[root@node02 ~]# vim /etc/sysconfig/network
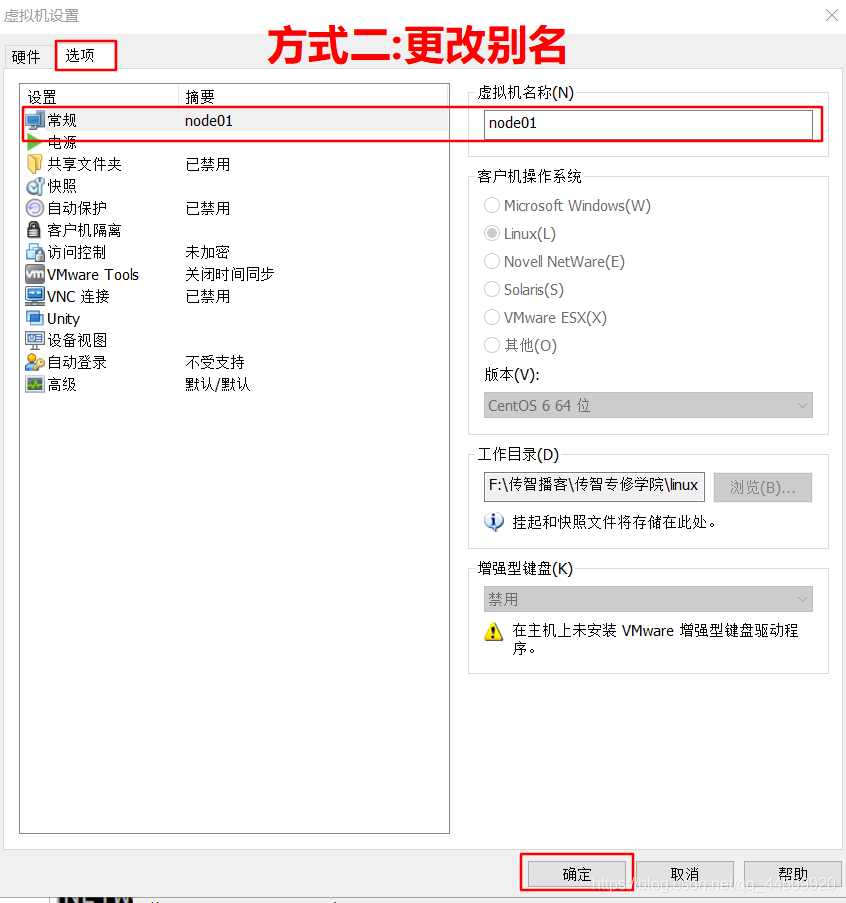
方式二:窗口设置修改别名
三台机器 给ip地址起别名
给ip地址起别名
[root@node02 ~]# vim /etc/hosts
127.0.0.1   localhost localhost.localdomain localhost4 localhost4.localdomain4
::1         localhost localhost.localdomain localhost6 localhost6.localdomain6
192.168.100.201      node01
192.168.100.202      node02
192.168.100.203      node03
测试
ping 192.168.100.202
ping hadoop02
[root@node02 ~]# ping 192.168.100.202    (通过 ping ip)
PING 192.168.100.202 (192.168.100.202) 56(84) bytes of data.
64 bytes from 192.168.100.202: icmp_seq=1 ttl=64 time=0.017 ms

[root@node02 ~]# ping node02             (通过ping 别名 )
PING node02 (192.168.100.202) 56(84) bytes of data.
64 bytes from node02 (192.168.100.202): icmp_seq=1 ttl=64 time=0.010 ms
一.scp 远程文件拷贝
是什么?
scp是 remote file copy program 的缩写, scp是远程文件拷贝命令。
从本地拷贝到远程机器上

1.文件
拷贝文件
语法格式( scp local_file remote_username@remote_ip:remote_folder)
[root@node02 ~]# scp /etc/hosts   node03:/etc/
[root@node02 ~]# scp /etc/hosts   root@node03:/etc/

需求: 将本地 01.txt 文件 复制到 192.168.100.202 机器的 /export目录下

scp  /export/aaa/01.txt   root@192.168.100.202:/export   (方式一)

scp  /export/aaa/02.txt   root@hadoop02:/export          (方式二)

[root@node02 ~]#scp /export/aaa/02.txt  hadoop02:/export (方式三)
2.文件夹
拷贝目录
语法格式 (scp -r local_folder remote_username@remote_ip:remote_folder)
需求: 将本地 aaa 目录 复制到 192.168.100.202 机器的 /export 目录下
 [root@node02 ~]# scp -r /export/aaa root@192.168.100.202:/export

 [root@node02 ~]# scp -r /export/aaa root@hadoop02:/export

 [root@node02 ~]# scp -r /export/aaa hadoop02:/export
二.将远程机器内容复制到本地机器上

1.文件
拷贝文件
语法格式 (scp remote_username@remote_ip:remote_file local_folder)
需求:将 hadoop02的 111.txt 文件 复制到 hadoop01的 export目录下
 [root@node02 ~]# scp root@192.168.100.202:/export/a1/111.txt  /export

 [root@node02 ~]# scp root@hadoop02:/export/a1/222.txt  /export

 [root@node02 ~]# scp hadoop02:/export/a1/222.txt  /export
2.目录
拷贝目录
语法格式 (scp -r remote_username@remote_ip:remote_folder local_folder)
需求:将hadoop02的 /export/a1/ 目录 复制到 hadoop01 的 export目录下
 [root@node02 ~]# scp -r root@192.168.100.202:/export/a1  /export

 [root@node02 ~]# scp -r hadoop02:/export/a1  /export
ssh远程登录
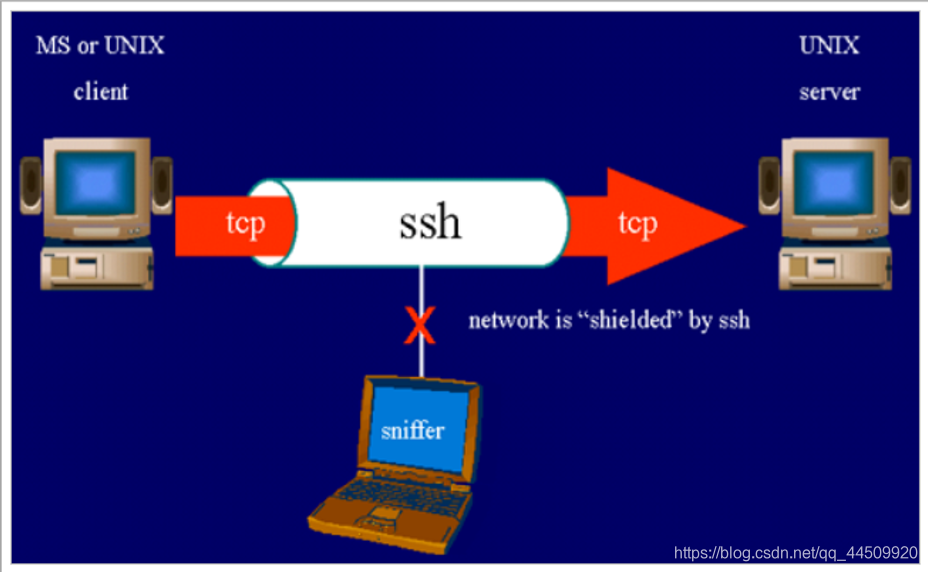
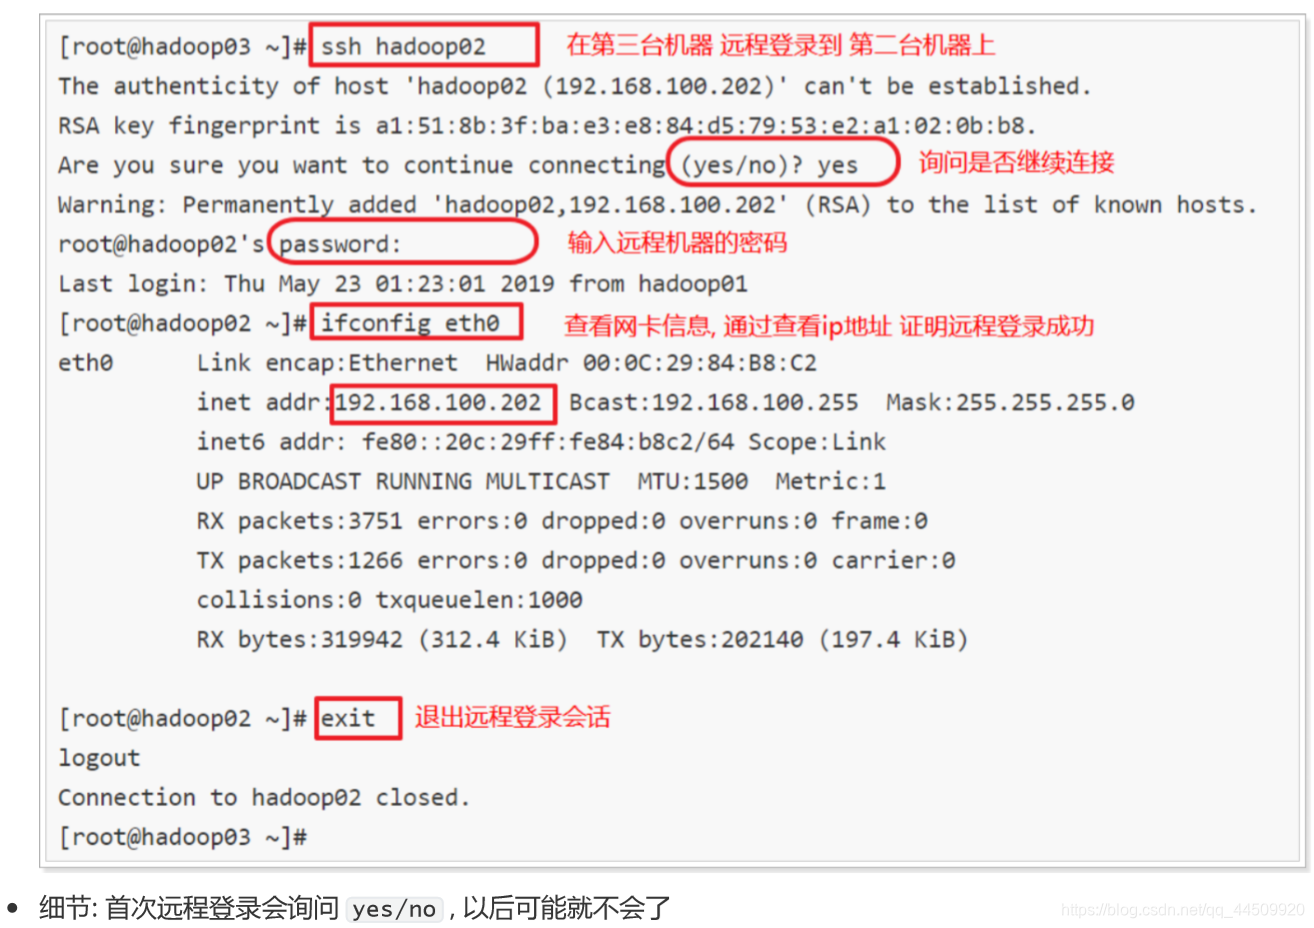
方式一 使用 ssh 基于密码的远程登录
| 命令 | 含义 |
|---|---|
| ssh ip地址 | 远程登录到指定服务器上(必须知道正确的密码) |
在第三台机器上登录到第二台机器上
方式二: 使用 ssh 基于密匙 实现 免密码登录(掌握)
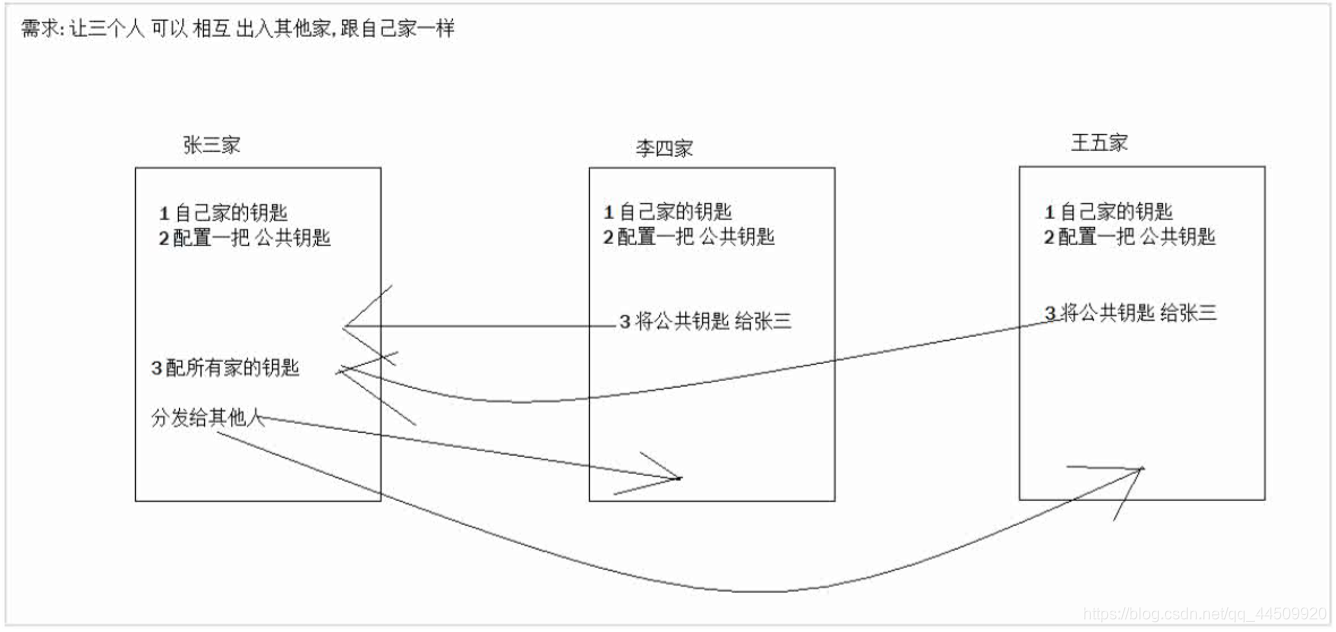
配置多节点无密码登录
目标:在node01节点 无密码登录到node01,node02和node03上
		1、在node01节点生成node02的公钥个私钥
		ssh-keygen   +  三个回车
[root@node01 ~]# ssh-keygen        (按三次回车-生成两把钥匙)
[root@node01 ~]# ls -a             (查看)
.                .bash_history  .bashrc      install.log.syslog  .ssh       (生成)
..               .bash_logout   .cshrc       is                  .tcshrc
anaconda-ks.cfg  .bash_profile  install.log  .oracle_jre_usage   .viminfo
[root@node01 ~]# cd .ssh/          (进入 .ssh/ 目录查看)
[root@node01 .ssh]# ll
总用量 12
-rw------- 1 root root 1675 10月 18 07:35 id_rsa     (生成私钥)
-rw-r--r-- 1 root root  393 10月 18 07:35 id_rsa.pub (生成公钥)
-rw-r--r-- 1 root root  808 10月 18 07:38 known_hosts

(方法一:创建文件,使用id密钥追加到文件)
[root@node01 .ssh]# touch authorized_keys    (创建文件)
[root@node01 .ssh]# cat id_rsa.pub >> authorized_keys   (id密钥追加到文件)

方法二:(推荐使用 拷贝id到node01这个节点)
[root@node01 .ssh]# ssh-copy-id  node01     (拷贝id到node01这个节点)

[root@node01 .ssh]# ll
总用量 16
-rw------- 1 root root  393 10月 18 08:07 authorized_keys  (生成新文件)
-rw------- 1 root root 1675 10月 18 07:35 id_rsa
-rw-r--r-- 1 root root  393 10月 18 07:35 id_rsa.pub  (id_rsa.pub公钥 已拷贝到authorized_keys新文件中)
-rw-r--r-- 1 root root  808 10月 18 07:38 known_hosts

[root@node01 .ssh]# ssh node01      (此时不需要密钥就可以登陆)
Last login: Fri Oct 18 05:10:28 2019 from node01
[root@node01 ~]# exit              (已完成node01无密码登陆-退出目录)

[root@node01 .ssh]# pwd
/root/.ssh                          (当前目录)

[root@node01 .ssh]# ssh-copy-id node02   (拷贝id到node02这个节点)
[root@node01 .ssh]# ssh node02
Last login: Fri Oct 18 05:10:28 2019 from node01
[root@node02 ~]# exit              (已完成node02无密码登陆-退出目录)
-----------------------------------------------------------
[root@node01 ~]# scp aa.txt  node02:/root/.ssh     (远程拷贝)
authorized_keys :表示哪些节点可以使用相应的密钥免密登录到本机(实际上是公钥的集合)

第一台服务器操作界面
更简单的方法 (三台服务器同步操作第一步骤,生成各自秘钥 )
[root@node01 /]# ssh-keygen -t rsa       (按三次回出车)
Generating public/private rsa key pair.
Enter file in which to save the key (/root/.ssh/id_rsa):
Created directory '/root/.ssh'.
Enter passphrase (empty for no passphrase):
Enter same passphrase again:
Your identification has been saved in /root/.ssh/id_rsa.
Your public key has been saved in /root/.ssh/id_rsa.pub.
The key fingerprint is:
e1:83:8b:a7:a5:49:e5:86:de:e7:19:28:3d:16:2f:e0 root@node01
The key's randomart image is:
+--[ RSA 2048]----+
|                 |
|                 |
|        .        |
|       o .       |
|    . + S        |
|   . B = .       |
|    E % o        |
|   o @ o.o       |
|    = .oo        |
+-----------------+

[root@node01 /]# ssh-copy-id node01     (拷贝id到node01这个节点)
The authenticity of host 'node01 (192.168.100.201)' can't be established.
RSA key fingerprint is 25:64:51:f0:f4:cb:3f:1c:68:2f:fc:d2:ee:16:c0:ae.
Are you sure you want to continue connecting (yes/no)? yes
Warning: Permanently added 'node01,192.168.100.201' (RSA) to the list of known hosts.
root@node01's password:     (输入node01节点密码)
Now try logging into the machine, with "ssh 'node01'", and check in:
  .ssh/authorized_keys
to make sure we haven't added extra keys that you weren't expecting.

(2.远程拷贝再复制到另一台服务器)
[root@node01 /]# scp -r /root/.ssh/authorized_keys  root@node02://root/.ssh    (远程拷贝到node02节点 *注意不要在末尾加/)
The authenticity of host 'node02 (192.168.100.202)' can't be established.
RSA key fingerprint is 25:64:51:f0:f4:cb:3f:1c:68:2f:fc:d2:ee:16:c0:ae.
Are you sure you want to continue connecting (yes/no)? yes
Warning: Permanently added 'node02,192.168.100.202' (RSA) to the list of known hosts.
root@node02's password:       (输入node02节点密码)
authorized_keys     100% 1179     1.2KB/s   00:00    (node02拷贝成功)

(2.远程拷贝再复制到另一台服务器)
[root@node01 /]# scp -r /root/.ssh/authorized_keys root@node03://root/.ssh    (远程拷贝到node03节点,*注意不要在末尾加/)
The authenticity of host 'node03 (192.168.100.203)' can't be established.
RSA key fingerprint is 25:64:51:f0:f4:cb:3f:1c:68:2f:fc:d2:ee:16:c0:ae.
Are you sure you want to continue connecting (yes/no)? yes
Warning: Permanently added 'node03,192.168.100.203' (RSA) to the list of known hosts.
root@node03's password:       (输入node03节点密码)
authorized_keys      100% 1179     1.2KB/s   00:00     (node03:拷贝成功)


[root@node01 /]# ssh node02       (登陆node02节点)
Last login: Fri Oct 18 10:26:43 2019 from node03
[root@node02 ~]# exit             (退出node02节点)

[root@node01 /]# ssh node03       (登陆node03节点)
Last login: Sat Oct 19 01:34:23 2019 from node02
[root@node03 ~]# exit             (退出node03节点)
第二台服务器操作界面 (第三台操作也一样)
(三台服务器同步操作第一步骤,生成各自秘钥 )
[root@node02 ~]# ssh-keygen -t rsa     (按三次回出车)
Generating public/private rsa key pair.
Enter file in which to save the key (/root/.ssh/id_rsa):
Created directory '/root/.ssh'.
Enter passphrase (empty for no passphrase):
Enter same passphrase again:
Your identification has been saved in /root/.ssh/id_rsa.
Your public key has been saved in /root/.ssh/id_rsa.pub.
The key fingerprint is:
d4:c6:e4:e8:34:ee:78:fe:43:90:1a:ac:e6:29:30:da root@node02
The key's randomart image is:
+--[ RSA 2048]----+
|          .      |
|         *       |
|     .  =.=      |
|      o=oo       |
|     . oS.       |
|o   o .o  .      |
|.+ o .. o.       |
|. E o  o  .      |
|   .    ....     |
+-----------------+
(多少个服务器就拷贝多少个节点)
[root@node02 ~]# ssh-copy-id node01     (拷贝id到node01这个节点)
[root@node02 ~]# ssh-copy-id node03     (拷贝id到node03这个节点)
The authenticity of host 'node01 (192.168.100.201)' can't be established.
RSA key fingerprint is 25:64:51:f0:f4:cb:3f:1c:68:2f:fc:d2:ee:16:c0:ae.
Are you sure you want to continue connecting (yes/no)? yes  (输入yes)
Warning: Permanently added 'node01,192.168.100.201' (RSA) to the list of known hosts.
root@node01's password:          (输入密码)
Now try logging into the machine, with "ssh 'node01'", and check in:
  .ssh/authorized_keys
to make sure we haven't added extra keys that you weren't expecting.

[root@node02 ~]# ssh node03       (登陆node03节点)
The authenticity of host 'node03 (192.168.100.203)' can't be established.
RSA key fingerprint is 25:64:51:f0:f4:cb:3f:1c:68:2f:fc:d2:ee:16:c0:ae.
Are you sure you want to continue connecting (yes/no)? yes
Warning: Permanently added 'node03,192.168.100.203' (RSA) to the list of known hosts.
Last login: Sat Oct 19 01:03:25 2019 from node02

[root@node03 ~]# exit
logout
Connection to node03 closed.
[root@node02 ~]# ssh node03
Last login: Sat Oct 19 01:34:18 2019 from node02
------->完成远程拷贝可登陆node01,node02,node03
-----------------------------------------------------------
[root@node03 ~]# rm -rf /root/.ssh     (删除重来)
crontab 任务调度
原理
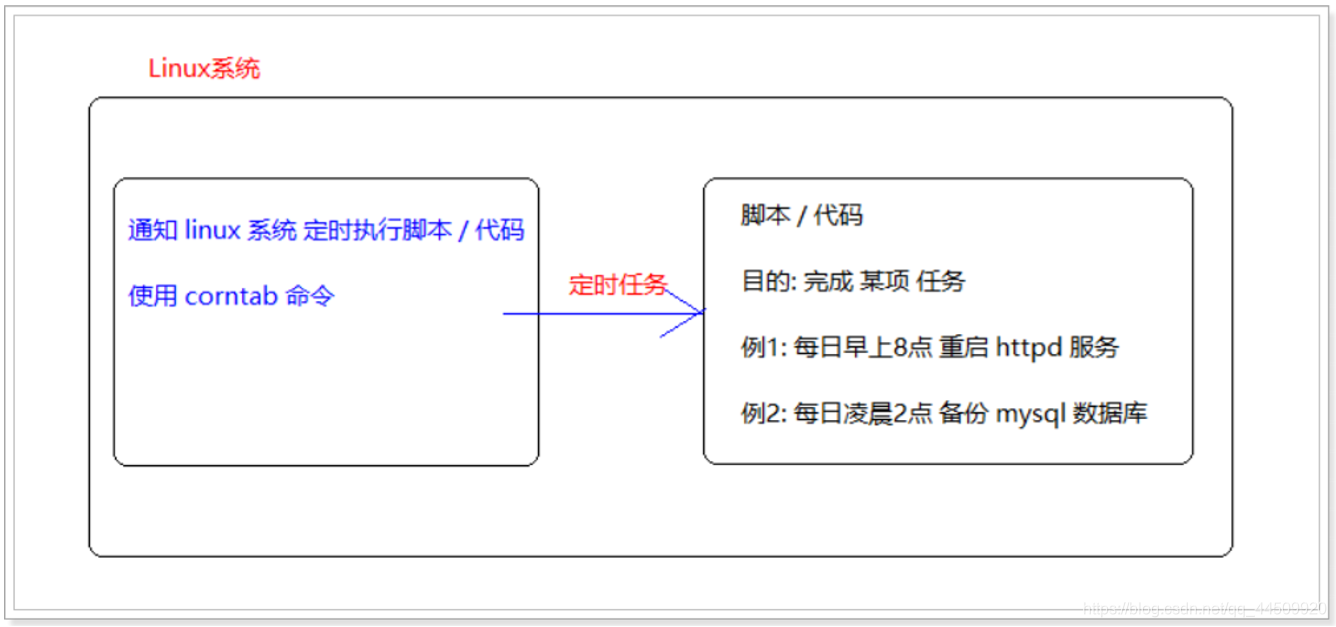
crontab 进行 定时任务的设置
基本语法 : crontab [选项]
| 选项 | 英文 | 含义 |
|---|---|---|
| -e | edit | 编辑crontab定时任务 |
| -l | displayed | 显示crontab任务 |
| -r | remove | 删除当前用户所有的crontab任务 |
案例: 每隔1分钟将时间打印到 /export/文件中
方案一: 直接式
第一步: date >> /export/mydate1.txt 测试命令 (追加方式)
或者创建该文件夹保存定时信息:touch /export/mydate1.txt
第二步: 通过 crontab -e 进入 定时任务
第三步: 编辑定时任务命令
*/1 * * * * date >> /export/mydate1.txt
第四步: 检测是否成功
cd /export/ && tail -f mydate1.txt
方式二: 脚本式
第一步: 书写测试命令
echo date +"%Y-%m-%d %H:%M:%S" >> mydate2.txt
第二步: 将命令放到脚本中 vim /export/task.sh
echo date +"%Y-%m-%d %H:%M:%S" >> /export/mydate2.txt
第三步: 增加可执行权限
chmod +x /export/task.sh
第四步: 执行脚本
/export/task.sh
第五步: 进入 定时任务 crontab -e
*/1 * * * * date >> /export/mydate1.txt
*/1 * * * * /export/task.sh
第六步: 测试 观察结果
tail -f /export/mydate2.txt
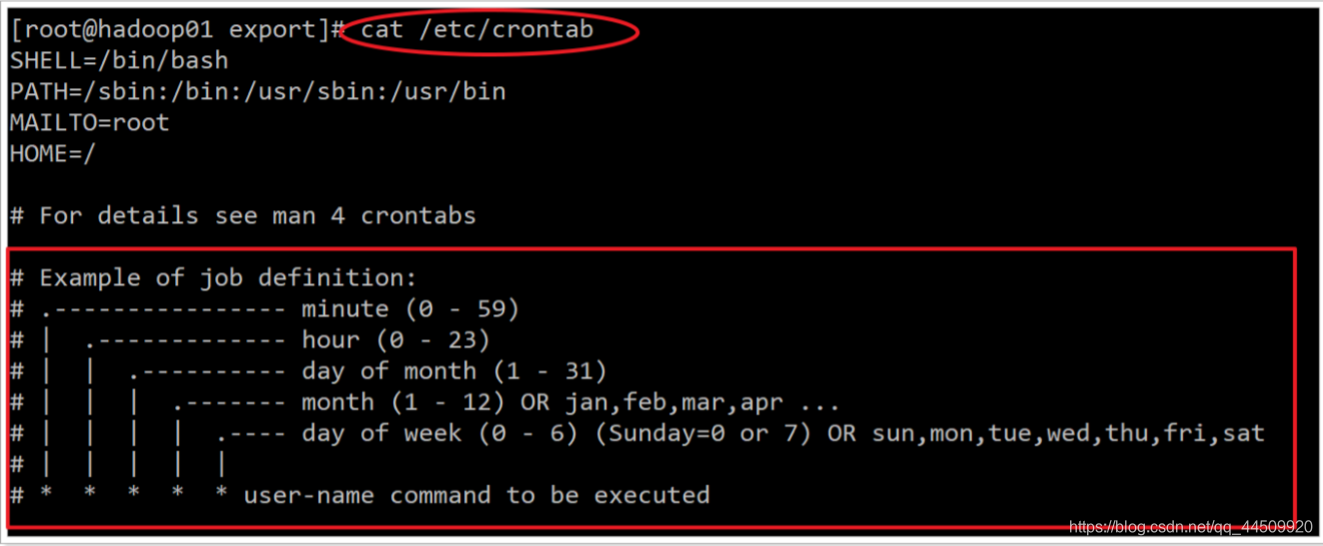
参数细节说明(学会查)
5个占位符的说明
| 英文 | 含义 | |
|---|---|---|
| 第一个 * | 一小时当中的第几分钟 | 0~59 |
| 第二个 * | 一天当中的第几小时 | 0~23 |
| 第三个* | 一个月当中的第几天 | 1~31 |
| 第四个* | 一年当中的第几月 | 1~12 |
| 第五个* | 一周当中的星期几 | 0~7(0和7都代表星期日) |
例子
| 命令 | 含义 |
|---|---|
| * * * * * command | 实例1:每1分钟执行一次command |
| 3,15 * * * * command | 实例2: 每小时的第3和第15分钟执行 |
| 3,15 8-11 * * * command | 实例3: 在上午8点到11点的第3和第15分钟执行 |
| 3,15 8-11 */2 * * command | 实例4: 每隔两天的上午8点到11点的第3和第15分钟执行 |
| 3,15 8-11 * * 1 command | 实例5: 每个星期一的上午8点到11点的第3和第15分钟执行 |
| 30 21 * * * /etc/init.d/smb restart | 实例6: 每晚的21:30重启smb |
| 45 4 1,10,22 * * /etc/init.d/smb restart | 实例7: 每月1、10、22日的4 : 45重启smb |
| 10 1 * * 6,0 /etc/init.d/smb restart | 实例8:每周六、周日的1 : 10重启smb |
| 0,30 18-23 * * * /etc/init.d/smb restart | 实例9:每天18 : 00至23 : 00之间每隔30分钟重启smb |
三台机器时钟同步
同步互联网时间

| 命令 | 英文 | 含义 |
|---|---|---|
| ntpdate 互联网时间服务器地址; | Network Time Protocol | 同步时间 |
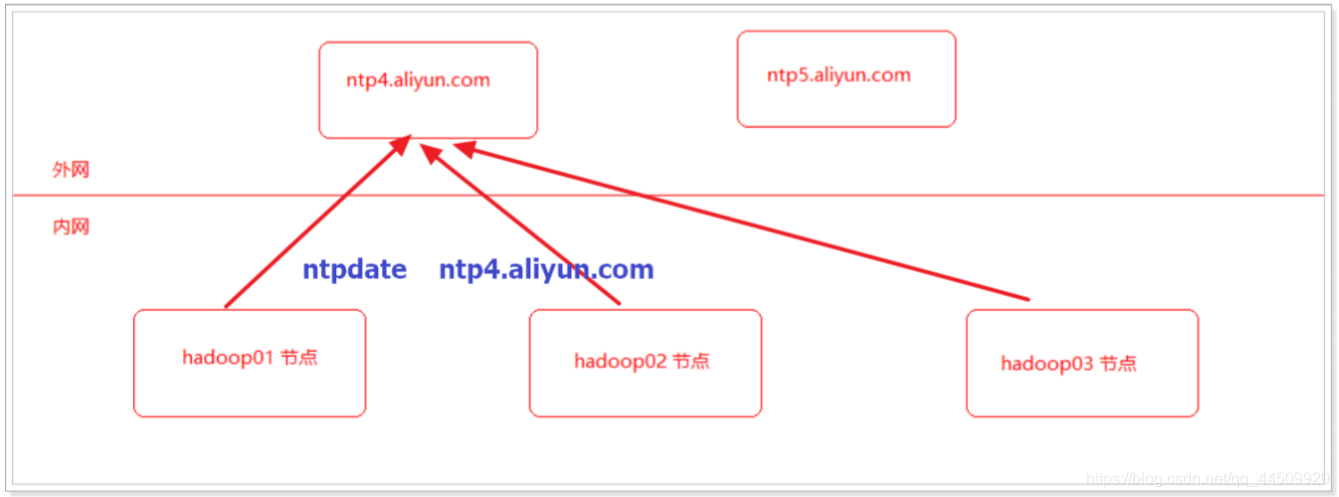
时钟同步
与阿里云提供的时钟服务器同步: ntpdate ntp4.aliyun.com
[root@node01 ~]# ntpdate ntp4.aliyun.com
23 Oct 20:39:55 ntpdate[7611]: step time server 203.107.6.88 offset 442987.864573 sec
[root@node01 ~]# date
三台机器定时任务 : 直接与阿里云服务器进行时钟同步
[root@node01 ~]# crontab -e
*/1 * * * *  /usr/sbin/ntpdate ntp4.aliyun.com;
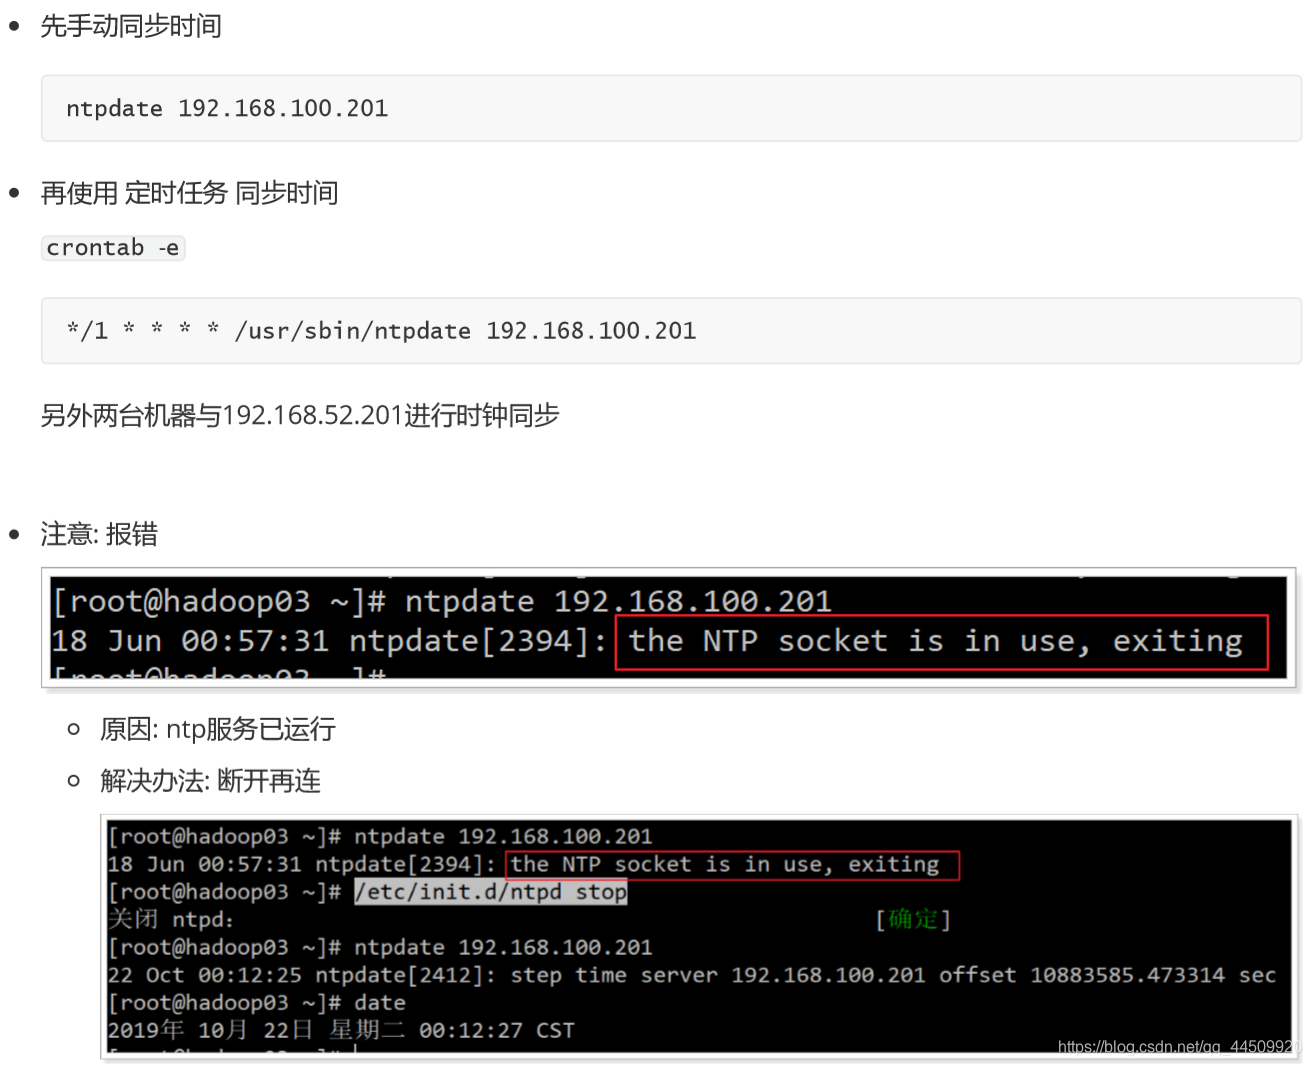
跟内网某台机器同步时间
为了安全, 大数据集群的节点不允许连接外网

第一步:确定是否安装了ntpd的服务

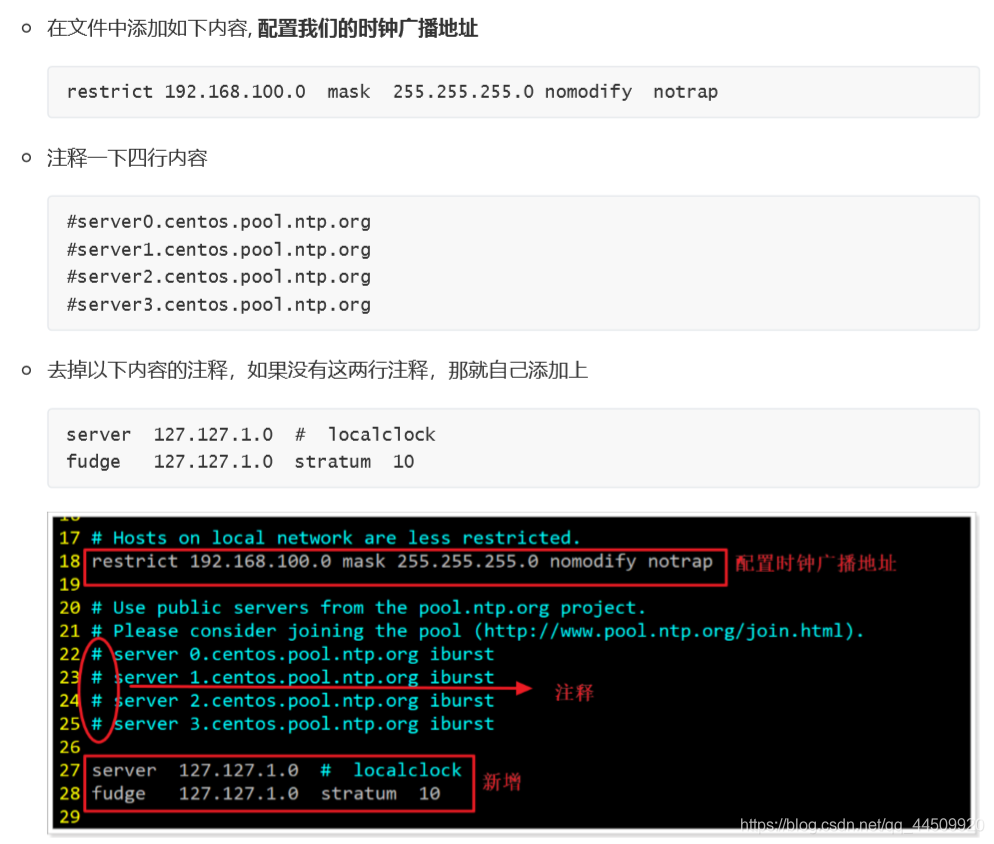
第二步:编辑 /etc/ntp.conf
编辑第一台机器的 /etc/ntp.conf
[root@node01 ~]# vim /etc/ntp.conf
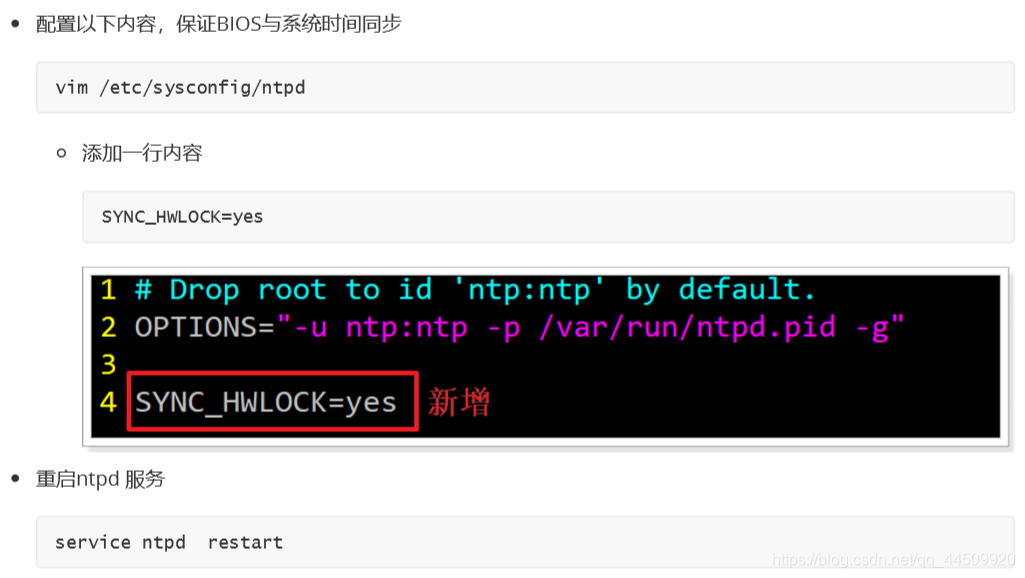
注意: 如果更改ntp时钟服务器的时间,也需要重启 ntpd 服务
第三步:另外两台机器与第一台机器时间同步