1、Wiremock工具介绍
一般开发项目都会分模块进行,比如都会把前端和后端分开,在前端和后端里面也通常是分模块开发的。当开发进度不一致时,可以对依赖接口构建Mock Service,模拟不同输入/数据/场景,这样不至于影响本模块的开发进度。构建Mock Service方法很多,今天介绍Wiremock,Wiremock非常轻便易用,甚至不用编程,一个jar包基本够用了,当然,也可以把它引用写进测试代码里。
官网地址:http://wiremock.org/
2、Wiremock工作原理
启动wiremock
java -jar wiremock-2.1.10-standalone.jar –port 9999 —verbose- 1
(–port设定端口为9999; –verbose开启日志。更多参数需要参考:
http://wiremock.org/docs/running-standalone/
启动后在同目录下生成两个空的文件夹:__files和mappings。__files是放上传/下载/录制文件的,mappings放response和request url的映射的。
在mappings文件夹下随便创建一个*.json文件,比如长下面这样:
"request": {
        "method": "GET",
        "url": "/api/testdetail"
    },
    "response": {
        "status": 200,
        "bodyFileName": "testdetail.json”,
        "headers": {
            "Content-Type": "application/json",
            "Cache-Control": "max-age=86400"
        }
    }
}- 1
- 2
- 3
- 4
- 5
- 6
- 7
- 8
- 9
- 10
- 11
- 12
- 13
bodyFileName还可以是html、xml等文档。
在浏览器或者使用curl命令,调用http://localhost:9999/api/testdetail,就能返回testdetail.json的内容了。testdetail.json就是需要我们在__files里面建立的响应文件。wiremock也支持直接在response结构体中返回响应内容,比如在mapping文件中,将response写成下面这样:
"response": {
    "status": 200,
    "body": “Hello world ",
    "headers": {
        "Content-Type": "application/json",
        "Cache-Control": "max-age=86400"
}- 1
- 2
- 3
- 4
- 5
- 6
- 7
当发送请求时候,将直接返回“Hello world”。
3、Wiremock支持的HTTP方法
HTTP方法支持GET, POST, PUT, DELETE, HEAD, TRACE, OPTIONS等,自定义头、数据模板(bodyPatterns,如不符合,抛出404错误),URL Template,Query参数匹配,显示指定文件内容等。下面将介绍如何使用wiremock实现这些。
3.1 POST
POST http://localhost:9999/api/products
{
    "request": {
        "method": "POST",
        "url": "/api/products",
          "bodyPatterns": [
                 {"equalToJson" : "{ \"name\": \"new product\", \"creator\": \"tester\", \"createTime\": \"2015-09-07\" }", "jsonCompareMode": "LENIENT"}
         ]
    },
    "response": {
        "status": 201,
        "body": "Add successfully.",
         "headers":{
                   "x-token":"xxxxxxxxxxxxxxxxxxxxxxxxxxxx"
         }
    }

}- 1
- 2
- 3
- 4
- 5
- 6
- 7
- 8
- 9
- 10
- 11
- 12
- 13
- 14
- 15
- 16
- 17
- 18
3.2 PUT
PUT: http://localhost:9999/api/products/1
{
    "request": {
        "method": "PUT",
        "url": "/api/products/1",
        "bodyPatterns": [{
            "equalToJson": "{ \"id\": 1, \"name\": \"new product\", \"creator\": \"tester\", \"createTime\": \"2015-09-07\" }",
            "jsonCompareMode": "LENIENT"
        }]
    },
    "response": {
        "status": 200,
        "body": "Update successfully.",
        "headers": {
            "x-token": " xxxxxxxxxxxxxxxxxxxxxxxxxxxx"
        }
    }
}- 1
- 2
- 3
- 4
- 5
- 6
- 7
- 8
- 9
- 10
- 11
- 12
- 13
- 14
- 15
- 16
- 17
3.3 DELETE
DELETE: http://localhost:9999/api/products/1
{
    "request": {
        "method": "DELETE",
        "url": "/api/products/1"
    },
    "response": {
        "status": 204,
        "headers":{
                  "x-token":" xxxxxxxxxxxxxxxxxxxxxxxxxxxx"
        }
    }
}- 1
- 2
- 3
- 4
- 5
- 6
- 7
- 8
- 9
- 10
- 11
- 12
- 13
3.4 URL Matching
URL Matching: http://localhost:9999/api/products/1(2/3…)
{
    "request": {
        "method": "GET",
        "urlPattern": "/api/products/[0-9]+"
    },
    "response": {
        "status": 200
    }
}- 1
- 2
- 3
- 4
- 5
- 6
- 7
- 8
- 9
3.5 Query参数匹配
Query参数匹配:http://localhost:9999/api/products?search=china
{
    "request": {
        "method": "GET",
        "urlPath": "/api/products",
        "queryParameters": {
            "search": {
                "contains": "chin"
            }
        }
    },
    "response": {
        "status": 200,
        "headers": {
            "Content-Type": "application/json"
        },
        "body": "{ \"id\": 7, \"name\": \"shan zai\", \"from\":\"China\" },{ \"id\": 7, \"name\": \"shan zai\", \"from\":\"China(RPC)\" }"
    }
}- 1
- 2
- 3
- 4
- 5
- 6
- 7
- 8
- 9
- 10
- 11
- 12
- 13
- 14
- 15
- 16
- 17
- 18
3.6 模拟错误
模拟404错误
{
    "request": {
        "url": "/unknown.html",
        "method": "GET"
    },
    "response": {
        "status": 404,
        "headers": {
            "Content-Type": "text/html; charset=utf-8"
        }
    }
}- 1
- 2
- 3
- 4
- 5
- 6
- 7
- 8
- 9
- 10
- 11
- 12
- 13
3.7 设置响应延迟
{
    "request": {
        "method": "GET",
        "url": "/delayed"
    },
    "response": {
        "status": 200,
        "bodyFileName": "mytest.json",
        "headers": {
            "Content-Type": "application/json",
            "Cache-Control": "max-age=86400"
        },
        "fixedDelayMilliseconds": 2000
    }
}- 1
- 2
- 3
- 4
- 5
- 6
- 7
- 8
- 9
- 10
- 11
- 12
- 13
- 14
- 15
4、Mock Service平台化
使用WireMock通过mappings和__files文件夹可以有效管理映射和返回内容文件。而这两个文件目前是手动编辑,如果可以做成平台化管理,所有接口通过创建完成,文件命名规则全部由系统进行管理,将节省的时间更多投入业务关注和及早进行自测,这样子的收益将会更大。
那怎么样的平台才算能够满足当前需求呢?
基于HTTP协议
支持Url、UrlPattern匹配、Query参数
支持数据存储
API接口规范化管理
提交表单即可生成mapping和__files所需文件
不同项目接口有不同的前缀
能够返回指定格式(json、xml、html等)内容
能够设定响应延迟
设置cookies
设置headers
支持用户验证
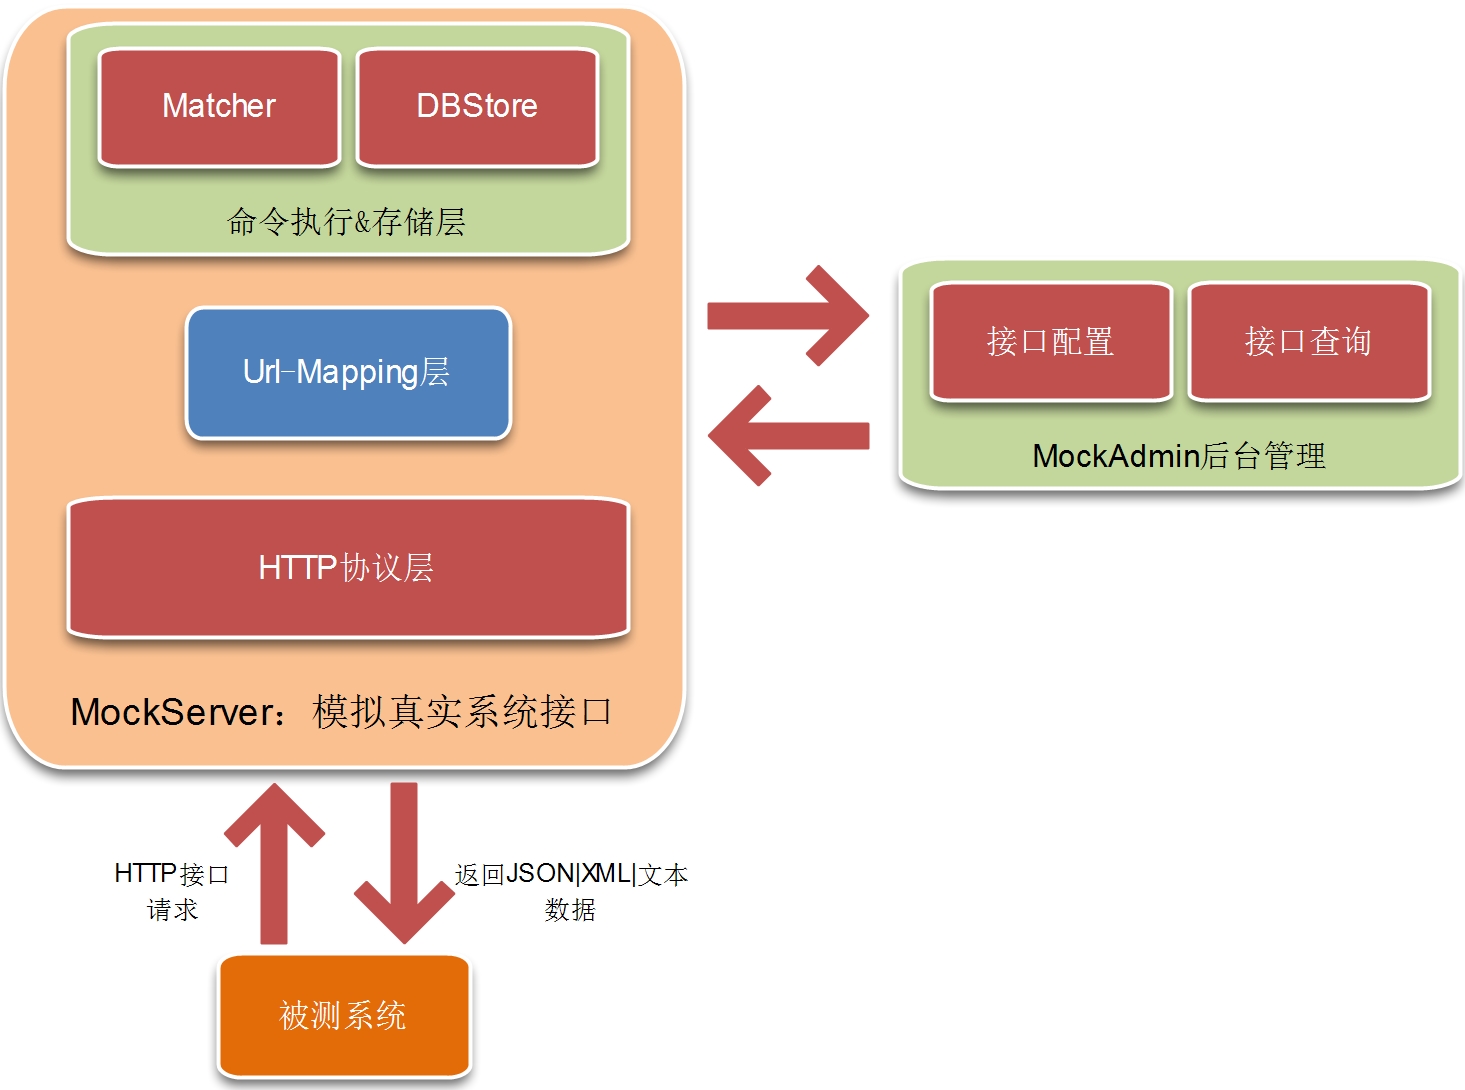
根据需求设计总体架构如下:
包括前台和后台。前台负责接受用户的Mock设置,后台负责将用户的设置转换为WireMock所需要的mapping和__file文件,并提供查询功能。
MockServer架构图
根据架构图,做了总体设计如下:
页面分为Mock项目管理和Mock API管理。Mock项目管理可以创建、修改、删除Mock项目,Mock PAI管理可以创建、修改、删除Mock的API。后台管理负责生成mapping和file文件、对wiremock进行重启等。
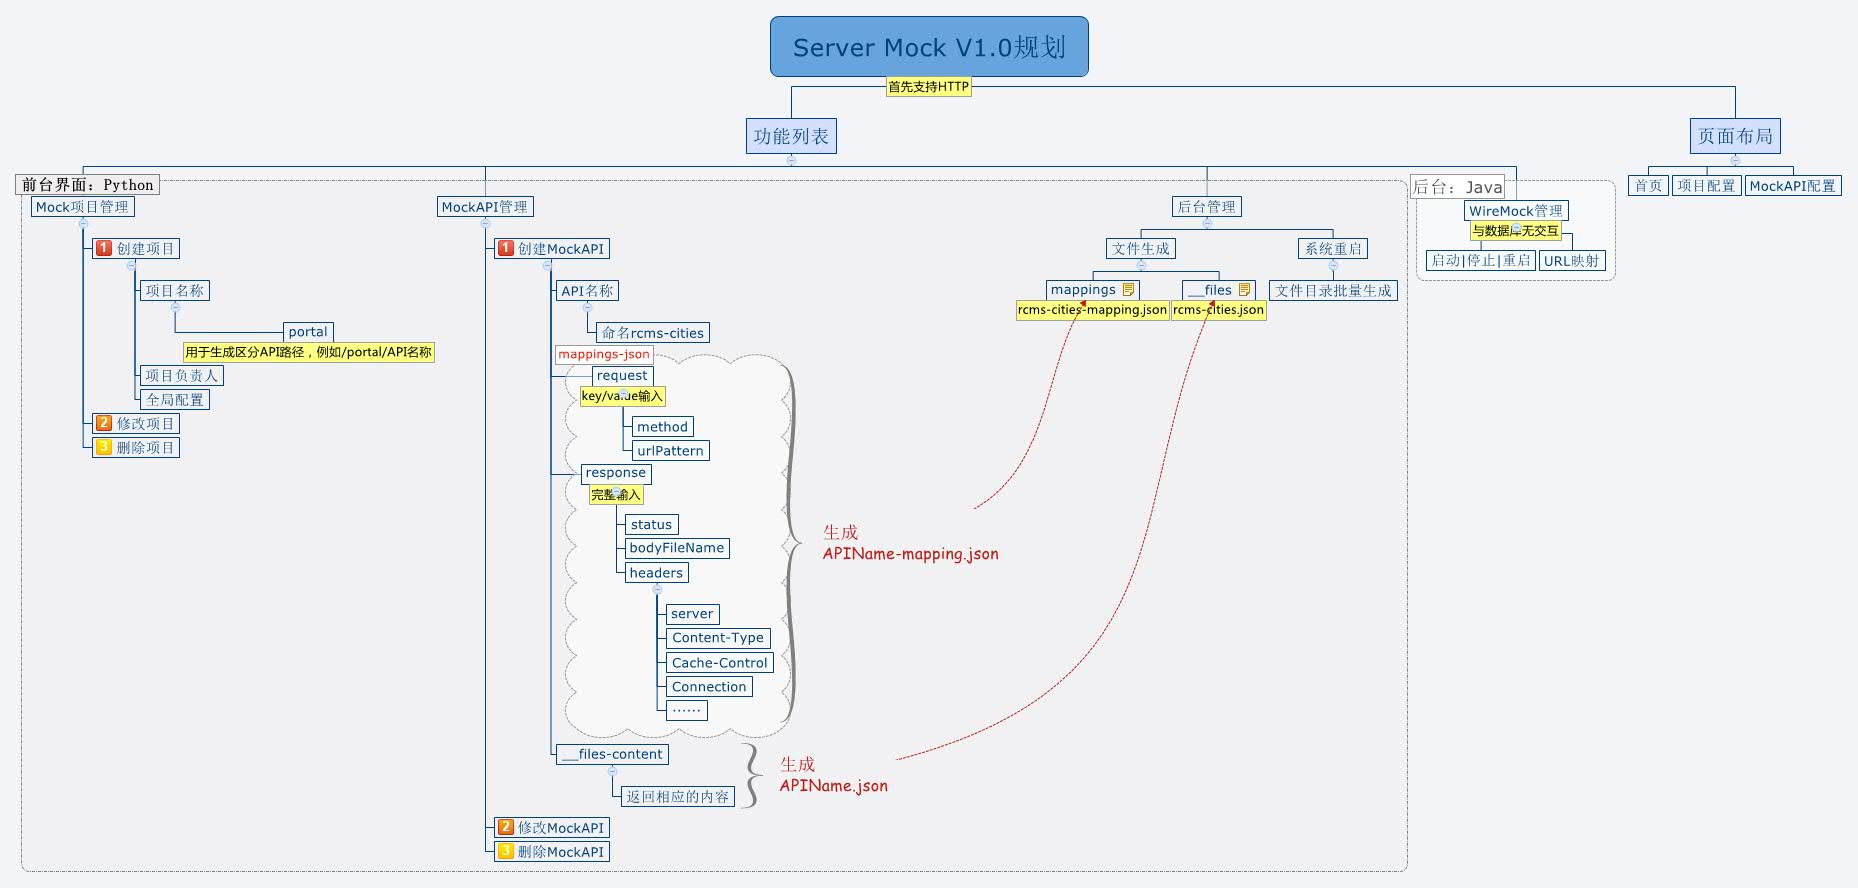
4.1 技术选型
由于大家对python都比较熟悉,也有过使用python的Flask框架进行开发经验,这次依然采用Flask+Mysql的方案。从界面录入到mapping、_files文件生成处理采用Python,后台工具使用WireMock的standalone模式,通过shell脚本进行一键启停管理,以及实时刷新url、mapping映射。
4.2 Mock项目管理页
4.2.1 添加项目
配置协议、进行mock服务器的重启、重新加载(有新的mapping、file文件生成系统会自动reset即可,当然手工reset也可以,即时加载无须重启服务等待)。
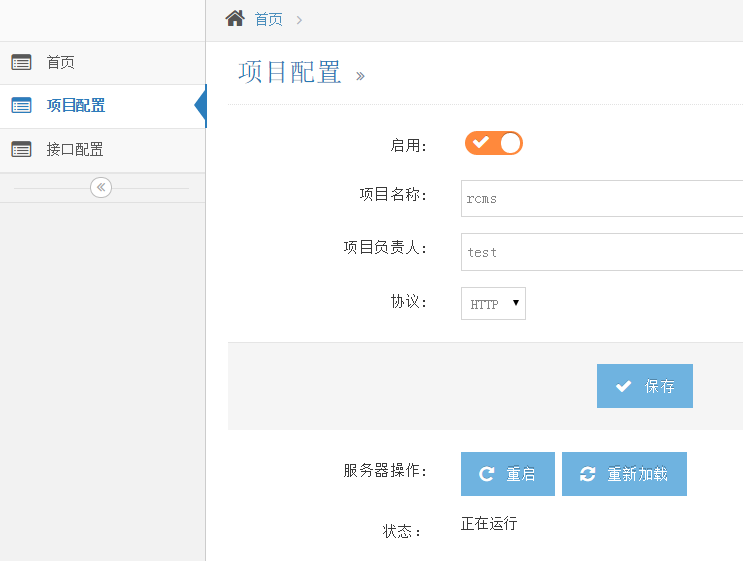
4.2.2 显示项目
4.2.3 修改项目
4.2.4 删除项目
4.3 Mock API管理页
4.3.1 添加API
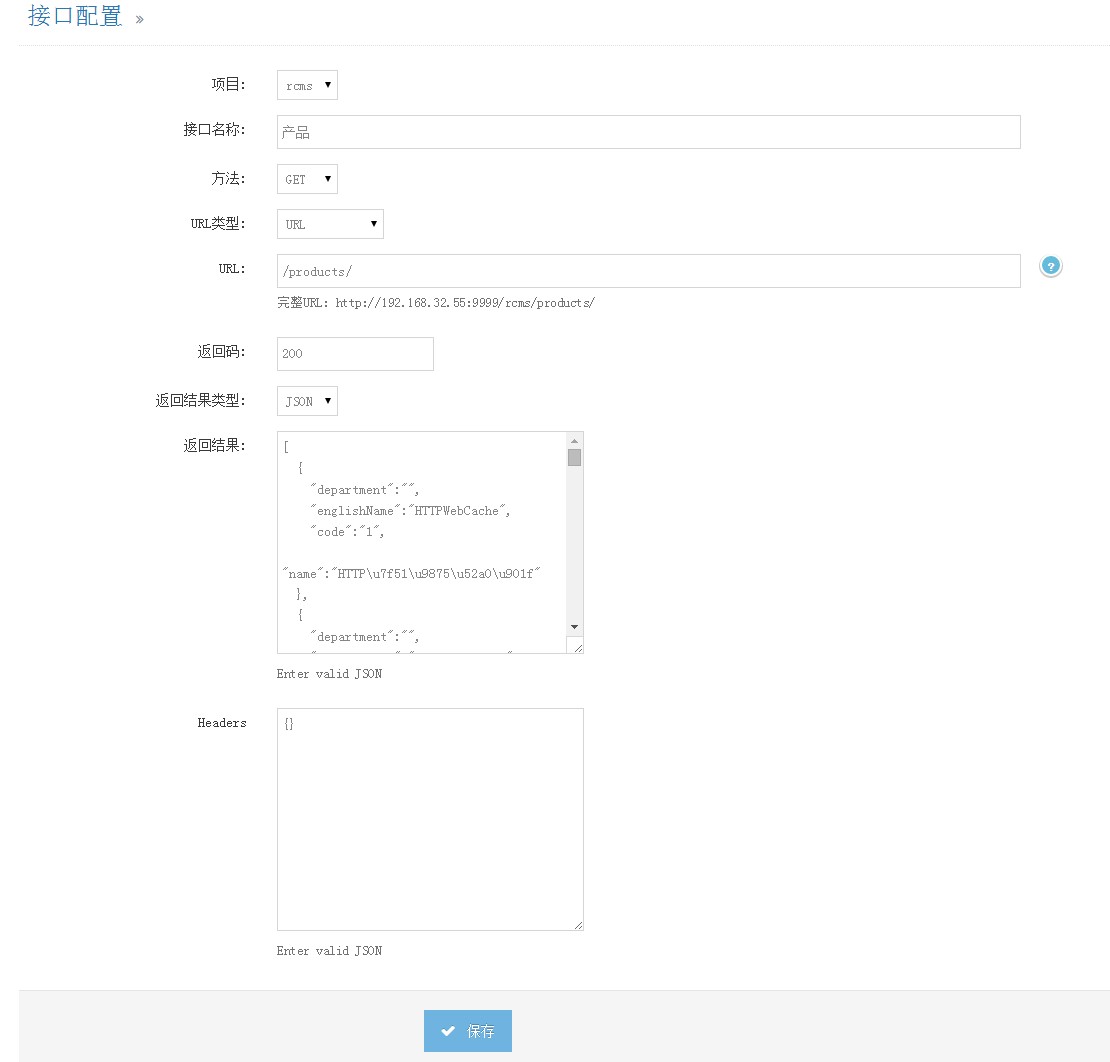
选择方法、URL类型,填写URL(如果选择URL类型为UrlPattern,则填写正则表达式),填写状态码、返回接口,以及返回头,就可以完成一个mock接口的创建。这些信息要存储到Mysql。
1)手工输入
适合响应体比较短小的情况 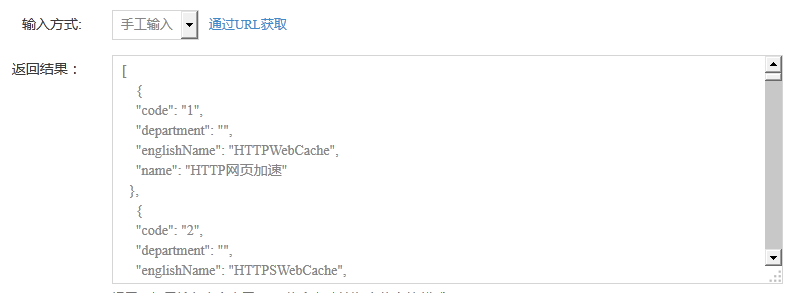
2)通过url获取
返回体比较大,目标Mock接口已经存在,可以直接抓取生成文件; 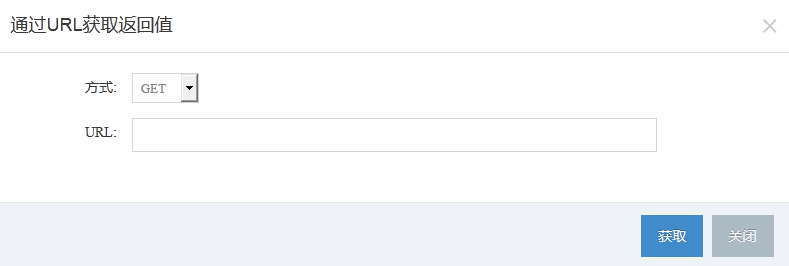
3)上传文件的方式
返回体比较大、目标Mock接口还未开发完成,手工上传返回内容的文件即可。 
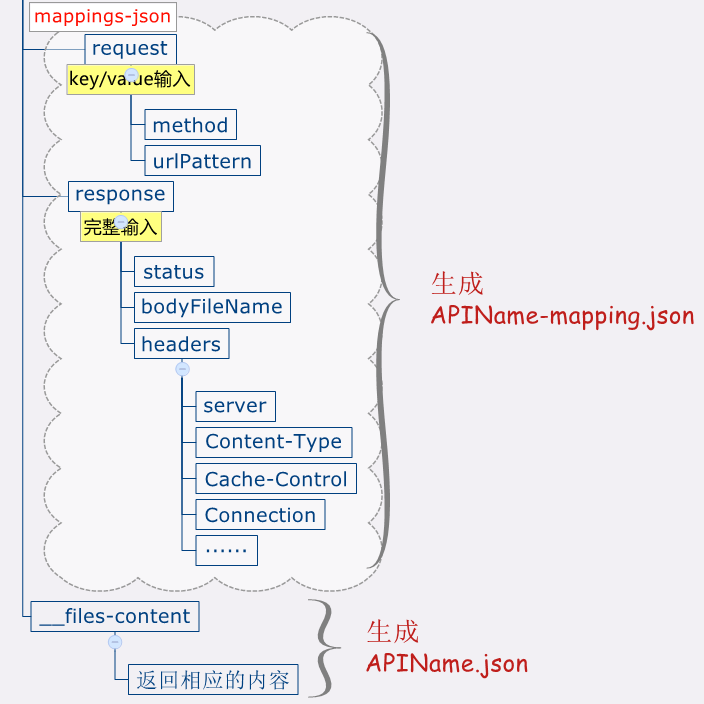
以上三种灵活的保存返回内容方式,最终保存的接口会按照以下格式生成mapping和__files所需文件。
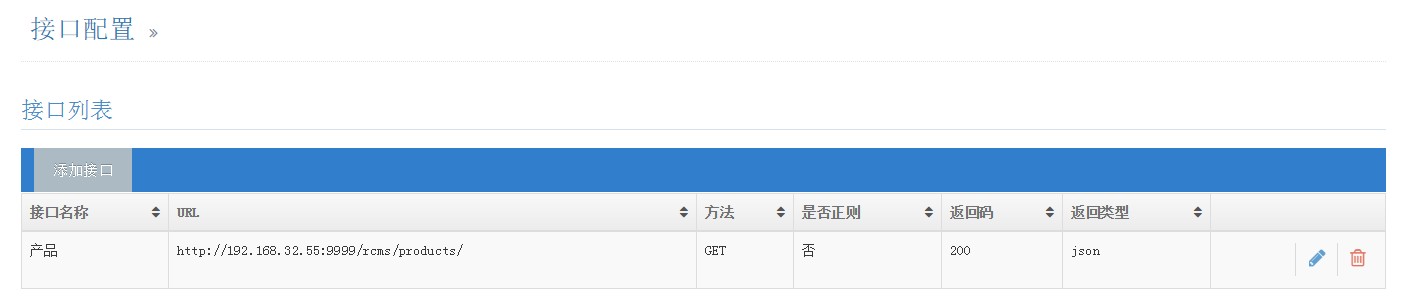
4.3.2 显示API
展示列表,列出相关URL、方法、是否正则、返回码、返回类型。
4.3.2 修改API
4.3.3 删除API
4.4 MockServer后台
使用Java-WireMock进行后台服务,在项目配置页通过按钮:重启、重新加载,调用后台脚本:wiremock_controller.sh,脚本内容参考:
#!/bin/bash
if [ "$#" = 0 ];then
    echo "Usage: $0 (start|stop|restart|reset)"
    exit 1
fi

dirWiremock=`pwd`
getCount=`ps -ef | grep "wiremock-1.53-standalone" | grep -v "grep" |wc -l`
wiremock_jar=${dirWiremock}/wiremock-1.53-standalone.jar
port=9999
wiremock_url=http://localhost:${port}

stop(){
    count=${getCount}
    if [ 1==${count} ];then
    curl -d log=aaa ${wiremock_url}/__admin/shutdown
    echo "Stop success!......"
    else
        echo "Already stop"
    fi
}

start(){
    count=${getCount}
    if [ 0==${count} ];then
       nohup java -jar ${wiremock_jar} --verbose=true --port=${port} &
       echo "Start success!......"
    else
        echo "Already start"
    fi
}

if [ "$1" = "restart" ];then
    count=${getCount}
    if [ 1==${count} ];then
          echo "Wiremock is running,wait for restarting! ...."
          stop
          echo "Start wiremock......"
          start
    else
        start
    fi

elif [ "$1" = "start" ];then
        echo "Start wiremock......"
        start

elif [ "$1" = "stop" ];then
        echo "Stop wiremock......"
        stop

elif [ "$1" = "reset" ];then
    count=${getCount}
    if [ 0==${count} ];then
          echo "Wiremock must be running before reset,wait for starting! ...."
          start
    fi
        curl -d log=aaa  ${wiremock_url}/__admin/mappings/reset
    echo "Reset success!......"
fi- 1
- 2
- 3
- 4
- 5
- 6
- 7
- 8
- 9
- 10
- 11
- 12
- 13
- 14
- 15
- 16
- 17
- 18
- 19
- 20
- 21
- 22
- 23
- 24
- 25
- 26
- 27
- 28
- 29
- 30
- 31
- 32
- 33
- 34
- 35
- 36
- 37
- 38
- 39
- 40
- 41
- 42
- 43
- 44
- 45
- 46
- 47
- 48
- 49
- 50
- 51
- 52
- 53
- 54
- 55
- 56
- 57
- 58
- 59
- 60
其中:
“nohup java -jar wiremockjar−−verbose=true−−port=wiremockjar−−verbose=true−−port={port} &”:在linux系统后台运行WireMock;
“curl -d log=aaa ${wiremock_url}/__admin/mappings/reset”:是通过发送POST请求,重新加载新生成的配置文件。
5、总结
Mock API接口是非常必要的,因为不同研发组的系统之间的数据交互往往是通过接口来实现,当不同组接口开发不同步时,接口测试无法及早参与,对接调试比较困难。这样势必导致软件开发迭代变慢,没有时间对质量进行充分验证。
可以借鉴《自动化单元测试实践之路》在单元测试中,使用Mockito对依赖进行Mock,那同样道理,使用Mock技术也可以对HTTP API进行Mock,按照这个思路探索下去,看看有没有开源解决方案,是否能够解决当前问题,如果可以就不用重复写一套解决方案;如果不行,那能否基于开源的做二次开发呢?
6、参考文档
http://wiremock.org/docs/
http://www.infoq.com/cn/articles/evolution-of-httpservermock-from-hand-to-platform/