作用域:
用于确定创建spring创建bean实例个数。
案例实现代码:
测试类:
import org.junit.Test;
import org.springframework.context.ApplicationContext;
import org.springframework.context.support.ClassPathXmlApplicationContext;

public class TestFactory {
    @Test
    public void demo02() {
        //spring工厂
        String xmlPath = "com/spring/d_scope/beans.xml";
        ApplicationContext applicationContext = new ClassPathXmlApplicationContext(xmlPath);
        UserService userService1 = applicationContext.getBean("UserServiceId", UserService.class);
        UserService userService2 = applicationContext.getBean("UserServiceId", UserService.class);
        System.out.println(userService1);
        System.out.println(userService2);
    }
}
UserService接口与UserServiceImpl实现类:
public interface UserService {
    public void addUser();
}


public class UserServiceImpl implements UserService {
    @Override
    public void addUser() {
        System.out.println("d_scope");
    }
}
bean.xml配置:
<?xml version="1.0" encoding="UTF-8"?>
<beans xmlns="http://www.springframework.org/schema/beans"
       xmlns:xsi="http://www.w3.org/2001/XMLSchema-instance"
       xsi:schemaLocation="http://www.springframework.org/schema/beans
                           http://www.springframework.org/schema/beans/spring-beans.xsd">
        <!-- scope="prototype"使得多例 -->
        <bean id="UserServiceId" class="com.spring.d_scope.UserServiceImpl" scope="prototype"></bean>
</beans>
运行结果及比较:
当是单例的情况时===》

当是多例的情况时===》

生命周期:
指目标方法执行前后执行后,将进行初始化或销毁。
案例实现代码:
UserService接口与UserServiceImpl实现类:
public interface UserService {
    public void addUser();
}


public class UserServiceImpl implements UserService {
    @Override
    public void addUser() {
        System.out.println("e_lifecycle");
    }

    public void myInit(){
        System.out.println("初始化");
    }

    public void myDestory(){
        System.out.println("销毁");
    }
}
spring 提供一种机制,只要实现接口BeanPostProcessor,并将实现类提供给spring容器,spring容器将自动执行,则在初始化方法前执行before(),在初始化方法后执行after() 。
BeanPostProcessor接口的实现类:
import java.lang.reflect.InvocationHandler;
import java.lang.reflect.Method;
import java.lang.reflect.Proxy;

public class MyBeanPostProcessor implements BeanPostProcessor {
    @Override
    public Object postProcessBeforeInitialization(Object bean,String beanName) throws BeansException{
        if ("userServiceId".equals(beanName)){
            System.out.println("前方法:"+beanName);
        }
        return bean;
    }

    @Override
    public Object postProcessAfterInitialization(final Object bean,String beanName) throws BeansException{
        System.out.println("后方法:"+beanName);
        //bean目标对象
        //生成jdk代理
        return Proxy.newProxyInstance(MyBeanPostProcessor.class.getClassLoader(), bean.getClass().getInterfaces(), new InvocationHandler() {
            @Override
            public Object invoke(Object proxy, Method method, Object[] args) throws Throwable {
                System.out.println("------开启事务");
                //执行目标方法
                Object obj = method.invoke(bean,args);
                System.out.println("------提交事务");

                return obj;
            }
        });
    }
}
bean.xml配置:
<?xml version="1.0" encoding="UTF-8"?>
<beans xmlns="http://www.springframework.org/schema/beans"
       xmlns:xsi="http://www.w3.org/2001/XMLSchema-instance"
       xsi:schemaLocation="http://www.springframework.org/schema/beans
                           http://www.springframework.org/schema/beans/spring-beans.xsd">
        <!-- init-method  用于配置初始方法,准备数据等
             destroy-method    用于配置销毁方法,清理数据等
         -->
        <bean id="UserServiceId" class="com.spring.e_lifecycle.UserServiceImpl"
                init-method="myInit" destroy-method="myDestory"></bean>

        <!--将后处理的实现类注册给spring-->
        <bean class="com.spring.e_lifecycle.MyBeanPostProcessor"></bean>
</beans>
测试类:
import org.junit.Test;
import org.springframework.context.ApplicationContext;
import org.springframework.context.support.ClassPathXmlApplicationContext;

public class TestCycle {
    @Test
    public void demo02() {
        //spring工厂
        String xmlPath = "com/spring/e_lifecycle/beans.xml";
        ApplicationContext applicationContext = new ClassPathXmlApplicationContext(xmlPath);
        UserService userService = applicationContext.getBean("UserServiceId",UserService.class);
        userService.addUser();

        //要求:1.容器必须close,销毁方法执行
        //      2.必须是单例的
        ((ClassPathXmlApplicationContext) applicationContext). close();
    }
}
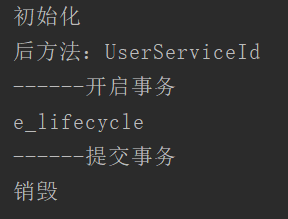
实现结果:

下一节:【Spring框架】Spring入门(四)——五种属性注入方式(详细代码)
