前言
迁移学习指的是保存已有问题的解决模型,并将其利用在其他不同但相关问题上。 比如说,训练用来辨识汽车的模型也可以被用来提升识别卡车的能力。很多情况下迁移学习能够简化或降低模型构建的难度,甚至还能取得不错的准确度。
本文将针对一个小的图片数据集,使用PyTorch进行迁移学习演示,包括如何使用预训练模型,并将结果自己搭建的卷积神经网络模型进行性能比较。
数据集介绍
考虑到VGG16要求图像的形状为(224,224,3),即像素为224x224的彩色图像,因为我准备用这个数据集进行实验。所谓的应急车辆包括:警车、消防车和救护车。在数据集中有一个emergency_train.csv,用来存放训练样本的标签。
数据集下载:【提取码:pyne】
选取预训练模型
预训练模型是由某个人或团队为解决特定问题而已经设计和训练好的模型。预训练模型在深度学习项目中非常有用,因为并非所有人都拥有足够多的算力。我们需要使用本地机器,因此预训练的模型就可以节约很多时间。预训练的模型通过将其权重和偏差矩阵传递给新模型来得以共享他们训练好的参数。因此,在进行迁移学习之前,我要首先选择一个合适的预训练模型,然后将其权重和偏差矩阵传递给新模型。针对不同的深度学习任务可能有很多预训练模型可用,现在针对我要做的这个任务确定哪种模型最适合,根据我们的数据集介绍,我会选择VGG16在ImageNet上的预训练模型,而不是在MNIST上的预训练模型,因为我们的数据集中包含车辆图像,ImageNet中具有丰富的车辆图像,因此前者应该更为合理。总之,选择预训练模型时不是考虑参数量和性能表现,而是考虑任务间的相关性以及数据集的相似程度。
数据处理
# PyTorch libraries and modules
import torch
from torch.autograd import Variable
from torch.nn import Linear, ReLU, CrossEntropyLoss, Sequential, Conv2d, MaxPool2d, Module, Softmax, BatchNorm2d, Dropout
from torch.optim import Adam, SGD
import pandas as pd
import numpy as np
from tqdm import tqdm

# torchvision for pre-trained models
from torchvision import models

# 导入读取和展示图片工具
from skimage.io import imread
from skimage.transform import resize
import matplotlib.pyplot as plt

# 数据切分,制作验证集
from sklearn.model_selection import train_test_split

# 模型评价
from sklearn.metrics import accuracy_score
接下来,读取包含图像名称和相应标签的.csv文件,并查看内容:
# loading dataset
train = pd.read_csv('emergency_train.csv')
print(train.shape)
train.head(10)
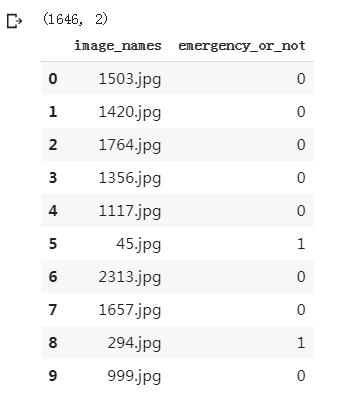
该csv文件中包含两列:
- image_names: 代表数据集中所有图像的名称
- Emergency_or_no: 指定特定图像属于紧急类别还是非紧急类别。0表示图像是非紧急车辆,1表示紧急车辆
接下来,我们将加载所有图像并将其以数组格式存储:
# 加载训练图像
train_img = []
for img_name in tqdm(train['image_names']):
    # defining the image path
    image_path = 'images/' + img_name
    # reading the image
    img = imread(image_path)
    # normalizing the pixel values
    img = img/255
    # resizing the image to (224,224,3)
    img = resize(img, output_shape=(224,224,3), mode='constant', anti_aliasing=True)
    # converting the type of pixel to float 32
    img = img.astype('float32')
    # appending the image into the list
    train_img.append(img)

# converting the list to numpy array
train_x = np.array(train_img)
train_x.shape

加载这些图像大约花费22秒钟。数据集中有1646张图像作为训练,由于VGG16需要所有此特定形状的图像,因此需要将所有图像重塑为(224,224,3)。现在让我们可视化来自数据集的一些图像:
# Exploring the data
index = 10
plt.imshow(train_x[index])
if (train['emergency_or_not'][index] == 1):
    print('It is an Emergency vehicle')
else:
    print('It is a Non-Emergency vehicle')
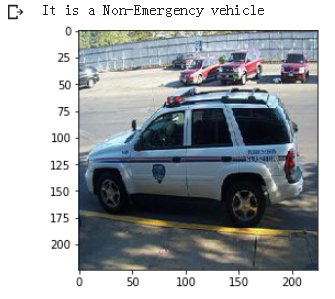
这是一辆普通的汽车,因此显示为非紧急车辆标签。现在将目标值(0 or 1)存储在单独的变量中:
# defining the target
train_y = train['emergency_or_not'].values
让我们借助sklearn划分数据集,这里只使用验证集来评估我们的模型,你也可以尝试将数据集划分为:训练/ 验证/ 测试,三个部分。
# create validation set
train_x, val_x, train_y, val_y = train_test_split(train_x, train_y, test_size = 0.1, random_state = 13, stratify=train_y)
(train_x.shape, train_y.shape), (val_x.shape, val_y.shape)

最后划分的训练集中有1,481张图像,验证集中有165张图像。现在,我们要将数据集转换为torch格式:
#先转换训练集
# converting training images into torch format
train_x = train_x.reshape(1481, 3, 224, 224)
train_x  = torch.from_numpy(train_x)

# converting the target into torch format
train_y = train_y.astype(int)
train_y = torch.from_numpy(train_y)

# shape of training data
train_x.shape, train_y.shape

#同样地对验证集进行转换
# converting validation images into torch format
val_x = val_x.reshape(165, 3, 224, 224)
val_x  = torch.from_numpy(val_x)

# converting the target into torch format
val_y = val_y.astype(int)
val_y = torch.from_numpy(val_y)

# shape of validation data
val_x.shape, val_y.shape
我们的数据已经准备好!在下一部分中,我们将使用预训练模型来解决此问题之前,将建立卷积神经网络(CNN)。
使用普通CNN卷积神经网络
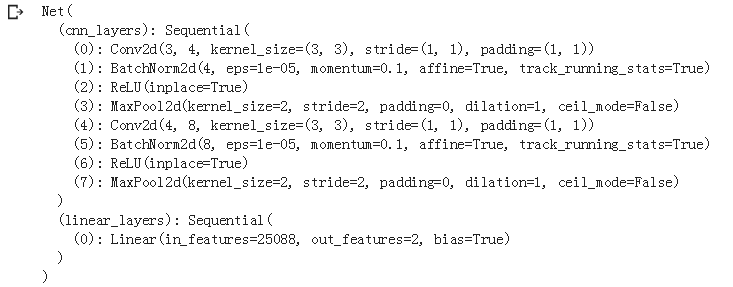
终于到了模型构建,在使用迁移学习解决问题之前,先使用普通的CNN模型训练处一个对照组(baseline)。
我们先构建一个非常简单的CNN架构,该架构具有两个卷积层以从图像中提取特征,最后是一个全连接层以对这些特征进行分类:
class Net(Module):
    def __init__(self):
        super(Net, self).__init__()

        self.cnn_layers = Sequential(
            # Defining a 2D convolution layer
            Conv2d(3, 4, kernel_size=3, stride=1, padding=1),
            BatchNorm2d(4),
            ReLU(inplace=True),
            MaxPool2d(kernel_size=2, stride=2),
            # Defining another 2D convolution layer
            Conv2d(4, 8, kernel_size=3, stride=1, padding=1),
            BatchNorm2d(8),
            ReLU(inplace=True),
            MaxPool2d(kernel_size=2, stride=2),
        )

        self.linear_layers = Sequential(
            Linear(8 * 56 * 56, 2)
        )

    # Defining the forward pass
    def forward(self, x):
        x = self.cnn_layers(x)
        x = x.view(x.size(0), -1)
        x = self.linear_layers(x)
        return x
现在,为模型定义优化器,学习率和损失函数,并使用GPU训练模型:
# defining the model
model = Net()
# defining the optimizer
optimizer = Adam(model.parameters(), lr=0.0001)
# defining the loss function
criterion = CrossEntropyLoss()
# checking if GPU is available
if torch.cuda.is_available():
    model = model.cuda()
    criterion = criterion.cuda()

print(model)
接下来设置迭代次数和训练批次大小,这里使用 batch_size = 128, epochs = 15 :
# batch size of the model
batch_size = 128
# number of epochs to train the model
n_epochs = 15
for epoch in range(1, n_epochs+1):
# keep track of training and validation loss
train_loss = 0.0
permutation = torch.randperm(train_x.size()[0])
training_loss = []
for i in tqdm(range(0,train_x.size()[0], batch_size)):
indices = permutation[i:i+batch_size]
batch_x, batch_y = train_x[indices], train_y[indices]
if torch.cuda.is_available():
batch_x, batch_y = batch_x.cuda(), batch_y.cuda()
optimizer.zero_grad()
# in case you wanted a semi-full example
outputs = model(batch_x)
loss = criterion(outputs,batch_y)
training_loss.append(loss.item())
loss.backward()
optimizer.step()
training_loss = np.average(training_loss)
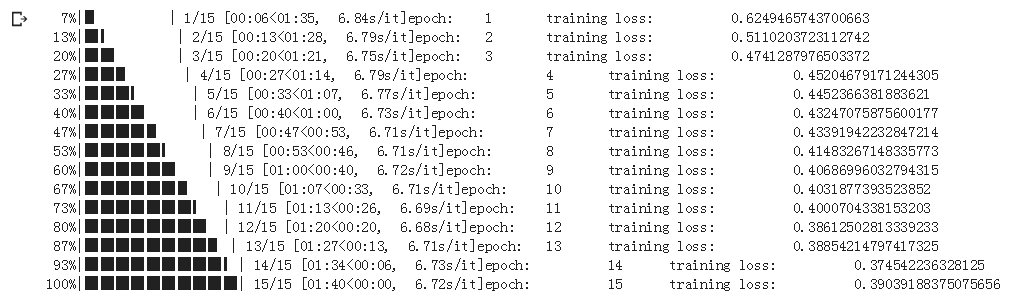
print('epoch: \t', epoch, '\t training loss: \t', training_loss)
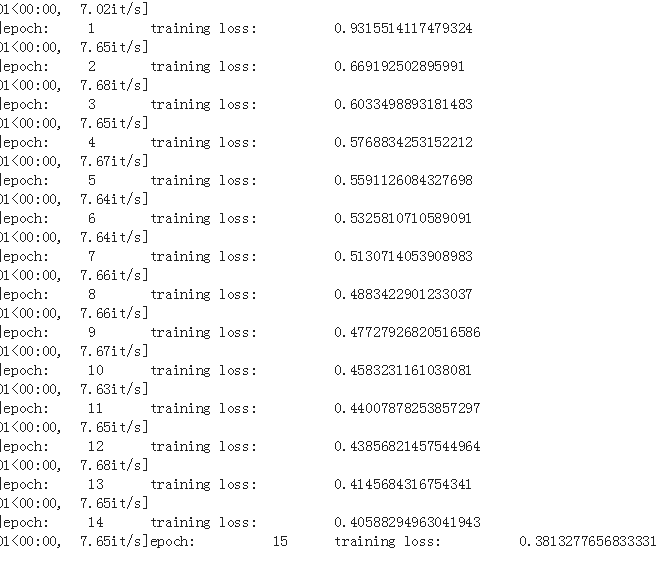
打印了训练进度和损失,正常情况下每次训练后训练损失都在减少。接下来验证准确性:
# prediction for training set
prediction = []
target = []
permutation = torch.randperm(train_x.size()[0])
for i in tqdm(range(0,train_x.size()[0], batch_size)):
    indices = permutation[i:i+batch_size]
    batch_x, batch_y = train_x[indices], train_y[indices]

    if torch.cuda.is_available():
        batch_x, batch_y = batch_x.cuda(), batch_y.cuda()

    with torch.no_grad():
        output = model(batch_x.cuda())

    softmax = torch.exp(output).cpu()
    prob = list(softmax.numpy())
    predictions = np.argmax(prob, axis=1)
    prediction.append(predictions)
    target.append(batch_y)

# training accuracy
accuracy = []
for i in range(len(prediction)):
    accuracy.append(accuracy_score(target[i],prediction[i]))

print('training accuracy: \t', np.average(accuracy))

# prediction for validation set
prediction_val = []
target_val = []
permutation = torch.randperm(val_x.size()[0])
for i in tqdm(range(0,val_x.size()[0], batch_size)):
    indices = permutation[i:i+batch_size]
    batch_x, batch_y = val_x[indices], val_y[indices]

    if torch.cuda.is_available():
        batch_x, batch_y = batch_x.cuda(), batch_y.cuda()

    with torch.no_grad():
        output = model(batch_x.cuda())

    softmax = torch.exp(output).cpu()
    prob = list(softmax.numpy())
    predictions = np.argmax(prob, axis=1)
    prediction_val.append(predictions)
    target_val.append(batch_y.cpu())

# validation accuracy
accuracy_val = []
for i in range(len(prediction_val)):
    accuracy_val.append(accuracy_score(target_val[i],prediction_val[i]))

print('validation accuracy: \t', np.average(accuracy_val))

验证准确性为69.7%。现在我们有了baseline,接下来我们使用迁移学习来解决此分类问题。
使用迁移学习进行分类
我们将使用在ImageNet数据集上训练的VGG16预训练模型。让我们先说下使用迁移学习训练模型的步骤:
- 加载预训练模型的权重-在本例中为VGG16
- 根据手头的问题对模型进行微调(不更新预训练模型中部分层的参数)
- 使用这些预训练的权重来提取我们训练集的图像特征
- 最后,使用提取的特征来训练微调模型
因此,让我们首先尝试加载预训练模型的权重:
torchvision—使用预训练模型参考
# loading the pretrained model
model = models.vgg16_bn(pretrained=True)

现在,我们将微调模型。我们不会训练VGG16模型的各个层,因此让我们冻结这些层的权重:
# Freeze model weights
for param in model.parameters():
    param.requires_grad = False
由于我们只有2个类别需要预测,并且VGG16在ImageNet上有1000个类别,因此我们需要根据任务更新最后一层,因此我们将只训练最后一层,可以通过设置该层中的requires_grad=True来只对最后一层进行权值更新。让我们将训练设置为GPU训练:
# checking if GPU is available
if torch.cuda.is_available():
    model = model.cuda()
# Add on classifier
# 添加分类器,只更新最后一层的权重
model.classifier[6] = Sequential(
                      Linear(4096, 2))
model.classifier
'''
输出设为2,并且更新这层的权重。
另外注意我们这里没有设置激活函数和dropout之类的防止过拟合手段,是为了与上面的CNN有可比性。
'''
for param in model.classifier[6].parameters():
    param.requires_grad = True

现在,我们将使用预训练模型来提取训练图像和验证图像的特征,将batch_size设置为128(同样,您可以根据需要增加或减少该batch_size):
# batch_size
batch_size = 128

# extracting features for train data
data_x = []
label_x = []

inputs,labels = train_x, train_y

for i in tqdm(range(int(train_x.shape[0]/batch_size)+1)):
    input_data = inputs[i*batch_size:(i+1)*batch_size]
    label_data = labels[i*batch_size:(i+1)*batch_size]
    input_data , label_data = Variable(input_data.cuda()),Variable(label_data.cuda())
    x = model.features(input_data)
    data_x.extend(x.data.cpu().numpy())
    label_x.extend(label_data.data.cpu().numpy())


# extracting features for validation data
data_y = []
label_y = []

inputs,labels = val_x, val_y

for i in tqdm(range(int(val_x.shape[0]/batch_size)+1)):
    input_data = inputs[i*batch_size:(i+1)*batch_size]
    label_data = labels[i*batch_size:(i+1)*batch_size]
    input_data , label_data = Variable(input_data.cuda()),Variable(label_data.cuda())
    x = model.features(input_data)
    data_y.extend(x.data.cpu().numpy())
    label_y.extend(label_data.data.cpu().numpy())
接下来,我们将这些数据转换为torch格式:
# converting the features into torch format
x_train  = torch.from_numpy(np.array(data_x))
x_train = x_train.view(x_train.size(0), -1)
y_train  = torch.from_numpy(np.array(label_x))
x_val  = torch.from_numpy(np.array(data_y))
x_val = x_val.view(x_val.size(0), -1)
y_val  = torch.from_numpy(np.array(label_y))
我们仍然需要为模型定义优化器和损失函数:
import torch.optim as optim

# specify loss function (categorical cross-entropy)
criterion = CrossEntropyLoss()

# specify optimizer (stochastic gradient descent) and learning rate
optimizer = optim.Adam(model.classifier[6].parameters(), lr=0.0005)
现在需要训练我们的模型,为了公平比较,仍然设置15次迭代周期,并将batch_size设置为128:
# batch size
batch_size = 128
model = model.cpu()# 在colal上运行这块的cuda()一直出现错误,改为了cpu训练,在后面再改回cuda。
# number of epochs to train the model
n_epochs = 15 # 与CNN一致设置为15

for epoch in tqdm(range(1, n_epochs+1)):

    # keep track of training and validation loss
    train_loss = 0.0

    permutation = torch.randperm(x_train.size()[0])

    training_loss = []
    for i in range(0,x_train.size()[0], batch_size):

        indices = permutation[i:i+batch_size]
        batch_x, batch_y = x_train[indices], y_train[indices]

        # if torch.cuda.is_available():
        #     batch_x, batch_y = batch_x.cuda(), batch_y.cuda()

        optimizer.zero_grad()
        # in case you wanted a semi-full example
        outputs = model.classifier(batch_x)
        loss = criterion(outputs,batch_y)

        training_loss.append(loss.item())
        loss.backward()
        optimizer.step()

    training_loss = np.average(training_loss)
    print('epoch: \t', epoch, '\t training loss: \t', training_loss)
# prediction for training set
prediction = []
target = []
permutation = torch.randperm(x_train.size()[0])
for i in tqdm(range(0,x_train.size()[0], batch_size)):
    indices = permutation[i:i+batch_size]
    batch_x, batch_y = x_train[indices], y_train[indices]

    if torch.cuda.is_available():
        batch_x, batch_y = batch_x.cuda(), batch_y.cuda()

    with torch.no_grad():
        output = model.classifier(batch_x.cuda())

    softmax = torch.exp(output).cpu()
    prob = list(softmax.numpy())
    predictions = np.argmax(prob, axis=1)
    prediction.append(predictions)
    target.append(batch_y)

# training accuracy
accuracy = []
for i in range(len(prediction)):
    accuracy.append(accuracy_score(target[i],prediction[i]))

print('training accuracy: \t', np.average(accuracy))
我们在训练集上的准确度达到82.5%。现在让我们检查验证准确性:
# prediction for validation set
prediction_val = []
target_val = []
permutation = torch.randperm(x_val.size()[0])
for i in tqdm(range(0,x_val.size()[0], batch_size)):
    indices = permutation[i:i+batch_size]
    batch_x, batch_y = x_val[indices], y_val[indices]

    if torch.cuda.is_available():
        batch_x, batch_y = batch_x.cuda(), batch_y.cuda()

    with torch.no_grad():
        output = model.classifier(batch_x.cuda())

    softmax = torch.exp(output).cpu()
    prob = list(softmax.numpy())
    predictions = np.argmax(prob, axis=1)
    prediction_val.append(predictions)
    target_val.append(batch_y)

# validation accuracy
accuracy_val = []
for i in range(len(prediction_val)):
    accuracy_val.append(accuracy_score(target_val[i],prediction_val[i]))

print('validation accuracy: \t', np.average(accuracy_val))
 模型在验证集上的准确性也相似,达到80.2%。训练和验证的准确性几乎是相同的,因此可以说该模型泛化能力较好。以下是我们的结果摘要:我们可以推断,与CNN模型相比,使用VGG16预训练模型提高了精度。
| Model | Training Accuracy | Validation Accuracy |
|---|---|---|
| CNN | 87.6% | 69.7% |
| VGG16 | 82.5% | 80.2% |
结论
我们完成了使用预训练模型和迁移学习方法来解决图像分类问题。首先了解什么是预训练模型,以及如何根据实际问题选择正确的预训练模型。然后,进行了一个案例研究,将车辆图像分类为紧急情况或非紧急情况。我们首先使用CNN模型解决了此案例研究,然后使用VGG16预训练模型解决了相同的问题。发现使用VGG16预训练模型提高了模型性能,且获得了更好的结果。
现在对使用PyTorch进行迁移学习有一个初步的了解,推荐从图像分类问题入手迁移学习,因为这是一类基础问题,并尝试应用转移学习来解决它们,这将帮助理解迁移学习的工作原理。
参考:
Transfer Learning in Pytorch
