SpringMVC框架搭建:
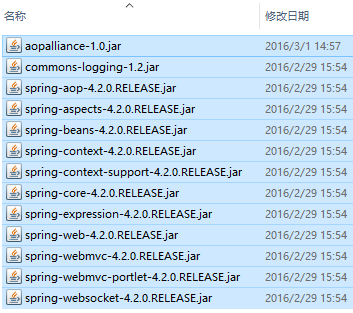
1.导入jar包
2.书写主配置文件:springmvc.xml web.xml
3.启动tomcat测试
准备工作:
新建Dynamic Web Project,下一步下一步勾选生成xml
项目下新建source folder名为resource。src下创建包cn.java.controller
WebContext下创建jsp文件名为index.jsp然后运行测试是否可用
第一步:导入jar包

把这些jar包复制到WebContent下WEB-INF下的lib中
第二步:书写主配置文件:springmvc.xml web.xml
在resource文件夹中创建springmvc.xml
把头复制进去:
<?xml version="1.0" encoding="UTF-8"?>
<beans xmlns="http://www.springframework.org/schema/beans"
    xmlns:xsi="http://www.w3.org/2001/XMLSchema-instance"
    xmlns:mvc="http://www.springframework.org/schema/mvc"
    xmlns:context="http://www.springframework.org/schema/context"
    xsi:schemaLocation="http://www.springframework.org/schema/beans
            http://www.springframework.org/schema/beans/spring-beans-4.2.xsd
            http://www.springframework.org/schema/mvc
            http://www.springframework.org/schema/mvc/spring-mvc-4.2.xsd
            http://www.springframework.org/schema/context
            http://www.springframework.org/schema/context/spring-context-4.2.xsd ">


</beans>
先在web.xml中配置springMVC的核心控制器类:DispatcherServlet

web.xml:
<?xml version="1.0" encoding="UTF-8"?>
<web-app xmlns:xsi="http://www.w3.org/2001/XMLSchema-instance"
xmlns="http://java.sun.com/xml/ns/javaee"
xsi:schemaLocation="
http://java.sun.com/xml/ns/javaee
http://java.sun.com/xml/ns/javaee/web-app_3_0.xsd"
id="WebApp_ID"
version="3.0">
  <display-name>springMVC</display-name>
  <welcome-file-list>
    <welcome-file>index.html</welcome-file>
    <welcome-file>index.htm</welcome-file>
    <welcome-file>index.jsp</welcome-file>
    <welcome-file>default.html</welcome-file>
    <welcome-file>default.htm</welcome-file>
    <welcome-file>default.jsp</welcome-file>
  </welcome-file-list>

  <!-- 配置springMVC的核心控制器类:DispatcherServlet -->
  <servlet>
      <servlet-name>dispatcherServlet</servlet-name>
      <!-- 按住ctrl + shift + H 输入DispatcherServlet,ok后在文件右键复制路径,粘贴到下面 -->
      <servlet-class>org.springframework.web.servlet.DispatcherServlet</servlet-class>
      <!-- 将DispatcherServlet和springmvc.xml文件关联起来 -->
      <init-param>
          <param-name>contextConfigLocation</param-name>
          <!-- param-value:给springmvc起一个文件名,固定写法,不能改 -->
          <param-value>classpath:springmvc.xml</param-value>
      </init-param>
  </servlet>

  <servlet-mapping>
      <servlet-name>dispatcherServlet</servlet-name>
      <!-- /*代表全部都拦截 -->
      <url-pattern>/*</url-pattern>
  </servlet-mapping>
</web-app>