序言
开发工具IDEA,从新建Springboot项目开始,介绍Maven plugin 配置JOOQ自动生成代码。
ps:只要是Maven项目就可以,用什么开发工具都无关。因为比较习惯使用IDEA,所以文章中的项目是在IDEA中创建的。
新建项目
第一步:
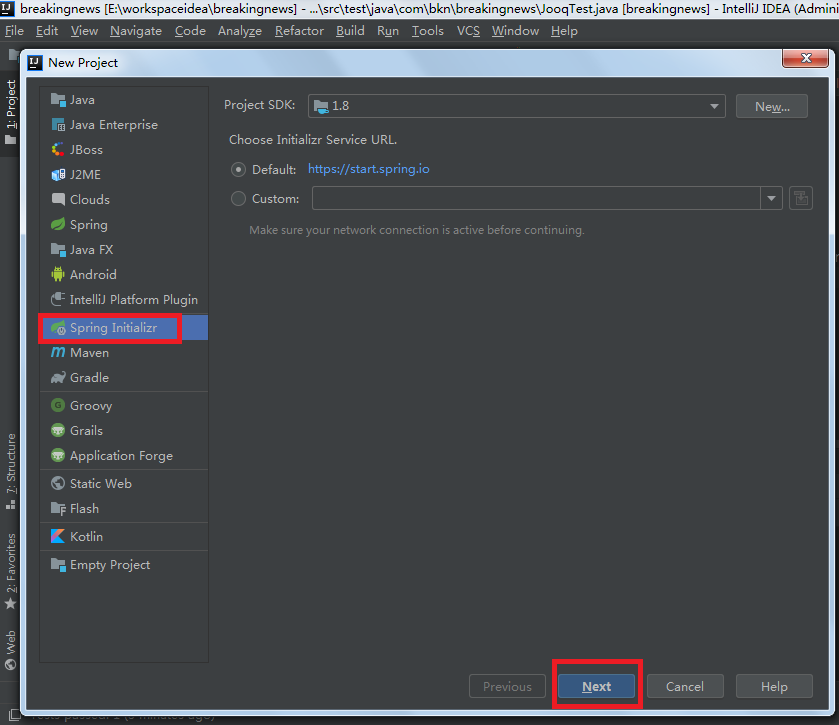
菜单顺序:File->New->Project->Spring Initailizr 选择完之后点击右下角的Next按钮开始下一步
如下图:
Project SDK 是指项目使用的JDK版本,如果和本地安装的不一样可以点击后面的New设置。
Choose Initializr Service URL 是指定从哪一个网址下载项目。
这里有一点补充的就是:我们看到默认选中的Default是指向https://start.spring.io
意思就是当我们创建完之后,会从上面这个网址去下载配置好的项目。(如果不用IDEA的话,我们也可以直接访问这个网址去创建Springboot的项目)
第二步:
这一步开始先设置Group和Artifact(项目名) ,这两个设置会直接确定项目的包名。
因为最终是一个web项目,所以打包方式选择War(至于jar包和war包有的区别不知道的可以自己去百度)。
点击Next

然后选择创建项目需要用到的技术,选择完成之后系统会在pom.xml自动帮我们导入相应的maven依赖。
Developer Tools:
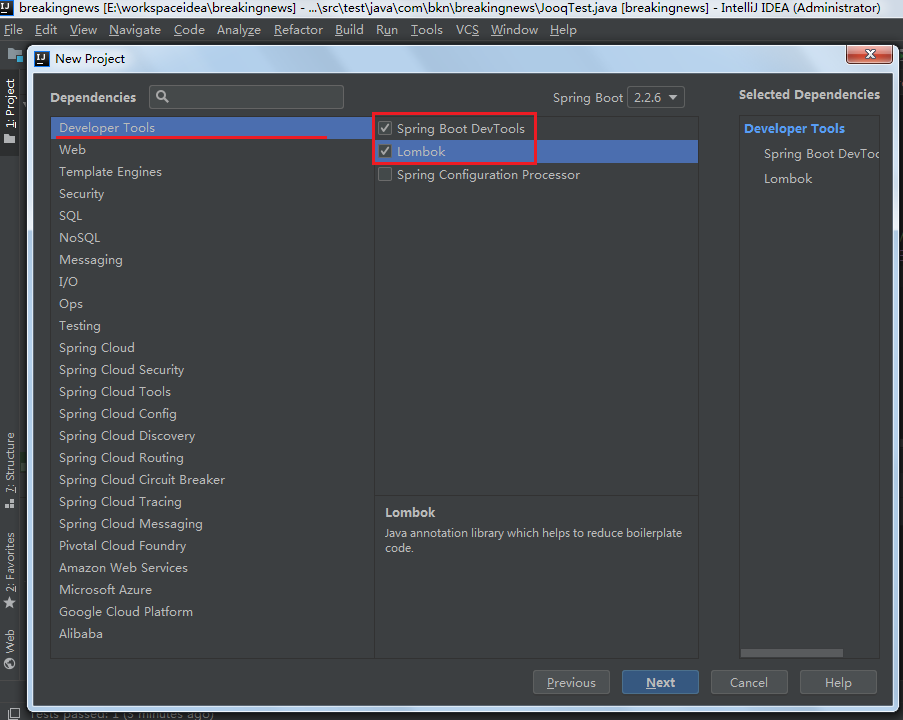
Web:

SQL:
这里选择了mysql、flyway、jooq三个
用mysql数据库要选这个如果使用其他的数据库选择对应的就可以,会自动引入数据库连接java的依赖。
Flyway则是数据库版本管理器,后续会用到,所以这里先引入,如果不想引入也可以先不选。
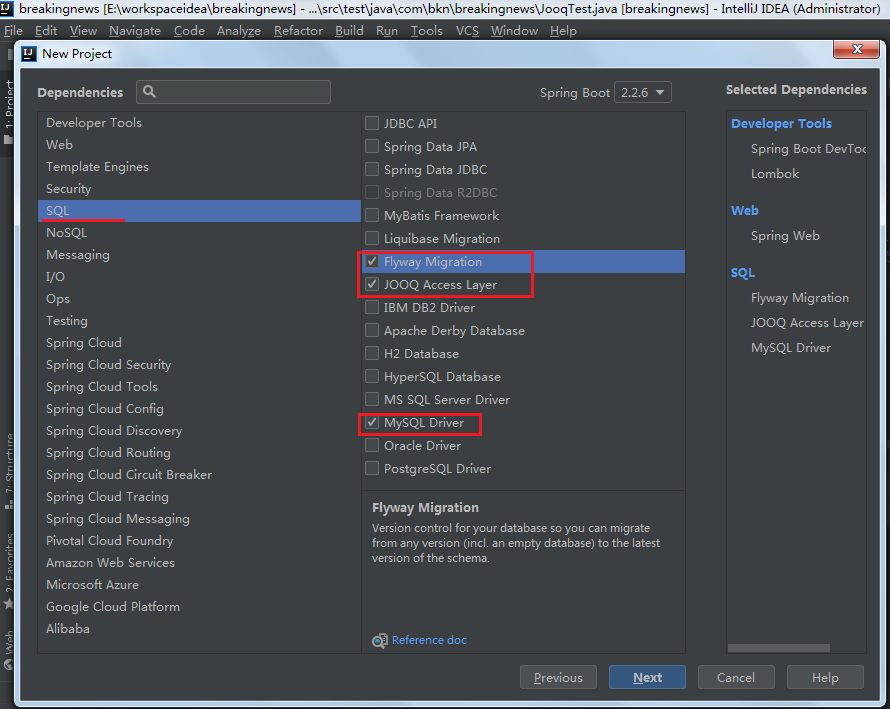
选择完成之后点击Next。
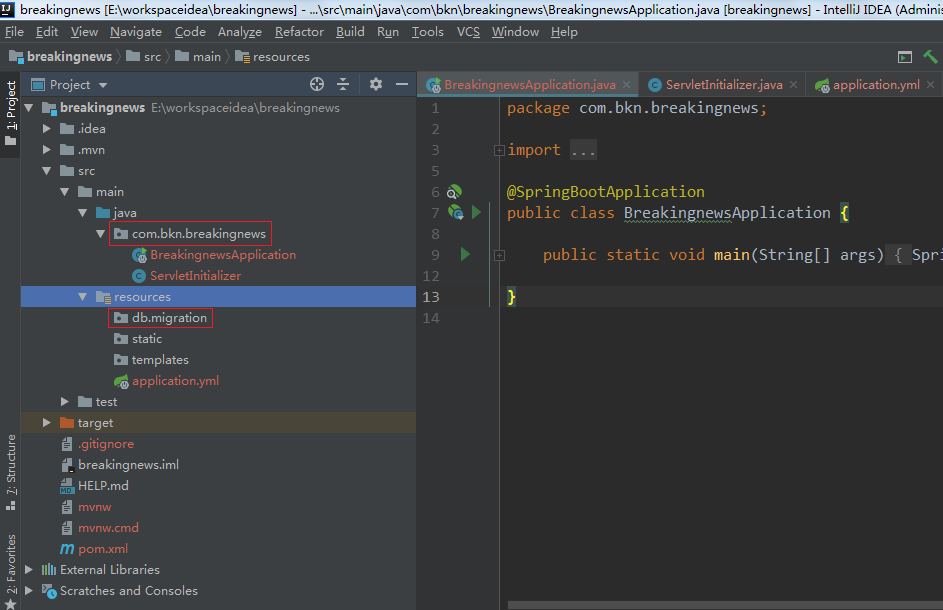
等待创建完成之后的目录结构,如下图:
可以看到是一个标准的maven项目结构,main下面包含java和resources
其中java是存放java代码
resources存放资源文件,例如配置文件、前端代码等等。
resources文件夹下面的db.migration存放Flyway要用的数据库脚本,暂时不用管;static和templates这两个文件夹可以删掉,因为在这次的例子里面用不上。
接下来是自动生成的pom.xml ,看看Springboot为我们自动加了哪些依赖。
<?xml version="1.0" encoding="UTF-8"?>
<project xmlns="http://maven.apache.org/POM/4.0.0" xmlns:xsi="http://www.w3.org/2001/XMLSchema-instance"
         xsi:schemaLocation="http://maven.apache.org/POM/4.0.0 https://maven.apache.org/xsd/maven-4.0.0.xsd">
    <modelVersion>4.0.0</modelVersion>
    <parent>
        <groupId>org.springframework.boot</groupId>
        <artifactId>spring-boot-starter-parent</artifactId>
        <version>2.2.6.RELEASE</version>
        <relativePath/> <!-- lookup parent from repository -->
    </parent>
    <groupId>com.bkn</groupId>
    <artifactId>breakingnews</artifactId>
    <version>0.0.1-SNAPSHOT</version>
    <packaging>war</packaging>
    <name>breakingnews</name>
    <description>a news web application</description>

    <properties>
        <java.version>1.8</java.version>
    </properties>

    <dependencies>

     <!-- jooq核心依赖 -->
        <dependency>
            <groupId>org.springframework.boot</groupId>
            <artifactId>spring-boot-starter-jooq</artifactId>
        </dependency>
        <dependency>
            <groupId>org.springframework.boot</groupId>
            <artifactId>spring-boot-starter-web</artifactId>
        </dependency>
        <dependency>
            <groupId>org.flywaydb</groupId>
            <artifactId>flyway-core</artifactId>
        </dependency>

        <dependency>
            <groupId>org.springframework.boot</groupId>
            <artifactId>spring-boot-devtools</artifactId>
            <scope>runtime</scope>
            <optional>true</optional>
        </dependency>
        <dependency>
            <groupId>mysql</groupId>
            <artifactId>mysql-connector-java</artifactId>
            <scope>runtime</scope>
        </dependency>
        <dependency>
            <groupId>org.projectlombok</groupId>
            <artifactId>lombok</artifactId>
            <optional>true</optional>
        </dependency>
        <dependency>
            <groupId>org.springframework.boot</groupId>
            <artifactId>spring-boot-starter-tomcat</artifactId>
            <scope>provided</scope>
        </dependency>
        <dependency>
            <groupId>org.springframework.boot</groupId>
            <artifactId>spring-boot-starter-test</artifactId>
            <scope>test</scope>
            <exclusions>
                <exclusion>
                    <groupId>org.junit.vintage</groupId>
                    <artifactId>junit-vintage-engine</artifactId>
                </exclusion>
            </exclusions>
        </dependency>
    </dependencies>

    <build>
        <plugins>
            <plugin>
                <groupId>org.springframework.boot</groupId>
                <artifactId>spring-boot-maven-plugin</artifactId>
            </plugin>
        </plugins>
    </build>

</project>
项目创建完成之后,开始看看在Maven项目中如何配置Jooq自动生成代码。
配置plugin
开始配置插件之前需要先引入两个需要的依赖
 1 <!--jooq 需要的meta和生成代码的codegen包
 2             这里注意查看spring-boot-starter-jooq 中的jooq是什么版本-->
 3         <dependency>
 4             <groupId>org.jooq</groupId>
 5             <artifactId>jooq-meta</artifactId>
 6             <version>3.12.4</version>
 7         </dependency>
 8         <dependency>
 9             <groupId>org.jooq</groupId>
10             <artifactId>jooq-codegen</artifactId>
11             <version>3.12.4</version>
12         </dependency>
接下来在就是配置插件,在pom.xml中添加如下配置,注意找到对应的标签,
需要把下面的jooq那一个plugin中的内容复制到你自己项目的plugins下面
 1 <build>
 2         <plugins>
 3             <plugin>
 4                 <groupId>org.springframework.boot</groupId>
 5                 <artifactId>spring-boot-maven-plugin</artifactId>
 6             </plugin>
 7             <!-- jooq code generate plugin-->
 8             <plugin>
 9                 <!-- Use org.jooq for the Open Source Edition
10                 org.jooq.pro-java-8 for commercial editions with Java 8 support,
11                 org.jooq.trial for the free trial edition
12                 Note: Only the Open Source Edition is hosted on Maven Central.
13                 Import the others manually from your distribution -->
14                 <groupId>org.jooq</groupId>
15                 <artifactId>jooq-codegen-maven</artifactId>
16                 <version>${org.jooq.version}</version>
17                 <!-- The jOOQ code generation plugin is also executed in the generate-sources phase, prior to compilation -->
18                 <executions>
19                     <execution>
20                         <phase>generate-sources</phase>
21                         <goals>
22                             <goal>generate</goal>
23                         </goals>
24                     </execution>
25                 </executions>
26                 <!-- This is a minimal working configuration. See the manual's section about the code generator for more details -->
27                 <configuration>
28                     <!-- 这里使用配置文件 -->
29                     <configurationFile>src/main/resources/jooqConfig.xml</configurationFile>
30                 </configuration>
31             </plugin>
32         </plugins>
33     </build>
关于插件中的生成代码配置,也就是<configeration>标签里面的内容,官网使用的是直接在该标签下配置。(官方怎么配置去官网查一下)
我这里使用的是使用配置文件的方式,两种方式都可以,看个人习惯。
这里我们需要新建一个jooqConfig.xml配置文件,放在resources文件夹下面,用来存放jooq生成代码的相关配置。
jooqConfig.xml
<?xml version="1.0" encoding="UTF-8" standalone="yes"?> <configuration xmlns="http://www.jooq.org/xsd/jooq-codegen-3.12.0.xsd"> <!-- Configure the database connection here --> <jdbc> <driver>com.mysql.cj.jdbc.Driver</driver> <url>jdbc:mysql://localhost:3306/bknews?serverTimezone=UTC&useUnicode=true&characterEncoding=utf-8</url> <user>root</user> <password>123456</password> </jdbc> <generator> <!-- The default code generator. You can override this one, to generate your own code style. Supported generators: - org.jooq.codegen.JavaGenerator - org.jooq.codegen.ScalaGenerator Defaults to org.jooq.codegen.JavaGenerator --> <name>org.jooq.codegen.JavaGenerator</name> <database> <!-- The database type. The format here is: org.jooq.meta.[database].[database]Database --> <name>org.jooq.meta.mysql.MySQLDatabase</name> <!-- The database schema (or in the absence of schema support, in your RDBMS this can be the owner, user, database name) to be generated --> <!-- 数据库名 --> <inputSchema>bknews</inputSchema> <!-- All elements that are generated from your schema (A Java regular expression. Use the pipe to separate several expressions) Watch out for case-sensitivity. Depending on your database, this might be important! --> <!-- 包含哪些表 --> <includes>.*</includes> <!-- All elements that are excluded from your schema (A Java regular expression. Use the pipe to separate several expressions). Excludes match before includes, i.e. excludes have a higher priority --> <!-- 排除哪些表,这里支持正则表达式 ,多个条件可以用 | 连接符连接--> <!-- 例如:TEST | OTHERS 生成代码时就不会把叫做TEST和OTHERS的表包括进去了--> <excludes></excludes> </database> <target> <!-- The destination package of your generated classes (within the destination directory) --> <!-- 生成的代码存放的包名 --> <packageName>com.bkn.breakingnews.model</packageName> <!-- The destination directory of your generated classes. Using Maven directory layout here --> <!-- 存放的路径 --> <directory>src/main/java/</directory> </target> </generator> </configuration>
配置文件中需要注意有两点:
1. 数据库URL中不带时区参数可能会报错,出现serverTimeZone的错误时,百度搜索一下就知道原因了。
2. 生成代码的路径如果在自己设置的位置的话自己多试几次就知道jooq是怎么存放的了。
执行plugin
配置完成之后就是执行生成代码操作,打开Mave的操作栏,IDEA如果没有自己重新设置过布局的话,Maven是在右边。
找到Plugins->jooq-codegen->jooq-codegen:generate 然后点击右键,选择Run Maven Build

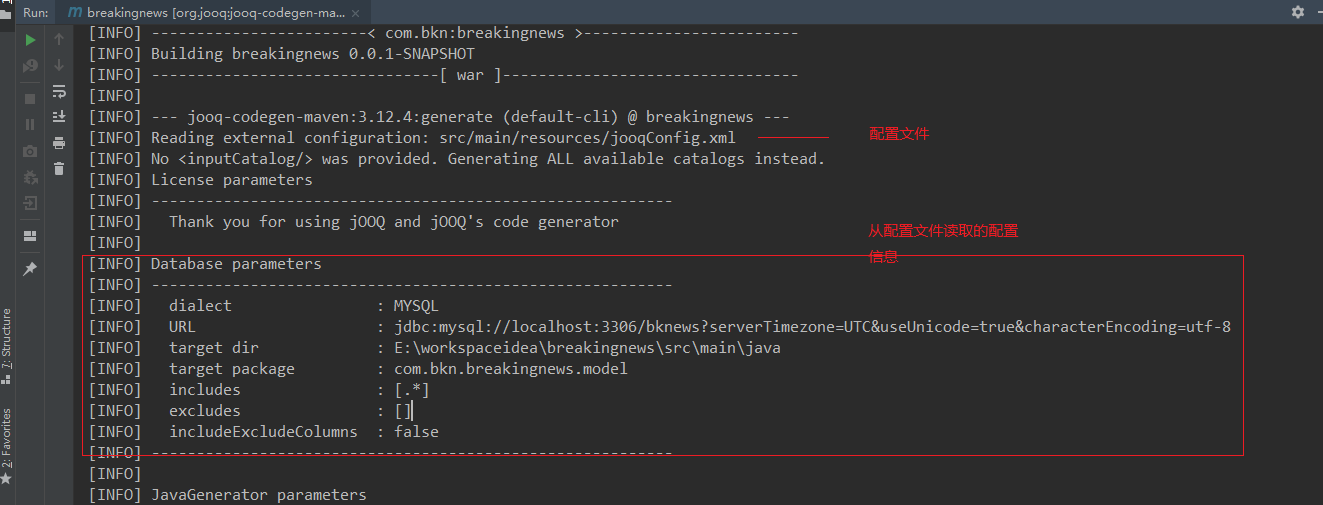
执行之后可以看到控制台的Maven执行日志,
执行完成之后,查看项目目录。

OK,代码生成成果之后来测试一下。
在test文件夹中新建类JooqTest,类中包含一个test()的方法,然后右键选择Run test 或者Debug test
package com.bkn.breakingnews;

import com.bkn.breakingnews.model.tables.BkUser;
import org.jooq.DSLContext;
import org.jooq.Result;
import org.jooq.impl.DSL;
import org.junit.jupiter.api.Test;

public class JooqTest {

    @Test
    void test(){
        DSLContext create = DSL.using("jdbc:mysql://localhost:3306/bknews?serverTimezone=UTC",
                "root",
                "123456");
        Result result = create.selectFrom(BkUser.BK_USER) //BkUser是生成的表
                                .orderBy(1)
                                .fetch();
        System.out.println(result);
    }
}
执行结果:

总结
a.配置过程中生成路径和数据库的URL出现问题时日志中错误信息还算比较完善,耐心看日志解决问题。
b.实际的开发中jooq常用的语法以及更加详细的配置会在后续的文章中来写。