Vouch-proxy 实现 Zabbix 对接 SSO
Zabbix 自身不支持 SSO 对接,我使用 Nginx 代理 Zabbix,将请求转发至 Vouch-proxy,由 Vouch-proxy 对接 SSO,对接完毕 Vouch-proxy 将返回 Nginx,Nginx 此时将获取到用户信息,使用 HTTP Basic Auth 接入 Zabbix。
环境
Zabbix            192.168.10.227:80
Nginx             192.168.10.227:8080
Vouch-proxy       192.168.10.227:9090
SSO               sso.mydomain.com:80    域名是修改 hosts 实现的,实际 IP 为 xxx.xxx.xxx.xxx
在 SSO(Keycloak) 中创建客户端
具体对接情况取决于实际情况,Vouch-proxy 支持多种协议,该方案应该满足各种协议。
我用的是 OpenID Connect 协议,需要在 SSO 中创建客户端,得到以下信息:
客户端ID:myzabbix
秘钥:xxxxxxxxxxxxxxxxxxxxxxxxxxxxxxx
三个对接需要的 URL:
http://sso.mydomain.com/auth/realms/master/protocol/openid-connect/auth
http://sso.mydomain.com/auth/realms/master/protocol/openid-connect/token
http://sso.mydomain.com/auth/realms/master/protocol/openid-connect/userinfo
同时需要在 SSO 中配置重定向地址:http://192.168.10.227:9090/auth,注意这是 Vouch-proxy 的地址
SSO 中的配置到此结束。
搭建 Vouch-proxy
创建并进入项目目录
mkdir -p /usr/local/zabbixsso && cd /usr/local/zabbixsso
创建映射目录
mkdir -p /usr/local/zabbixsso/config && \
mkdir -p /usr/local/zabbixsso/data
创建配置文件 /usr/local/zabbixsso/config/config.yml,配置文件的模板来自 config.yml_example_oidc
vouch:
  domains:
  - 192.168.10.227
  - sso.mydomain.com

  allowAllUsers: true

  headers:
    claims:
      - groups
      - given_name
      - preferred_username

oauth:
  provider: oidc
  client_id: myzabbix
  client_secret: xxxxxxxxxxxxxxxxxxxxxxxxxxxxxxx
  auth_url: http://sso.mydomain.com/auth/realms/master/protocol/openid-connect/auth
  token_url: http://sso.mydomain.com/auth/realms/master/protocol/openid-connect/token
  user_info_url: http://sso.mydomain.com/auth/realms/master/protocol/openid-connect/userinfo
  scopes:
    - openid
    - email
    - profile
  callback_url: http://192.168.10.227:9090/auth
启动 Vouch-proxy 容器
注意,我的 SSO 域名 sso.mydomain.com 是自己改 hosts 实现的,我必须添加 host,不然无法访问 SSO
docker run \
    --add-host=sso.mydomain.com:xxx.xxx.xxx.xxx \
    -d \
    -p 9090:9090 \
    --name vouch-proxy \
    -v ${PWD}/config:/config \
    -v ${PWD}/data:/data \
    voucher/vouch-proxy
搭建 Nginx(OpenResty)
Nginx 需要用到 http_auth_basic_module 和 lua,默认的 Nginx 没有安装这些组件,我们使用 OpenResty,这是个加强版的 Nginx,有我们需要的一切东西。
创建目录
mkdir -p /usr/local/zabbixsso/conf.d
创建配置文件 /usr/local/zabbixsso/conf.d/default.conf
server {
    listen       80;
    server_name  localhost;

    error_page   500 502 503 504  /50x.html;
    location = /50x.html {
        root   /usr/share/nginx/html;
    }

    auth_request /validate;

    location = /validate {
      # forward the /validate request to Vouch Proxy
      proxy_pass http://192.168.10.227:9090/validate;

      # be sure to pass the original host header
      proxy_set_header Host $http_host;

      # Vouch Proxy only acts on the request headers
      proxy_pass_request_body off;
      proxy_set_header Content-Length "";

      # optionally add X-Vouch-User as returned by Vouch Proxy along with the request
      # auth_request_set $auth_resp_x_vouch_user $upstream_http_x_vouch_user;

      # these return values are used by the @error401 call
      auth_request_set $auth_resp_jwt $upstream_http_x_vouch_jwt;
      auth_request_set $auth_resp_err $upstream_http_x_vouch_err;
      auth_request_set $auth_resp_failcount $upstream_http_x_vouch_failcount;
    }

    # if validate returns `401 not authorized` then forward the request to the error401block
    error_page 401 = @error401;

    location @error401 {
        # redirect to Vouch Proxy for login
        return 302 http://192.168.10.227:9090/login?url=$scheme://$http_host$request_uri&vouch-failcount=$auth_resp_failcount&X-Vouch-Token=$auth_resp_jwt&error=$auth_resp_err;
        # you usually *want* to redirect to Vouch running behind the same Nginx config proteced by https
        # but to get started you can just forward the end user to the port that vouch is running on
    }

    # proxy pass authorized requests to your service
    location / {
      # forward authorized requests to your service protectedapp.yourdomain.com
      # proxy_pass http://192.168.10.227:9091/header/show_headers;
      proxy_pass http://192.168.10.227/;
      # you may need to set these variables in this block as per https://github.com/vouch/vouch-proxy/issues/26#issuecomment-425215810
      # auth_request_set $auth_resp_x_vouch_idp_claims_groups $upstream_http_x_vouch_idp_claims_groups;
      # auth_request_set $auth_resp_x_vouch_idp_claims_given_name $upstream_http_x_vouch_idp_claims_given_name;

      auth_request_set $auth_resp_x_vouch_user $upstream_http_x_vouch_user;
      auth_request_set $auth_resp_x_vouch_preferred_username $upstream_http_x_vouch_idp_claims_preferred_username;

      # set user header (usually an email)
      proxy_set_header X-Vouch-User $auth_resp_x_vouch_user;
      # 这是登陆用户名
      proxy_set_header X-Vouch-Preferred-Username $auth_resp_x_vouch_preferred_username;

      # 设置 Zabbix 需要的 HTTP Basic Auth 请求头
      # 最终的效果是在访问 Zabbix 的请求头中添加 Authorization = 'Basic QWRtaW46MTIzNDU2Nzg5MDExMQ==';

      default_type text/html;
      set $encode_username "";
      access_by_lua_block {
          ngx.var.encode_username = ngx.encode_base64(ngx.var.auth_resp_x_vouch_preferred_username..":1234567890113")
      }
      proxy_set_header Authorization "Basic $encode_username";

    }
}
启动容器
docker run \
    --name openresty-test \
    -p 8080:80 \
    -v ${PWD}/conf.d:/etc/nginx/conf.d \
    openresty/openresty:1.15.8.2-7-centos
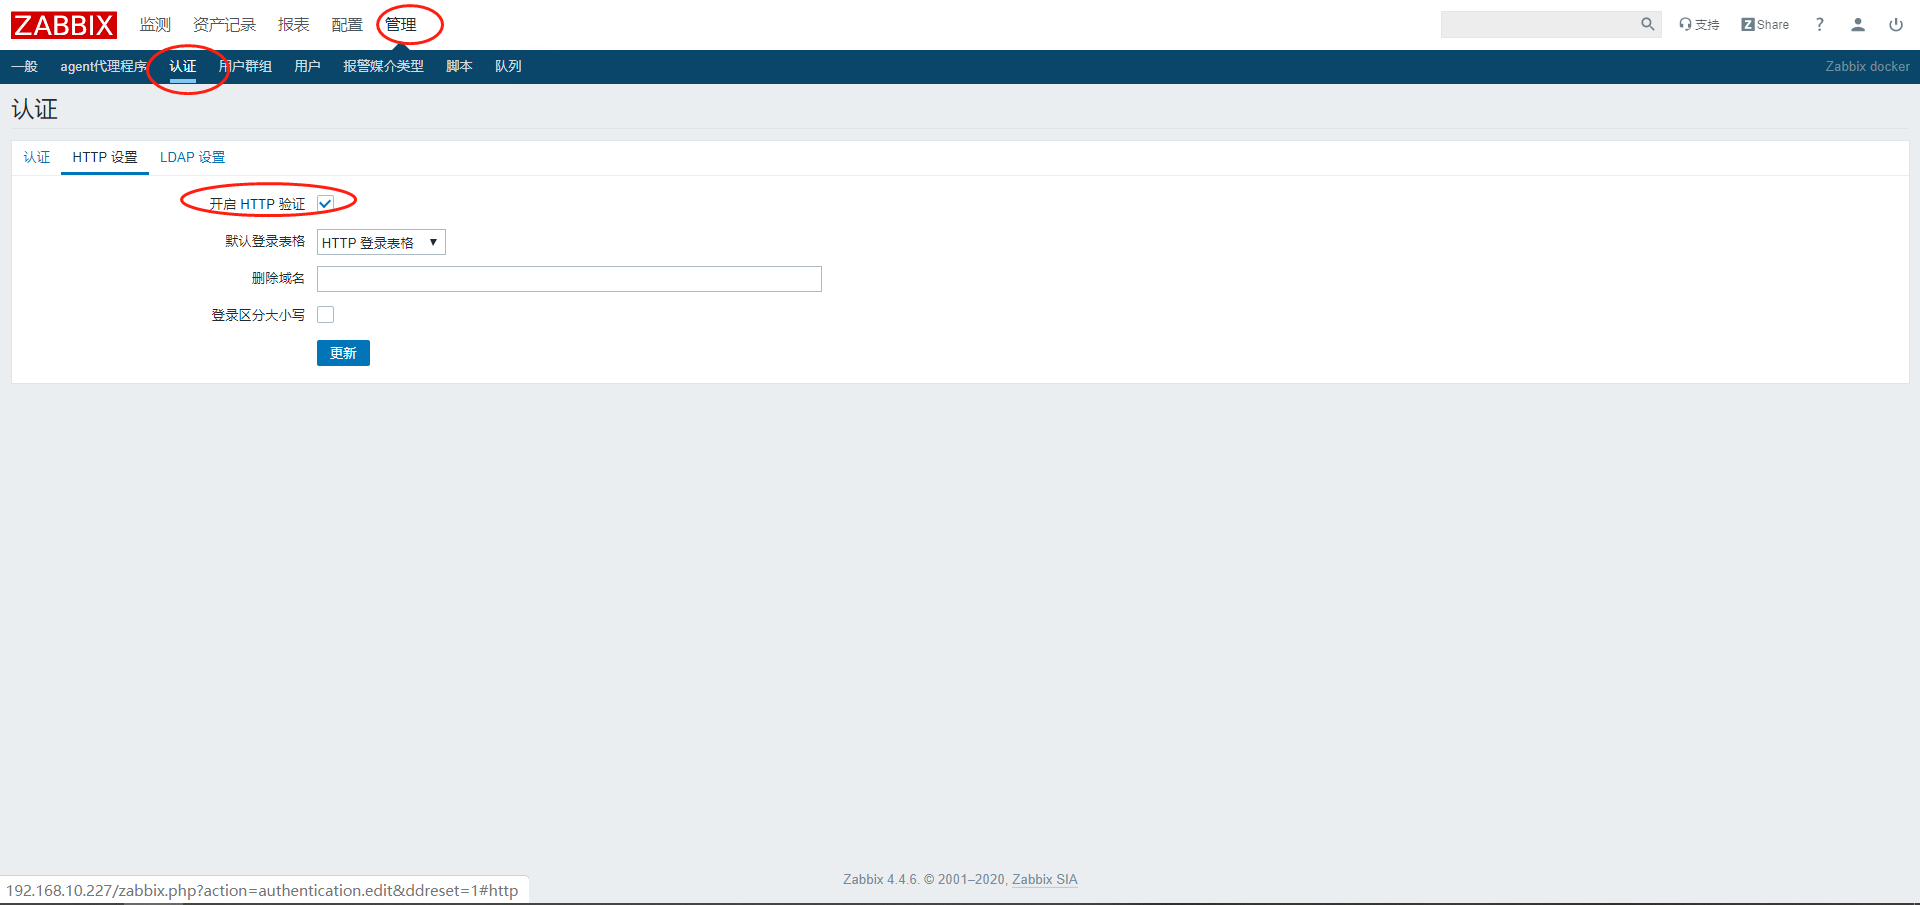
Zabbix 开启 HTTP auth
访问
直接访问 Nginx 地址
http://192.168.10.227:8080/
如果配置正常,将跳转到 sso 页面,登陆成功将会用 Admin 身份进入 Zabbix 系统。
注意,通过 SSO 登陆的用户,必须在 Zabbix 创建好对应用户。
PS:理想的话,应该将 Zabbix 的退出功能,重定向到 Vouch-proxy 的退出,暂时没有这个需求,先不做了。