xml方法对事务进行增强
步骤一
创建UserServiceLogger
/**
 *定义切面
 */
public class UserServiceLogger {
	private static final Logger log = LoggerFactory.getLogger(UserServiceLogger.class);
	public void before(JoinPoint jp) {
		log.info("调用 " + jp.getTarget() + " 的 " + jp.getSignature().getName()
				+ " 方法。方法入参:" + Arrays.toString(jp.getArgs())+"           前置增强");
	}
	public void afterReturning(JoinPoint jp, Object returnValue) {
		log.info("调用 " + jp.getTarget() + " 的 " + jp.getSignature().getName()
				+ " 方法。方法返回值:" + returnValue+"           后置增强");
	}
}
步骤二
准备业务类UserService创建方法addNewUser
@Service("userService")
public class UserServiceImpl implements UserService {

	// 声明接口类型的引用,和具体实现类解耦合
    @Autowired
    private UserDao dao;
	public void addNewUser(User user) {
		// 调用用户DAO的方法保存用户信息
		dao.save(user);
	}
	}
步骤三
创建测试方法
@Test
	public void aopTest() {//xml方式aop
		ApplicationContext ctx = new ClassPathXmlApplicationContext("applicationContext.xml");
		UserService service = (UserService) ctx.getBean("userService");

		User user = new User();
		user.setId(1);
		user.setUsername("123");
		user.setPassword("123");
		user.setEmail("123");

		service.addNewUser(user);
	}
步骤四
修改applicationContext.xml
<?xml version="1.0" encoding="UTF-8"?>
<beans xmlns="http://www.springframework.org/schema/beans"
       xmlns:xsi="http://www.w3.org/2001/XMLSchema-instance"
       xmlns:aop="http://www.springframework.org/schema/aop"
       xmlns:context="http://www.springframework.org/schema/context"
       xsi:schemaLocation="http://www.springframework.org/schema/beans
	http://www.springframework.org/schema/beans/spring-beans-3.2.xsd
	http://www.springframework.org/schema/aop
	http://www.springframework.org/schema/aop/spring-aop-3.2.xsd
http://www.springframework.org/schema/context
http://www.springframework.org/schema/context/spring-context.xsd">

    <!--扫描edu.cn.**下的所有包-->
    <context:component-scan base-package="edu.cn.**"/>
    <!--声明日志切面-->
    <bean class="edu.cn.aop.UserServiceLogger" id="userServiceLogger"></bean>
    <!--通过aop:config把业务对象与辅助功能编织在一起。-->
    <aop:config>
        <!-- 定义切入点 ,指定要增强的业务功能
            public void addNewUser(..)===指定所有的addNewUser方法
        -->
        <aop:pointcut id="pointcut"  expression="execution(public void addNewUser(..))"/>
        <!--指定日志增强辅助功能-->
        <aop:aspect ref="userServiceLogger">
            <!--前置增强,指定增强类型before,-->
            <aop:before method="before" pointcut-ref="pointcut"/>
            <!--后置增强-->
            <aop:after-returning method="afterReturning" returning="returnValue" pointcut-ref="pointcut"/>
        </aop:aspect>
    </aop:config>


</beans>
Xml书写步骤:
- 声明业务对象
<context:component-scan base-package="edu.cn.**"/> - 声明日志切面
- 通过aop:config把业务对象与辅助功能编织在一起。
- 定义切入点 ,指定要增强的业务功能
<aop:pointcut id="pointcut" expression="execution(public void addNewUser(..))"/>
- 指定日志增强辅助功能
<aop:aspect ref="userServiceLogger">
            <!--前置增强,指定增强类型before,-->
            <aop:before method="before" pointcut-ref="pointcut"/>
            <!--后置增强-->
            <aop:after-returning method="afterReturning" returning="returnValue" pointcut-ref="pointcut"/>
        </aop:aspect>
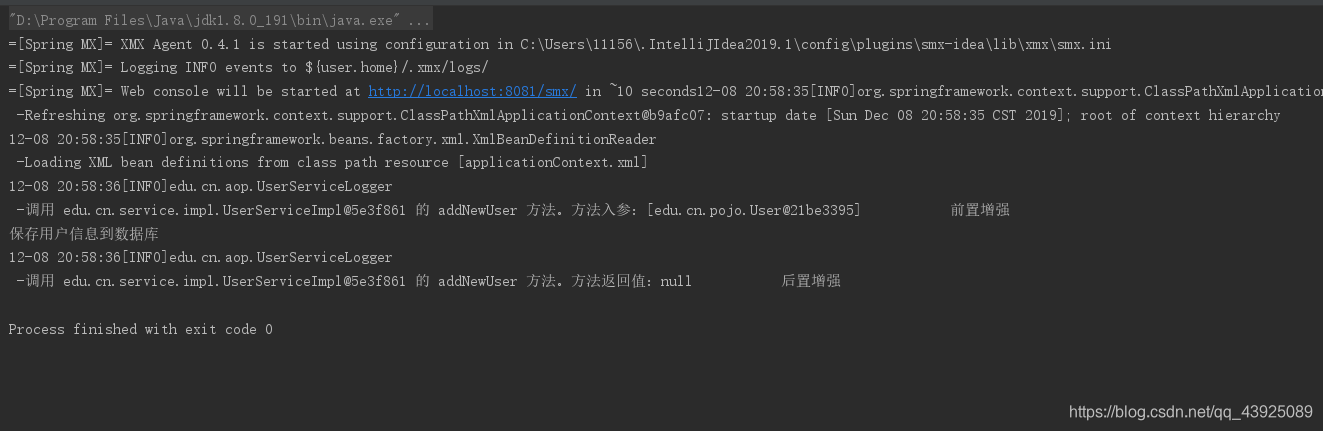
步骤五
测试
注解方式
步骤一
注解配置切面
@Aspect 注解表示这是一个切面
@Component 表示这是一个bean,由Spring进行管理
@After(“execution(public void deleteUserByid(…))”)表示对所有的deleteUserByid进行增强
/**
 * 通过注解实现最终增强
 */
@Aspect
@Component
public class AfterLogger {
	private static final Logger log = LoggerFactory.getLogger(AfterLogger.class);
	@After("execution(public void deleteUserByid(..))")
	public void afterLogger(JoinPoint jp) {
		log.info(jp.getSignature().getName() + " 方法结束执行。                        最终增强  ");
	}
}
步骤二
创建服务方法
@Service("userService")
public class UserServiceImpl implements UserService {
	@Override
	public void deleteUserByid(int id) {
		System.out.println(" =================================删除成功=================================");
	}
}
步骤三
Xml配置
<?xml version="1.0" encoding="UTF-8"?>
<beans xmlns="http://www.springframework.org/schema/beans"
       xmlns:xsi="http://www.w3.org/2001/XMLSchema-instance"
       xmlns:aop="http://www.springframework.org/schema/aop"
       xmlns:context="http://www.springframework.org/schema/context"
       xsi:schemaLocation="http://www.springframework.org/schema/beans
	http://www.springframework.org/schema/beans/spring-beans-3.2.xsd
	http://www.springframework.org/schema/aop
	http://www.springframework.org/schema/aop/spring-aop-3.2.xsd
http://www.springframework.org/schema/context
http://www.springframework.org/schema/context/spring-context.xsd">
    <!--扫描edu.cn.**下的所有包-->
    <context:component-scan base-package="edu.cn.**"/>
    <!--扫描包aspect和service,定位业务类和切面类-->
    <aop:aspectj-autoproxy/>
</beans>
步骤四
创建测试
@Test
	public void aopdelTest() {//注解方式
		ApplicationContext ctx = new ClassPathXmlApplicationContext("applicationContext.xml");
		UserService service = (UserService) ctx.getBean("userService");
		service.deleteUserByid(1);
	}
步骤五
测试结果

