Spring Boot是现在最流行的构建Java应用程序的框架。它是在spring的基础上构建,使用注解和自动配置替代和简化了原来基于xml的配置。Spring Boot还整合了市面上绝大多数流行的第三方组件。为它们提供自动配置功能。只需要在项目中应用对应的starter。所以说,作为一名Java程序员。现在掌握Spring Boot的核心原理刻不容缓!
Spring Boot 2.2.6.RELEASE官方文档
Spring Boot 已经整合的第三方组件的starters
这里讨论的Spring Boot原理主要基于Web的方式。Spring Boot应用也可以不依赖Servlet容器启动。比如整合Dubbo时,它可以依赖Netty启动服务。而依赖Servlet 。这里默认你已经对spring的基础知识有所了解。不适合新手看。
Spring Boot应用有两个启动方式。一是打成war包,放在web容器中启动;二是现在比较主流的,打成jar包,使用内置的web容器启动。
- jar方式启动
以jar方式启动,添加spring-boot-starter-web ,然添加一个包含main函数的启动类,要想激活自动配置功能,还得在启动类上加上@SpringBootApplication注解 。在开发时可以直接运行这个main方法就能启动,部署的时候需要使用java -jar 项目jar包 +【args】来启动。
如下:
@SpringBootApplication
public class BcloudAuthServerApplication {
    public static void main(String[] args) {
  public static void main(String[] args) {
        SpringApplication springApplication = new SpringApplication(BcloudAuthServerApplication.class);
        //关闭Banner
        springApplication.setBannerMode(Banner.Mode.OFF);
        //禁止懒加载
        springApplication.setLazyInitialization(false);
        //设置自定义监听器
        springApplication.addListeners(new BcloudListener());
        //添加自定义的应用初始化器
        springApplication.addInitializers();
        //启动应用
        springApplication.run(args);
    }
    }
}
这里可以看到,spring boot启动的核心类是SpringApplication,下面就以阅读源码的方式一步一步探索它的内部原理:
	//应用中配置的ApplicationContextInitializer实例
	private List<ApplicationContextInitializer<?>> initializers;
    //应用中配置ApplicationListener监听器实例对象
	private List<ApplicationListener<?>> listeners;
	/**
	 * 创建一个SpringApplication实例。 在调用run(BcloudAuthServerApplication.class, args)之前可以自定义一些特性
	 *
	 * Create a new {@link SpringApplication} instance. The application context will load
	 * beans from the specified primary sources (see {@link SpringApplication class-level}
	 * documentation for details. The instance can be customized before calling
	 * {@link #run(String...)}.
	 * @param resourceLoader the resource loader to use
	 * @param primarySources the primary bean sources
	 * @see #run(Class, String[])
	 * @see #setSources(Set)
	 */
	@SuppressWarnings({ "unchecked", "rawtypes" })
	public SpringApplication(ResourceLoader resourceLoader, Class<?>... primarySources) {
	    //① 类加载器。默认是null,当为null时使用的是AppClassLoader
		this.resourceLoader = resourceLoader;
		Assert.notNull(primarySources, "PrimarySources must not be null");
		//② 执行主类,本例中是BcloudAuthServerApplication.class
		this.primarySources = new LinkedHashSet<>(Arrays.asList(primarySources));
		//③ web应用类型,有三种NONE(非web) ,SERVLET(web) , REACTIVE(响应式web),详细可以参考WebApplicationType枚举类
		//主要原理是根据导入的jar包,优先使用SERVLET方式
		this.webApplicationType = WebApplicationType.deduceFromClasspath();
		//④ 读取classpath下所有jar包中的META-INF/spring.factories文件中配置信息 ,详细参考SpringFactoriesLoader实现
		//读取后存放在缓存中(),格式为MultiValueMap<String, String> 如{‘接口限定名’,['实现类1','实现类2','实现类3']}
		//获取配置中所有ApplicationContextInitializer的实现类
		setInitializers((Collection) getSpringFactoriesInstances(ApplicationContextInitializer.class));
		//⑤ 获取配置中所有ApplicationListener.class的实现类
		setListeners((Collection) getSpringFactoriesInstances(ApplicationListener.class));
		//⑥ 获应用启动主类,这里值为BcloudAuthServerApplication.class
		this.mainApplicationClass = deduceMainApplicationClass();
	}
以上是SpringApplication默认的构造流程,也可以通过SpringApplicationBuilder来构造SpringApplication实例并自定义特性。这里先就探讨默认的启动方式。
由启动器SpringApplication的构造可以知道,在构造SpringApplication实例后,在调用run方法之前,我们可以通过两种方式配置ApplicationContextInitializer(应用上下文初始化器)和ApplicationListener(应用监听器)
1, 在主启动类中直接添加,如上启动应用时操作
2, 在META-INF/spring.factories文件中进行配置
在SpringApplication实例构造之后,就可以调用run方法来启动一个web应用了,源码如下:
	/**
	 * Run the Spring application, creating and refreshing a new
	 * {@link ApplicationContext}.
	 * @param args the application arguments (usually passed from a Java main method)
	 * @return a running {@link ApplicationContext}
	 */
	public ConfigurableApplicationContext run(String... args) {
	    //应用启动计时器,记录启动的时间,此处就是将系统现在的时间记录下来
		StopWatch stopWatch = new StopWatch();
		stopWatch.start();
		//应用上下文对象,最核心的就是这个对象,这个方法就是要初始化一个ConfigurableApplicationContext实例
		ConfigurableApplicationContext context = null;
		//异常处理
		Collection<SpringBootExceptionReporter> exceptionReporters = new ArrayList<>();
		//设置java.awt.headless=true
		configureHeadlessProperty();
		/**
		 * 读取META-INF/spring.factories配置的SpringApplicationRunListener接口的实现类的实例。
		 * 默认是现实是EventPublishingRunListener。主要作用是发布时间 publish {@link SpringApplicationEvent}s.
		 **/
		SpringApplicationRunListeners listeners = getRunListeners(args);
		listeners.starting();
		try {
		    //处理应用jar包是附加的参数处理,这里默认不加参数,args={}
			ApplicationArguments applicationArguments = new DefaultApplicationArguments(args);
			//初始化ConfigurableApplicationContext实例启动的环境对象,读取配置信息
			ConfigurableEnvironment environment = prepareEnvironment(listeners, applicationArguments);
			//设置spring.beaninfo.ignore=true
			configureIgnoreBeanInfo(environment);
			//打印Banner,可以打印文字,图片等。生成环境一般关闭此功能,将Banner.Mode=Banner.Mode.OFF
			Banner printedBanner = printBanner(environment);
			//创建应用上下文,根据上文中的webApplicationType来决定创建什么类型的ApplicationContext实例
			//此时webApplicationType=WebApplicationType.SERVLET,启动的是AnnotationConfigServletWebServerApplicationContext
			context = createApplicationContext();
			//获取META-INF/spring.factories下配置的SpringBootExceptionReporter子类的实例
			exceptionReporters = getSpringFactoriesInstances(SpringBootExceptionReporter.class,
					new Class[] { ConfigurableApplicationContext.class }, context);
			//准备初始化	AnnotationConfigServletWebServerApplicationContext,执行ApplicationContextInitializer等等
			//这个方法最终要是的创建AnnotationConfigServletWebServerApplicationContext的父容器AnnotationConfigApplicationContext
			prepareContext(context, environment, listeners, applicationArguments, printedBanner);
	        //刷新容器,这是最核心的方法。初始化bean一系列的操作都在这里面
			refreshContext(context);
			//目前版本,这个方法是空方法,预留的
			afterRefresh(context, applicationArguments);
			//容器初始化完毕,计时器停止
			stopWatch.stop();
			//如果允许打印启动信息(默认允许),就打印启动的时长
			if (this.logStartupInfo) {
				new StartupInfoLogger(this.mainApplicationClass).logStarted(getApplicationLog(), stopWatch);
			}
			//发版ApplicationStartedEvent事件。
			listeners.started(context);
			//执行自定义的ApplicationRunner 和 CommandLineRunner
			callRunners(context, applicationArguments);
		}
		catch (Throwable ex) {
			handleRunFailure(context, ex, exceptionReporters, listeners);
			throw new IllegalStateException(ex);
		}

		try {
		    //发布ApplicationReadyEvent事件
			listeners.running(context);
		}
		catch (Throwable ex) {
			handleRunFailure(context, ex, exceptionReporters, null);
			throw new IllegalStateException(ex);
		}
		//启动成功
		return context;
	}
以上大致分析了Spring Boot 应用以jar方式运行时的启动流程。下面章节将详细分析每一步的原理 。
- war方式启动
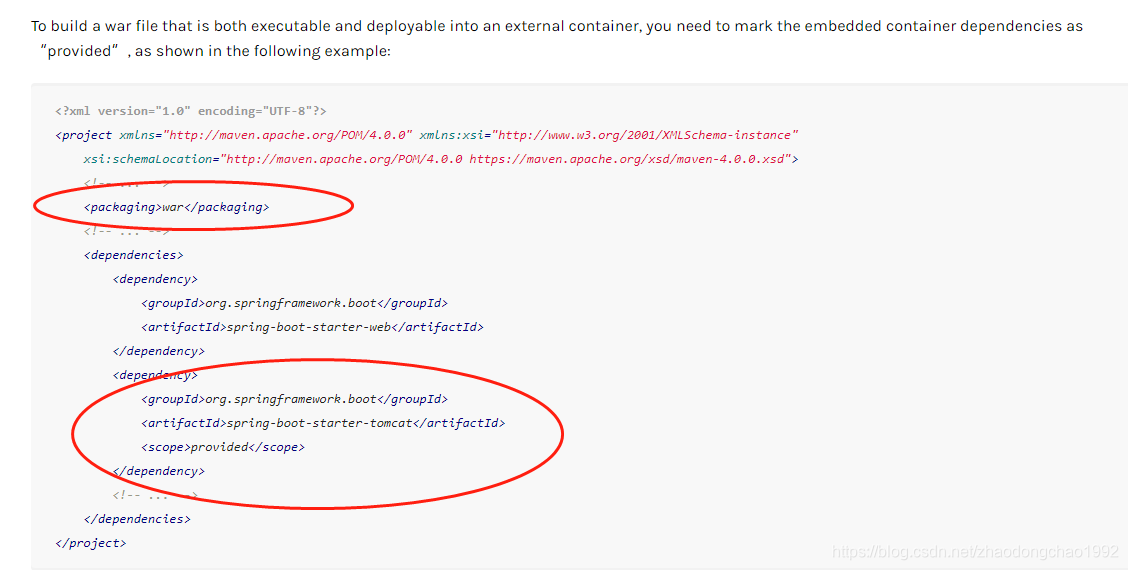
现在使用spring boot官方推荐使用jar启动,但是也支持war的方式启动。这时候需要在jar方式启动的基础上做如下改变:
- 将pom中打包方式设置为war
- 将spring-boot-starter-tomcat这个starter的scope改为provided
- 启动主类继承SpringBootServletInitializer ,并重写configure(SpringApplicationBuilder builder)方法,将启动主类设置进去
官方说明如下:
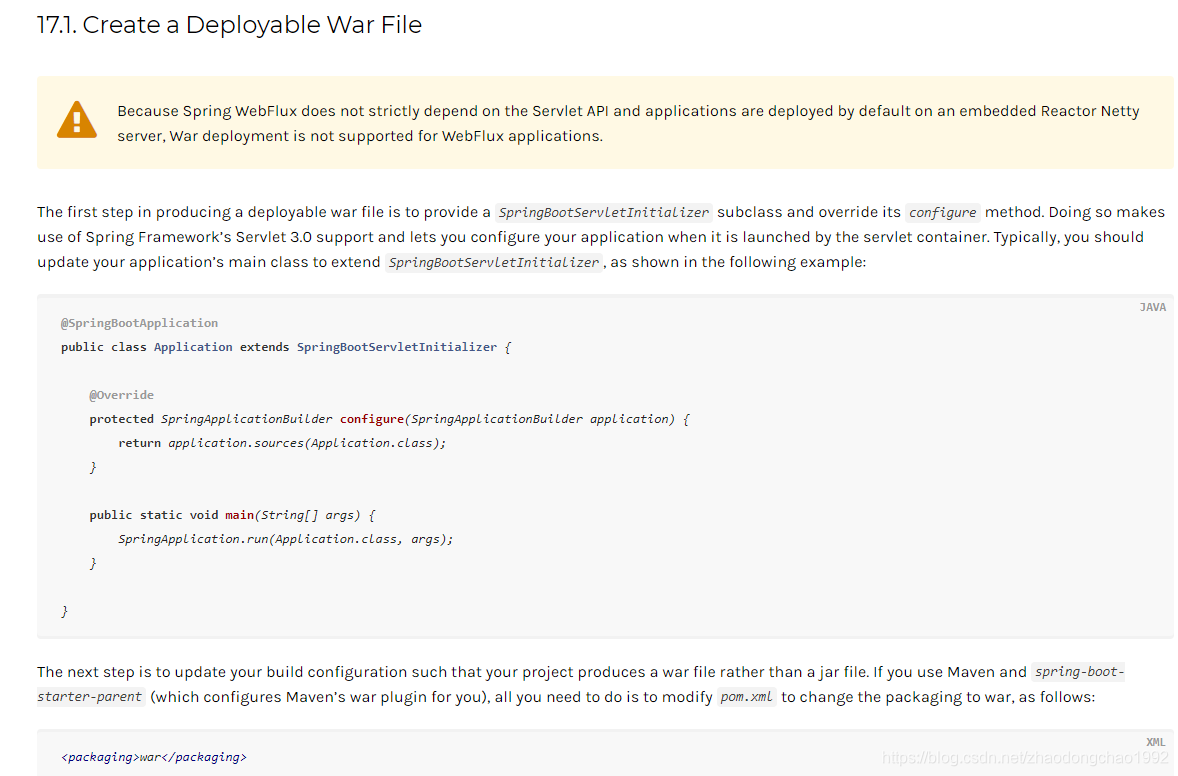
Spring Boot打War包部署官方文档
仔细阅读一下官方文档,然后还需要下载一个对应版本的Tomcat 。
Tomcat下载链接
这个时候就能将打好的war包,并在Tomcat容器中正常运行啦,无需任务xml配置 。
基于Servlet的Spring Boot应用的核心就是Servlet ,所以启动应用的核心就是启动spring容器和初始化Servlet 。spring MVC模式的核心就是前段控制器的DispatcherServlet,它就是一个Servlet,用来处理前端的请求。这里就不着重讲DispatcherServlet的工作原来,重点说明的DispatcherServlet在以war包形式部署时的启动过程!
在Servlet里核心元素是 Servlet ,filter ,listener 。 以前都是使用web.xml来配置, 在Servlet3.0之后,支持了注解形式。也就是从此以后可以使用纯Java的方式来配置Servlet(spring mvc 里面的DispatcherServlet)。
官方给出的方式如下:
public class MyWebApplicationInitializer implements WebApplicationInitializer {

    @Override
    public void onStartup(ServletContext servletCxt) {

        // Load Spring web application configuration
        AnnotationConfigWebApplicationContext ac = new AnnotationConfigWebApplicationContext();
        ac.register(AppConfig.class);
        ac.refresh();

        // Create and register the DispatcherServlet
        DispatcherServlet servlet = new DispatcherServlet(ac);
        ServletRegistration.Dynamic registration = servletCxt.addServlet("app", servlet);
        registration.setLoadOnStartup(1);
        registration.addMapping("/app/*");
    }
}
为什么在spring boot应用里面实现这个接口,在Tomcat启动的时候就能去自动执行呢,这就涉及到了SPI的思想。
在spring-web包的META-INF/services目录下定义了SPI的配置。如下:
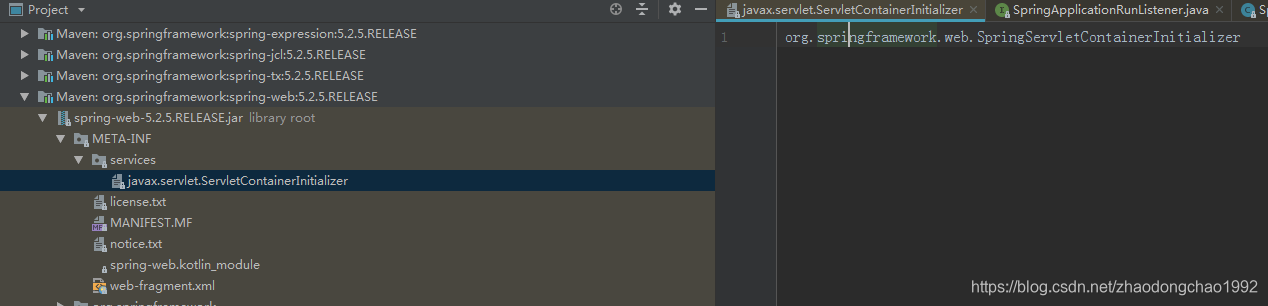
看一下SPI接口ServletContainerInitializer的源码:
/**
 * ServletContainerInitializers (SCIs) are registered via an entry in the
 * file META-INF/services/javax.servlet.ServletContainerInitializer that must be
 * included in the JAR file that contains the SCI implementation.
 * <p>
 * SCI processing is performed regardless of the setting of metadata-complete.
 * SCI processing can be controlled per JAR file via fragment ordering. If
 * absolute ordering is defined, then only the JARs included in the ordering
 * will be processed for SCIs. To disable SCI processing completely, an empty
 * absolute ordering may be defined.
 * <p>
 * SCIs register an interest in annotations (class, method or field) and/or
 * types via the {@link javax.servlet.annotation.HandlesTypes} annotation which
 * is added to the class.
 *
 * @since Servlet 3.0
 */
public interface ServletContainerInitializer {

    /**
     * Receives notification during startup of a web application of the classes
     * within the web application that matched the criteria defined via the
     * {@link javax.servlet.annotation.HandlesTypes} annotation.
     *
     * @param c     The (possibly null) set of classes that met the specified
     *              criteria
     * @param ctx   The ServletContext of the web application in which the
     *              classes were discovered
     *
     * @throws ServletException If an error occurs
     */
    void onStartup(Set<Class<?>> c, ServletContext ctx) throws ServletException;
}
可以看到这个SPI接口是从Servlet3.0才开始提供的,在web application启动时执行。
再看Spring web中是如何实现这个SPI接口的
@HandlesTypes(WebApplicationInitializer.class)
public class SpringServletContainerInitializer implements ServletContainerInitializer {

	@Override
	public void onStartup(@Nullable Set<Class<?>> webAppInitializerClasses, ServletContext servletContext)
			throws ServletException {
        //webAppInitializerClasses为WebApplicationInitializer接口的子类集合
		List<WebApplicationInitializer> initializers = new LinkedList<>();

		if (webAppInitializerClasses != null) {
			for (Class<?> waiClass : webAppInitializerClasses) {
				// Be defensive: Some servlet containers provide us with invalid classes,
				// no matter what @HandlesTypes says...
				//找到不是接口,不是抽象类,并且超类或者时候是父类是WebApplicationInitializer的class
				if (!waiClass.isInterface() && !Modifier.isAbstract(waiClass.getModifiers()) &&
						WebApplicationInitializer.class.isAssignableFrom(waiClass)) {
					try {
					    //实例化符合以上条件的class
						initializers.add((WebApplicationInitializer)
								ReflectionUtils.accessibleConstructor(waiClass).newInstance());
					}
					catch (Throwable ex) {
						throw new ServletException("Failed to instantiate WebApplicationInitializer class", ex);
					}
				}
			}
		}

		if (initializers.isEmpty()) {
			servletContext.log("No Spring WebApplicationInitializer types detected on classpath");
			return;
		}

		servletContext.log(initializers.size() + " Spring WebApplicationInitializers detected on classpath");
		//排序
		AnnotationAwareOrderComparator.sort(initializers);
		//最后调用所有WebApplicationInitializer的子类中的onStartup方法
		for (WebApplicationInitializer initializer : initializers) {
			initializer.onStartup(servletContext);
		}
	}

}
这个实现类就是的作用就是来取代原来的web.xml的。这里有几个点说明一下:
-
@HandlesTypes注解
This annotation is used to declare an array of application classes which are passed to a javax.servlet.ServletContainerInitializer
在ServletContainerInitializer接口定时已经有说明,用来标记onStartup中的第一个参数的class的类型的 ,也就是说,注解@HandlesTypes(WebApplicationInitializer.class)中WebApplicationInitializer接口的子类都会被作为参数传入到onStartup中的第一个参数中来。 -
WebApplicationInitializer接口
如果我们要定义自己的逻辑在Servlet容器启动时执行,就需要实现这个接口。正如上文所举例子中的MyWebApplicationInitializer类
在spring boot 的种的实现如下:

到此。以war包方式部署启动的核心原理就浮出水面了,其他的细节操作全部是围绕着这个特性来展开。由于精力和篇幅原因,其他技术细节将以后慢慢的列出来。
