马克吐温说,让你陷入困境的,并不是这个世界;真正让你陷入困境的,是这个世界最终并非你所想象。
简化MVC
到现在Spring MVC已经很普遍了,不过繁琐的配置还是让我们有时恨不得想要把它抛弃,现在微服务越发火热,但是并不是所用的团队都适用微服务,至于为什么,先留下思考。
传统的MVC模型,已经帮助我们解决了太多问题,然而,有些场景可能也不是很适合了,比如,移动互联网下的响应式触发场景。
就像过去我们总说面向过程的编程没有面向对象好,可java 8里提出的函数式编程,也是一种面向过程的编程,反而针对数据的处理更高效,还有现在翻身的Python,同样是面向过程。
而Spring Boot在某种程度上极大的优化了MVC的操作流程(至少不用繁琐的配置一大堆XML文件),下面我们就从一个简单的例子入手,来简化我们的web MVC编程。
Thymeleaf模板引擎
Spring Boot自带了很多模板引擎,包含有FreeMarker、Groovy、Thymeleaf、Velocity和Mustache,Spring Boot中官方推荐使用Thymeleaf作为模板引擎,我们也可以根据使用习惯和需要选择,原理都差不多。
Thymeleaf是一个Java类库,它是一个xml/xhtml/html5的模板引擎,主要作为MVC的Web应用的View层。
Thymeleaf还提供了额外的模块与Spring MVC集成,所以我们可以使用Thymeleaf完全替代JSP。
传统做法
view层与Spring MVC集成的传统做法一般有四步——
1.建立web项目
2.添加Thymeleaf依赖
3.用Thymeleaf的语法(比如,访问model数据,对数据进行迭代,数据判断等)写一个index.html
4.在Spring MVC中配置集成
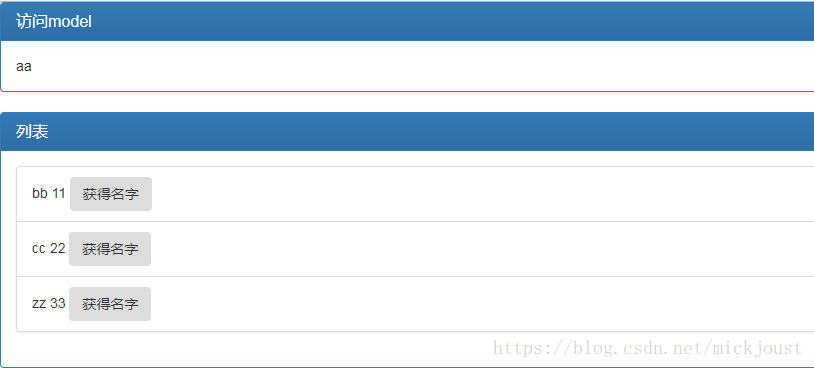
具体细节这里不再详细介绍,下面介绍Spring Boot的用法,先来看下最终效果图:
Spring Boot的Thymeleaf支持
Spring Boot通过org.springframework.boot.autoconfigure.thymeleaf包对Thymeleaf进行了自动配置,如图所示:
通过ThymeleafAutoConfiguration类对集成所需要的Bean进行自动配置,包括templateResolver、templateEngine和thymeleafViewResolver的配置。
通过ThymeleafProperties来配置Thymeleaf,在application.properties中,以spring.thymeleaf开头来配置,通过查看ThymeleafProperties的主要源码,我们可以看出如何设置属性以及默认配置:
spring.thymeleaf.xxxx=xxxxx
这里看下ThymeleafProperties的类定义,里面是我们可以设置的属性
实战
1.新建Spring Boot项目
可以参考boot-start来建立,如果使用我的demo代码,直接在主工程下添加一个maven工程即可。
2.添加Thymeleaf依赖
<dependency>
    <groupId>org.springframework.boot</groupId>
    <artifactId>spring-boot-starter-thymeleaf</artifactId>
</dependency>
选择Thymeleaf依赖,spring-boot-starter-thymeleaf会自动包含spring-boot-starter-web,如图7-3所示。
3.示例Bean
public class Man {

    private String name;
    private Integer phone;

    public Man() {
    }

    public String getName() {
        return name;
    }

    public void setName(String name) {
        this.name = name;
    }

    public Integer getPhone() {
        return phone;
    }

    public void setPhone(Integer phone) {
        this.phone = phone;
    }
}
此类是用来在模板页面展示数据用,包含name属性和phone属性:
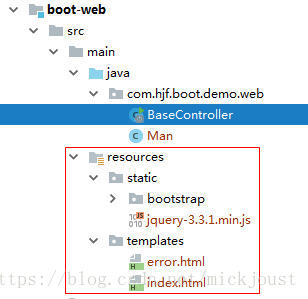
4.添加静态文件
据默认约定原则,脚本样式、图片等静态文件应放置在src/main/resources/static下,这里引入了Bootstrap和jQuery。
5.模板文件
页面放在src/main/resources/templates下。在src/main/resources/templates下新建index.html,如图所示
index.html代码如下:
<html xmlns:th="http://www.thymeleaf.org">
<head>
    <meta content="text/html;charset=UTF-8"/>
    <meta http-equiv="X-UA-Compatible" content="IE=edge"/>
    <meta name="viewport" content="width=device-width, initial-scale=1"/>
    <link th:href="@{bootstrap/css/bootstrap.min.css}" rel="stylesheet"/>
    <link th:href="@{bootstrap/css/bootstrap-theme.min.css}" rel="stylesheet"/>
</head>
<body>

<div class="panel panel-primary">
    <div class="panel-heading">
        <h3 class="panel-title">访问model</h3>
    </div>
    <div class="panel-body">
        <span th:text="${singleMan.name}"></span>
    </div>
</div>

<div th:if="${not #lists.isEmpty(mans)}">
    <div class="panel panel-primary">
        <div class="panel-heading">
            <h3 class="panel-title">列表</h3>
        </div>
        <div class="panel-body">
            <ul class="list-group">
                <li class="list-group-item" th:each="man:${mans}">
                    <span th:text="${man.name}"></span>
                    <span th:text="${man.phone}"></span>
                    <button class="btn" th:onclick="'getName(\'' + ${man.name} + '\');'">获得名字</button>
                </li>
            </ul>
        </div>
    </div>
</div>

<script th:src="@{jquery-3.3.1.min.js}" type="text/javascript"></script><!-- 2 -->
<script th:src="@{bootstrap/js/bootstrap.min.js}"></script><!-- 2 -->

<script th:inline="javascript">
    var single = [[${singleMan}]];
    console.log(single.name+"/"+single.phone)

    function getName(name){
        console.log(name);
    }
</script>

</body>
</html>
6.数据服务
BaseController 代码如下:
@Controller
@SpringBootApplication
public class BaseController {
    public static void main(String[] args) {
        SpringApplication.run(BaseController.class,args);
    }

    @RequestMapping(value = {"/","/index.html"})
    public String returnView(Model model){

        Man single = new Man("aa",11);

        List<Man> mans = new ArrayList<>();

        Man p1 = new Man("bb",11);
        Man p2 = new Man("cc",22);
        Man p3 = new Man("zz",33);
        mans.add(p1);
        mans.add(p2);
        mans.add(p3);

        model.addAttribute("singleMan", single);
        model.addAttribute("mans", mans);

        return "index";
    }
}
7.运行
访问http://localhost:8080,效果如前所示。
小结
本文用Spring Boot简化了MVC开发中的大量配置,主要介绍了Spring Boot中如何使用模板引擎的方法。
示例代码地址:boot-web
参考资源
1、Spring Boot
2、Thymeleaf官网:http://www.thymeleaf.org
3、BootStrap中文网:http://www.bootcss.com/
4、jQuery API 中文文档:https://www.jquery123.com/