Spring概述
Spring是什么
Spring 是分层的 Java SE/EE 应用 full-stack 轻量级开源框架,以
IoC(Inverse Of Control:反转控制)和AOP(Aspect Oriented Programming:面向切面编程)为内核,提供了展现层
Spring MVC 和持久层 Spring JDBC
以及业务层事务管理等众多的企业级应用技术,还能整合开源世界众多著名的第三方框架和类库,逐渐成为使用最多的 Java EE 企业应用开源框架。
优势
- 方便解耦,简化开发
通过 Spring 提供的 IoC 容器,可以将对象间的依赖关系交由 Spring 进行控制,避免硬编码所造成的过度程序耦合。用户也不必再为单例模式类、属性文件解析等这些很底层的需求编写代码,可以更专注于上层的应用。- AOP 编程的支持
通过 Spring 的 AOP 功能,方便进行面向切面的编程,许多不容易用传统 OOP 实现的功能可以通过 AOP 轻松应付。- 声明式事务的支持
可以将我们从单调烦闷的事务管理代码中解脱出来,通过声明式方式灵活的进行事务的管理,提高开发效率和质量。- 方便程序的测试
可以用非容器依赖的编程方式进行几乎所有的测试工作,测试不再是昂贵的操作,而是随手可做的事情。- 方便集成各种优秀框架
Spring 可以降低各种框架的使用难度,提供了对各种优秀框架(Struts、Hibernate、Hessian、Quartz等)的直接支持。- 降低 JavaEE API 的使用难度
Spring 对 JavaEE API(如 JDBC、JavaMail、远程调用等)进行了薄薄的封装层,使这些 API 的使用难度大为降低。
体系结构

程序间耦合
编译期依赖
创建一个maven工程,导入数据库的依赖,然后在数据库中新建一个account表:
create table account(
	id int primary key auto_increment,
	name varchar(40),
	money float
)character set utf8 collate utf8_general_ci;

insert into account(name,money) values('aaa',1000);
insert into account(name,money) values('bbb',1000);
insert into account(name,money) values('ccc',1000);
创建一个Jdbc测试类
public class JdbcDemo1 {

    public static void main(String[] args) throws Exception{
        //注册驱动
        DriverManager.registerDriver(new Driver());
        //获取连接
        Connection connection = DriverManager.getConnection("jdbc:mysql:///test?serverTimezone=UTC", "root", "sjh2019");
        //获取预处理对象
        PreparedStatement preparedStatement = connection.prepareStatement("select * from account");
        //得到结果集
        ResultSet resultSet = preparedStatement.executeQuery();
        //遍历结果集
        while(resultSet.next()){
            System.out.println(resultSet.getString("name"));
        }
        //释放资源
        resultSet.close();
        preparedStatement.close();
        connection.close();
    }
}
当把pom.xml的mysql依赖注释掉时,程序出现编译错误

- 程序的耦合:
程序间的依赖关系 包括类之间的依赖和方法间的依赖- 解耦:
降低程序间的依赖关系- 实际开发中应该做到:
编译期不依赖,运行时才依赖- 解耦的思路:
1 创建对象时使用反射,避免使用new关键字。 2 通过读取配置文件来获取要创建的对象全限定类名。
代码中存在的问题
创建maven工程,分别创建业务层和持久层的接口和实现类,以及模拟表现层的测试类。
//账户持久层接口
public interface IAccountDao {
void save();
}
//账户持久层实现类
public class AccountDaoImpl implements IAccountDao {
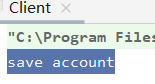
public void save() {
System.out.println("save account");
}
}
//业务层接口
public interface IAccountService {
//模拟保持账户
void save();
}
//账户的业务层实现类
public class AccountServiceImpl implements IAccountService {
private IAccountDao accountDao=new AccountDaoImpl();
public void save() {
accountDao.save();
}
}
//模拟表现层
public class Client {
public static void main(String[] args) {
IAccountService accountService=new AccountServiceImpl();
accountService.save();
}
}
工程结构

可以看到,这样的代码具有很高的耦合性(业务层实现类new了持久层实现类,测试类new了业务层实现类,依赖关系很强,代码不灵活)。
利用工厂模式解耦
创建一个工厂类
public class BeanFactory {

    private static Properties properties;
    //使用静态代码块赋值
    static {
        try {
            properties=new Properties();
            properties.load(BeanFactory.class.getClassLoader().getResourceAsStream("bean.properties"));
        } catch (IOException e) {
            throw new ExceptionInInitializerError("初始化失败");
        }
    }
    //根据bean名称获取bean对象
    public static Object getBean(String beanName){
        Object bean = null;
        try {
            String beanPath=properties.getProperty(beanName);
            bean=Class.forName(beanPath).newInstance();
        }catch (Exception e){
            e.printStackTrace();
        }
        return bean;
    }
}
创建配置文件
accountService=service.impl.AccountServiceImpl
accountDao=dao.impl.AccountDaoImpl
利用工厂创建对象取代new

//测试类中:
IAccountService accountService= (IAccountService) BeanFactory.getBean("accountService");
//业务层:
private IAccountDao accountDao= (IAccountDao) BeanFactory.getBean("accountDao");
优化工厂为单例模式
/**
    一个创建Bean对象的工厂
    bean在计算机英语中,有可重用组件的含义
    JavaBean(用Java语言编写的可重用组件),范围大于实体类
    创建service和dao对象:
    1. 需要一个配置文件配置service和dao 配置的内容:全限定类名 唯一标识(key value形式)
    2. 通过读取配置文件,反射创建对象
    配置文件可以是xml或properties
*/
public class BeanFactory {

    private static Properties properties;
    //创建一个容器存放要创建的对象
    private static Map<String,Object> beans;

    //使用静态代码块赋值
    static {
        try {
            properties=new Properties();
            properties.load(BeanFactory.class.getClassLoader().getResourceAsStream("bean.properties"));
            //实例化容器
            beans=new HashMap<>();
            //取出配置文件所有的key
            Enumeration keys = properties.keys();
            while (keys.hasMoreElements()){
                String key = keys.nextElement().toString();
                String beanPath = properties.getProperty(key);
                Object value = Class.forName(beanPath).newInstance();
                beans.put(key,value);
            }
        } catch (Exception e) {
            throw new ExceptionInInitializerError("初始化失败");
        }
    }
    //根据bean名称获取bean对象
    public static Object getBean(String beanName){
        return beans.get(beanName);
    }
}
Spring中的IOC
IOC的概念和作用
- 概念
控制反转把创建对象的权利交给框架,是框架的重要特征,并非面向对象编程的专用术语。它包括依赖注入DI和依赖查找。 - 作用
削减计算机程序的耦合。
使用IOC解决程序耦合(XML方式)
在pom.xml中添加spring依赖
		<dependency>
            <groupId>org.springframework</groupId>
            <artifactId>spring-context</artifactId>
            <version>5.1.5.RELEASE</version>
        </dependency>
在resources目录下创建bean.xml配置文件
<?xml version="1.0" encoding="UTF-8"?>
<beans xmlns="http://www.springframework.org/schema/beans"
       xmlns:xsi="http://www.w3.org/2001/XMLSchema-instance"
       xsi:schemaLocation="http://www.springframework.org/schema/beans
        http://www.springframework.org/schema/beans/spring-beans.xsd">
    <!--把对象的创建交给spring -->
    <bean id="accountService" class="service.impl.AccountServiceImpl"/>

    <bean id="accountDao" class="dao.impl.AccountDaoImpl"/>
</beans>
测试类
public class Client {

    //获取spring的IOC核心容器,并根据id获取对象
    public static void main(String[] args) {
        ApplicationContext applicationContext=new ClassPathXmlApplicationContext("bean.xml");
        IAccountService accountService= applicationContext.getBean("accountService",IAccountService.class);
        IAccountDao accountDao=applicationContext.getBean("accountDao",IAccountDao.class);
        System.out.println(accountService);
        System.out.println(accountDao);
    }
}
结果:

ApplicationContext 接口的实现类
- ClassPathXmlApplicationContext:
它是从类的根路径下加载配置文件 推荐使用这种 - FileSystemXmlApplicationContext:
它是从磁盘路径上加载配置文件,配置文件可以在磁盘的任意位置。 - AnnotationConfigApplicationContext:
当我们使用注解配置容器对象时,需要使用此类来创建 spring 容器。它用来读取注解。
BeanFactory 和 ApplicationContext 的区别
- BeanFactory 才是 Spring 容器中的顶层接口。
ApplicationContext 是它的子接口。 - 创建对象的时间点不一样。
ApplicationContext:只要一读取配置文件,默认情况下就会创建对象。(适用单例)
BeanFactory:什么使用什么时候创建对象。(适用多例)
三种创建bean对象的方式
环境准备,去掉dao包,修改service实现类
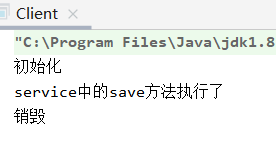
public class AccountServiceImpl implements IAccountService {

    //private IAccountDao accountDao= new AccountDaoImpl();

    public void save() {
        //accountDao.save();
        System.out.println("service中的save方法执行了");
    }

	public void init() {
        System.out.println("初始化");
    }

    public void destroy(){
        System.out.println("销毁");
    }
}
- 第一种方式:使用默认无参构造函数
   <!-- 使用默认构造函数创建 使用bean标签 配以id和class属性 且没有其他属性 如果类中没有默认构造函数会失败-->
    <bean id="accountService" class="service.impl.AccountServiceImpl"/>
- 第二种方式:spring 管理静态工厂-使用静态工厂的方法创建对象
public class Factory {

    public static IAccountService getAccountService(){
        return new AccountServiceImpl();
    }
}
    <!-- 使用静态工厂中的方法创建对象-->
    <bean id="accountService" class="factory.Factory" factory-method="getAccountService"/>
- 第三种方式:spring 管理实例工厂-使用实例工厂的方法创建对象
public class Factory {

    public IAccountService getAccountService(){
        return new AccountServiceImpl();
    }
}
    <!-- 使用普通工厂中的方法创建对象-->
    <bean id="factory" class="factory.Factory"/>
    <bean id="accountService" factory-bean="factory" factory-method="getAccountService"/>
bean的作用范围和生命周期
- scope:指定对象的作用范围。
- singleton :默认值,单例的.
- prototype :多例的.
- request :WEB 项目中,Spring 创建一个 Bean 的对象,将对象存入到 request 域中.
- session :WEB 项目中,Spring 创建一个 Bean 的对象,将对象存入到 session 域中.
- global session :WEB 项目中,应用在 Portlet 环境.如果没有 Portlet 环境那么 globalSession 相当于 session.
测试类
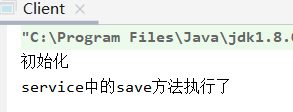
public static void main(String[] args) {
        ClassPathXmlApplicationContext applicationContext=new ClassPathXmlApplicationContext("bean.xml");
        IAccountService accountService= applicationContext.getBean("accountService",IAccountService.class);
        accountService.save();
        applicationContext.close();
    }
- 单例对象:scope=“singleton”
一个应用只有一个对象的实例。它的作用范围就是整个引用。
- 生命周期:
对象出生:当应用加载,创建容器时,对象就被创建了。
对象活着:只要容器在,对象一直活着。
对象死亡:当应用卸载,销毁容器时,对象就被销毁了。
配置
init-method:指定类中的初始化方法名称。
destroy-method:指定类中销毁方法名称。
<bean id="accountService" class="service.impl.AccountServiceImpl"
     scope="singleton" init-method="init" destroy-method="destroy"/>
结果
- 多例对象:scope=“prototype”
每次访问对象时,都会重新创建对象实例。
- 生命周期:
对象出生:当使用对象时,创建新的对象实例。
对象活着:只要对象在使用中,就一直活着。
对象死亡:当对象长时间不用时,被 java 的垃圾回收器回收了。
配置
<bean id="accountService" class="service.impl.AccountServiceImpl"
     scope="prototype" init-method="init" destroy-method="destroy"/>
结果
Spring的依赖注入
概念
- Dependency Injection,它是 spring 框架核心 ioc 的具体实现。
- 我们的程序在编写时,通过控制反转,把对象的创建交给了 spring,由spring来维护依赖关系,这种依赖关系的维护就叫做依赖注入。
- 简单的说,就是坐等框架把持久层对象传入业务层,而不用我们自己去获取。
能注入的数据
- 基本类型和String
- 其他bean类型(在配置文件或注解配置的bean)
- 复杂类型/集合类型
注入集合数据
- List 结构的:
array,list,set- Map 结构的:
map,entry,props,prop
注入的方式
- 使用构造函数
- 使用set方法
- 使用注解
使用构造函数注入
constructor-arg
属性:
- index:指定参数在构造函数参数列表的索引位置
- type:指定参数在构造函数中的数据类型
- name:指定参数在构造函数中的名称 用这个找给谁赋值
======= 上面三个都是找给谁赋值,下面两个指的是赋什么值的==============- value:它能赋的值是基本数据类型和 String 类型
- ref:它能赋的值是其他 bean 类型,也就是说,必须得是在配置文件中配置过的 bean
优点:
在获取bean对象时,注入数据是必需的,否则无法创建成功
缺点:
改变了bean对象的实例化方式,即使不使用某些对象也需要提供
业务层实现类
public class AccountServiceImpl implements IAccountService {

    private IAccountDao accountDao;

    public AccountServiceImpl(IAccountDao accountDao){
        this.accountDao=accountDao;
    }

    public void save() {
        accountDao.save();
    }

}
配置
<bean id="accountService" class="service.impl.AccountServiceImpl">
       <constructor-arg name="accountDao" ref="accountDao"/>
    </bean>


    <bean id="accountDao" class="dao.impl.AccountDaoImpl"/>
测试类
public static void main(String[] args) {
        ApplicationContext applicationContext=new ClassPathXmlApplicationContext("bean.xml");
        IAccountService accountService= applicationContext.getBean("accountService",IAccountService.class);
        accountService.save();
    }
结果
使用set方法注入(常用)
涉及的标签:
property
属性:
- name:找的是类中 set 方法后面的部分
- ref:给属性赋值是其他 bean 类型的
- value:给属性赋值是基本数据类型和 string 类型的
优点
创建对象时没有明确限制,可以直接使用默认构造函数
缺点
如果某个成员必须有值,则获取对象时可能set方法没有执行
业务层实现类
public class AccountServiceImpl implements IAccountService {

    private IAccountDao accountDao;

    public void setAccountDao(IAccountDao accountDao) {
        this.accountDao = accountDao;
    }

    public void save() {
        accountDao.save();
    }

}
配置
	<bean id="accountService" class="service.impl.AccountServiceImpl">
       <property name="accountDao" ref="accountDao"/>
    </bean>
测试类和结果不变
使用IOC解决程序耦合(注解方式)
常用注解和分类
- 用于创建对象的
相当于:<bean id="" class="" > @Component
作用:
把当前类对象存入spring容器中,相当于在 xml 中配置一个 bean。
属性:
value:指定 bean 的 id。如果不指定 value 属性,默认 bean 的 id 是当前类的类名,首字母小写。@Controller @Service @Repository
他们三个注解都是针对一个的衍生注解,他们的作用及属性都是一模一样的。
他们只不过是提供了更加明确的语义化。
@Controller:一般用于表现层的注解。
@Service:一般用于业务层的注解。
@Repository:一般用于持久层的注解。
细节:如果注解中有且只有一个属性要赋值时,且名称是 value,value 在赋值是可以不写。
- 用于注入数据的
相当于:<property name="" ref=""><property name="" value=""> @Autowired
作用:
自动按照类型注入。当使用注解注入属性时,set 方法可以省略。它只能注入其他 bean 类型。当有多个类型匹配时,使用要注入的对象变量名称作为 bean 的 id,在 spring 容器继续查找,找到了也可以注入成功。找不到就报错。@Qualifier
作用:
在自动按照类型注入的基础之上,再按照 Bean 的 id 注入。它在给字段注入时不能独立使用,必须和@Autowire一起使用;但是给方法参数注入时,可以独立使用。
属性:
value:指定 bean 的 id。@Resource
作用:
直接按照 Bean 的 id 注入。它也只能注入其他 bean 类型。
属性:
name:指定 bean 的 id。@Value
作用:
注入基本数据类型和 String 类型数据,可以使用spEL,写法:${表达式}
属性:
value:用于指定值
- 用于改变作用范围的:
相当于:<bean id="" class="" scope=""> @Scope
作用:
指定 bean 的作用范围。
属性:
value:指定范围的值。
取值:singletonprototyperequestsessionglobalsession
- 和生命周期相关的:(了解)
相当于:<bean id="" class="" init-method="" destroy-method="" /> @PostConstruct
作用:
用于指定初始化方法。@PreDestroy
作用:
用于指定销毁方法。
beanAnno.xml配置文件
<?xml version="1.0" encoding="UTF-8"?>
<beans xmlns="http://www.springframework.org/schema/beans"
       xmlns:xsi="http://www.w3.org/2001/XMLSchema-instance"
       xmlns:context="http://www.springframework.org/schema/context"
       xsi:schemaLocation="http://www.springframework.org/schema/beans
        http://www.springframework.org/schema/beans/spring-beans.xsd
        http://www.springframework.org/schema/context
        http://www.springframework.org/schema/context/spring-context.xsd">

    <!-- 告之spring创建容器时要扫描的包,配置所需要的标签不在beans约束中,在context名称空间和约束中 -->
    <context:component-scan base-package="service"/>
    <context:component-scan base-package="dao"/>
</beans>
dao接口实现类添加持久层注解
//账户持久层实现类
@Repository("accountDao")
public class AccountDaoImpl implements IAccountDao {

    public void save() {
        System.out.println("save account");
    }
}
service接口实现类添加业务层注解
@Service("accountService")
public class AccountServiceImpl implements IAccountService {

    @Autowired
    private IAccountDao accountDao;

    public void save() {
        accountDao.save();
    }
}
测试方法
public class Client {
    ApplicationContext applicationContext=new ClassPathXmlApplicationContext("beanAnno.xml");


    IAccountService accountService= (IAccountService) applicationContext.getBean("accountService");

    @Test
    public void test() {
        accountService.save();
    }
}
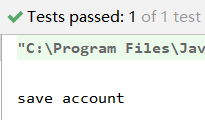
结果
基于XML的 IOC案例
pom.xml配置的依赖
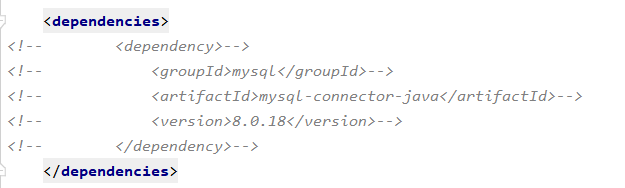
 <dependencies>
        <dependency>
            <groupId>mysql</groupId>
            <artifactId>mysql-connector-java</artifactId>
            <version>8.0.18</version>
        </dependency>

        <dependency>
            <groupId>org.springframework</groupId>
            <artifactId>spring-context</artifactId>
            <version>5.1.5.RELEASE</version>
        </dependency>

        <dependency>
            <groupId>commons-dbutils</groupId>
            <artifactId>commons-dbutils</artifactId>
            <version>1.4</version>
        </dependency>

        <dependency>
            <groupId>c3p0</groupId>
            <artifactId>c3p0</artifactId>
            <version>0.9.1.2</version>
        </dependency>

        <dependency>
            <groupId>junit</groupId>
            <artifactId>junit</artifactId>
            <version>4.12</version>
            <scope>compile</scope>
        </dependency>
    </dependencies>
业务层的接口和实现类
//业务层接口
public interface IAccountService {

    //查询所有
    List<Account> findAll();

    //查询一个
    Account findAccountById(Integer id);

    //保存
    void saveAccount(Account account);

    //更新
    void updateAccount(Account account);

    //删除
    void deleteAccount(Integer id);
}
//账户的业务层实现类
public class AccountServiceImpl implements IAccountService {

    private IAccountDao accountDao;

    public void setAccountDao(IAccountDao accountDao) {
        this.accountDao = accountDao;
    }

    public List<Account> findAll() {
        return accountDao.findAll();
    }

    public Account findAccountById(Integer id) {
        return accountDao.findAccountById(id);
    }

    public void saveAccount(Account account) {
        accountDao.saveAccount(account);
    }

    public void updateAccount(Account account) {
        accountDao.updateAccount(account);
    }

    public void deleteAccount(Integer id) {
        accountDao.deleteAccount(id);
    }
}
持久层的接口和实现类
//账户持久层接口
public interface IAccountDao {

    //查询所有
    List<Account> findAll();

    //查询一个
    Account findAccountById(Integer id);

    //保存
    void saveAccount(Account account);

    //更新
    void updateAccount(Account account);

    //删除
    void deleteAccount(Integer id);
}
//账户持久层实现类
public class AccountDaoImpl implements IAccountDao {

    private QueryRunner queryRunner;

    public void setQueryRunner(QueryRunner queryRunner) {
        this.queryRunner = queryRunner;
    }

    public List<Account> findAll() {
        try {
            return queryRunner.query("select * from account",new BeanListHandler<Account>(Account.class));
        } catch (SQLException e) {
            throw new RuntimeException(e);
        }
    }

    public Account findAccountById(Integer id) {
        try {
            return queryRunner.query("select * from account where id = ?",new BeanHandler<Account>(Account.class),id);
        } catch (SQLException e) {
            throw new RuntimeException(e);
        }
    }

   public void saveAccount(Account account) {
        try {
            queryRunner.update("insert into account(name,money) values (?,?)",account.getName(),account.getMoney());
        } catch (SQLException e) {
            throw new RuntimeException(e);
        }
    }

    public void updateAccount(Account account) {
        try {
             queryRunner.update("update account set name=?,money=? where id =?",account.getName(),account.getMoney(),account.getId());
        } catch (SQLException e) {
            throw new RuntimeException(e);
        }
    }

    public void deleteAccount(Integer id) {
        try {
            queryRunner.update("delete from account where id =?",id);
        } catch (SQLException e) {
            throw new RuntimeException(e);
        }
    }
}
在resources目录下创建bean.xml
<?xml version="1.0" encoding="UTF-8"?>
<beans xmlns="http://www.springframework.org/schema/beans"
       xmlns:xsi="http://www.w3.org/2001/XMLSchema-instance"
       xsi:schemaLocation="http://www.springframework.org/schema/beans
        http://www.springframework.org/schema/beans/spring-beans.xsd">

    <!--把对象的创建交给spring -->
    <bean id="accountService" class="service.impl.AccountServiceImpl">
        <!-- 注入dao对象 -->
       <property name="accountDao" ref="accountDao"/>
    </bean>

    <!-- 配置dao -->
    <bean id="accountDao" class="dao.impl.AccountDaoImpl">
        <!-- 注入queryrunner -->
        <property name="queryRunner" ref="query"/>
    </bean>

    <!-- 配置query runner 使用多例-->
    <bean id="query" class="org.apache.commons.dbutils.QueryRunner" scope="prototype">
        <!-- 注入数据源 -->
        <constructor-arg name="ds" ref="dataSource"/>
    </bean>

    <!-- 配置数据源 -->
    <bean id="dataSource" class="com.mchange.v2.c3p0.ComboPooledDataSource">
        <!-- 连接数据库的信息 -->
        <property name="driverClass" value="com.mysql.cj.jdbc.Driver"/>
        <property name="jdbcUrl" value="jdbc:mysql:///test?serverTimezone=UTC"/>
        <property name="user" value="root"/>
        <property name="password" value="sjh2019"/>
    </bean>

</beans>
测试类
public class AccountTest {
    private ApplicationContext ac=new ClassPathXmlApplicationContext("bean.xml");
    IAccountService accountService=ac.getBean("accountService",IAccountService.class);

    @Test
    public void findAll(){
        List<Account> accounts = accountService.findAll();
        accounts.forEach(System.out::println);
    }

    @Test
    public void findOne(){
        Account account = accountService.findAccountById(1);
        System.out.println(account);
    }

    @Test
    public void save(){
        Account account = new Account();
        account.setName("范闲");
        account.setMoney(5000f);
        accountService.saveAccount(account);
    }

    @Test
    public void update(){
        Account account = accountService.findAccountById(4);
        account.setMoney(2000f);
        accountService.updateAccount(account);
    }

    @Test
    public void delete(){
        accountService.deleteAccount(4);
    }
}
对自己写的类添加注解配置
给业务层实现类添加注解,并给dao对象添加注解,可去掉dao的set方法
@Service("accountService")
public class AccountServiceImpl implements IAccountService {

    @Resource(name = "accountDao")
    private IAccountDao accountDao;
给持久层实现类添加注解,并给query runner添加注解,并去掉其set方法
@Repository("accountDao")
public class AccountDaoImpl implements IAccountDao {

    @Resource(name = "query")
    private QueryRunner queryRunner;
beanAnno.xml的配置
<?xml version="1.0" encoding="UTF-8"?>
<beans xmlns="http://www.springframework.org/schema/beans"
       xmlns:xsi="http://www.w3.org/2001/XMLSchema-instance"
       xmlns:context="http://www.springframework.org/schema/context"
       xsi:schemaLocation="http://www.springframework.org/schema/beans
        http://www.springframework.org/schema/beans/spring-beans.xsd
        http://www.springframework.org/schema/context
        http://www.springframework.org/schema/context/spring-context.xsd">

    <!-- 告之spring创建容器时要扫描的包,配置所需要的标签不在beans约束中,在context名称空间和约束中 -->
    <context:component-scan base-package="service"/>
    <context:component-scan base-package="dao"/>

    <!-- 配置query runner 使用多例-->
    <bean id="query" class="org.apache.commons.dbutils.QueryRunner" scope="prototype">
        <!-- 注入数据源 -->
        <constructor-arg name="ds" ref="dataSource"/>
    </bean>

    <!-- 配置数据源 -->
    <bean id="dataSource" class="com.mchange.v2.c3p0.ComboPooledDataSource">
        <!-- 连接数据库的信息 -->
        <property name="driverClass" value="com.mysql.cj.jdbc.Driver"/>
        <property name="jdbcUrl" value="jdbc:mysql:///test?serverTimezone=UTC"/>
        <property name="user" value="root"/>
        <property name="password" value="sjh2019"/>
    </bean>
</beans>
纯注解配置
我们发现,之所以我们现在离不开 xml 配置文件,是因为我们有一句很关键的配置:
<!-- 告知spring框架在,读取配置文件,创建容器时,扫描注解,依据注解创建对象,并存入容器中 -->
 <context:component-scan base-package="com.itheima"></context:component-scan>
如果他要也能用注解配置,那么我们就离脱离 xml 文件又进了一步。
另外,数据源和 JdbcTemplate 的配置也需要靠注解来实现。
@Configuration
作用:
用于指定当前类是一个 spring 配置类,当创建容器时会从该类上加载注解。获取容器时需要使用AnnotationApplicationContext(有@Configuration 注解的类.class),类作为参数传递时可不加。
属性:
value:用于指定配置类的字节码@ComponentScan
作用:
用于指定 spring 在初始化容器时要扫描的包。作用和在 spring 的 xml 配置文件中的:
<context:component-scan base-package=“com.itheima”/>是一样的。
属性:
basePackages:用于指定要扫描的包。和该注解中的 value 属性作用一样。@Bean
作用:
该注解只能写在方法上,表明使用此方法创建一个对象,并且放入 spring 容器。
属性:
name:给当前@Bean 注解方法创建的对象指定一个名称(即 bean 的 id)。
细节:
当我们使用注解配置方法时,如果方法有参数,spring会去容器查找是否有可用bean对象,查找方式和auto wired一样
创建一个SpringConfig类,并添加相应注解
@Configuration
@ComponentScan(basePackages = {"dao","service"})
public class SpringConfig {

    //创建一个queryRunner
    @Bean("query")@Scope("prototype")
    public QueryRunner createQueryRunner(DataSource dataSource){
        return new QueryRunner(dataSource);
    }

    //创建数据源对象
    @Bean("dataSource")
    public DataSource createDataSource(){
        try{
            ComboPooledDataSource dataSource = new ComboPooledDataSource();
            dataSource.setDriverClass("com.mysql.cj.jdbc.Driver");
            dataSource.setJdbcUrl("jdbc:mysql:///test?serverTimezone=UTC");
            dataSource.setUser("root");
            dataSource.setPassword("sjh2019");
            return dataSource;
        }catch (Exception e){
            throw new RuntimeException();
        }
    }
}
测试类
public class AccountTest {
    private ApplicationContext ac=new AnnotationConfigApplicationContext(SpringConfig.class);
    IAccountService accountService=ac.getBean("accountService",IAccountService.class);

//...其余测试方法代码不变
@PropertySource- 用于加载.properties 文件中的配置。例如我们配置数据源时,可以把连接数据库的信息写到properties 配置文件中,就可以使用此注解指定 properties 配置文件的位置。
属性:
value[]:用于指定 properties 文件位置。如果是在类路径下,需要写上classpath:
@Import
作用:
用于导入其他配置类,在引入其他配置类时,可以不用再写@Configuration 注解。当然写上也没问题。有import的是父配置类,引入的是子配置类。
属性:
value[]:用于指定其他配置类的字节码。
创建一个JdbcConfig类
@Configuration
public class JdbcConfig {
    @Value("${driver}")
    private String driver;
    @Value("${url}")
    private String url;
    @Value("${user}")
    private String user;
    @Value("${password}")
    private String password;

    //创建一个queryRunner
    @Bean("query")@Scope("prototype")
    public QueryRunner createQueryRunner(DataSource dataSource){
        return new QueryRunner(dataSource);
    }

    //创建数据源对象
    @Bean("dataSource")
    public DataSource createDataSource(){
        try{
            ComboPooledDataSource dataSource = new ComboPooledDataSource();
            dataSource.setDriverClass(driver);
            dataSource.setJdbcUrl(url);
            dataSource.setUser(user);
            dataSource.setPassword(password);
            return dataSource;
        }catch (Exception e){
            throw new RuntimeException();
        }
    }
}
创建一个jdbc.propertis配置文件
driver=com.mysql.cj.jdbc.Driver
url=jdbc:mysql:///test?serverTimezone=UTC
user=root
password=sjh2019
优化SpringConfig主配置
@ComponentScan(basePackages = {"dao","service"})
@Import(JdbcConfig.class)
@PropertySource("classpath:jdbc.properties")
public class SpringConfig {

}
测试类
public class AccountTest {
    private ApplicationContext ac=new AnnotationConfigApplicationContext(SpringConfig.class);
    IAccountService accountService=ac.getBean("accountService",IAccountService.class);

    @Test
    public void findAll(){
        List<Account> accounts = accountService.findAll();
        accounts.forEach(System.out::println);
    }
    //。。。。跟前面相同 省略
Spring整合junit
问题
在测试类中,每个测试方法都有以下两行代码:
ApplicationContext ac = new ClassPathXmlApplicationContext("bean.xml");
IAccountService as = ac.getBean("accountService",IAccountService.class);
这两行代码的作用是获取容器,如果不写的话,直接会提示空指针异常。所以又不能轻易删掉。
步骤
- 在pom.xml中导入依赖
		<dependency>
            <groupId>org.springframework</groupId>
            <artifactId>spring-test</artifactId>
            <version>5.0.2.RELEASE</version>
        </dependency>
-
使用
@RunWith注解替换原有运行器 -
使用
@ContextConfiguration指定 spring 配置文件的位置
locations 属性:用于指定配置文件的位置。如果是类路径下,需要用 classpath:表明
classes 属性:用于指定注解的类。当不使用 xml 配置时,需要用此属性指定注解类的位置。 -
使用
@Autowired给测试类中的变量注入数据
@RunWith(SpringJUnit4ClassRunner.class)
@ContextConfiguration(classes = {SpringConfig.class})
public class AccountTest {

    @Autowired
    IAccountService accountService;
	//。。。省略
