上一篇学习了StateMachine原理,在此基础上,继续分析系统Wifi相关服务的开启流程,以及wifi的打开流程,下面开始
Wifi相关服务的启动
我们都知道每次系统开机以后,默认wifi相关的功能都可以使用了,那么肯定有在系统启动的时候,有启动wifi相关的服务,是在SystemServer中启动的,如下:
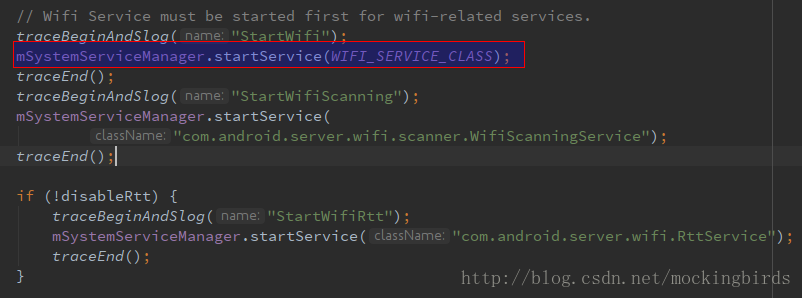
以上,WIFI_SERVICE_CLASS是WifiService的全类名
private static final String WIFI_SERVICE_CLASS =
            "com.android.server.wifi.WifiService";
通过反射启动WifiService并且通过Binder通信和WifiServiceImpl绑定,如下:
WifiService一览
public final class WifiService extends SystemService {

    private static final String TAG = "WifiService";
    final WifiServiceImpl mImpl;

    public WifiService(Context context) {
        super(context);
        mImpl = new WifiServiceImpl(context, new WifiInjector(context), new WifiAsyncChannel(TAG));
    }

    @Override
    public void onStart() {
        Log.i(TAG, "Registering " + Context.WIFI_SERVICE);
        publishBinderService(Context.WIFI_SERVICE, mImpl);
    }

    @Override
    public void onBootPhase(int phase) {
        if (phase == SystemService.PHASE_SYSTEM_SERVICES_READY) {
            mImpl.checkAndStartWifi();
        }
    }

    @Override
    public void onSwitchUser(int userId) {
        mImpl.handleUserSwitch(userId);
    }

    @Override
    public void onUnlockUser(int userId) {
        mImpl.handleUserUnlock(userId);
    }

    @Override
    public void onStopUser(int userId) {
        mImpl.handleUserStop(userId);
    }
}
WifiService重写的SystemService方法,真正实现是在WifiServiceImpl中的,上面有两行比较重要
- mImpl = new WifiServiceImpl(context, new WifiInjector(context), new WifiAsyncChannel(TAG));
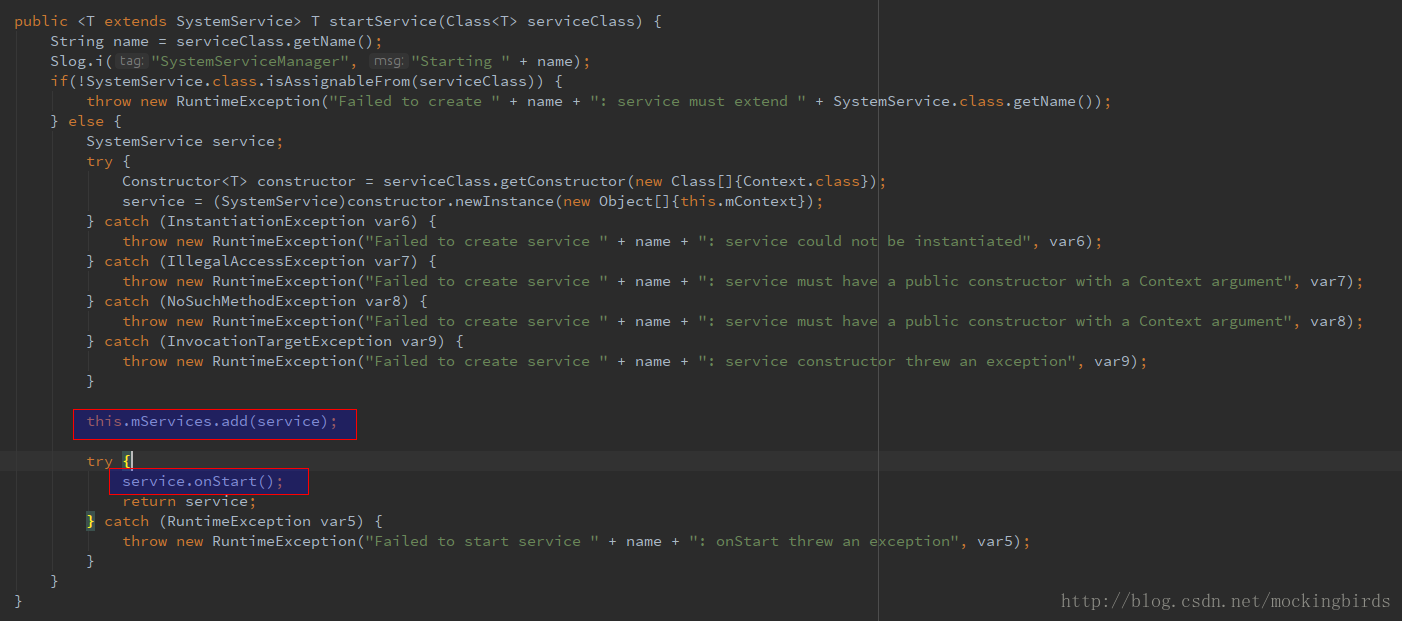
创建WifiServiceImpl实现类,并且创建了WifiInjector,WifiInjector中包含了WifiStateMachine,WifiController,WifiNative等重要属性的初始化工作 - publishBinderService(Context.WIFI_SERVICE, mImpl);
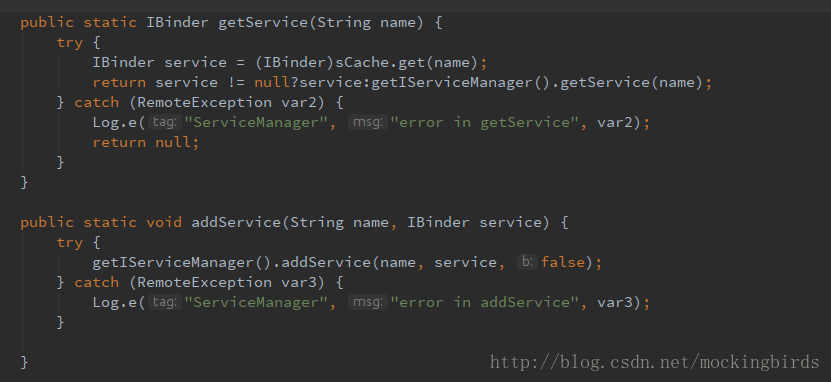
publishBinderService函数是SystemService中的函数,最后是调用了ServiceManager.addService
到此为止,wifi相关服务就已经启动完成了,并且知道了WifiService的实现其实就是WifiServiceImpl
上面在创建WifiStateMachine对象的时候,在WifiStateMachine的构造方法中初始化了状态树,并设置了初始状态
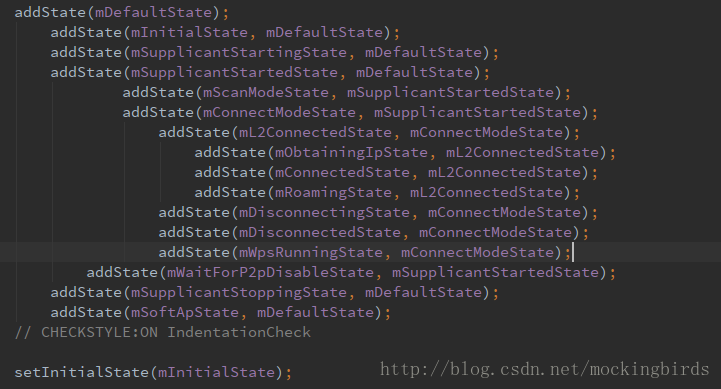
WifiStateMachine中的状态树
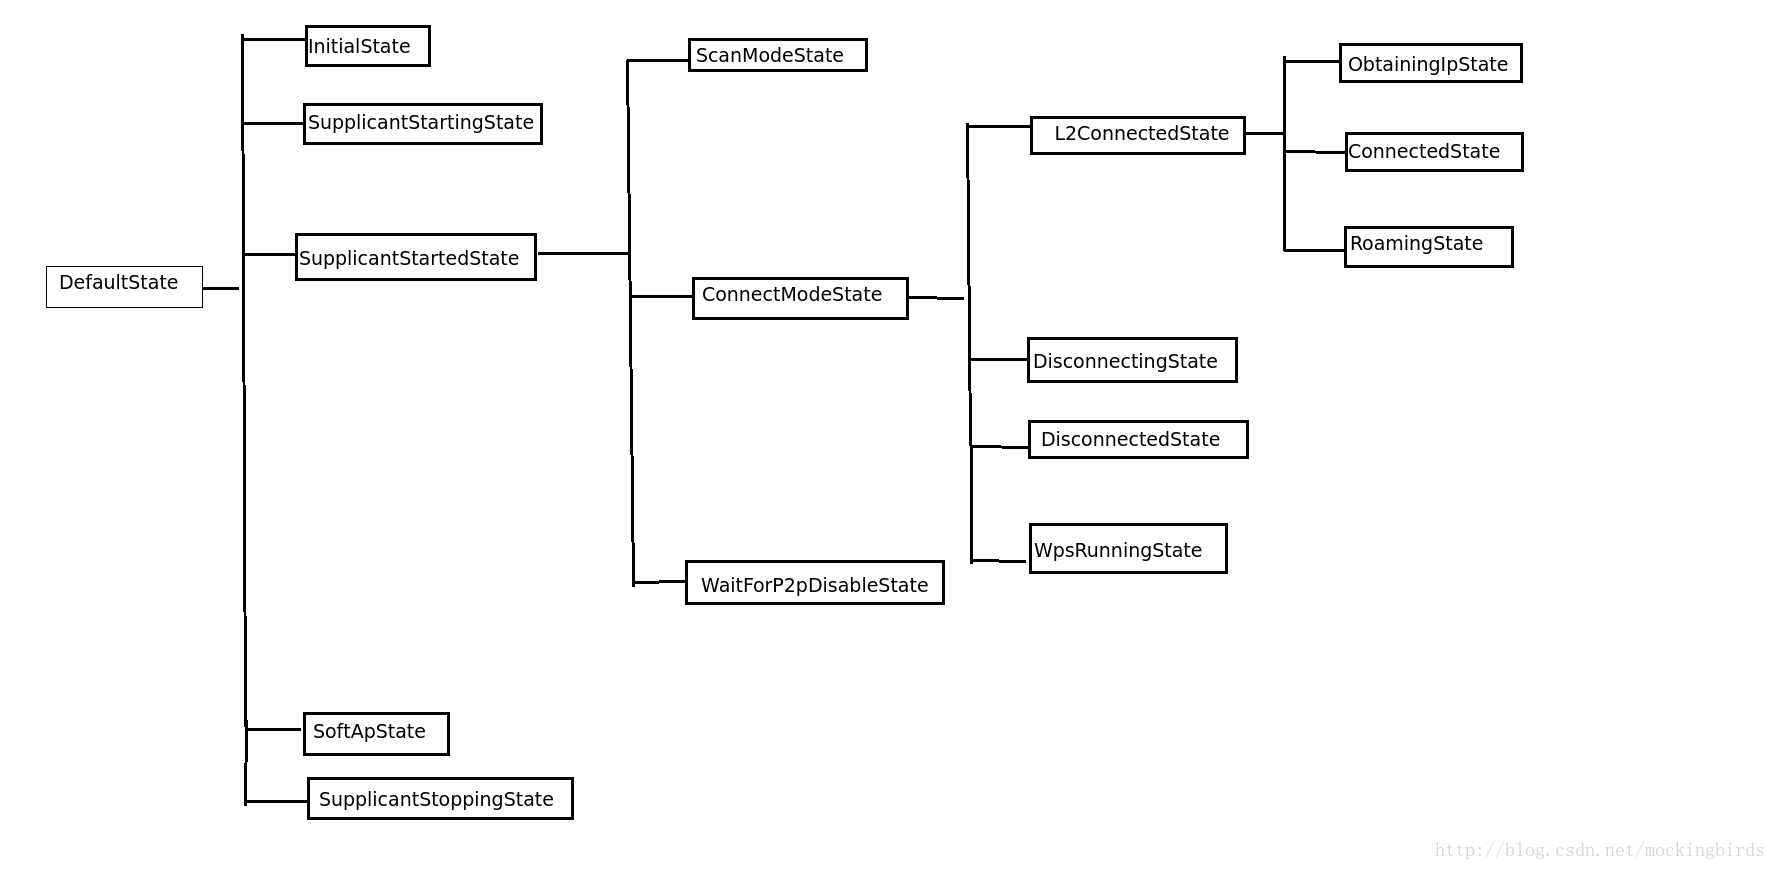
另外在创建WifiController时候,也构建了WifiController自己维护的一个状态树,如下:
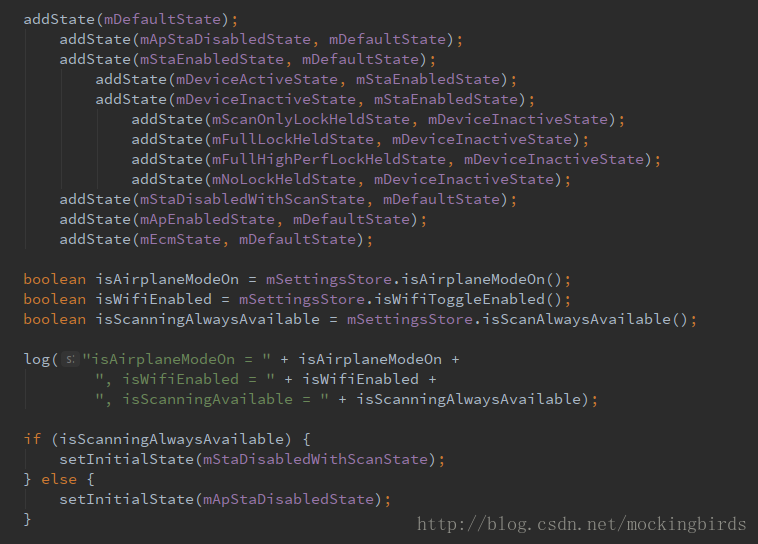

可以看到上面设定初始状态,是根据一个属性isScanningAlwaysAvailable 来决定的,其实就是判断SettingProvider中存储的值,这里按照常规配置,ApStaDisabledState作为初始状态来分析
private boolean getPersistedScanAlwaysAvailable() {
        return Global.getInt(this.mContext.getContentResolver(), "wifi_scan_always_enabled", 0) == 1;
    }
Wifi的打开流程
基于以上分析,下面来看Wifi的打开流程,三方应用打开或者关闭wifi,是通过调用系统提供的API,如下:
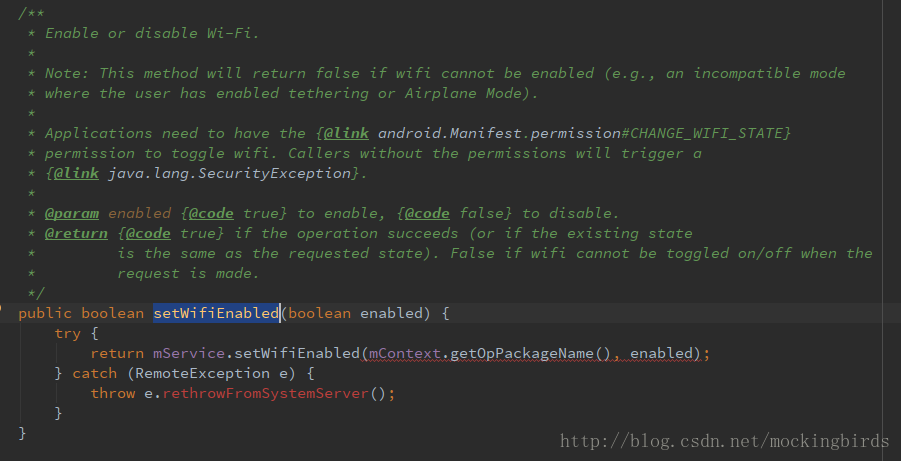
可以看到,这里其实是直接调用mService的方法,mService其实就是WifiServiceImpl的实例对象
系统服务都是在SystemServiceRegistry的static静态代码块中进行注册的
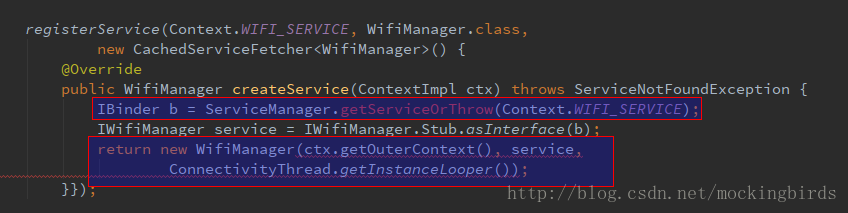
上面已经分析,SystemServer启动系统服务的时候,会将每个服务的服务端实现类通过ServiceManager.addService 来让ServiceManager接管管理,这里也可以说明我们通过ServiceManager.getServiceOrThrow获取的到的服务,就正是在publishBinderService中最终添加的WifiServiceImpl
WifiServiceImpl#setWifiEnabled
@Override
public synchronized boolean setWifiEnabled(String packageName, boolean enable)
            throws RemoteException {

    ....
    // 权限检查热点打开检测等
    mWifiController.sendMessage(CMD_WIFI_TOGGLED);
    return true;

}
WifiController也是继承自StateMachine,并且从上面分析,已经知道WifiController的初始状态为ApStaDisabledState,所以这里发送的CMD_WIFI_TOGGLED消息,由ApStaDisabledState状态来处理
ApStaDisabledState
标记1
下面只看ApStaDisabledState处理CMD_WIFI_TOGGLED消息
@Override
public void enter() {
            mWifiStateMachine.setSupplicantRunning(false);
            mDisabledTimestamp = SystemClock.elapsedRealtime();
            mDeferredEnableSerialNumber++;
}

@Override
        public boolean processMessage(Message msg) {
            switch (msg.what) {
                case CMD_WIFI_TOGGLED:
                case CMD_AIRPLANE_TOGGLED:
                    if (mSettingsStore.isWifiToggleEnabled()) { // 若500毫秒内重复打开或者关闭wifi不做处理
                        if (doDeferEnable(msg)) {
                            if (mHaveDeferredEnable) {
                                //  have 2 toggles now, inc serial number an ignore both
                                mDeferredEnableSerialNumber++;
                            }
                            mHaveDeferredEnable = !mHaveDeferredEnable;
                            break;
                        }
                        if (mDeviceIdle == false) {
                            // wifi is toggled, we need to explicitly tell WifiStateMachine that we
                            // are headed to connect mode before going to the DeviceActiveState
                            // since that will start supplicant and WifiStateMachine may not know
                            // what state to head to (it might go to scan mode).
                            // 设置CONNECT_MODE,将会开启supplicant
                            mWifiStateMachine.setOperationalMode(WifiStateMachine.CONNECT_MODE);
                            transitionTo(mDeviceActiveState);
                        } else {
                            checkLocksAndTransitionWhenDeviceIdle();
                        }
                    } else if (mSettingsStore.isScanAlwaysAvailable()) {
                        transitionTo(mStaDisabledWithScanState);
                    }
                    break;
    ....
上面主要做了如下三个操作:
- 若500毫秒内重复打开或者关闭wifi不做处理
- 通过设置setOperationalMode将会在WifiStateMachine中将状态切换到SupplicantStartedState,并且开启supplicant
- 将当前WifiController中的ApStaDisabledState状态转换到DeviceActiveState
WifiStateMachine#setOperationalMode
public void setOperationalMode(int mode) {
        if (mVerboseLoggingEnabled) log("setting operational mode to " + String.valueOf(mode));
        sendMessage(CMD_SET_OPERATIONAL_MODE, mode, 0);
}
由于WifiStateMachine的初始状态是InitialState,所以CMD_SET_OPERATIONAL_MODE消息也是由InitialState处理的
InitialState#processMessage
@Override
public boolean processMessage(Message message) {
    ....
    case CMD_START_SUPPLICANT:
        ....
        if (!mWifiNative.enableSupplicant()) {  // 开启supplicant
                        loge("Failed to start supplicant!");
                        setWifiState(WifiManager.WIFI_STATE_UNKNOWN);
                        cleanup();
                        break;
         }
         // 和supplicant建立通信,接受分发supplicant上报的消息
         mWifiMonitor.startMonitoring(mInterfaceName, true);
         transitionTo(mSupplicantStartingState);
         break;
    case CMD_SET_OPERATIONAL_MODE:
                    mOperationalMode = message.arg1;// mOperationalMode = CONNECT_MODE
                    if (mOperationalMode != DISABLED_MODE) {
                        sendMessage(CMD_START_SUPPLICANT);
                    }
                    break;
     ....
}
上面对于CMD_SET_OPERATIONAL_MODE消息,直接发送CMD_START_SUPPLICANT,当前InitialState状态可以处理该消息,主要做了下面事情:
- 开启supplicant
- WifiMonitor和supplicant建立通信,接受分发supplicant上报的消息
- 切换状态到SupplicantStartingState
WifiMonitor#startMonitoring
/**
     * Start Monitoring for wpa_supplicant events.
     *
     * @param iface Name of iface.
     * TODO: Add unit tests for these once we remove the legacy code.
     */
    public synchronized void startMonitoring(String iface, boolean isStaIface) {
        // 这里的iface默认是"wlan0", SystemProperties.get("wifi.interface", "wlan0")
        if (ensureConnectedLocked()) {
            setMonitoring(iface, true);  // 启动supplicant
            broadcastSupplicantConnectionEvent(iface);  // 启动完成supplicant以后,发送 SUP_CONNECTION_EVENT消息
        } else {
            boolean originalMonitoring = isMonitoring(iface);
            setMonitoring(iface, true);
            broadcastSupplicantDisconnectionEvent(iface);
            setMonitoring(iface, originalMonitoring);
        }
    }


/**
     * Wait for wpa_supplicant's control interface to be ready.
     *
     * TODO: Add unit tests for these once we remove the legacy code.
     */
    private boolean ensureConnectedLocked() {
        if (mConnected) {
            return true;
        }
        if (mVerboseLoggingEnabled) Log.d(TAG, "connecting to supplicant");
        int connectTries = 0;
        while (true) {
            mConnected = mWifiInjector.getWifiNative().connectToSupplicant();
            if (mConnected) {
                return true;
            }
            if (connectTries++ < 50) { // 若启动不成功,每间隔100毫秒重新尝试
                try {
                    Thread.sleep(100);
                } catch (InterruptedException ignore) {
                }
            } else {
                return false;
            }
        }
    }
当InitialState状态CMD_START_SUPPLICANT消息处理完成以后,就会切换到SupplicantStartingState状态,此时supplicant开启以后,会上报消息给WifiMonitor,WifiMonitor会通过broadcastSupplicantConnectionEvent发送到WifiStateMachine状态机,由当前状态SupplicantStartingState处理
 /**
     * Broadcast the connection to wpa_supplicant event to all the handlers registered for
     * this event.
     *
     * @param iface Name of iface on which this occurred.
     */
    public void broadcastSupplicantConnectionEvent(String iface) {
        sendMessage(iface, SUP_CONNECTION_EVENT);
    }
这里的消息发送到哪里了呢,就是每个注册过该消息的handler,之前我们已经看到过,在WifiStateMachine的构造方法中,会构造当前的状态树,其实还会注册很多消息,这样就可以接收到来自WifiMonitor发送的消息了
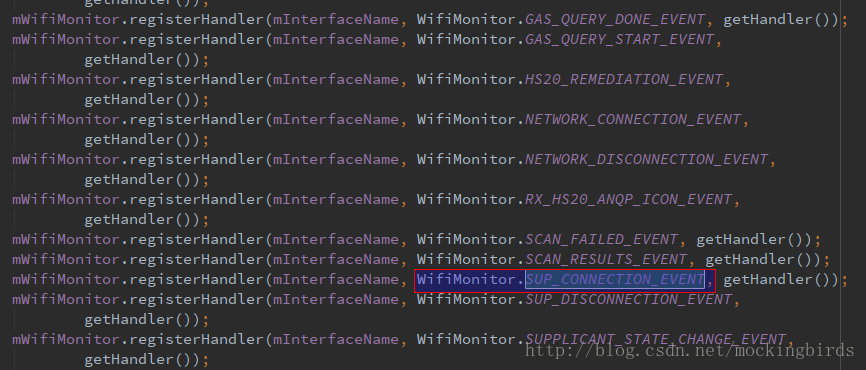
当前WifiStateMachine状态机所处的状态是SupplicantStartingState,所以SUP_CONNECTION_EVENT消息由它处理
class SupplicantStartingState extends State {
        private void initializeWpsDetails() {
            String detail;
            detail = mPropertyService.get("ro.product.name", "");
            if (!mWifiNative.setDeviceName(detail)) {
                loge("Failed to set device name " +  detail);
            }
            detail = mPropertyService.get("ro.product.manufacturer", "");
            if (!mWifiNative.setManufacturer(detail)) {
                loge("Failed to set manufacturer " + detail);
            }
            detail = mPropertyService.get("ro.product.model", "");
            if (!mWifiNative.setModelName(detail)) {
                loge("Failed to set model name " + detail);
            }
            detail = mPropertyService.get("ro.product.model", "");
            if (!mWifiNative.setModelNumber(detail)) {
                loge("Failed to set model number " + detail);
            }
            detail = mPropertyService.get("ro.serialno", "");
            if (!mWifiNative.setSerialNumber(detail)) {
                loge("Failed to set serial number " + detail);
            }
            if (!mWifiNative.setConfigMethods("physical_display virtual_push_button")) {
                loge("Failed to set WPS config methods");
            }
            if (!mWifiNative.setDeviceType(mPrimaryDeviceType)) {
                loge("Failed to set primary device type " + mPrimaryDeviceType);
            }
        }

        @Override
        public boolean processMessage(Message message) {
            logStateAndMessage(message, this);

            switch(message.what) {
                case WifiMonitor.SUP_CONNECTION_EVENT:
                    if (mVerboseLoggingEnabled) log("Supplicant connection established");

                    mSupplicantRestartCount = 0;
                    /* Reset the supplicant state to indicate the supplicant
                     * state is not known at this time */
                    mSupplicantStateTracker.sendMessage(CMD_RESET_SUPPLICANT_STATE);
                    /* Initialize data structures */
                    mLastBssid = null;
                    mLastNetworkId = WifiConfiguration.INVALID_NETWORK_ID;
                    mLastSignalLevel = -1;

                    mWifiInfo.setMacAddress(mWifiNative.getMacAddress());
                    initializeWpsDetails(); // 设置当前配置的设备基本信息
                    // 发送一个SUPPLICANT_CONNECTION_CHANGE_ACTION广播
                    sendSupplicantConnectionChangedBroadcast(true);
                    // 切换到SupplicantStartedState状态
                    transitionTo(mSupplicantStartedState);
                    break;
              ....
       }

}
上面最终切换到SupplicantStartedState,上面的分析已经知道当前的mOperationalMode是CONNECT_MODE
class SupplicantStartedState extends State {
        @Override
        public void enter() {
           ....
           // initialize network state
            setNetworkDetailedState(DetailedState.DISCONNECTED);

            if (mOperationalMode == SCAN_ONLY_MODE ||
                    mOperationalMode == SCAN_ONLY_WITH_WIFI_OFF_MODE) {
                mWifiNative.disconnect();
                setWifiState(WIFI_STATE_DISABLED);
                transitionTo(mScanModeState);
            } else if (mOperationalMode == CONNECT_MODE) { // 上面的分析在标记1处知道,当前mOperationalMode == CONNECT_MODE
                setWifiState(WIFI_STATE_ENABLING); // 设置当前wifi状态为WIFI_STATE_ENABLING,此时会发送一个WIFI_STATE_CHANGED_ACTION广播
                // Transitioning to Disconnected state will trigger a scan and subsequently AutoJoin
                transitionTo(mDisconnectedState);
            } else if (mOperationalMode == DISABLED_MODE) {
                transitionTo(mSupplicantStoppingState);
            }


            if (mP2pSupported) {  // 发送CMD_ENABLE_P2P消息,启动p2p相关功能
                if (mOperationalMode == CONNECT_MODE) {
                    p2pSendMessage(WifiStateMachine.CMD_ENABLE_P2P);
                } else {
                    // P2P state machine starts in disabled state, and is not enabled until
                    // CMD_ENABLE_P2P is sent from here; so, nothing needs to be done to
                    // keep it disabled.
                }
            }

            final Intent intent = new Intent(WifiManager.WIFI_SCAN_AVAILABLE);
            intent.addFlags(Intent.FLAG_RECEIVER_REGISTERED_ONLY_BEFORE_BOOT);
            intent.putExtra(WifiManager.EXTRA_SCAN_AVAILABLE, WIFI_STATE_ENABLED);
            mContext.sendStickyBroadcastAsUser(intent, UserHandle.ALL);

            // Disable wpa_supplicant from auto reconnecting.
            mWifiNative.enableStaAutoReconnect(false);
            // STA has higher priority over P2P
            mWifiNative.setConcurrencyPriority(true);
        }
}
DisconnectedState#enter
class DisconnectedState extends State {
        @Override
        public void enter() {
            Log.i(TAG, "disconnectedstate enter");
            // 发送CMD_NO_NETWORKS_PERIODIC_SCAN消息给自己处理,这里的mNoNetworksPeriodicScan间隔时间是配置的R.integer.config_wifi_no_network_periodic_scan_interval
            /**
             * If we have no networks saved, the supplicant stops doing the periodic scan.
             * The scans are useful to notify the user of the presence of an open network.
             * Note that these are not wake up scans.
             * 如果当前没有P2P连接,并且没有之前保存的AP信息,则发送CMD_NO_NETWORKS_PERIODIC_SCAN消息出发扫描
             */
            if (mNoNetworksPeriodicScan != 0 && !mP2pConnected.get()
                    && mWifiConfigManager.getSavedNetworks().size() == 0) {
                sendMessageDelayed(obtainMessage(CMD_NO_NETWORKS_PERIODIC_SCAN,
                        ++mPeriodicScanToken, 0), mNoNetworksPeriodicScan);
            }

            mDisconnectedTimeStamp = mClock.getWallClockMillis();
            mWifiStateTracker.updateState(WifiStateTracker.DISCONNECTED);
        }
        @Override
        public boolean processMessage(Message message) {
            boolean ret = HANDLED;

            logStateAndMessage(message, this);

            switch (message.what) {
                case CMD_NO_NETWORKS_PERIODIC_SCAN:
                    if (mP2pConnected.get()) break;
                    if (mNoNetworksPeriodicScan != 0 && message.arg1 == mPeriodicScanToken &&
                            mWifiConfigManager.getSavedNetworks().size() == 0) {
                        // 会再次间隔时间扫描,这里由于是UNKNOWN_SCAN_SOURCE,所以会到其父亲类SupplicantStartedState处理
                        startScan(UNKNOWN_SCAN_SOURCE, -1, null, WIFI_WORK_SOURCE);
                        sendMessageDelayed(obtainMessage(CMD_NO_NETWORKS_PERIODIC_SCAN,
                                    ++mPeriodicScanToken, 0), mNoNetworksPeriodicScan);
                    }
                    break;

        }

}


public void startScan(int callingUid, int scanCounter,
                          ScanSettings settings, WorkSource workSource) {
        Bundle bundle = new Bundle();
        bundle.putParcelable(CUSTOMIZED_SCAN_SETTING, settings);
        bundle.putParcelable(CUSTOMIZED_SCAN_WORKSOURCE, workSource);
        bundle.putLong(SCAN_REQUEST_TIME, mClock.getWallClockMillis());
        sendMessage(CMD_START_SCAN, callingUid, scanCounter, bundle);
}
SupplicantStartedState处理CMD_START_SCAN消息
case CMD_START_SCAN:
                    handleScanRequest(message);
                    break;


private void handleScanRequest(Message message) {
        ....

        // Retrieve the list of hidden network SSIDs to scan for.
        List<WifiScanner.ScanSettings.HiddenNetwork> hiddenNetworks =
                mWifiConfigManager.retrieveHiddenNetworkList();

        // call wifi native to start the scan
        if (startScanNative(freqs, hiddenNetworks, workSource)) {
            // a full scan covers everything, clearing scan request buffer
            if (freqs == null)
                mBufferedScanMsg.clear();
            messageHandlingStatus = MESSAGE_HANDLING_STATUS_OK;
            return;
        }
}
startScanNative方法最终调用会向wpa_supplicant发送扫描指令,当扫描结束以后,WifiMonitor会发送消息SCAN_RESULTS_EVENT,此时由当前状态 SupplicantStartedState处理
/**
     * Broadcast scan result event to all the handlers registered for this event.
     * @param iface Name of iface on which this occurred.
     */
    public void broadcastScanResultEvent(String iface) {
        sendMessage(iface, SCAN_RESULTS_EVENT);
    }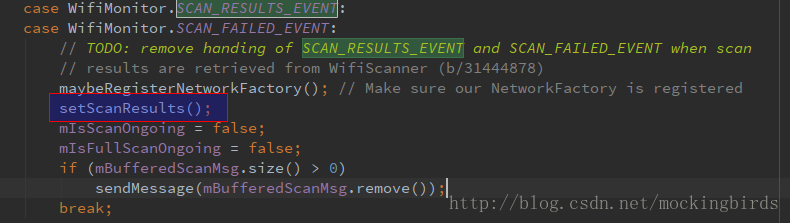
上面就获取到了扫描的结果。
好了,wifi的打开流程就先到这吧