1.美图

2.概述
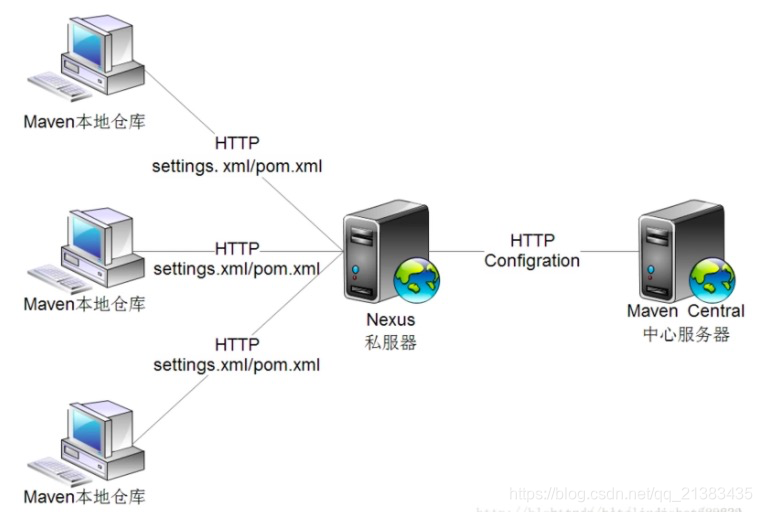
2.1 原理
nexus的私服原理就不多说了,直接上一幅网图吧。
2.安装
2.1 下载安装
在保证安装jdk 1.7+,去nexus官网下载nexus(http://www.sonatype.com/download-oss-sonatype) 最新版本
解压zip文件,配置nexus下bin目录全局变量 打开.bash_profile添加如下
export NEXUS_HOME=/Users/lcc/soft/nexus/nexus-3.22.0-02-mac
export PATH=$NEXUS_HOME/exus-3.22.0-02/bin:$PATH
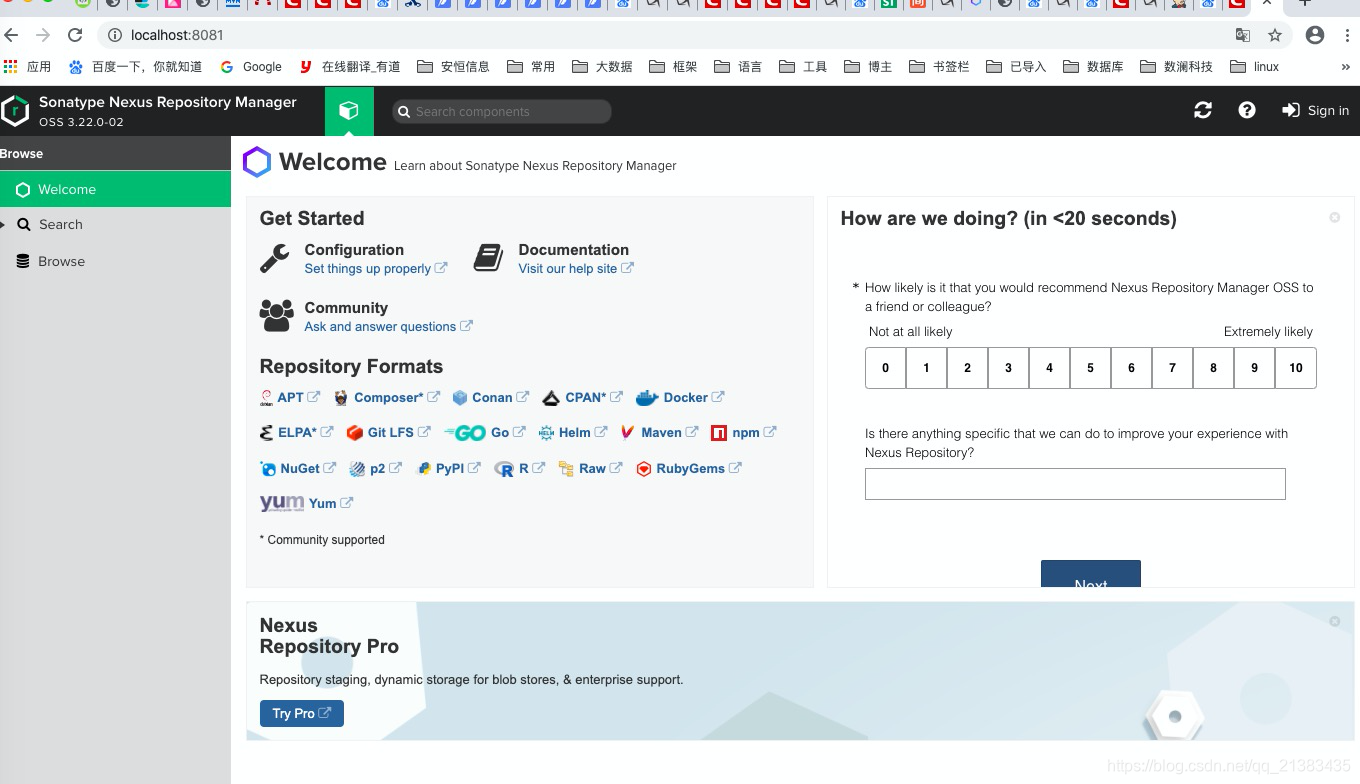
进入到bin目录后./nexus start启动nexus, 浏览器打开http://localhost:8081/ 如果能成功访问。则说明安装成功了,界面如下:
(base) lcc@lcc nexus-3.22.0-02$ pwd
/Users/lcc/soft/nexus/nexus-3.22.0-02-mac/
(base) lcc@lcc nexus-3.22.0-02-mac$ ll
total 0
drwxr-xr-x@  4 lcc  staff  128  3 30 11:07 ./
drwxr-xr-x   5 lcc  staff  160  3 30 11:07 ../
drwxr-xr-x@ 12 lcc  staff  384  3 30 11:07 nexus-3.22.0-02/
drwxr-xr-x@  3 lcc  staff   96  3 30 11:07 sonatype-work/


(base) lcc@lcc nexus-3.22.0-02-mac$ cd nexus-3.22.0-02/
(base) lcc@lcc nexus-3.22.0-02$ ll
total 136
drwxr-xr-x@ 12 lcc  staff    384  3 30 11:07 ./
drwxr-xr-x@  4 lcc  staff    128  3 30 11:07 ../
drwxr-xr-x@ 34 lcc  staff   1088  3 30 11:07 .install4j/
-rw-r--r--@  1 lcc  staff    395  3 28 00:24 NOTICE.txt
-rw-r--r--@  1 lcc  staff  17321  3 28 00:24 OSS-LICENSE.txt
-rw-r--r--@  1 lcc  staff  41954  3 28 00:24 PRO-LICENSE.txt
drwxr-xr-x@  6 lcc  staff    192  3 30 11:07 bin/
drwxr-xr-x@  3 lcc  staff     96  3 30 11:07 deploy/
drwxr-xr-x@  8 lcc  staff    256  3 30 11:07 etc/
drwxr-xr-x@ 10 lcc  staff    320  3 30 11:07 lib/
drwxr-xr-x@ 18 lcc  staff    576  3 30 11:07 public/
drwxr-xr-x@ 22 lcc  staff    704  3 30 11:07 system/


(base) lcc@lcc nexus-3.22.0-02$ bin/nexus start
Starting nexus
2.2 配置
查了默认配置
/Users/lcc/soft/nexus/nexus-3.22.0-02-mac/nexus-3.22.0-02
(base) lcc@lcc nexus-3.22.0-02$ vi etc/nexus-default.properties


## DO NOT EDIT - CUSTOMIZATIONS BELONG IN $data-dir/etc/nexus.properties
##
# Jetty section
application-port=8081
application-host=0.0.0.0
nexus-args=${jetty.etc}/jetty.xml,${jetty.etc}/jetty-http.xml,${jetty.etc}/jetty-requestlog.xml
nexus-context-path=/

# Nexus section
nexus-edition=nexus-pro-edition
nexus-features=\
 nexus-pro-feature

nexus.hazelcast.discovery.isEnabled=true
访问界面 界面 如下
端口默认配置在nexus.properties,点击登录,会提示我们admin的密码是多少
(base) lcc@lcc nexus-3.22.0-02$ cat /Users/lcc/soft/nexus/nexus-3.22.0-02-mac/sonatype-work/nexus3/admin.password
e3d49c38-5de8-47b8-8c55-66c0cf4f9f25
然后点击登录。需要我们修改密码
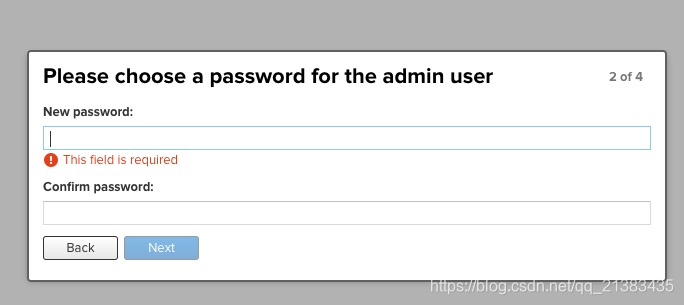 这里我们写
这里我们写 123456
3.nexus仓库介绍
nexus的仓库类型分为以下四种:
group: 仓库组
hosted:宿主
proxy:代理
virtual:虚拟
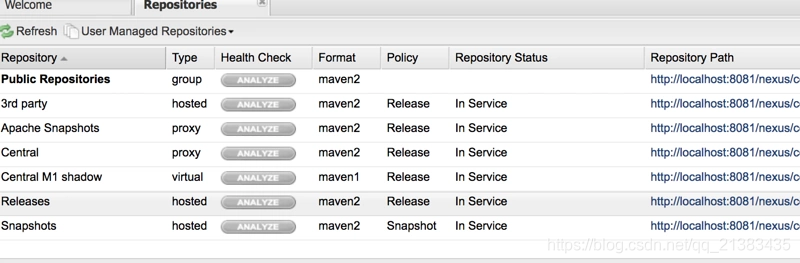
登录看到以下几个仓库:
PublicRepositories:仓库组
3rd party:无法从公共仓库获得的第三方发布版本的构件仓库
Apache Snapshots:用了代理ApacheMaven仓库快照版本的构件仓库
Central:用来代理maven中央仓库中发布版本构件的仓库
Central M1 shadow:用于提供中央仓库中M1格式的发布版本的构件镜像仓库
Releases:用来部署管理内部的发布版本构件的宿主类型仓库
Snapshots:用来部署管理内部的快照版本构件的宿主类型仓库
4.创建一个仓库
打开配置页面,创建本地库。此处由于时间关系就不涉及用户权限管理相关内容,如果公司内部项目组过多,且要求保密性,则需要分用户创建本地库。
点击 Create repository,创建本地版本库,上图中红框中的版本库是我们的本地库,其余为默认创建。创建步骤如下:
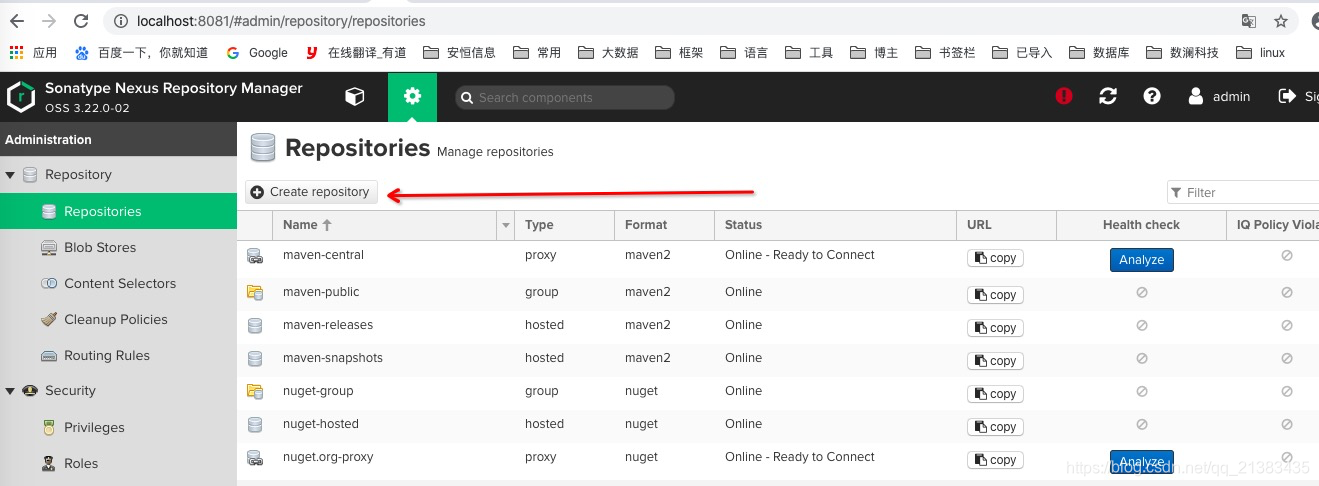
选择maven2(hosted)

这里简单介绍下几种repository的类型:
hosted,本地仓库,通常我们会部署自己的构件到这一类型的仓库。比如公司的第二方库。proxy,代理仓库,它们被用来代理远程的公共仓库,如maven中央仓库。group,仓库组,用来合并多个hosted/proxy仓库,当你的项目希望在多个repository使用资源时就不需要多次引用了,只需要引用一个group即可。
起个名字就可以了

保存完毕,仓库就创建完成了。
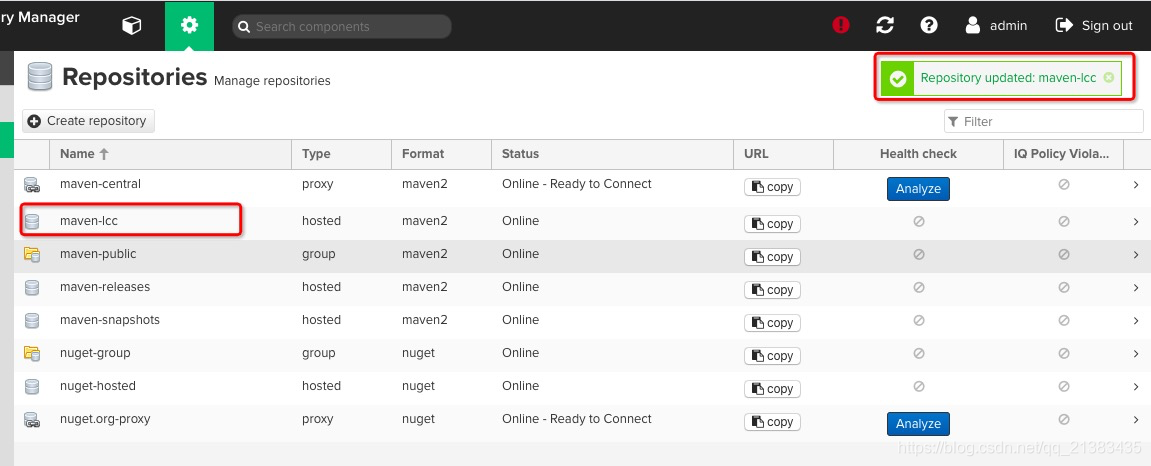
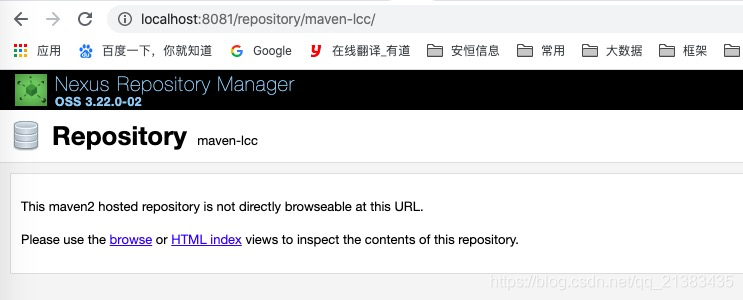
仓库地址:http://localhost:8081/repository/maven-lcc/
打开仓库组 maven-public,将刚建立的本地库maven-lcc 添加到仓库组中
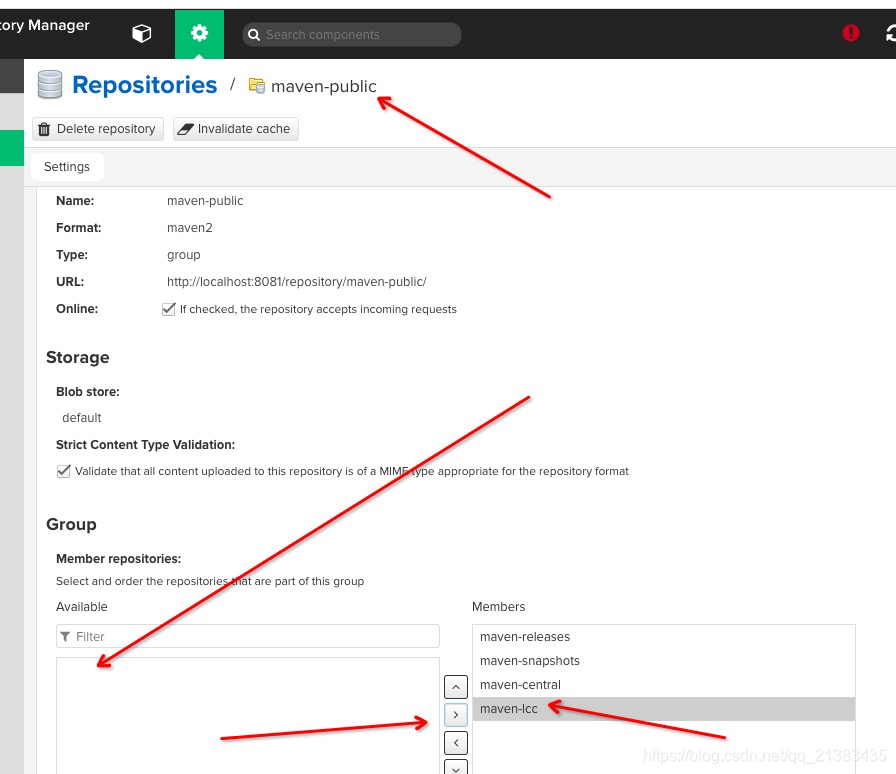
保存完成,这样就完成了整体的Nexus配置。
5.配置Maven连接私服
5.1 MAVEN 安装
省略
5.2 配置
修改Maven的配置文件 setting.xml
本地库地址可以修改也可以使用默认,我这里采用的是默认配置 Default ,如需修改,则放开下图中红框的语句,修改路径即可。
<localRepository>/Users/lcc/soft/maven/repo</localRepository>
配置安装好的Nexus私服的用户名密码。
  <servers>
     <server>
      <id>nexus</id>
      <username>admin</username>
      <password>123456</password>
    </server>
  </servers>
5.3 上传公司内部Jar包到Nexus私服
执行命令将所有私有JAR包上传:
mvn deploy:deploy-file -DgroupId=org.apache.flink -DartifactId=flink-core -Dversion=1.10.0 -Dpackaging=jar -Dfile=/Users/lcc/flink-core-1.10.0.jar -Durl=http://localhost:8081/repository/maven-lcc/ -DrepositoryId=nexus
这里简单介绍一下各个参数的含义:
DgroupId、DartifactId、Dversion: 构成该jar包在pom.xml中引用的标签。上传时可以随意修改,你开心就好啦。
- Dpackaging:打包类型。
- Dfile:需要上传的jar包的绝对路径。
- Durl:私服上自己建立仓库的地址,打开nexus->repositories菜单,可以看到该路径。
- DrepositoryId:服务器的表示id,就是我们之前在Maven的配置文件setting.xml中配置的server id。
(base) lcc@lcc nexus-3.22.0-02$ ll /Users/lcc/soft/maven/repo/org/apache/flink/flink-core/1.10.0/flink-core-1.10.0.jar
-rw-r--r--  1 lcc  staff  1573078  3 21 08:16 /Users/lcc/soft/maven/repo/org/apache/flink/flink-core/1.10.0/flink-core-1.10.0.jar
(base) lcc@lcc nexus-3.22.0-02$ mvn deploy:deploy-file -DgroupId=org.apache.flink -DartifactId=flink-core -Dversion=1.10.0 -Dpackaging=jar -Dfile=/Users/lcc/soft/maven/repo/org/apache/flink/flink-core/1.10.0/flink-core-1.10.0.jar -Durl=http://localhost:8081/repository/maven-lcc/ -DrepositoryId=nexus
[INFO] Scanning for projects...
[INFO]
[INFO] ------------------< org.apache.maven:standalone-pom >-------------------
[INFO] Building Maven Stub Project (No POM) 1
[INFO] --------------------------------[ pom ]---------------------------------
[INFO]
[INFO] --- maven-deploy-plugin:2.7:deploy-file (default-cli) @ standalone-pom ---
Downloading from alimaven: http://maven.aliyun.com/nexus/content/groups/public/org/codehaus/plexus/plexus-utils/1.5.6/plexus-utils-1.5.6.jar
Downloaded from alimaven: http://maven.aliyun.com/nexus/content/groups/public/org/codehaus/plexus/plexus-utils/1.5.6/plexus-utils-1.5.6.jar (0 B at 0 B/s)
[INFO] ------------------------------------------------------------------------
[INFO] BUILD FAILURE
[INFO] ------------------------------------------------------------------------
[INFO] Total time: 3.232 s
[INFO] Finished at: 2020-03-30T12:30:18+08:00
[INFO] ------------------------------------------------------------------------
[ERROR] Failed to execute goal org.apache.maven.plugins:maven-deploy-plugin:2.7:deploy-file (default-cli) on project standalone-pom: Cannot deploy artifact from the local repository: /Users/lcc/soft/maven/repo/org/apache/flink/flink-core/1.10.0/flink-core-1.10.0.jar -> [Help 1]
[ERROR]
[ERROR] To see the full stack trace of the errors, re-run Maven with the -e switch.
[ERROR] Re-run Maven using the -X switch to enable full debug logging.
[ERROR]
[ERROR] For more information about the errors and possible solutions, please read the followin
错误参考:
执行新的命令
base) lcc@lcc nexus-3.22.0-02$ cp /Users/lcc/soft/maven/repo/org/apache/flink/flink-core/1.10.0/flink-core-1.10.0.jar /Users/lcc/
(base) lcc@lcc nexus-3.22.0-02$ mvn deploy:deploy-file -DgroupId=org.apache.flink -DartifactId=flink-core -Dversion=1.10.0 -Dpackaging=jar -Dfile=/Users/lcc/flink-core-1.10.0.jar -Durl=http://localhost:8081/repository/maven-lcc/ -DrepositoryId=nexus
[INFO] Scanning for projects...
[INFO]
[INFO] ------------------< org.apache.maven:standalone-pom >-------------------
[INFO] Building Maven Stub Project (No POM) 1
[INFO] --------------------------------[ pom ]---------------------------------
[INFO]
[INFO] --- maven-deploy-plugin:2.7:deploy-file (default-cli) @ standalone-pom ---
Uploading to nexus: http://localhost:8081/repository/maven-lcc/org/apache/flink/flink-core/1.10.0/flink-core-1.10.0.jar
Uploaded to nexus: http://localhost:8081/repository/maven-lcc/org/apache/flink/flink-core/1.10.0/flink-core-1.10.0.jar (1.6 MB at 1.5 MB/s)
Uploading to nexus: http://localhost:8081/repository/maven-lcc/org/apache/flink/flink-core/1.10.0/flink-core-1.10.0.pom
Uploaded to nexus: http://localhost:8081/repository/maven-lcc/org/apache/flink/flink-core/1.10.0/flink-core-1.10.0.pom (400 B at 2.3 kB/s)
Downloading from nexus: http://localhost:8081/repository/maven-lcc/org/apache/flink/flink-core/maven-metadata.xml
Uploading to nexus: http://localhost:8081/repository/maven-lcc/org/apache/flink/flink-core/maven-metadata.xml
Uploaded to nexus: http://localhost:8081/repository/maven-lcc/org/apache/flink/flink-core/maven-metadata.xml (308 B at 3.3 kB/s)
[INFO] ------------------------------------------------------------------------
[INFO] BUILD SUCCESS
[INFO] ------------------------------------------------------------------------
[INFO] Total time: 2.634 s
[INFO] Finished at: 2020-03-30T12:34:33+08:00
[INFO] ------------------------------------------------------------------------
(base) lcc@lcc nexus-3.22.0-02$
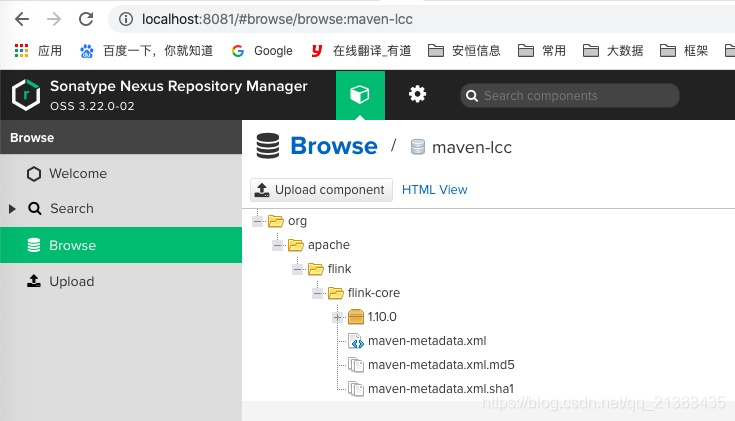
可以看到远程仓库已经有了我们的包
6.项目使用
pom文件引入如下
<repositories>
    <repository>
        <id>nexus</id>
        <name>lcc repository</name>
        <url>http://localhost:8081/repository/maven-public/</url>
        <releases>
            <enabled>true</enabled>
            <updatePolicy>always</updatePolicy>
        </releases>
        <snapshots>
            <enabled>true</enabled>
            <updatePolicy>always</updatePolicy>
        </snapshots>
    </repository>
</repositories>
更新项目Maven引用就完成了。
