Android程序开发中有六大布局。
LinearLayout(线性布局) RelativeLayout(相对布局)
TableLayout(表格布局) FrameLayout(帧布局) AbsoluteLayout(绝对布局) GridLayout(网格布局)。
其中常用的布局就是两种 ,LinearLayout(线性布局) RelativeLayout(相对布局)。所以在本章来中点研究一下如何采用这两种布局构造Android界面。
LinearLayout(线性布局)
LinearLayOut作为常用的布局控件,具有几种常用的属性:
android:id
// 设置资源的ID,以便于在Java程序中能够通过FindView ById(id),寻找资源。(我的Android Studio3.0好像有限定格式,无法随便乱取)
android:layout_width
//设置资源的水平宽度,Android Studio中提供了两种默认的属性:即wrap_content和match_parent 。
warp_content :即控件的长度,依赖于自身的内容,自身的内容多少,控件长度就多少。
match_parent :即控件的长度,根据于父控件的大小来调整自身的大小,匹配父控件。
自定义:即可以自己设定控件的长度,例如 :android:layout_width=“360dp”。
android:layout_height
//设置资源的垂直,Android Studio中提供了两种默认的属性:即wrap_content和match_parent 。
warp_content :即控件的长度,依赖于自身的内容,自身的内容多少,控件长度就多少。
match_parent :即控件的长度,根据于父控件的大小来调整自身的大小,匹配父控件。
自定义:即可以自己设定控件的长度,例如 :android:layout_width=“360dp”。
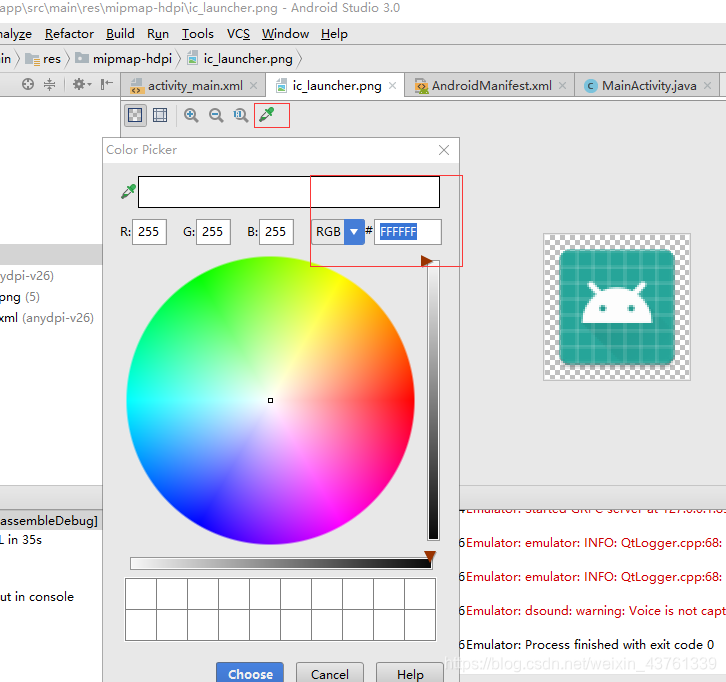
android:background
//设置控件的背景颜色,例如: android:background="#2D44FF",对于取色的话,可以在Android Studio中随便打开一张图片 ,里面会有一个自带的取色器,而不用采用别的方式取色。(目前只知道这种方式)
如图所示:
android:orientation
//设置控件是水平线性排列,还是垂直线性排列
android:layout_weight
//指定控件在父控件中所占位置的权重。
代码如下:
    <LinearLayout
        android:id="@+id/action0_1"
        android:layout_width="0dp"
        android:layout_height="300dp"
        android:background="#FF7B4C"
        android:orientation="horizontal"
        android:layout_weight="1" <!--两个并列的控件权重都为一-->
        android:padding="30dp">

        <View
            android:layout_height="match_parent"
            android:layout_width="match_parent"
            android:background="@mipmap/ic_launcher_round"/>
    </LinearLayout>

    <LinearLayout
        android:id="@+id/action0_2"
        android:layout_width="0dp"
        android:layout_height="100dp"
        android:background="#2D44FF"
        android:orientation="horizontal"
        android:layout_weight="1"> <!--两个并列的控件权重都为一-->
    </LinearLayout>
显示效果如图所示:(因为我们前面设定了这两个控件都是水平排列,所以他们水平的长度相同。)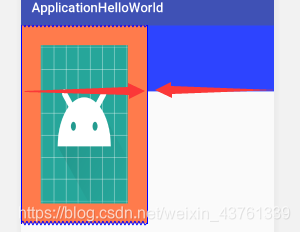 android:padding
//这个属性是设置控件属性的内边距。例如: android:padding=“30dp”,即设置控件的子控件边界到父控件的边界为30dp。
类似 android:paddingLeft 、android:paddingRight、android:paddingTop、 android:paddingBottom。分别表示左右上下的内边距。
android:layout_margin
//这个属性是设置控件和其它控件之间的间隔(包括和父控件的边界之间的距离)。例如:android:layout_margin=“20dp”。 android:gravity
//指定子控件在父控件中的位置。例如: android:gravity="center"让子控件居中。
RelativeLayout(相对布局)
相对布局对于线性布局来说,需要一个依赖的控件。线性布局的话则可以不用。相对布局中很多常用元素和线性布局中的常用元素很像,在此我就不一一列举。
先上一段代码:
<RelativeLayout
            android:layout_height="match_parent"
            android:layout_width="match_parent"
            android:padding="10dp"
            android:background="#1BFFEE">
            <View
            android:id="@+id/view_1"
            android:layout_height="10dp"
            android:layout_width="10dp"
            android:background="#FF7B4C"/>

            <View
                android:id="@+id/view_2"
                android:layout_height="20dp"
                android:layout_width="20dp"
                android:layout_toRightOf="@id/view_1"
                android:layout_marginLeft="10dp"
                android:background="#FF7B4A"/>
            </RelativeLayout>
显示效果如图所示: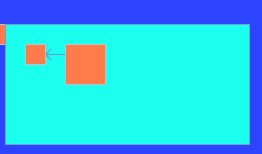
android:layout_toRightOf
//该属性的作用是指定一个本控件位于另外一个控件的右边,当然,那个控件应该事先设定好ID。与android:layout_toRightOf类似的还有、android:layout_toStartOf、android:layout_toEndOf、android:layout_toLeftOf。
还有一些其他的控件属性,可以看一看这篇文章: RelativeLayout。
总结:LinearLayOut 与 RelativeLayOut的布局各有优缺点,所以我们在使用这两组控件的时候常常可以嵌套使用。以下是我学习时嵌套使用的代码。仅供学习。
    <LinearLayout
        android:id="@+id/action0_2"
        android:layout_width="0dp"
        android:layout_height="100dp"
        android:background="#2D44FF"
        android:orientation="horizontal"
        android:padding="20dp"
        android:layout_weight="1">
        <View
            android:layout_height="10dp"
            android:layout_width="10dp"
            android:background="#FF7B4C"/>
        <RelativeLayout
            android:layout_height="match_parent"
            android:layout_width="match_parent"
            android:padding="10dp"
            android:background="#1BFFEE">
            <View
            android:id="@+id/view_1"
            android:layout_height="10dp"
            android:layout_width="10dp"
            android:background="#FF7B4C"/>

            <View
                android:id="@+id/view_2"
                android:layout_height="20dp"
                android:layout_width="20dp"
                android:layout_toRightOf="@id/view_1"
                android:layout_marginLeft="10dp"
                android:background="#FF7B4A"/>
            </RelativeLayout>
    </LinearLayout>
