文章目录
playbook ,也叫剧本,是 ansible 的配置、部署、编排语言。它们可以北描述为一个需要希望远程主机执行命令的方案,或者一组 ansible 模块程序运行的命令
playbook组成
hosts:运行指定任务的目标主机或主机组,需要先在/etc/ansible/hosts文件中定义remote_user:选择在远程主机以哪个用户的身份执行剧本sudo_user:设置非管理员有哪些成分tasks:任务列表,由各个模块和参数组成
# 对象:webserver组的主机
# 用户:root
# 任务:创建一个名为nginx1,uid为3000的用户
# 安装nginx
# 启动nginx
- hosts: webservers
  remote_user: root

  tasks:
  - name: create a user	# 当前任务名
    user: name=nginx1 uid=3000	# 使用的模块及模块参数
    ignore_errors: yes
  - name: install nginx
    yum: name=nginx state=present
  - name: start nginx service
    service: name=nginx state=started
-
检测playbook影响的主机及任务,check一下,并不会真正执行
ansible-playbook -C --list-hosts --list-tags --list-tasks test.yml
playbook核心组件
Tasks
任务,由模块定义的操作的列表
Variables
变量,当我们需要定制一些模板时,需要从外部传入变量来配置 playbook,这种传入变量的语法为 Jinja2:{{ var }} 括号两边都是有空格的
-
方法1:在执行 playbook 时使用
-e选项来指定变量ansible-playbook -e pkgname=nginx install_nginx.yaml# install_nginx.yaml - hosts: webservers remote_user: root tasks: - name: install {{ pkgname }} yum: name={{ pkgname }} tags: install {{ pkgname }} - name: start {{ pkgname }} service: name= {{ pkgname }} state=started enabled=true -
方法2:在 playbook 中使用
vars初始化变量- hosts: webservers remote_user: root vars: - pkgname: nginx tasks: - name: install {{ pkgname }} yum: name={{ pkgname }} tags: install {{ pkgname }} - name: start {{ pkgname }} service: name= {{ pkgname }} state=started enabled=true
Template
模板,即使用了模板语言的文本文件,ansible 中的模板语言为 Jinja2
# nginx_jinja.yaml
- hosts: webservers
  vars:
    # 定义主机或组变量
    worker_processes: 4
    num_cpus: 4
    max_open_file: 65500
    root: /data/www

  tasks:
  - name: make sure nginx is latest version
    yum: name=nginx state=latest
  # 执行任务模块及参数
  - name: write the nginx config file
    # 定义模板配置文件,src为管理端本地文件,dest为目标主机文件路径
    template: src=/root/nginx.conf dest=/etc/nginx/nginx.conf
    notify: restart nginx
  - name: make sure nginx is running
    service: name=nginx state=started

  handlers:
  - name: restart nginx
    service: name=nginx state=restarted
# /root/nginx.conf
# For more information on configuration, see:
#   * Official English Documentation: http://nginx.org/en/docs/
#   * Official Russian Documentation: http://nginx.org/ru/docs/

user nginx;
worker_processes {{ worker_processes }};
{% if num_cpus == 2 %}
worker_cpu-affinity 01 10;
{% else %}
worker_cpu_affinity 0001 0010 0100 1000;
{% endif %}
worker_rlimit_nofile {{ max_open_file }};
error_log /var/log/nginx/error.log;
pid /run/nginx.pid;

# Load dynamic modules. See /usr/share/doc/nginx/README.dynamic.
include /usr/share/nginx/modules/*.conf;

...

}
# 渲染后的文件为
user nginx;
worker_processes 4;
worker_cpu_affinity 0001 0010 0100 1000;
worker_rlimit_nofile 65500;
Handlers
触发器,某些 Tasks 中会使用 notify 信号来调用触发器
notify:信号,与handlers的名称相对应handlers:触发器,接收到信号后执行其下的任务
- hosts: webservers
  remote_user: root

  tasks:
  - name: copy config file
    copy:
      src=/root/nginx.conf
      dest=/etc/nginx/nginx.conf #推送文件
    notify: reload nginx service	# 在推送文件的这个任务最后调用触发器重启nginx服务
  - name: start nginx service
    service: name=nginx state=started

  handlers:
  - name: reload nginx service	# 这个触发器用于重启nginx服务
    service: name=nginx started=restarted
Roles
角色,以特定的层级目录结构进行组织 tasks、variables、handlers、tmplates、files(依赖文件)等。具体使用方法看实战部分
shell > cd /etc/ansible/ ; tree .
.
├── ansible.cfg
├── debug.yaml
├── hosts
└── roles
    └── nginx
        ├── default
        ├── files
        │   ├── index.html
        │   ├── nginx-1.12.2.tar.gz
        │   └── nginx-1.14.0.tar.gz
        ├── handlers
        │   └── main.yaml
        ├── meta
        ├── nginx.conf
        ├── tasks
        │   └── main.yaml
        ├── templates
        │   └── nginx.conf
        └── vars
            └── main.yaml
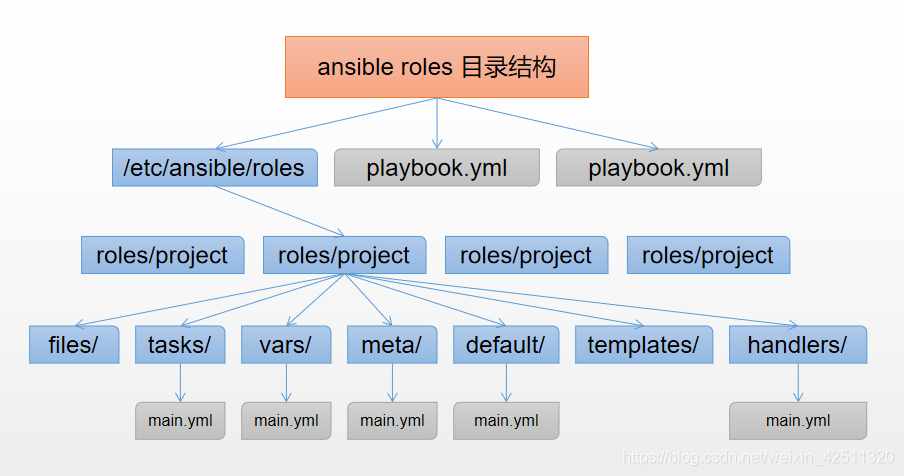
roles:          <--所有的角色必须放在roles目录下,这个目录可以自定义位置,默认的位置在/etc/ansible/roles
  project:      <---具体的角色项目名称,比如nginx、tomcat、php
    files:     <--用来存放由copy模块或script模块调用的文件。
    templates: <--用来存放jinjia2模板,template模块会自动在此目录中寻找jinjia2模板文件。
    tasks:     <--此目录应当包含一个main.yml文件,用于定义此角色的任务列表;其他的文件需要由main.yml进行“包含”调用
      main.yml
    handlers:  <--此目录应当包含一个main.yml文件,用于定义此角色中触发条件时执行的动作;其他的文件需要由main.yml进行“包含”调用
      main.yml
    vars:      <--此目录应当包含一个main.yml文件,用于定义此角色用到的变量;其他的文件需要由main.yml进行“包含”调用
      main.yml
    defaults:  <--此目录应当包含一个main.yml文件,用于为当前角色设定默认变量;其他的文件需要由main.yml进行“包含”调用
      main.yml
    meta:      <--此目录应当包含一个main.yml文件,用于定义此角色的特殊设定及其依赖关系;其他的文件需要由main.yml进行“包含”调用
      main.yml
Tags
标签,当有些任务我们需要单独执行或者跳过时,可以给任务打标签
# syn_nginx_conf.yml
- hosts: webservers
  remote_user: root

  tasks:
  - name: copy config file
    copy:
      src=/root/nginx.conf
      dest=/etc/nginx/nginx.conf  # 推送文件
    tags: copyfile	# 打上标签
    notify: reload nginx service
  - name: start nginx service
    service: name=nginx state=started

  handlers:
  - name: reload nginx service
    service: name=nginx started=restarted
-
只执行标签任务:
ansible-playbook -t copyfile syn_nginx_conf.yml -
跳过标签任务
ansible-playbook --skip-tags copyfile syn_nginx_conf.yaml
实战:通过 playbook roles 部署 nginx
创建角色目录及相关子目录
cd /etc/ansible/roles
mkdir -pv nginx/{files,templates,vars,handlers,meta,default,tasks}
在tasks中定义任务
# /etc/ansible/roles/nginx/tasks/main.yml

# 创建文件夹
- name: mkdir /data/www
  file: path=/data/www state=directory
# 创建用户
- name: create user nginx
  user: name=nginx
# 将主页挪进nginx目录中
- name: copy nginx html to remote host
  copy: src=index.html dest=/usr/local/nginx/html/
# 将nginx源码包发送到目标主机
- name: copy nginx package to remote host
  copy: src=nginx-1.12.2.tar.gz dest=/tmp/nginx-1.12.2.tar.gz
  tags: cppkg	# 打标签,可选择跳过
# 解压源码包
- name: tar nginx
  shell: cd /tmp; tar -xzf nginx-1.12.2.tar.gz
# 安装nginx依赖包
- name: install pkg
  yum:
    name:
    - openssl-devel
    - pcre-devel
    - gcc
    state: latest
# 编译安装nginx
- name: install nginx
  shell: cd /tmp/nginx-1.12.2; ./configure --prefix=/usr/local/nginx  --user=nginx --group=nginx --with-http_stub_status_module --with-http_ssl_module --with-pcre; make && make install
# 将模板文件拷到目标主机
- name: copy conf file nginx.conf
  template: src=nginx.conf dest=/usr/local/nginx/nginx.conf
  tags: ngxconf
  notify: reload nginx service
在主控端准备文件
cd nginx/files
# 下载nginx源码包
wget http://nginx.org/download/nginx-1.12.2.tar.gz

# 编写主页文件
vim index.html
<h1>a gril is very cute</h1>
准备nginx配置模板文件
# /etc/ansible/roles/nginx/templates/nginx.conf
worker_processes  1;

events {
    worker_connections  {{ con_counts }};
}

http {
    include       mime.types;
    default_type  application/octet-stream;

    #log_format  main  '$remote_addr - $remote_user [$time_local] "$request" '
    #                  '$status $body_bytes_sent "$http_referer" '
    #                  '"$http_user_agent" "$http_x_forwarded_for"';

    #access_log  logs/access.log  main;

    sendfile        on;
    #tcp_nopush     on;

    #keepalive_timeout  0;
    keepalive_timeout  65;

    #gzip  on;

    server {
        listen       80;
        server_name  localhost;

        location / {
            root   {{ html_dir }};
            index  index.html index.htm;
        }

        error_page   500 502 503 504  /50x.html;
        location = /50x.html {
            root   html;
        }

    }
}
在vars中定义变量
# /etc/ansible/roles/nginx/vars/main.yml
con_counts: "65535"
html_dir: "/data/www"
在handlers中定义触发器
# /etc/ansible/roles/nginx/handlers/main.yml
- name: reload nginx service
  shell: /usr/local/nginx/sbin/nginx
创建playbook引导文件
# /etc/ansible/roles/nginx.conf
- hosts: webservers
  remote_user: root
  roles:
    - nginx
执行剧本
[root@localhost nginx]$ ansible-playbook nginx.conf

PLAY [webservers] ***********************************************************************************************

TASK [Gathering Facts] ******************************************************************************************
ok: [192.168.159.131]

TASK [nginx : mkdir /data/www] **********************************************************************************
ok: [192.168.159.131]

TASK [nginx : create user nginx] ********************************************************************************
ok: [192.168.159.131]

TASK [nginx : copy nginx html to remote host] *******************************************************************
ok: [192.168.159.131]

TASK [nginx : copy nginx package to remote host] ****************************************************************
ok: [192.168.159.131]

TASK [nginx : tar nginx] ****************************************************************************************
changed: [192.168.159.131]

TASK [nginx : install pkg] **************************************************************************************
ok: [192.168.159.131]

TASK [nginx : install nginx] ************************************************************************************
changed: [192.168.159.131]

TASK [nginx : copy conf file nginx.conf] ************************************************************************
ok: [192.168.159.131]

PLAY RECAP ******************************************************************************************************
192.168.159.131            : ok=9    changed=2    unreachable=0    failed=0    skipped=0    rescued=0    ignored=0
验证:
[root@localhost nginx]$ curl 192.168.159.131
curl: (7) Failed connect to 192.168.159.131:80; 没有到主机的路由
# ......配错了吗
# 并没有!!!跑了半天以为我做错了,最后发现是防火墙没关我去
[root@localhost nginx]$ curl 192.168.159.131
<h1>a girl is very cute</h1>

