Authentication
1. Basic Authentication
老王,你家的狗咋还咬我呢?
那不是大黄没见过你嘛。
HTTP提供了用于权限控制和认证的通用框架,最常用的认证方案就是Basic Authentication
![]()
认证的步骤:
-
接收到客户端的未认证请求后,服务端向客户端发送
challenge(质询信息),提供如何验证- 客户端输入用户名和密码,发送经过
Base64编码后的用户名密码组合字符串 - 服务端检查证书(credentials),通过返回
200,否则返回403.
- 客户端输入用户名和密码,发送经过
响应头 质询信息
-
状态码
401表示UnauthorizedWWW-Authenticate字段,提供如何进行验证的信息,一般为WWW-Authenticate: Basic realm="xxxxxx",表示用Basic HTTP验证方案
请求头 Authorization字段
以用户名admin密码password为例
-
将用户名密码用
:联结admin:password- 通过
Base64算法将联结后的字符串编码 - 将认证方法和空格添加到编码结果前,得到
Authorization字段
- 通过
Express实现Basic Auth
新建app.js
function basicAuth(req, res, next) {
    // 获取authorization字段
    var authHeader = req.headers.authorization

    // 未认证请求
    if (!authHeader) {
        // 设置响应头
        var err = new Error('You are not authenticated!')
        res.setHeader('WWW-Authenticate', 'Basic')
        err.statusCode = 401
        next(err)
        return
    }

    // 待认证
    // 按Base64解码
    var auth = new Buffer.from(authHeader.split(' ')[1], 'base64').toString().split(':')
    var user = auth[0]
    var pass = auth[1]
    if (user === 'admin' && pass === 'password') {
        next()
    } else { // 未通过认证
        var err = new Error('You are not authenticated!')
        res.setHeader('WWW-Authenticate', 'Basic')
        err.status = 401
        next(err)
    }
}
2. session-based Auth
2.1 Cookie and Session
诶?你这次进来大黄怎么没咬你?
上次喂大黄吃了饼干,它总得记住我吧!
HTTP是无状态协议,为了在请求时保持状态,需要session和cookies。
啥是无状态协议?
In computing, a stateless protocol is a communications protocol that treats each request as an independent transaction that is unrelated to any previous request so that the communication consists of independent pairs of request and response. A stateless protocol does not require the server to retain session information or status about each communications partner for the duration of multiple requests. In contrast, a protocol which requires keeping of the internal state on the server is known as a stateful protocol.
摘自wiki.
通俗地说,你每次来,大黄每次都咬你,那大黄就是个傻狗,无状态的,记不住你。
你喂大黄吃饼干,它就记住你了。
-
这跟Authentication有啥关系?
HTTP是无状态的,你认证完一次后,再次登录:还要输入用户名和密码,再认证一次,不会记得你认证过这回事儿。
2.2 session-based Auth步骤
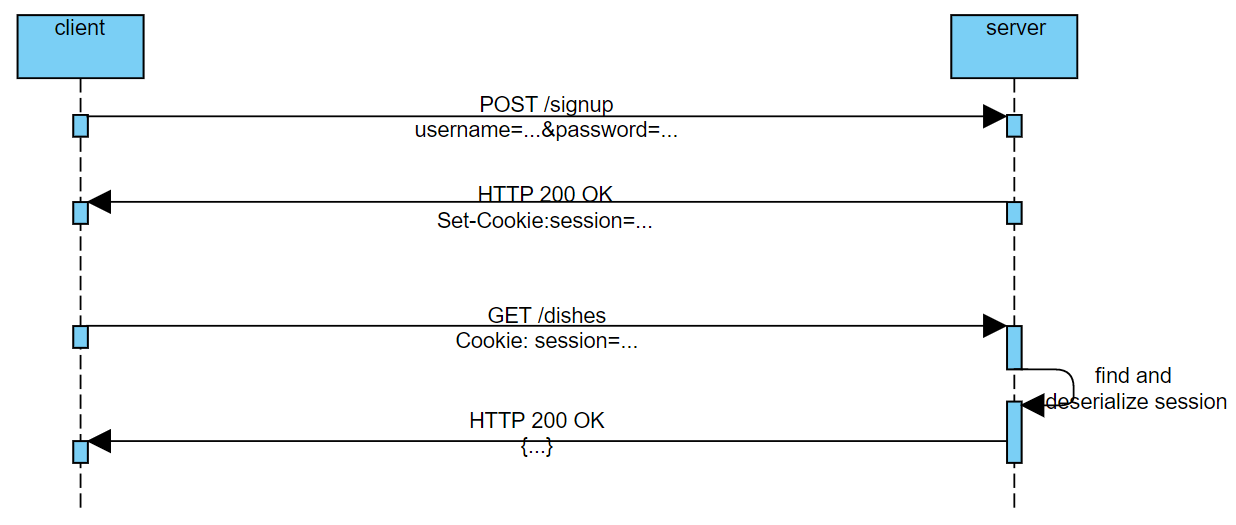
1. 用户发送带有用户名和密码的请求
2. 服务端储存该用户信息,并设置cookie到服务端
3. 后续的客户端请求都会带上cookie
4. 服务端查找用户信息并返回
HTTP Cookie
HTTP Cookie是服务器发送给客户端,并保存在本地的数据,浏览器客户端再向服务器发起请求时,会带上Cookie一并发送给服务器。
有了Cookie,就可以保持状态,比如你的登录信息。再认证时,会将cookie也发送,服务器根据cookie就可以知道是不是来自同一个浏览器。
来看一下维基百科的描述
Another popular use of cookies is for logging into websites. When the user visits a website's login page, the web server typically sends the client a cookie containing a unique session identifier. When the user successfully logs in, the server remembers that that particular session identifier has been authenticated and grants the user access to its services.
如何创建Cookie
服务器通过Set-Cookie响应头设置(下面通过express-session自动设置cookie)
Cookie的属性
-
Domain和PathDomain和Path属性定义了cookie的作用域,告知浏览器该cookie术语哪个网址。举个例子,在sports.myweb.com下发送请求:HTTP/1.1 200 OK Set-Cookie: LSID=DQAAAK…Eaem_vYg; Path=/login; Expires=Wed, 23 Mar 2020 20:20:20 GMT; Secure; HttpOnly Set-Cookie: HSID=CYWFUm…CKrbyt; Domain=.myweb.com; Path=/; Expires=Wed, 23 Mar 2020 20:20:20 GMT; HttpOnly Set-Cookie: SSID=BQ3T…RYUEv; Secure; HttpOnly第一个cookie,
LSID没有Domain属性,cookie只能用于包含sports.myweb.com/login的请求;其余两个cookie用于.myweb.com的子域名请求中 -
Expires和Max-AgeExpires属性定义了删除cookie的时间,若未设置,关闭浏览器后删除;Max-Age定义了cookie的有效期。 -
Secure和HttpOnlySecure属性规定cookie只能在加密连接的情况下使用;HttpOnly属性规定浏览器不要通过HTTP请求以外的通道公开cookie(cookie不能通过document.cookie获得)
Session
cookie在认证后的每一次请求时,都会发送到服务器,来验证已经认证过。不同的客户端向同一台服务器发送cookie,服务器必须分辨出对于同一服务的不同客户端请求。那每个已经认证的客户必须在服务端有记录,并且要有唯一的ID来标记。
所以session在Authentication中就是用来跟踪用户HTTP会话信息的,session里面存点啥(以express-session中间件为例)?
- cookie : Options object for the session ID cookie. The default value is
{ path: '/', httpOnly: true, secure: false, maxAge: null }. - genid: Function to generate the session ID. Default is to use uuid
- name:The name of the session ID cookie to set in the response (and read from in the request).
- proxy: Trust the reverse proxy when setting secure cookies.
- resave: If true forces a session to be saved back to store even if it was not modified in the request.
- rolling: Forces a cookie to be set on every request.
- saveUninitialized: If true it forces a newly created session without any modifications to be saved to the session store.
- secret: It is a required option and is used for signing the session ID cookie.
- store: Session store instance. Default is to use memory store.
- unset: Controls the handling of session object in the store after it is unset. Either
deleteorkeepthe session object. Default is to keep the session object
显然session是一个复合数据,用一个对象来存储。
2.3 Express实现
下面时用cookie-parser和express-session中间件实现的一个例子:这里使用signedCookies
更改app.js如下
var session = require('express-session')
var FileStore = require('session-file-store')(session)

var cookieParser = require('cookie-parser');
// 将密钥传给cookie-parser
app.use(cookieParser('12345-67890-09876-54321'))

// 定义session对象
app.use(session({
    name: 'session-id',	// cookie的名称
    secret: '12345-67890-09876-54321',	// 签名cookie的密钥
    saveUninitialized: false,
    resave: false,
    store: new FileStore()	// 使用session-file-store将session存储到本地
}))

function basicAuth(req, res, next) {

    if (!req.session.user) {
        var authHeader = req.headers.authorization
        if (!authHeader) {
            // 没有认证信息
            var err = new Error('You are not authenticated!')
    		res.setHeader('WWW-Authenticate', 'Basic')
            err.status = 401
            next(err)
            return
        }
        var auth = new Buffer.from(authHeader.split(' ')[1], 'base64').toString().split(':')
        var user = auth[0]
        var pass = auth[1]
        if (user === 'admin' && pass === 'password') {
            // 认证通过,设置加密的Cookies
            req.session.user = 'admin'
            next()
        } else {
            var err = new Error('You are not authenticated!')
            res.setHeader('WWW-Authenticate', 'Basic')
            err.status = 401
            next(err)
        }
    } else {
        // 已认证,获取加密的cookies
        if (req.session.user === 'admin') {
            console.log('req.session')
            next()
        } else {
            var err = new Error('You are not authenticated!')
            err.status = 401
            next(err)
        }
    }
}
session是永久存储在服务器上的,存在内存中,重启服务器会清除掉。所以登录信息要存储到数据库。
3. Token-Based Authentication
3.1 session-based authentication的弊端(为什么要用token-based authentication)?
-
扩展性
程序扩展性变差:用户认证后,服务器做认证记录,如果认证的记录被保存在内存中的话,这意味着用户下次请求还必须在这台服务器上才能拿到授权的资源,这样在分布式的应用上,相应的限制了负载均衡器的能力,也就意味着限制了扩展的能力
-
移动端(???)
> [移动端处理cookie有些问题]( https://www.socialmediatoday.com/content/cookies-mobile-do-they-exist ), 移动端用原生接口发请求最大特点是每一次都新建一个session。 在web端,首次登录成功后,之后的每次请求都带上认证通过的信息;但在移动端,每一次请求一个新的session.
-
跨域请求
-
CSRF
既然token-based Auth作为替代出现,一定是解决了上述问题,也就是token的特点:
1. self-contained    自身包含信息
2. shareable    可以在其他应用中使用
我们先来看一看token认证的步骤:
3.2 token认证的步骤
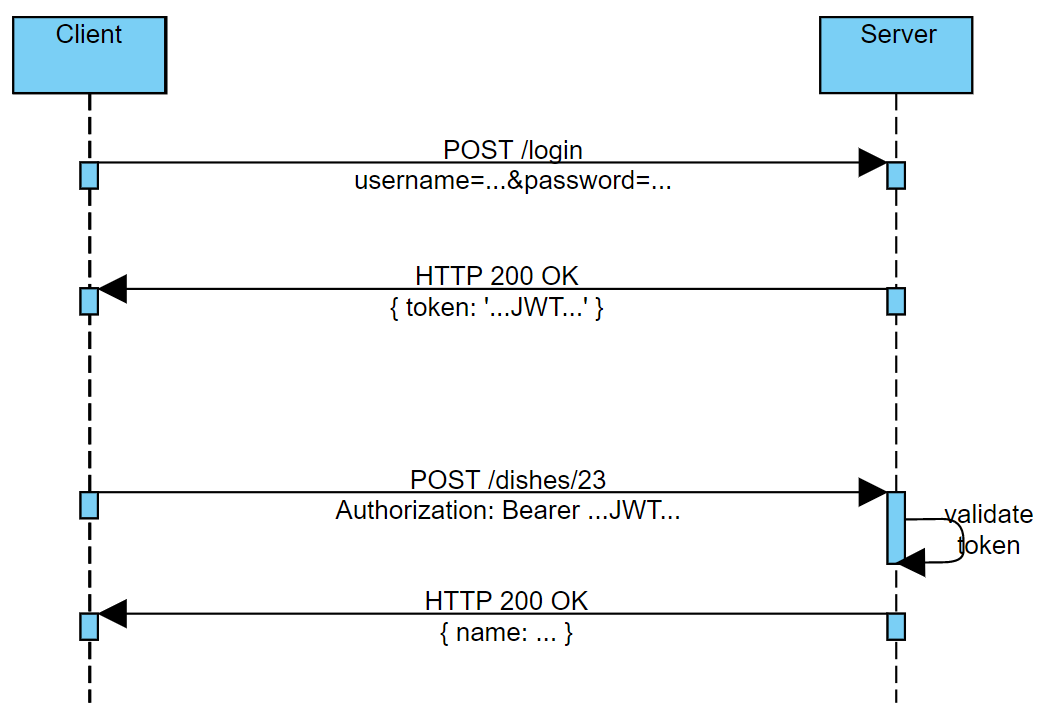
1. 用户发送带有用户名和密码的请求
2. 服务端验证身份
3. 服务端创建并发送token到客户端(服务端啥也没存)
4. 后续的客户端请求都会带上token
5. 服务端验证token,通过则响应数据
为什么token能够自身包含信息并能在其他应用中使用?我们来看一看token的组成:
3.3 token(以JSON Web Token为例)

-
Header
- type token的类型,这里用的是JSON Web Token
- alg 使用的
hash算法,这里用的是HMAC SHA256
Header使用
Base64Url编码 -
Payload
JWT的主体,也成为
JWT Claims,存储要传输的信息和token的其他信息-
Registered Claims
一组预定义的声明,这些声明非强制,但是推荐。包括iss(issuer),exp(expiration time),sub(subject),aud(audience)等。
-
Public Claims
自定义信息,如用户名和其他重要信息
-
Private Claims
令牌创建者和使用者可以同意使用私有claim名称。容易冲突,小心使用
-
-
Signature
-
要创建签名,须获取编码后的header、payload,密钥和header中指定的算法,进行签名,例如:
HMACSHA256( base64UrlEncode(header) + "." + base64UrlEncode(payload), secret) -
密钥是服务端持有的签名,来验证token或签署新token
-
3.4 Express实现
使用jsonwebtoken中间件签发并验证token;使用passport-jwt中间件支持JWT认证策略
更改authenticate.js
var JwtStrategy = require('passport-jwt').Strategy
var ExtractJwt = require('passport-jwt').ExtractJwt
var jwt = require('jsonwebtoken')	// 创建,签名,验证token

// jwt.sign(payload, secretOrPrivateKey, [options, callback])
// (Synchronous) Returns the JsonWebToken as string
exports.getToken = function(user) {	// 签发token,第二个参数是密钥
    return jwt.sign(user, '12345-67890-09876-54321', {expiresIn: 3600})
}

var opts = {}
// 解析token
opts.jwtFromRequest = ExtractJwt.fromAuthHeaderAsBearerToken()
opts.secretOrKey = '12345-67890-09876-54321'

// new JwtStrategy(options, verify)
exports.jwtPassport = passport.use(new JwtStrategy(opts,
	(jwt_payload, done) => {
    	console.log("JWT payload: ", jwt_payload)
    	User.findOne({_id: jwt_payload._id}), (err, user) => {
            if (err) {
                return done(err, false)
            } else if (user) {
                return done(null, user)
            } else {
                return done(null, false)
            }
        }
}))

exports.verifyUser = passport.authenticate('jwt', {session: false})
更改users.js
...
var authenticate = require('../authenticate')
...
router.post('/login', passport.authenticate('local'), (req, res) => {
    var token = authenticate.getToken({_id: req.user._id})	// token中payload存储 _id
    res.statusCode = 200
    res.setHeader('Content-Type', 'application/json')
    res.json({success: true, token: token, status: 'You are successfully logged in!'})
})
...
在各router文件中各个路由添加验证方法verifyUser
var authenticate = require('../authenticate')
...

dishRouter.route('/')

.post(authenticate.verifyUser, (req, res, next) => {
   . . .
})

.put(authenticate.verifyUser, (req, res, next) => {
   . . .
})

.delete(authenticate.verifyUser, (req, res, next) => {
   . . .
})

...