目录
2.1.1 InstantiationAwareBeanPostProcessor
之前看到过一篇对Bean生命周期讲解的很不错的博客,现在我对其再做一些整理补充分享给大家,以供学习使用。
一、Bean的生命周期
Spring Bean的生命周期是Spring面试热点问题。这个问题即考察对Spring的微观了解,又考察对Spring的宏观认识,想要答好并不容易!本文希望能够从源码角度入手,帮助面试者彻底搞定Spring Bean的生命周期。
只有四个!
是的,Spring Bean的生命周期只有这四个阶段。把这四个阶段和每个阶段对应的扩展点糅合在一起虽然没有问题,但是这样非常凌乱,难以记忆。要彻底搞清楚Spring的生命周期,首先要把这四个阶段牢牢记住。实例化和属性赋值对应构造方法和setter方法的注入,初始化和销毁是用户能自定义扩展的两个阶段。在这四步之间穿插的各种扩展点,稍后会讲。
- 实例化 Instantiation
- 属性赋值 Populate
- 初始化 Initialization
- 销毁 Destruction
实例化 -> 属性赋值 -> 初始化 -> 销毁
主要逻辑都在doCreate()方法中,逻辑很清晰,就是顺序调用以下三个方法,这三个方法与三个生命周期阶段一一对应,非常重要,在后续扩展接口分析中也会涉及。
- createBeanInstance() -> 实例化
- populateBean() -> 属性赋值
- initializeBean() -> 初始化
注:bean的生命周期是从将bean定义全部注册到BeanFacotry中以后开始的。
源码如下,能证明实例化,属性赋值和初始化这三个生命周期的存在。关于本文的Spring源码都将忽略无关部分,便于理解:
创建Bean:
// 忽略了无关代码
protected Object doCreateBean(final String beanName, final RootBeanDefinition mbd, final @Nullable Object[] args)
      throws BeanCreationException {
   // Instantiate the bean.
   BeanWrapper instanceWrapper = null;
   if (instanceWrapper == null) {
       // 实例化阶段!
      instanceWrapper = createBeanInstance(beanName, mbd, args);
   }
   // Initialize the bean instance.
   Object exposedObject = bean;
   try {
       // 属性赋值阶段!
      populateBean(beanName, mbd, instanceWrapper);
       // 初始化阶段!
      exposedObject = initializeBean(beanName, exposedObject, mbd);
   }
}
上面这些这个实例化Bean的方法是在getBean()方法中调用的,而getBean是在finishBeanFactoryInitialization方法中调用的,用来实例化单例非懒加载Bean,源码如下:
@Override
public void refresh() throws BeansException, IllegalStateException {
    synchronized (this.startupShutdownMonitor) {
        try {
            // Allows post-processing of the bean factory in context subclasses.
            postProcessBeanFactory(beanFactory);
            // Invoke factory processors registered as beans in the context.
            invokeBeanFactoryPostProcessors(beanFactory);
            // Register bean processors that intercept bean creation.

            // 所有BeanPostProcesser初始化的调用点
            registerBeanPostProcessors(beanFactory);
            // Initialize message source for this context.
            initMessageSource();
            // Initialize event multicaster for this context.
            initApplicationEventMulticaster();
            // Initialize other special beans in specific context subclasses.
            onRefresh();
            // Check for listener beans and register them.
            registerListeners();
            // Instantiate all remaining (non-lazy-init) singletons.

            // 所有单例非懒加载Bean的调用点
            finishBeanFactoryInitialization(beanFactory);
            // Last step: publish corresponding event.
            finishRefresh();
        }
}
销毁Bean:
至于销毁,是在容器关闭时调用的,详见ConfigurableApplicationContext#close()
二、常用扩展点
Spring生命周期相关的常用扩展点非常多,所以问题不是不知道,而是记不住或者记不牢。其实记不住的根本原因还是不够了解,这里通过源码+分类的方式帮大家记忆。
区分影响一个bean或者多个bean是从源码分析得出的.
以BeanPostProcessor为例:
- 从refresh方法来看,BeanPostProcessor 实例化比正常的bean早.
- 从initializeBean方法看,每个bean初始化前后都调用所有BeanPostProcessor的postProcessBeforeInitialization和postProcessAfterInitialization方法.
2.1 第一大类:影响多个Bean的接口
实现了这些接口的Bean会切入到多个Bean的生命周期中。正因为如此,这些接口的功能非常强大,Spring内部扩展也经常使用这些接口,例如自动注入以及AOP的实现都和他们有关。
- InstantiationAwareBeanPostProcessor
- BeanPostProcessor
这两兄弟可能是Spring扩展中最重要的两个接口!InstantiationAwareBeanPostProcessor作用于实例化阶段的前后,BeanPostProcessor作用于初始化阶段的前后。正好和第一、第三个生命周期阶段对应。通过图能更好理解:
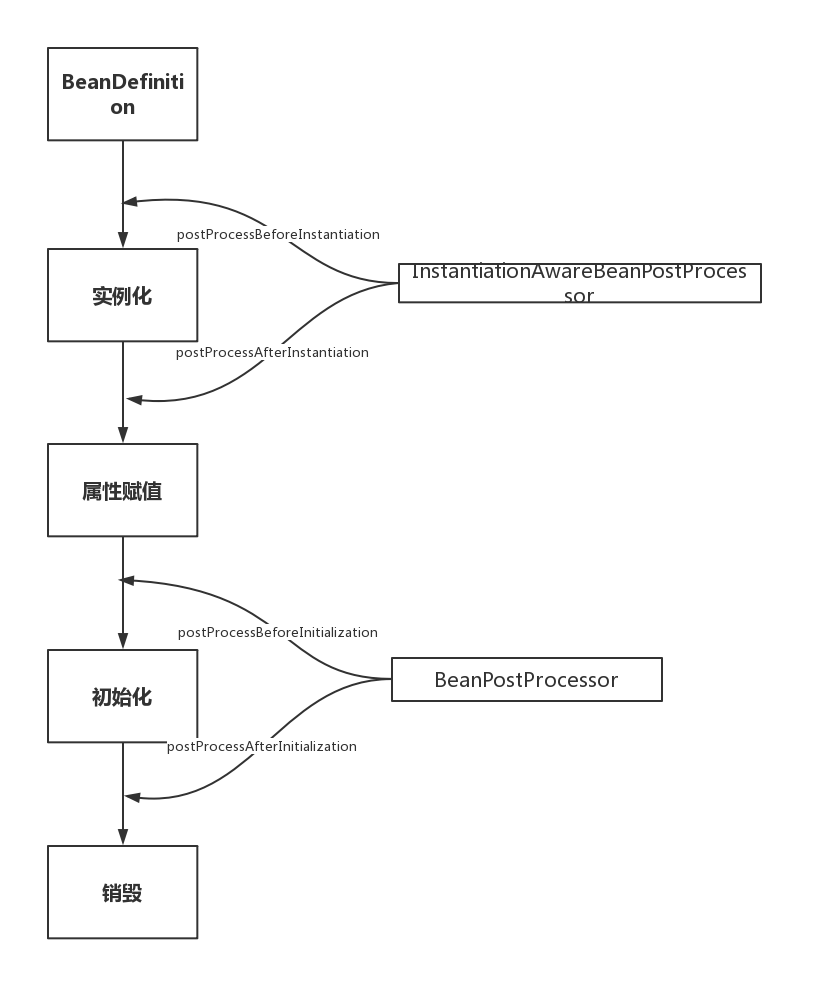
2.1.1 InstantiationAwareBeanPostProcessor
InstantiationAwareBeanPostProcessor实际上继承了BeanPostProcessor接口,严格意义上来看他们不是两兄弟,而是两父子。但是从生命周期角度我们重点关注其特有的对实例化阶段的影响,图中省略了从BeanPostProcessor继承的方法。
InstantiationAwareBeanPostProcessor extends BeanPostProcessor
InstantiationAwareBeanPostProcessor源码分析:
- postProcessBeforeInstantiation调用点,忽略无关代码:
@Override
protected Object createBean(String beanName, RootBeanDefinition mbd, @Nullable Object[] args)
        throws BeanCreationException {
    try {
        // Give BeanPostProcessors a chance to return a proxy instead of the target bean instance.
        // postProcessBeforeInstantiation方法调用点,这里就不跟进了,
        // 有兴趣的同学可以自己看下,就是for循环调用所有的InstantiationAwareBeanPostProcessor
        Object bean = resolveBeforeInstantiation(beanName, mbdToUse);
        if (bean != null) {
            return bean;
        }
    }

    try {
        // 上文提到的doCreateBean方法,可以看到
        // postProcessBeforeInstantiation方法在创建Bean之前调用
        Object beanInstance = doCreateBean(beanName, mbdToUse, args);
        if (logger.isTraceEnabled()) {
            logger.trace("Finished creating instance of bean '" + beanName + "'");
        }
        return beanInstance;
    }

}
可以看到,postProcessBeforeInstantiation在doCreateBean之前调用,也就是在bean实例化之前调用的,英文源码注释解释道该方法的返回值会替换原本的Bean作为代理,这也是Aop等功能实现的关键点。
- postProcessAfterInstantiation调用点,忽略无关代码:
protected void populateBean(String beanName, RootBeanDefinition mbd, @Nullable BeanWrapper bw) {
    // Give any InstantiationAwareBeanPostProcessors the opportunity to modify the
    // state of the bean before properties are set. This can be used, for example,
    // to support styles of field injection.
    boolean continueWithPropertyPopulation = true;

     // InstantiationAwareBeanPostProcessor#postProcessAfterInstantiation()
     // 方法作为属性赋值的前置检查条件,在属性赋值之前执行,能够影响是否进行属性赋值!
    if (!mbd.isSynthetic() && hasInstantiationAwareBeanPostProcessors()) {
       for (BeanPostProcessor bp : getBeanPostProcessors()) {
          if (bp instanceof InstantiationAwareBeanPostProcessor) {
             InstantiationAwareBeanPostProcessor ibp = (InstantiationAwareBeanPostProcessor) bp;
             if (!ibp.postProcessAfterInstantiation(bw.getWrappedInstance(), beanName)) {
                continueWithPropertyPopulation = false;
                break;
             }
          }
       }
    }

    // 忽略后续的属性赋值操作代码
}
可以看到该方法在属性赋值方法内,但是在真正执行赋值操作之前。其返回值为boolean,返回false时可以阻断属性赋值阶段(continueWithPropertyPopulation = false;)。
2.1.2 BeanPostProcesso
关于BeanPostProcessor执行阶段的源码穿插在下文Aware接口的调用时机分析中,因为部分Aware功能的就是通过他实现的!只需要先记住BeanPostProcessor在初始化前后调用就可以了。
接口源码:
public interface BeanPostProcessor {
     //bean初始化之前调用
	@Nullable
	default Object postProcessBeforeInitialization(Object bean, String beanName) throws BeansException {
		return bean;
	}

    //bean初始化之后调用
	@Nullable
	default Object postProcessAfterInitialization(Object bean, String beanName) throws BeansException {
		return bean;
	}
}
2.2 第二大类:只调用一次的接口
这一大类接口的特点是功能丰富,常用于用户自定义扩展。
第二大类中又可以分为两类:
- Aware类型的接口
- 生命周期接口
2.2.1 无所不知的Aware
Aware类型的接口的作用就是让我们能够拿到Spring容器中的一些资源。基本都能够见名知意,Aware之前的名字就是可以拿到什么资源,例如BeanNameAware可以拿到BeanName,以此类推。调用时机需要注意:所有的Aware方法都是在初始化阶段之前调用的!
Aware接口众多,这里同样通过分类的方式帮助大家记忆。
Aware接口具体可以分为两组,至于为什么这么分,详见下面的源码分析。如下排列顺序同样也是Aware接口的执行顺序,能够见名知意的接口不再解释。
Aware Group1
- BeanNameAware
- BeanClassLoaderAware
- BeanFactoryAware
Aware Group2
- EnvironmentAware
- EmbeddedValueResolverAware 这个知道的人可能不多,实现该接口能够获取Spring EL解析器,用户的自定义注解需要支持spel表达式的时候可以使用,非常方便。
- ApplicationContextAware(ResourceLoaderAware\ApplicationEventPublisherAware\MessageSourceAware) 这几个接口可能让人有点懵,实际上这几个接口可以一起记,其返回值实质上都是当前的ApplicationContext对象,因为ApplicationContext是一个复合接口,如下:
public interface ApplicationContext extends EnvironmentCapable, ListableBeanFactory, HierarchicalBeanFactory,
        MessageSource, ApplicationEventPublisher, ResourcePatternResolver {}
这里涉及到另一道面试题,ApplicationContext和BeanFactory的区别,可以从ApplicationContext继承的这几个接口入手,除去BeanFactory相关的两个接口就是ApplicationContext独有的功能,这里不详细说明。
Aware调用时机源码分析
详情如下,忽略了部分无关代码。代码位置就是我们上文提到的initializeBean方法详情,这也说明了Aware都是在初始化阶段之前调用的!
// 见名知意,初始化阶段调用的方法
protected Object initializeBean(final String beanName, final Object bean, @Nullable RootBeanDefinition mbd) {
    // 这里调用的是Group1中的三个Bean开头的Aware
    invokeAwareMethods(beanName, bean);

    Object wrappedBean = bean;

    // 这里调用的是Group2中的几个Aware,
    // 而实质上这里就是前面所说的BeanPostProcessor的调用点!
    // 也就是说与Group1中的Aware不同,这里是通过BeanPostProcessor(ApplicationContextAwareProcessor)实现的。
    wrappedBean = applyBeanPostProcessorsBeforeInitialization(wrappedBean, beanName);

    // 这个是初始化方法,下文要介绍的InitializingBean调用点就是在这个方法里面
    invokeInitMethods(beanName, wrappedBean, mbd);

    // BeanPostProcessor的另一个调用点
    wrappedBean = applyBeanPostProcessorsAfterInitialization(wrappedBean, beanName);

    return wrappedBean;
}
可以看到并不是所有的Aware接口都使用同样的方式调用。Bean××Aware都是在代码中直接调用的,而ApplicationContext相关的Aware都是通过BeanPostProcessor#postProcessBeforeInitialization()实现的。感兴趣的可以自己看一下ApplicationContextAwareProcessor这个类的源码,就是判断当前创建的Bean是否实现了相关的Aware方法,如果实现了会调用回调方法将资源传递给Bean。
至于Spring为什么这么实现,应该没什么特殊的考量。也许和Spring的版本升级有关。基于对修改关闭,对扩展开放的原则,Spring对一些新的Aware采用了扩展的方式添加。
BeanPostProcessor的调用时机也能在这里体现,包围住invokeInitMethods方法,也就说明了在初始化阶段的前后执行。
关于Aware接口的执行顺序,其实只需要记住第一组在第二组执行之前就行了。每组中各个Aware方法的调用顺序其实没有必要记,有需要的时候点进源码一看便知。
2.2.2 简单的两个生命周期接口
至于剩下的两个生命周期接口就很简单了,实例化和属性赋值都是Spring帮助我们做的,能够自己实现的有初始化和销毁两个生命周期阶段。
2.2.2.1 InitializingBean接口
InitializingBean顾名思义,是初始化Bean相关的接口。
接口定义:
public interface InitializingBean {

    void afterPropertiesSet() throws Exception;

}看方法名,是在读完Properties文件,之后执行的方法。afterPropertiesSet()方法是在初始化过程中被调用的。
InitializingBean 对应生命周期的初始化阶段,在上面源码的invokeInitMethods(beanName, wrappedBean, mbd);方法中调用。
有一点需要注意,因为Aware方法都是执行在初始化方法之前,所以可以在初始化方法中放心大胆的使用Aware接口获取的资源,这也是我们自定义扩展Spring的常用方式。
除了实现InitializingBean接口之外还能通过注解(@PostConstruct)或者xml配置的方式指定初始化方法(init-method),至于这几种定义方式的调用顺序其实没有必要记。因为这几个方法对应的都是同一个生命周期,只是实现方式不同,我们一般只采用其中一种方式。
三种实现指定初始化方法的方法:
- 使用@PostConstruct注解,该注解作用于void方法上
- 在配置文件中配置init-method方法
<bean id="student" class="com.demo.Student" init-method="init2">
        <property name="name" value="小明"></property>
        <property name="age" value="20"></property>
        <property name="school" ref="school"></property>
</bean>- 将类实现InitializingBean接口
@Component("student")
public class Student implements InitializingBean{
    private String name;
    private int age;
	        …
}
执行:
@Component("student")
public class Student implements InitializingBean{
    private String name;
    private int age;


    public String getName() {
        return name;
    }
    public void setName(String name) {
        this.name = name;
    }
    public int getAge() {
        return age;
    }
    public void setAge(int age) {
        this.age = age;
    }

    //1.使用postconstrtct注解
    @PostConstruct
    public void init(){
        System.out.println("执行 init方法");
    }

    //2.在xml配置文件中配置init-method方法
    public void init2(){
        System.out.println("执行init2方法 ");
    }

    //3.实现InitializingBean接口
    public void afterPropertiesSet() throws Exception {
        System.out.println("执行init3方法");
    }

}
通过测试我们可以得出结论,三种实现方式的执行顺序是:
Constructor > @PostConstruct > InitializingBean > init-method
2.2.2.2 DisposableBean接口
DisposableBean 类似于InitializingBean,对应生命周期的销毁阶段,以ConfigurableApplicationContext#close()方法作为入口,实现是通过循环获取所有实现了DisposableBean接口的Bean然后调用其destroy()方法 。
接口定义:
public interface DisposableBean {
    void destroy() throws Exception;
}
定义一个实现了DisposableBean接口的Bean:
public class IndexBean implements InitializingBean,DisposableBean {
    public void destroy() throws Exception {
        System.out.println("destroy");
    }
    public void afterPropertiesSet() throws Exception {
        System.out.println("init-afterPropertiesSet()");
    }
    public void test(){
        System.out.println("init-test()");
    }
}
执行:
public class Main {
    public static void main(String[] args) {
        AbstractApplicationContext applicationContext=new ClassPathXmlApplicationContext("classpath:application-usertag.xml");
        System.out.println("init-success");
        applicationContext.registerShutdownHook();
    }
}
执行结果:
init-afterPropertiesSet()
init-test()
init-success
destroy
也就是说,在对象销毁的时候,会去调用DisposableBean的destroy方法。在进入到销毁过程时先去调用一下DisposableBean的destroy方法,然后后执行 destroy-method声明的方法(用来销毁Bean中的各项数据)。
三、扩展阅读: BeanPostProcessor 注册时机与执行顺序
首先要明确一个概念,在spring中一切皆bean
所有的组件都会被作为一个bean装配到spring容器中,过程如下图:
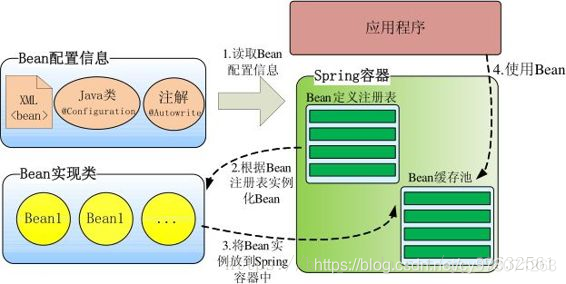
所以我们前面所讲的那些拓展点,也都会被作为一个个bean装配到spring容器中
3.1 注册时机
我们知道BeanPostProcessor也会注册为Bean,那么Spring是如何保证BeanPostProcessor在我们的业务Bean之前初始化完成呢?
请看我们熟悉的refresh()方法的源码,省略部分无关代码(refresh的详细注解见refresh()):
@Override
public void refresh() throws BeansException, IllegalStateException {
    synchronized (this.startupShutdownMonitor) {
        try {
            // Allows post-processing of the bean factory in context subclasses.
            postProcessBeanFactory(beanFactory);

            // Invoke factory processors registered as beans in the context.
            invokeBeanFactoryPostProcessors(beanFactory);

            // Register bean processors that intercept bean creation.
            // 注册所有BeanPostProcesser的方法
            registerBeanPostProcessors(beanFactory);

            // Initialize message source for this context.
            initMessageSource();

            // Initialize event multicaster for this context.
            initApplicationEventMulticaster();

            // Initialize other special beans in specific context subclasses.
            onRefresh();

            // Check for listener beans and register them.
            registerListeners();

            // Instantiate all remaining (non-lazy-init) singletons.
            // 所有单例非懒加载Bean的创建方法
            finishBeanFactoryInitialization(beanFactory);

            // Last step: publish corresponding event.
            finishRefresh();
        }
}
可以看出,Spring是先执行registerBeanPostProcessors()进行BeanPostProcessors的注册,然后再执行finishBeanFactoryInitialization创建我们的单例非懒加载的Bean。
3.2 执行顺序
BeanPostProcessor有很多个,而且每个BeanPostProcessor都影响多个Bean,其执行顺序至关重要,必须能够控制其执行顺序才行。关于执行顺序这里需要引入两个排序相关的接口:PriorityOrdered、Ordered
- PriorityOrdered是一等公民,首先被执行,PriorityOrdered公民之间通过接口返回值排序
- Ordered是二等公民,然后执行,Ordered公民之间通过接口返回值排序
- 都没有实现是三等公民,最后执行
在以下源码中,可以很清晰的看到Spring注册各种类型BeanPostProcessor的逻辑,根据实现不同排序接口进行分组。优先级高的先加入,优先级低的后加入。
// First, invoke the BeanDefinitionRegistryPostProcessors that implement PriorityOrdered.
// 首先,加入实现了PriorityOrdered接口的BeanPostProcessors,顺便根据PriorityOrdered排了序
String[] postProcessorNames =
beanFactory.getBeanNamesForType(BeanDefinitionRegistryPostProcessor.class, true, false);
for (String ppName : postProcessorNames) {
    if (beanFactory.isTypeMatch(ppName, PriorityOrdered.class)) {
        currentRegistryProcessors.add(beanFactory.getBean(ppName, BeanDefinitionRegistryPostProcessor.class));
        processedBeans.add(ppName);
    }
}

sortPostProcessors(currentRegistryProcessors, beanFactory);
registryProcessors.addAll(currentRegistryProcessors);
invokeBeanDefinitionRegistryPostProcessors(currentRegistryProcessors, registry);
currentRegistryProcessors.clear();

// Next, invoke the BeanDefinitionRegistryPostProcessors that implement Ordered.
// 然后,加入实现了Ordered接口的BeanPostProcessors,顺便根据Ordered排了序
postProcessorNames = beanFactory.getBeanNamesForType(BeanDefinitionRegistryPostProcessor.class, true, false);
for (String ppName : postProcessorNames) {
    if (!processedBeans.contains(ppName) && beanFactory.isTypeMatch(ppName, Ordered.class)) {
        currentRegistryProcessors.add(beanFactory.getBean(ppName, BeanDefinitionRegistryPostProcessor.class));
        processedBeans.add(ppName);
    }
}
sortPostProcessors(currentRegistryProcessors, beanFactory);
registryProcessors.addAll(currentRegistryProcessors);
invokeBeanDefinitionRegistryPostProcessors(currentRegistryProcessors, registry);
currentRegistryProcessors.clear();
// Finally, invoke all other BeanDefinitionRegistryPostProcessors until no further ones appear.

// 最后加入其他常规的BeanPostProcessors
boolean reiterate = true;
while (reiterate) {
    reiterate = false;
    postProcessorNames = beanFactory.getBeanNamesForType(BeanDefinitionRegistryPostProcessor.class, true, false);
    for (String ppName : postProcessorNames) {
        if (!processedBeans.contains(ppName)) {
            currentRegistryProcessors.add(beanFactory.getBean(ppName, BeanDefinitionRegistryPostProcessor.class));
            processedBeans.add(ppName);
            reiterate = true;
        }
    }
    sortPostProcessors(currentRegistryProcessors, beanFactory);
    registryProcessors.addAll(currentRegistryProcessors);
    invokeBeanDefinitionRegistryPostProcessors(currentRegistryProcessors, registry);
    currentRegistryProcessors.clear();
}
根据排序接口返回值排序,默认升序排序,返回值越低优先级越高。
/**
 * Useful constant for the highest precedence value.
 * @see java.lang.Integer#MIN_VALUE
 */
int HIGHEST_PRECEDENCE = Integer.MIN_VALUE;
/**
 * Useful constant for the lowest precedence value.
 * @see java.lang.Integer#MAX_VALUE
 */
int LOWEST_PRECEDENCE = Integer.MAX_VALUE;
PriorityOrdered、Ordered接口作为Spring整个框架通用的排序接口,在Spring中应用广泛,也是非常重要的接口。
四、总结
Spring Bean的生命周期分为四个阶段和多个扩展点。扩展点又可以分为影响多个Bean和影响单个Bean。整理如下:
4.1 四个阶段
- 实例化 Instantiation
- 属性赋值 Populate
- 初始化 Initialization
- 销毁 Destruction
4.2 多个扩展点
- 影响多个Bean
- BeanPostProcessor
- InstantiationAwareBeanPostProcessor
- 影响单个Bean
- Aware
- Aware Group1
- BeanNameAware
- BeanClassLoaderAware
- BeanFactoryAware
- Aware Group2
- EnvironmentAware
- EmbeddedValueResolverAware
- ApplicationContextAware(ResourceLoaderAware\ApplicationEventPublisherAware\MessageSourceAware)
- Aware Group1
- 生命周期
- InitializingBean
- DisposableBean
- Aware
4.3 Bean的生命周期流程图

