https://blog.csdn.net/ilovemilk/article/details/79336951
http://www.cnblogs.com/ityouknow/p/7566682.html
https://www.cnblogs.com/ityouknow/p/7344005.html
推荐看以上博客,以下存粘贴以上博客内容
mongodb集群架构图:
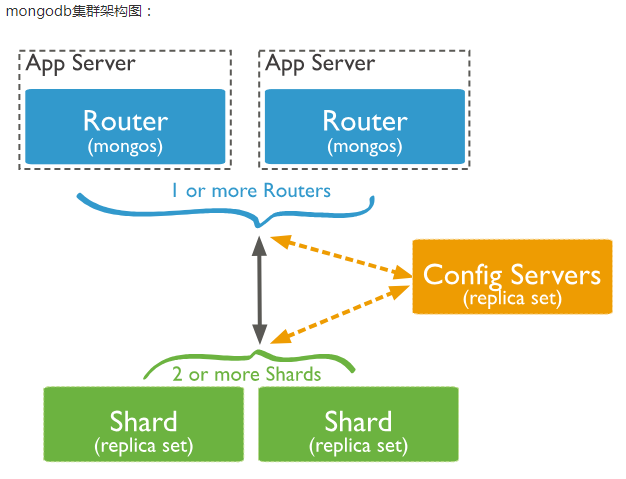
从图中可以看到有四个组件:mongos、config server、shard、replica set。
mongos,数据库集群请求的入口,所有的请求都通过mongos进行协调,不需要在应用程序添加一个路由选择器,mongos自己就是一个请求分发中心,它负责把对应的数据请求请求转发到对应的shard服务器上。在生产环境通常有多mongos作为请求的入口,防止其中一个挂掉所有的mongodb请求都没有办法操作。
config server,顾名思义为配置服务器,存储所有数据库元信息(路由、分片)的配置。mongos本身没有物理存储分片服务器和数据路由信息,只是缓存在内存里,配置服务器则实际存储这些数据。mongos第一次启动或者关掉重启就会从 config server 加载配置信息,以后如果配置服务器信息变化会通知到所有的 mongos 更新自己的状态,这样 mongos 就能继续准确路由。在生产环境通常有多个 config server 配置服务器,因为它存储了分片路由的元数据,防止数据丢失!
shard,分片(sharding)是指将数据库拆分,将其分散在不同的机器上的过程。将数据分散到不同的机器上,不需要功能强大的服务器就可以存储更多的数据和处理更大的负载。基本思想就是将集合切成小块,这些块分散到若干片里,每个片只负责总数据的一部分,最后通过一个均衡器来对各个分片进行均衡(数据迁移)。
replica set,中文翻译副本集,其实就是shard的备份,防止shard挂掉之后数据丢失。复制提供了数据的冗余备份,并在多个服务器上存储数据副本,提高了数据的可用性, 并可以保证数据的安全性。
简单了解之后,我们可以这样总结一下,应用请求mongos来操作mongodb的增删改查,配置服务器存储数据库元信息,并且和mongos做同步,数据最终存入在shard(分片)上,为了防止数据丢失同步在副本集中存储了一份,仲裁在数据存储到分片的时候决定存储到哪个节点。
统系统 centos6.9
五台服务器:192.168.0.31/32/33/34/35
安装包: mongodb-linux-x86_64-3.4.6.tgz
服务器规划
| 服务器31 | 服务器32 | 服务器33 | 服务器34 | 服务器35 |
|---|---|---|---|---|
| mongos server | mongos server | config server | config server | config server |
| shard1 server | shard2 server | shard3 server | shard4 server | shard5 server |
| shard5 server | shard1 server | shard2 server | shard3 server | shard4 server |
| shard4 server | shard5 server | shard1 server | shard2 server | shard3 server |
端口分配:
mongos:20000
config:21000
shard1:27001
shard2:27002
shard3:27003
shard4:27004
shard5:27005
1. mongodb 安装,参考之前博客。只需要安装,不需要启动。
2、创建相关目录
根据服务器的规范,分别在对应的服务器上建立conf、mongos、config、shard1、shard2、shard3、shard4、shard5等目录,因为mongos不存储数据,只需要建立日志文件目录即可。
mkdir -p /usr/local/mongodb/conf
mkdir -p /data/mongos/log
mkdir -p /data/config/data
mkdir -p /data/config/log
mkdir -p /data/shard1/data
mkdir -p /data/shard1/log
mkdir -p /data/shard2/data
mkdir -p /data/shard2/log
mkdir -p /data/shard3/data
mkdir -p /data/shard3/log
mkdir -p /data/shard4/data
mkdir -p /data/shard4/log
mkdir -p /data/shard5/data
mkdir -p /data/shard5/log
集群配置
1、config server配置服务器
在服务器33、34、35上配置以下内容:
添加配置文件:
vi /usr/local/mongodb/conf/config.conf


## content
systemLog:
  destination: file
  logAppend: true
  path: /data/config/log/config.log

# Where and how to store data.
storage:
  dbPath: /data/config/data
  journal:
    enabled: true
# how the process runs
processManagement:
  fork: true
  pidFilePath: /data/config/log/configsrv.pid

# network interfaces
net:
  port: 21000
  bindIp: 192.168.0.33

#operationProfiling:
replication:
    replSetName: config


sharding:
    clusterRole: configsvr
启动三台服务器的config server
mongod --config /usr/local/mongodb/conf/config.conf
登录任意一台配置服务器,初始化配置副本集
mongo 192.168.0.33:21000
#config变量
config = {
...    _id : "config",
...     members : [
...         {_id : 0, host : "192.168.0.33:21000" },
...         {_id : 1, host : "192.168.0.34:21000" },
...         {_id : 2, host : "192.168.0.35:21000" }
...     ]
... }
#初始化副本集
rs.initiate(config)
#查看分区状态
rs.status();
其中,"_id" : "configs"应与配置文件中配置的 replicaction.replSetName 一致,"members" 中的 "host" 为三个节点的ip和port
这样配置服务器就配置好了
2、配置分片、副本集
配置第一个分片副本集
在服务器 31、32、33上面做以下配置
配置文件
vi /usr/local/mongodb/conf/shard1.conf


#配置文件内容
# where to write logging data.
systemLog:
  destination: file
  logAppend: true
  path: /data/shard1/log/shard1.log

# Where and how to store data.
storage:
  dbPath: /data/shard1/data
  journal:
    enabled: true
  wiredTiger:
    engineConfig:
       cacheSizeGB: 20

# how the process runs
processManagement:
  fork: true
  pidFilePath: /data/shard1/log/shard1.pid

# network interfaces
net:
  port: 27001
  bindIp: 192.168.0.33

#operationProfiling:
replication:
    replSetName: shard1
sharding:
    clusterRole: shardsvr
启动三台服务器的shard1 server
mongod --config /usr/local/mongodb/conf/shard1.conf
登陆任意一台服务器,初始化副本集
mongo 192.168.0.31:27001
#使用admin数据库
use admin
#定义副本集配置
config = {
...    _id : "shard1",
...     members : [
...         {_id : 0, host : "192.168.0.31:27001" },
...         {_id : 1, host : "192.168.0.32:27001" },
...         {_id : 2, host : "192.168.0.33:27001" }
...     ]
... }


#初始化副本集配置
rs.initiate(config);


#查看分区状态
rs.status();
配置第二个分片副本集
在服务器32、33、34上面做以下配置
配置文件
vi /usr/local/mongodb/conf/shard2.conf

#配置文件内容
# where to write logging data.
systemLog:
  destination: file
  logAppend: true
  path: /data/shard2/log/shard2.log

# Where and how to store data.
storage:
  dbPath: /data/shard2/data
  journal:
    enabled: true
  wiredTiger:
    engineConfig:
       cacheSizeGB: 20

# how the process runs
processManagement:
  fork: true
  pidFilePath: /data/shard2/log/shard2.pid

# network interfaces
net:
  port: 27002
  bindIp: 192.168.0.33


#operationProfiling:
replication:
    replSetName: shard2
sharding:
    clusterRole: shardsvr
启动三台服务器的shard2 server
mongod --config /usr/local/mongodb/conf/shard2.conf
登陆任意一台服务器,初始化副本集
mongo 192.168.0.32:27002
#使用admin数据库
use admin
#定义副本集配置
config = {
...    _id : "shard2",
...     members : [
...         {_id : 0, host : "192.168.0.32:27002" },
...         {_id : 1, host : "192.168.0.33:27002" },
...         {_id : 2, host : "192.168.0.34:27002" }
...     ]
... }


#初始化副本集配置
rs.initiate(config);

#查看分区状态
rs.status();
依次做其他分片的配置......
3、配置路由服务器 mongos
以下配置在服务器31、32上执行
注意:先启动配置服务器和分片服务器,后启动路由实例
vi /usr/local/mongodb/conf/mongos.conf

systemLog:
  destination: file
  logAppend: true
  path: /data/mongos/log/mongos.log
processManagement:
  fork: true
#  pidFilePath: /usr/local/mongodb/mongos.pid

# network interfaces
net:
  port: 20000
  bindIp: 192.168.0.31
#监听的配置服务器,只能有1个或者3个 configs为配置服务器的副本集名字
sharding:
   configDB: config/192.168.0.33:21000,192.168.0.34:21000,192.168.0.35:21000
启动二台服务器的mongos server
mongos --config /usr/local/mongodb/conf/mongos.conf
4、启用分片
目前搭建了mongodb配置服务器、路由服务器,各个分片服务器,不过应用程序连接到mongos路由服务器并不能使用分片机制,还需要在程序里设置分片配置,让分片生效。
登陆任意一台mongos
mongo 192.168.0.31:20000
#使用admin数据库
use  myzcy
#串联路由服务器与分配副本集
sh.addShard("shard1/192.168.0.31:27001,192.168.0.32:27001,192.168.0.33:27001")
sh.addShard("shard2/192.168.0.32:27002,192.168.0.33:27002,192.168.0.34:27002")
sh.addShard("shard3/192.168.0.33:27003,192.168.0.34:27003,192.168.0.35:27003")
sh.addShard("shard4/192.168.0.34:27004,192.168.0.35:27004,192.168.0.31:27004")
sh.addShard("shard5/192.168.0.35:27005,192.168.0.31:27005,192.168.0.32:27005")
#查看集群状态
sh.status()
5、测试
目前配置服务、路由服务、分片服务、副本集服务都已经串联起来了,但我们的目的是希望插入数据,数据能够自动分片。连接在mongos上,准备让指定的数据库、指定的集合分片生效。
#指定testdb分片生效
db.runCommand( { enablesharding :"testdb"});
#指定数据库里需要分片的集合和片键
db.runCommand( { shardcollection : "testdb.table1",key : {id: 1} } )
或者:
#指定test分片生效
sh.enableSharding("test")
sh.shardCollection("test.users", {user_id: 1})
我们设置testdb的 table1 表需要分片,根据 user_id 自动分片到 shard1 ,shard2,shard3 上面去。要这样设置是因为不是所有mongodb 的数据库和表 都需要分片!
指定分片的片键
片键有两种模式:hash模式,range模式
使用hash模式分片: 记录在各片上的分布比较平均
mongos> sh.shardCollection( "new.person", { "_id": "hashed" } )
使用range模式分片
mongos> sh.shardCollection( "new.person2", { "name": 1 } )
要分片的库原来有数据的情况下,先建index,然后再指定片键
mongos> sh.enableSharding("new2")
mongos> use new2
mongos> db.user2.createIndex( { "username": 1 } )
mongos> sh.shardCollection( "new2.user2", { "username": 1 } )
测试分片配置结果
mongo  127.0.0.1:20000
#使用testdb
use  testdb;
#插入测试数据
for (var i = 1; i <= 100000; i++)
db.table1.save({id:i,"test1":"testval1"});
#查看分片情况如下,部分无关信息省掉了
db.table1.stats();

{
        "sharded" : true,
        "ns" : "testdb.table1",
        "count" : 100000,
        "numExtents" : 13,
        "size" : 5600000,
        "storageSize" : 22372352,
        "totalIndexSize" : 6213760,
        "indexSizes" : {
                "_id_" : 3335808,
                "id_1" : 2877952
        },
        "avgObjSize" : 56,
        "nindexes" : 2,
        "nchunks" : 3,
        "shards" : {
                "shard1" : {
                        "ns" : "testdb.table1",
                        "count" : 42183,
                        "size" : 0,
                        ...
                        "ok" : 1
                },
                "shard2" : {
                        "ns" : "testdb.table1",
                        "count" : 38937,
                        "size" : 2180472,
                        ...
                        "ok" : 1
                },
                "shard3" : {
                        "ns" : "testdb.table1",
                        "count" :18880,
                        "size" : 3419528,
                        ...
                        "ok" : 1
                }
        },
        "ok" : 1
}
可以看到数据分到3个分片,各自分片数量为: shard1 “count” : 42183,shard2 “count” : 38937,shard3 “count” : 18880。已经成功了!
后期运维
启动关闭
mongodb的启动顺序是,先启动配置服务器,在启动分片,最后启动mongos.
mongod -f /usr/local/mongodb/conf/config.conf
mongod -f /usr/local/mongodb/conf/shard1.conf
mongod -f /usr/local/mongodb/conf/shard2.conf
mongod -f /usr/local/mongodb/conf/shard3.conf
mongod -f /usr/local/mongodb/conf/mongos.conf
关闭时,直接killall杀掉所有进程
killall mongod
killall mongos命令:
sh.status() #查看集群的信息
db.account.stats() #查看集合的分布情况