格式调整
\section{格式调整}
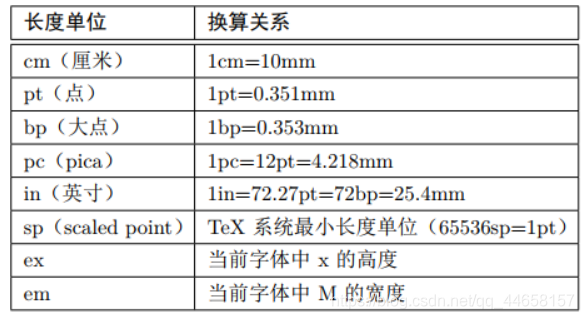
\subsection{各种长度单位}
字体使用
\subsection{字体使用}
在LaTeX中,一个字体有5种属性:编码(encoding)、族名(family),系列(series)、形状(shape)和大小(size)。
字体编码
\subsubsection{字体编码}
字体的编码根据其中包含的字符种类以及各字符的编号来划分。常见的正文字体的编码有 OT1、T1 和 EU1 等,而数学字体的编码有 OML、OMS 和 OMX 等。
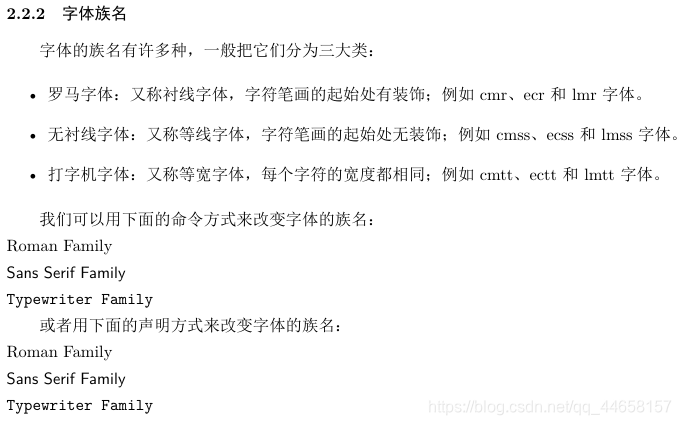
字体族名
\subsubsection{字体族名}
字体的族名有许多种,一般把它们分为三大类:
\begin{itemize}
	\item 罗马字体:又称衬线字体,字符笔画的起始处有装饰;例如 cmr、ecr 和 lmr 字体。
	\item 无衬线字体:又称等线字体,字符笔画的起始处无装饰;例如 cmss、ecss 和 lmss 字体。
	\item 打字机字体:又称等宽字体,每个字符的宽度都相同;例如 cmtt、ectt 和 lmtt 字体。
\end{itemize}
我们可以用下面的命令方式来改变字体的族名:
\noindent \textrm{Roman Family} \\
\textsf{Sans Serif Family} \\
\texttt{Typewriter Family}
或者用下面的声明方式来改变字体的族名:
\noindent {\rmfamily Roman Family} \\
{\sffamily Sans Serif Family} \\
{\ttfamily Typewriter Family}
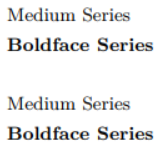
字体系列
\subsubsection{字体系列}
字体系列根据字体的粗细和宽度来划分。经常用到的如下这两种( 正常和粗体):
\noindent \textmd{Medium Series} \\
\textbf{Boldface Series} \\
\\
{\mdseries Medium Series} \\
{\bfseries Boldface Series}
\subsubsection{字体形状}
字体形状主要有这些:直立,斜体,伪斜体和小型大写。可以用下面的命令或声明来改变:
\noindent \textup{Upright Shape} \\
\textit{Italic Shape} \\
\textsl{Slanted Shape} \\
\textsc{Small Caps Shape} \\
\\
{\upshape Upright Shape} \\
{\itshape Italic Shape}\\
{\slshape Slanted Shape} \\
{\scshape Small Caps Shape}

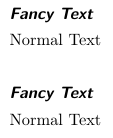
对字体的族名、系列和形状这三种样式作了修改之后,可以用 \textnormal 命令或者 \normalfont 声明来使用默认字体样式。例如:
\noindent \textit{\textbf{\textsf{Fancy Text}}}\\
\textnormal{Normal Text} \\
\\
{\itshape\bfseries\sffamily Fancy Text}\\
{\normalfont Normal Text}\\
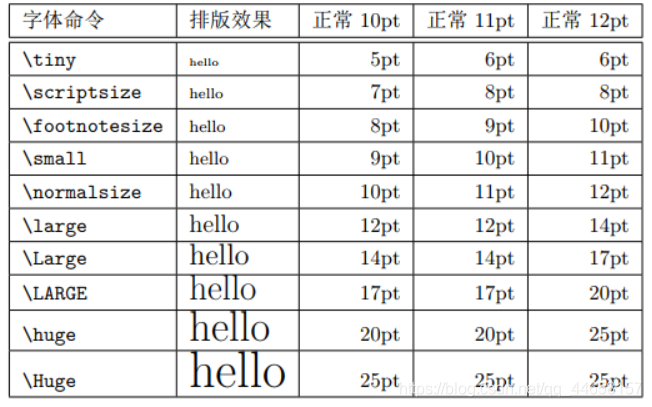
字体大小
\subsubsection{字体大小}
在 LaTeX 中可以用各种命令来改变文本字体的大小,它的实际大小和文档类的正常字体大小(即 \normalsize 的大小)设置有关,详细情形下表
段落对齐
居中对齐
\subsection{段落对齐}
\subsubsection{居中对齐}
在 LaTeX 中,可以用 \verb||center 环境得到居中的文本段落,其中可以用双斜杠换行。例如:
\noindent This is the first normal paragraph. This is the first normal paragraph.
\begin{center}
	Hi, the center. Hi, the center. Hi, the center. \\
	Hi, the center. Hi, the center. Hi, the center.
\end{center}
This is another normal paragraph. This is another normal paragraph.

如果居中段落在一行放不下,只会在最后一行是居中的,其它行都填满页面宽度。在一个环境内部,也可以用命令 centering来使得后面的文本都居中放置。
单侧对齐
\subsubsection{单侧对齐}
类似地,可以用 \verb||flushleft 和 \verb||flushright 环境分别得到向左对齐和向右对齐的文本段落。例如:
\noindent This is the first normal paragraph. This is the first normal paragraph.
\begin{flushleft}
	Hi, the left. Hi, the left. Hi, the left. Hi, the left. \\
	Hi, the left. Hi, the left. Hi, the left. Hi, the left.
\end{flushleft}
\begin{flushright}
	Hi, the right. Hi, the right. Hi, the right. Hi, the right. \\
	Hi, the right. Hi, the right. Hi, the right. Hi, the right.
\end{flushright}
This is another normal paragraph. This is another normal paragraph.
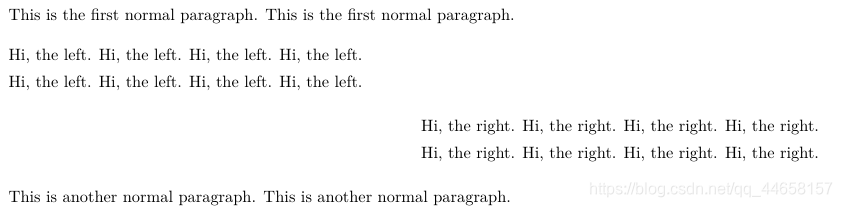
同样地,在环境内部也可以分别用\raggedleft 和\raggedright声明达到
\flushleft 和 \flushright 的效果。
页面大小布局
\subsection{页面大小布局}
前面已经说明,直接在文档类中设定页面大小时,纸张大小不会随着变化。
因此我们推荐用 geometry 宏包来设定页面大小,比如 B5 页面大小是这样设置的:
\usepackage[b5paper]{geometry}
接着我们来说说如何定制页面的布局,比如正文区域的宽度和高度,和各个边距的大小。LATEX 中提供了各种命令来定制页面布局,但是非常难用。
因此,我们同样推荐用 geometry 宏包来调整页面布局。例如本文的页面布局就是用如下的代码设定的:
\usepackage[b5paper,text={125mm,195mm},centering]{geometry}
如果你想直观地观察设置好的页面布局,可以在 geometry 宏包的选项中再加上 showframe 一项。这样 geometry 宏包将在文档的第一页画出页面的布局。
目录页格式
\subsection{目录页格式}
要调整章节标题在目录页中的格式,可以用 titletoc 宏包。该宏包的基本
命令参数如下:
\titlecontents{标题层次}[左间距]{整体格式}{标题序号}{标题内容}{指引线和页码}[下间距]
其中“标题层次”参数可以取为 part、chapter、section 等标题名以及 figure和 table 浮动图表名。“左间距”指的是“标题内容与页芯左侧的距离。因为“标题序号”一般在“标题内容”的左侧,所以除非标题居中放置或者标题无序号,“左间距”一般需要取大于 0 的值。实际上,该参数总是不可省略的。
我们通过例子来看看其它参数的使用。比如我们要将章(chapter)标题用大号粗体居中放置,同时要保留序号,则可以用下面的命令达到:
\titlecontents{chapter}
[0em]
{\filcenter\Large\bfseries}
{\contentslabel{3em}}
{}
{}
其中“标题序号”参数的 \contentslabel 命令指代该部分的序号内容,如果不写上就没有序号。
而后面的 3em 表示“标题序号”左侧和“标题内容”左侧的距离,这个长度值一般要大于 0,否则两者就重合了。
接下来看看,假如我们需要将节(section)标题去掉序号,在离页芯左侧4em 处对齐,并且用居中的点(\cdot)来画出指引线,可以用下面的命令达到:
\titlecontents{section}
[4em]
{}
{}
{}
{\titlerule*[1em]{$\cdot$}\contentspage}
其中 \titlerule* 命令用于画指引线,1em 表明指引线的各个点的距离。而 \contentpage 命令表示页码。
如果用 ctex 宏包来撰写中文文档,需要先载入 titletoc 宏包在载入 ctex 宏包,否则中文设置将会覆盖掉。正确的例子如下:
\documentclass{article}
\usepackage{titletoc}
\usepackage{ctexcap}
\begin{document}
	...
\end{document}
