0. 关于kubernetes版本变更和停用的说明
大概是2020年3月12日左右 k8s官方停止对老版本k8s的支持 按照以前的安装方法安装的k8s 一方面是必要的镜像下载不下来 另外一方面是kube-flannel.yml文件版本过老无法成功创建flannel网络。经过反复安装和测试 k8sv1.17.3+flannelv0.12才可以顺利完成安装 当然 采用更新的k8s版本也可以 本文安装的是1.17.4的版本 下边使用的flannel也是最新的 可以放心使用
写文章时的时间是 2020年3月15日14:03:29
1. 关于主机要求的简单说明
系统:centos7 即可 我用的是centos7.4
内存:如果是字符界面的系统 2G就可以 如果图形化界面 建议3G
CPU:我的是2颗 每个单核 这个没太大所谓
网络:可以根据自己喜好 选择NAT 桥接 或者仅主机 主从节点能要能够联通 在同一网段
别的好像也没有什么需要说的了
2. 环境准备
1)设置主机名并修改hosts文件
[root@localhost ~]# hostnamectl set-hostname k8s-master01
[root@localhost ~]# hostnamectl set-hostname k8s-node01
[root@localhost ~]# hostnamectl set-hostname k8s-node02

192.168.20..130 k8s-master01
192.168.20.131 k8s-node01
192.168.20.132 k8s-node02
2) 关闭防火墙 selinux swap分区
[root@localhost ~]# systemctl stop firewalld && systemctl disable firewalld
[root@localhost ~]# swapoff -a && sed -i '/ swap / s/^\(.*\)$/#\1/g' /etc/fstab
[root@localhost ~]# setenforce 0 && sed -i 's/^SELINUX=.*/SELINUX=disabled/' /etc/selinux/config
3)必要模块的加载
查看:lsmod | grep br_netfilter
如果没有看到 则加载:
[root@localhost ~]# modprobe br_netfilter
4)修改内核参数 开启网桥模式
[root@localhost ~]# cat <<EOF >  /etc/sysctl.d/kubernetes.conf
net.bridge.bridge-nf-call-ip6tables = 1
net.bridge.bridge-nf-call-iptables = 1
EOF
[root@localhost ~]# sysctl -p /etc/sysctl.d/kubernetes.conf
5)调整系统时区
设置系统时区为 中国/上海
[root@localhost ~]# timedatectl set-timezone Asia/Shanghai

进行网络对时
[root@localhost ~]# ntpdate ntp.ntsc.ac.cn
3. 安装docker
[root@localhost ~]# yum install -y yum-utils device-mapper-persistent-data lvm2
[root@localhost ~]# yum-config-manager \
--add-repo \
http://mirrors.aliyun.com/docker-ce/linux/centos/docker-ce.repo
[root@localhost ~]# yum -y install docker-ce

# 重启docker服务
[root@localhost ~]# systemctl daemon-reload && systemctl restart docker && systemctl enable docker
4. 安装kubeadm等必备服务
[root@localhost ~]# cat <<EOF > /etc/yum.repos.d/kubernetes.repo
[kubernetes]
name=Kubernetes
baseurl=http://mirrors.aliyun.com/kubernetes/yum/repos/kubernetes-el7-x86_64
enabled=1
gpgcheck=0
repo_gpgcheck=0
gpgkey=http://mirrors.aliyun.com/kubernetes/yum/doc/yum-key.gpg
http://mirrors.aliyun.com/kubernetes/yum/doc/rpm-package-key.gpg
EOF
[root@localhost ~]# yum -y install kubeadm-1.17.4 kubectl-1.17.4 kubelet-1.17.4
[root@localhost ~]# systemctl enable kubelet.service
5. 初始化主节点、安装flannel网络
从k8s官方下载镜像特别慢 建议从阿里云下载 完全可用
主节点初始化
[root@localhost ~]# kubeadm init  --kubernetes-version=v1.17.4 --apiserver-advertise-address=192.168.20.130 --pod-network-cidr=10.244.0.0/16 --image-repository=registry.aliyuncs.com/google_containers

安装flannel网络
[root@localhost ~]# wget https://raw.githubusercontent.com/coreos/flannel/master/Documentation/kube-flannel.yml
[root@localhost ~]# kubectl apply -f kube-flannel.yml

关于从节点下载镜像:
在主节点上执行kubeadm config images list 可以查看用到的镜像
从节点pull这些镜像下来即可
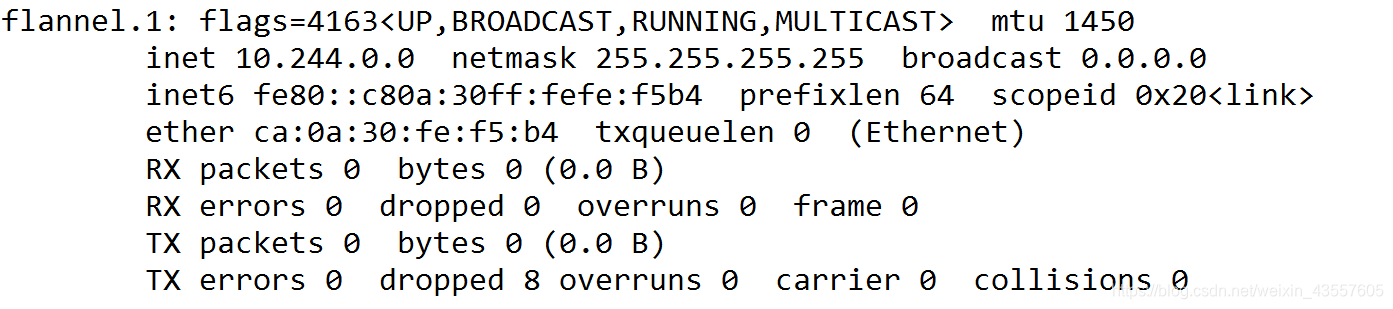
flannel网络部署完成后 使用ifconfig看master 会发现一个叫flannel.1的网桥 如下
两个node节点执行加入集群的指令(在初始化时候屏幕上输出的日志里) 加入集群
[root@localhost ~]# kubeadm join 192.168.20.130:6443 --token abcdef.0123456789abcdef \
    --discovery-token-ca-cert-hash sha256:a5e9dfa94b5fd8cdb4132df91d584a323bdbd46dbae558a15d6ce9a2711ae300
master端查看节点状态
[root@k8s-master01 flannel]# kubectl get nodes
NAME           STATUS   ROLES    AGE     VERSION
k8s-master01   Ready    master   19m     v1.17.4
k8s-node01     Ready    <none>   25s     v1.17.4
k8s-node02     Ready    <none>   2m16s   v1.17.4
6. 问题及解决
1. 创建flannel时报错如下的时候 重新初始化
[root@k8s-master01 ~]# kubectl apply -f kube-flannel.yml
Unable to connect to the server: x509: certificate signed by unknown authority (possibly because of "crypto/rsa: verification error" while trying to verify candidate authority certificate "kubernetes")
重新初始化的操作
[root@k8s-master01 ~]# kubeadm reset
之后就是初始化的操作了
2. 从节点加入集群时报错
如下 如果加入时报错
[preflight] Running pre-flight checks
error execution phase preflight: [preflight] Some fatal errors occurred:
        [ERROR FileAvailable--etc-kubernetes-kubelet.conf]: /etc/kubernetes/kubelet.conf already exists
        [ERROR Port-10250]: Port 10250 is in use
        [ERROR FileAvailable--etc-kubernetes-pki-ca.crt]: /etc/kubernetes/pki/ca.crt already exists
[preflight] If you know what you are doing, you can make a check non-fatal with `--ignore-preflight-errors=...`

此时 从节点kubeadm reset一下再试就好了
