一、SpringBoot的helloworld程序
新建一个maven项目,在pow.xml中加入:
<?xml version="1.0" encoding="UTF-8"?>
<project xmlns="http://maven.apache.org/POM/4.0.0" xmlns:xsi="http://www.w3.org/2001/XMLSchema-instance"
         xsi:schemaLocation="http://maven.apache.org/POM/4.0.0 https://maven.apache.org/xsd/maven-4.0.0.xsd">
    <modelVersion>4.0.0</modelVersion>
    <parent>
        <groupId>org.springframework.boot</groupId>
        <artifactId>spring-boot-starter-parent</artifactId>
        <version>2.2.5.RELEASE</version>
        <relativePath/> <!-- lookup parent from repository -->
    </parent>
    <groupId>com.example</groupId>
    <artifactId>hellospringboot</artifactId>
    <version>0.0.1-SNAPSHOT</version>
    <name>hellospringboot</name>
    <description>Demo project for Spring Boot</description>

    <properties>
        <java.version>1.8</java.version>
    </properties>

    <dependencies>
        <dependency>
            <groupId>org.springframework.boot</groupId>
            <artifactId>spring-boot-starter-web</artifactId>
        </dependency>

        <dependency>
            <groupId>org.springframework.boot</groupId>
            <artifactId>spring-boot-starter-test</artifactId>
            <scope>test</scope>
            <exclusions>
                <exclusion>
                    <groupId>org.junit.vintage</groupId>
                    <artifactId>junit-vintage-engine</artifactId>
                </exclusion>
            </exclusions>
        </dependency>
    </dependencies>

    <build>
        <plugins>
            <plugin>
                <groupId>org.springframework.boot</groupId>
                <artifactId>spring-boot-maven-plugin</artifactId>
            </plugin>
        </plugins>
    </build>

</project>
然后使maven导入依赖包。
然后我们新建一个主程序Application
package com.ogj.helloworld;

import org.springframework.boot.SpringApplication;
import org.springframework.boot.autoconfigure.SpringBootApplication;

@SpringBootApplication
public class Application {
    public static void main(String[] args) {
        SpringApplication.run(Application.class,args);
    }
}
我们再写一个helloworld的Controller的class
package com.ogj.helloworld.Controller;

import org.springframework.stereotype.Controller;
import org.springframework.web.bind.annotation.RequestMapping;
import org.springframework.web.bind.annotation.ResponseBody;

@Controller
public class hello {
    @ResponseBody
    @RequestMapping("/hello")
    public String sayhello(){
        return "hello World!";
    }
}
然后运行application即可:

二、SpringBoot打包过程
-
我们不需要进行war的打包部署,Spring-boot的机制可以直接打包成jar文件,然后用java -jar 即可运行;
-
在spring的官方文档下找到:

- 然后找到Geting Start:

-
把该配置复制到Spring-Boot的pow.xml文件中,即可。
-


双击进行打包。
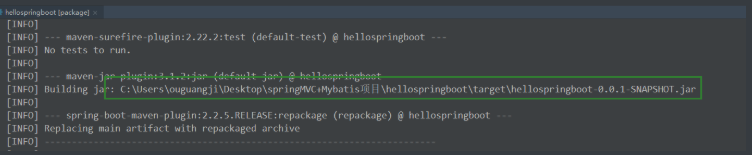
这样就把该项目打包成了jar包,我们可以把该jar包拿到只要有java环境的机子下就可以运行,不需要再配置tomcat服务器等配置,因为所有的tomcat已经被嵌入到了springboot下面。
我们就来看一下是不是真的嵌入了呢?

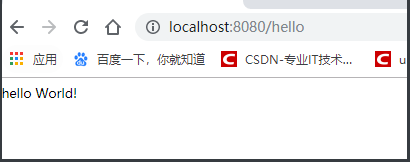
果然是这个样子,tomcat已经被springboot打包到了jar中,我们直接用java -jar xx就可以运行了

使用浏览器访问:
三、主程序的分析:
1.Application的分析:
package com.ogj.helloworld;

import org.springframework.boot.SpringApplication;
import org.springframework.boot.autoconfigure.SpringBootApplication;

@SpringBootApplication
public class Application {
    public static void main(String[] args) {
        SpringApplication.run(Application.class,args);
    }
}
@SpringBootApplication:SpringBoot 应用标注在某个类上,就说明这个类是SpringBoot的主配置类,SpringBoot就应该运行这个类的main方法来启动SpringBoot应用。
我们来看一下这个注解是什么:按住ctrl然后点击进入:
@Target({ElementType.TYPE})
@Retention(RetentionPolicy.RUNTIME)
@Documented
@Inherited
@SpringBootConfiguration
@EnableAutoConfiguration
@ComponentScan(
    excludeFilters = {@Filter(
    type = FilterType.CUSTOM,
    classes = {TypeExcludeFilter.class}
), @Filter(
    type = FilterType.CUSTOM,
    classes = {AutoConfigurationExcludeFilter.class}
)}
)
这是一个组合注解类。
@SpringBootConfiguration:SpringBoot的配置注解。
@Confirguration: 就是一个配置类注解(Spring)。
配置类—>就是spring中的配置文件,是容器中的一个组件。
@EnableAutoConfiguration:开启自动配置功能。
@Target({ElementType.TYPE})
@Retention(RetentionPolicy.RUNTIME)
@Documented
@Inherited
@AutoConfigurationPackage
@Import({AutoConfigurationImportSelector.class})
@AutoConfigurationPackage:自动配置包。
@Import({Registrar.class}):给容器中导入一个组件,这个是spring的最底层注解。
将主配置类(SpringBootApplication标注的类)的所在包及下面的包里的所有组件扫描到Spring容器中。
@Import({AutoConfigurationImportSelector.class}):给容器导入组件。
![[外链图片转存失败,源站可能有防盗链机制,建议将图片保存下来直接上传(img-CVUmqTvv-1583427885901)(C:\Users\ouguangji\AppData\Roaming\Typora\typora-user-images\1583418008118.png)]](https://img-blog.csdnimg.cn/2020030601090634.png)
![[外链图片转存失败,源站可能有防盗链机制,建议将图片保存下来直接上传(img-TZT9NA7e-1583427885904)(C:\Users\ouguangji\AppData\Roaming\Typora\typora-user-images\1583419924862.png)]](https://img-blog.csdnimg.cn/20200306010918571.png?x-oss-process=image/watermark,type_ZmFuZ3poZW5naGVpdGk,shadow_10,text_aHR0cHM6Ly9ibG9nLmNzZG4ubmV0L3FxXzQxNjE3ODQ4,size_16,color_FFFFFF,t_70)
进入getCondidateConfigurations函数:
![[外链图片转存失败,源站可能有防盗链机制,建议将图片保存下来直接上传(img-YkbmUGNV-1583427885906)(C:\Users\ouguangji\AppData\Roaming\Typora\typora-user-images\1583419973514.png)]](https://img-blog.csdnimg.cn/20200306010936388.png)
然后我们进入loadFactoryNames函数:
![[外链图片转存失败,源站可能有防盗链机制,建议将图片保存下来直接上传(img-vAfqMyFX-1583427885908)(C:\Users\ouguangji\AppData\Roaming\Typora\typora-user-images\1583420159746.png)]](https://img-blog.csdnimg.cn/20200306010953200.png?x-oss-process=image/watermark,type_ZmFuZ3poZW5naGVpdGk,shadow_10,text_aHR0cHM6Ly9ibG9nLmNzZG4ubmV0L3FxXzQxNjE3ODQ4,size_16,color_FFFFFF,t_70)

我们可以看到,这个load函数中:
1.我们获取到了这个项目的包名称;
2.我们进入一个新的函数,这个函数加载了我们的Maven中的源包。
我们可以来看一个Maven中的配置:

load函数加载了每一个包中的spring.factories文件,然后每个spring.factories文件中包含了非常多的包配置文件。
通过这一系列的操作,将所有需要的组件按照数组的方式全部导入到容器中,这个导入会给容器导入很多自动配置类,类似于:

里面类似有web的配置类、webmvc的配置类等等。
这样我们就做到了所有spring、springmvc、springboot的包自动的导入到了容器中,我们不再需要些xml文件来配置了。
