安装环境:
VMware-15.1.0 CentOS-7-x86_64-DVD-1611
安装步骤:
1) 查看系统自带的Mariadb数据库
[root@test01 sbin]# rpm -qa|grep mariadb

2) 卸载自带数据库
[root@test01 sbin]# rpm -e --nodeps mariadb-libs-5.5.52-1.el7.x86_64
3)删除etc目录下的my.cnf文件
[root@test01 sbin]# rm /etc/my.cnf
rm: 无法删除"/etc/my.cnf": 没有那个文件或目录
4) 检查Mysql是否存在,存在则删除
[root@test01 sbin]# rpm -qa | grep mysql
5) 检查mysql组和用户是否存在,如无创建
[root@test01 sbin]# cat /etc/group | grep mysql
[root@test01 sbin]# cat /etc/passwd | grep mysql

删除用户和组
userdel mysql
groupdel mysql
6) 创建用户和组
[root@test01 sbin]# groupadd mysql
[root@test01 sbin]# useradd -g mysql mysql
7) 修改密码,密码设置为123456即可
[root@test01 sbin]# passwd mysql
更改用户 mysql 的密码 。
新的 密码:
无效的密码: 密码少于 8 个字符
重新输入新的 密码:
抱歉,密码不匹配。
新的 密码:
无效的密码: 密码少于 8 个字符
重新输入新的 密码:
passwd:所有的身份验证令牌已经成功更新。
8) 进入到/usr/local目录,
[root@test01 sbin]# cd /usr/local/
9)通过Xftp同居将mysql压缩包上传到该目录下

10)解压
[root@test01 local]# tar -zxvf mysql-5.7.24-linux-glibc2.12-x86_64.tar.gz
11)重命名,方便后续操作
[root@test01 local]# mv mysql-5.7.24-linux-glibc2.12-x86_64 mysql57
12)添加进用户和组
[root@test01 local]# chown -R mysql mysql57/
[root@test01 local]# chgrp -R mysql mysql57/
13) 进入mysql57目录 创建data目录
[root@test01 local]# cd mysql57
[root@test01 mysql57]# mkdir data
[root@test01 mysql57]# chown -R mysql:mysql data
14) 在/etc下创建my.cnf文件时mysql的配置文件,5.7.18之后没有该文件了
[root@test01 mysql57]# vi /etc/my.cnf
15)文件内容
[mysql]
# 设置mysql客户端默认字符集
default-character-set=utf8
[mysqld]
skip-name-resolve
#设置3306端口
port = 3306
# 设置mysql的安装目录
basedir=/usr/local/mysql57
# 设置mysql数据库的数据的存放目录
datadir=/usr/local/mysql57/data
# 允许最大连接数
max_connections=200
# 服务端使用的字符集默认为8比特编码的latin1字符集
character-set-server=utf8
# 创建新表时将使用的默认存储引擎
default-storage-engine=INNODB
lower_case_table_names=1
max_allowed_packet=16M
16) 配置路径,其中的路径不同在需要修改
[root@test01 mysql57]# bin/mysql_install_db --user=mysql --basedir=/usr/local/mysql57/ --datadir=/usr/local/mysql57/data/
2020-03-24 20:43:05 [WARNING] mysql_install_db is deprecated. Please consider switching to mysqld --initialize
2020-03-24 20:43:07 [WARNING] The bootstrap log isn't empty:
2020-03-24 20:43:07 [WARNING] 2020-03-24T12:43:05.542366Z 0 [Warning] --bootstrap is deprecated. Please consider using --initialize instead
2020-03-24T12:43:05.543904Z 0 [Warning] Changed limits: max_open_files: 1024 (requested 5000)
2020-03-24T12:43:05.543917Z 0 [Warning] Changed limits: table_open_cache: 407 (requested 2000)
17) 安装和初始化
[root@test01 mysql57]# cp ./support-files/mysql.server /etc/init.d/mysqld
[root@test01 mysql57]# chown 777 /etc/my.cnf
[root@test01 mysql57]#  chmod +x /etc/init.d/mysqld
[root@test01 mysql57]# /etc/init.d/mysqld restart
 ERROR! MySQL server PID file could not be found!
Starting MySQL.Logging to '/usr/local/mysql57/data/test01.err'.
 SUCCESS!
18) 设置开机启动
[root@test01 mysql57]# chkconfig --level 35 mysqld on
[root@test01 mysql57]#  chkconfig --list mysqld

注意:该输出结果只显示 SysV 服务,并不包含原生 systemd 服务。SysV 配置数据可能被原生 systemd 配置覆盖。
      如果您想列出 systemd 服务,请执行 'systemctl list-unit-files'。
      欲查看对特定 target 启用的服务请执行
      'systemctl list-dependencies [target]'。

mysqld             0:关    1:关    2:开    3:开    4:开    5:开    6:关
19)
[root@test01 mysql57]# chmod +x /etc/rc.d/init.d/mysqld
[root@test01 mysql57]# chkconfig --add mysqld
[root@test01 mysql57]# chkconfig --list mysqld

注意:该输出结果只显示 SysV 服务,并不包含原生 systemd 服务。SysV 配置数据可能被原生 systemd 配置覆盖。
      如果您想列出 systemd 服务,请执行 'systemctl list-unit-files'。
      欲查看对特定 target 启用的服务请执行
      'systemctl list-dependencies [target]'。

mysqld             0:关    1:关    2:开    3:开    4:开    5:开    6:关
[root@test01 mysql57]# service mysqld status
 SUCCESS! MySQL running (8805)
20) 配置环境变量
[root@test01 mysql57]# vi /etc/profile

[root@test01 mysql57]# source /etc/profile
21) 获取初始密码,这个密码一定要记住
[root@test01 mysql57]# cat /root/.mysql_secret
# Password set for user 'root@localhost' at 2020-03-24 20:43:05
q%di+mmm6s<l
22) 登录数据库
[root@test01 mysql57]# mysql -uroot -p
Enter password:   在此处输入上面获取的初始密码
Welcome to the MySQL monitor.  Commands end with ; or \g.
Your MySQL connection id is 3
Server version: 5.7.24

Copyright (c) 2000, 2018, Oracle and/or its affiliates. All rights reserved.

Oracle is a registered trademark of Oracle Corporation and/or its
affiliates. Other names may be trademarks of their respective
owners.

Type 'help;' or '\h' for help. Type '\c' to clear the current input statement.

mysql>
23) 设置新密码
mysql> set PASSWORD = PASSWORD('123456');
Query OK, 0 rows affected, 1 warning (0.01 sec)
24) 刷新
mysql> flush privileges;
Query OK, 0 rows affected (0.00 sec)
25) 添加远程访问权限
第一步: 使用数据库
mysql> use mysql
Reading table information for completion of table and column names
You can turn off this feature to get a quicker startup with -A

Database changed

第二步: 修改表中的值
mysql> update user set host='%' where user='root';
Query OK, 1 row affected (0.00 sec)
Rows matched: 1  Changed: 1  Warnings: 0

第三步:表示可以通过root用户密码为123456进行远程访问
mysql>  GRANT ALL PRIVILEGES ON *.* TO 'root'@'%' IDENTIFIED BY '123456' WITH GRANT OPTION;
Query OK, 0 rows affected, 1 warning (0.00 sec)

第四步: 刷新权限
mysql> flush privileges;
Query OK, 0 rows affected (0.00 sec)
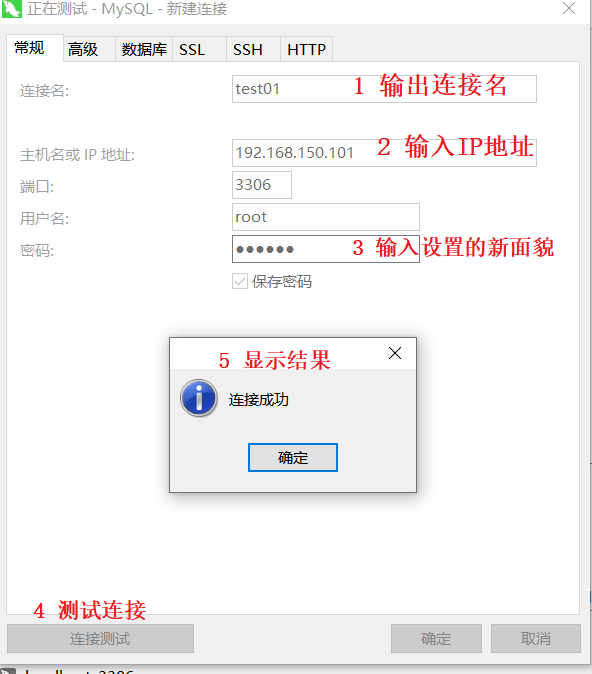
26)在windows测试
