前一段时间写了一个基于微信端的保险项目,用到了mint-ui的picker,当时在选择地区的三级联动这一块,确实徘徊很长时间,很大程度是因为不太理解mint-ui的文档,用了很多很复杂的方法,最后还是苦心钻研文档,才发现,官方提供的方法写起来非常简单。现在回过头来,觉得有必要记录一下,指引那些和我曾经一样懵懂的少年。ok,抒情到此为止,介绍一下背景,项目没有搭建vue脚手架,引入的vue和mint-ui的cdn,写法上有些许不同,但是思路完全一下,各位看官大人不必惊慌。我已经努力把代码整理的尽可能的详细,大家不要头晕,我只说重点。
首先展示一下效果图
HTML页面没什么好说的,应该没人会卡在这一部分:
-
<div class="weui-cell weui-cell_input font-size-8" style="background-color: white;" @click="openAreaPopup" >
-
<div class="weui-cell__hd">
-
<div class="weui-label">选择地区
</div>
-
</div>
-
<div class="weui-cell__bd" >
-
<input name="isareastart" class="weui-input color-black" :value='areaValue' disabled />
-
</div>
-
<div class="weui-cell__ft weui-cell__ft_in-access">
</div>
-
</div>
-
-
<mt-popup v-model="areaVisible" popup-transition="popup-fade" position="bottom" style="width: 100%;" >
-
<mt-picker :slots="areaList" value-Key="name" :show-toolbar="true" @change="selectArea">
-
<Slot>
-
<div class="confirmKey flex justify-content-between font-size-9 border-box">
-
<div class="color-grey" @click="closePopup">取消
</div>
-
<div class="color-green" @click="sureArea">确定
</div>
-
</div>
-
</Slot>
-
</mt-picker>
-
</mt-popup>
JS:
1、首先创建一个solts,确定picker的格式和初始数据
-
//注意这一级,二级,三级的含义,下边会经常提到级别。
-
areaList:[
-
{
//一级 省
-
flex:
1,
-
values: [
"请选择"],
-
className:
'slot1',
-
textAlign:
'center'
-
}, {
-
divider:
true,
-
content:
'-',
-
className:
'slot1'
-
}, {
//二级 市
-
flex:
1,
-
values: [
"请选择"],
-
className:
'slot1',
-
textAlign:
'center'
-
},{
-
divider:
true,
-
content:
'-',
-
className:
'slot1'
-
},{
//三级 区
-
flex:
1,
-
values: [
"请选择"],
-
className:
'slot1',
-
textAlign:
'center'
-
}
-
],
values 为每一级slot的值,className 为这一级的样式名称,textAlign为这一级的文本对齐方式。
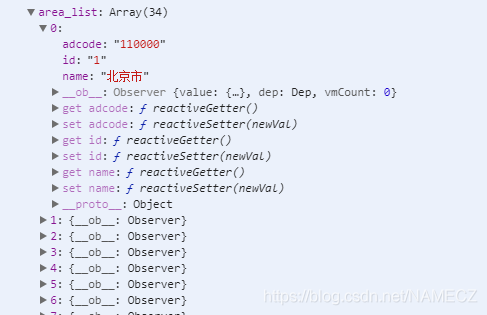
2、因为地区的数据都是动态请求后台获取的,所以初始化的时候至少要给areaList的第一级省的数据加载出来并放入areaList[0].values 中,否则会出现用户首次选择地区的时候没有数据。
-
beforeMount:
function(){
-
-
},
-
mounted:
function(){
-
let that =
this;
-
axios.post(
'ajax?_ajaxurl=arealist')
-
.then(
function (res) {
-
console.log(res);
-
that.areaList[
0].values=res.data.area_list;
-
})
-
.catch(
function (error) {
-
console.log(error);
-
});
-
},
在beforeMount和mounted中请求数据都是可以的,看个人喜好。
我们公司返回的地区数据为下图所示:
3、我们需要了解picker实例上的方法
setSlotValues(index, values):设定给定 slot 的备选值数组 index从0开始。
getValues():获取所有 slot 目前被选中的值(分隔符 slot 除外)
这两个方法我们将会用到
思路是这样:
① 用户选择省后,得到省的id ;
② 通过省的id进行axios请求获取到该省下市的数据;
③ 用setSlotValues(index, values)方法将市的数据放入areaList的二级中;
④ 用户选择市后,获取到市的id;
⑤ 通过市的id进行axios请求获取到该市下区的数据;
⑥ 用setSlotValues(index, values)方法将区的数据放入areaList的三级中;
⑦ 用getValues()获取到用户选择的数据
需要注意的是:
axios请求一般为异步请求,数据不能及时获取,从而导致③④⑤⑥⑦步不能正常进行,
所以这里我们要做一个处理,将axios请求转换为同步,此处使用到promise;
-
//调取地区列表的函数
-
area(id){
-
let that =
this;
-
//因为我们需要拿到axios请求的数据,来进行下一个axios的请求,
-
//所以我们这里使用promise对象,将异步转换为同步。
-
let promise=
new
Promise(
function(resolve,reject){
-
let o={
-
pid:id
-
}
-
axios.post(
'ajax?_ajaxurl=arealist',Qs.stringify(o))
-
.then(
function (res) {
-
resolve(res.data.area_list);
-
})
-
.catch(
function (error) {
-
console.log(error);
-
});
-
})
-
return promise;
-
-
},
没了解过promise的可以移步https://blog.csdn.net/NAMECZ/article/details/84954418,让你30秒快速上手promise。
所以这一块我们的代码是这样子的:
-
// 选择地区
-
selectArea(picker,values){
-
let that =
this;
-
console.log(
"values",values);
//你选中的值
-
that.area(values[
0][
"id"]).then(
function(data){
//通过一级 省的id 获取市的列表
-
picker.setSlotValues(
1,data);
//将市的地区列表放入 areaList的二级列表中
-
});
-
that.area(values[
1][
"id"]).then(
function(data){
//通过 二级 市的id 获取区域的列表
-
picker.setSlotValues(
2,data);
//将区的地区列表放入 areaList的三级列表中
-
});
-
let arr = picker.getValues();
-
that.cityName=
`${arr[0].name}-${arr[1].name}-${arr[2].name}`;
-
that.cityCode={
-
province:arr[
0].adcode,
-
city:arr[
1].adcode,
-
county:arr[
2].adcode
-
};
-
-
},
4、到此为止三级联动的功能已经实现了,下边贴出完整代码
-
new Vue({
-
el:
"#app",
-
data:{
-
handler:
function(e){e.preventDefault();},
//阻止body滑动
-
areaList:[
-
{
//一级 省
-
flex:
1,
-
values: [
"请选择"],
-
className:
'slot1',
-
textAlign:
'center'
-
}, {
-
divider:
true,
-
content:
'-',
-
className:
'slot1'
-
}, {
//二级 市
-
flex:
1,
-
values: [
"请选择"],
-
className:
'slot1',
-
textAlign:
'center'
-
},{
-
divider:
true,
-
content:
'-',
-
className:
'slot1'
-
},{
//三级 区
-
flex:
1,
-
values: [
"请选择"],
-
className:
'slot1',
-
textAlign:
'center'
-
}
-
],
-
flag:
false,
//初始时禁止picker自动加载
-
areaVisible:
false,
//初始选择地区弹窗为关闭状态
-
areaValue:
"省-市-区",
//页面上显示的内容
-
cityName:
"",
//最终选中的地区的名字
-
cityCode:
"",
//最终选中的地区的id
-
},
-
watch:{
-
areaVisible:
function(newvs,oldvs){
//判断选择地区弹窗的状态
-
console.log(
"newvs",newvs);
-
console.log(
"oldvs",oldvs);
-
if(newvs){
//如果areaVisible的值为true,说明弹窗出现
-
this.closeTouch();
//阻止body滑动
-
}
else{
//如果areaVisible的值为false,说明弹窗隐藏
-
this.openTouch();
//恢复body滑动
-
}
-
},
-
},
-
beforeMount:
function(){
-
-
},
-
mounted:
function(){
-
let that =
this;
-
axios.post(
'ajax?_ajaxurl=arealist')
-
.then(
function (res) {
-
console.log(res);
-
that.areaList[
0].values=res.data.area_list;
-
})
-
.catch(
function (error) {
-
console.log(error);
-
});
-
},
-
methods:{
-
// 打开选择地区的弹窗
-
openAreaPopup(){
-
let that =
this;
-
that.areaVisible=
true;
-
that.flag=
true;
-
},
-
// 选择地区
-
selectArea(picker,values){
-
let that =
this;
-
// console.log("picker",picker);
-
// console.log("values",values);
-
if(that.flag){
-
that.area(values[
0][
"id"]).then(
function(data){
//通过一级 省的id 获取市的列表
-
picker.setSlotValues(
1,data);
//将市的地区列表放入 areaList的二级列表中
-
});
-
that.area(values[
1][
"id"]).then(
function(data){
//通过 二级 市的id 获取区域的列表
-
picker.setSlotValues(
2,data);
//将区的地区列表放入 areaList的三级列表中
-
});
-
let arr = picker.getValues();
-
// console.log(arr);
-
that.cityName=
`${arr[0].name}-${arr[1].name}-${arr[2].name}`;
-
that.cityCode={
-
province:arr[
0].adcode,
-
city:arr[
1].adcode,
-
county:arr[
2].adcode
-
};
-
console.log(
"picker");
-
}
-
-
},
-
//关闭弹窗
-
closePopup(){
-
let that =
this;
-
that.areaVisible=
false;
-
},
-
//确定地区
-
sureArea(){
-
let that =
this;
-
that.areaValue=that.cityName;
-
that.areaVisible=
false;
-
},
-
//调取地区列表的函数
-
area(id){
-
let that =
this;
-
//因为我们需要拿到axios请求的数据,来进行下一个axios的请求,
-
//所以我们这里使用promise对象,将异步转换为同步。
-
let promise=
new
Promise(
function(resolve,reject){
-
let o={
-
pid:id
-
}
-
axios.post(
'ajax?_ajaxurl=arealist',Qs.stringify(o))
-
.then(
function (res) {
-
resolve(res.data.area_list);
-
})
-
.catch(
function (error) {
-
console.log(error);
-
});
-
})
-
return promise;
-
-
},
-
/*解决iphone页面层级相互影响滑动的问题*/
-
closeTouch:
function(){
-
document.getElementsByTagName(
"body")[
0].addEventListener(
'touchmove',
-
this.handler,{
passive:
false});
//阻止默认事件
-
console.log(
"closeTouch haved happened.");
-
},
-
openTouch:
function(){
-
document.getElementsByTagName(
"body")[
0].removeEventListener(
'touchmove',
-
this.handler,{
passive:
false});
//打开默认事件
-
console.log(
"openTouch haved happened.");
-
},
-
}
-
})
今天的分享,就是这些,其实很长时间没看这些代码了,今天回顾一下,发现还有很多能够优化的地方,希望阅读过这篇文章的同学能够自己思考并写出更加优质的代码。还望往来的朋友不要吝啬,给我点个小小的赞,您的随手之劳,对我来说是很大的动力。抱拳~
<li class="tool-item tool-active is-like "><a href="javascript:;"><svg class="icon" aria-hidden="true">
<use xlink:href="#csdnc-thumbsup"></use>
</svg><span class="name">点赞</span>
<span class="count">7</span>
</a></li>
<li class="tool-item tool-active is-collection "><a href="javascript:;" data-report-click="{"mod":"popu_824"}"><svg class="icon" aria-hidden="true">
<use xlink:href="#icon-csdnc-Collection-G"></use>
</svg><span class="name">收藏</span></a></li>
<li class="tool-item tool-active is-share"><a href="javascript:;"><svg class="icon" aria-hidden="true">
<use xlink:href="#icon-csdnc-fenxiang"></use>
</svg>分享</a></li>
<!--打赏开始-->
<!--打赏结束-->
<li class="tool-item tool-more">
<a>
<svg t="1575545411852" class="icon" viewBox="0 0 1024 1024" version="1.1" xmlns="http://www.w3.org/2000/svg" p-id="5717" xmlns:xlink="http://www.w3.org/1999/xlink" width="200" height="200"><defs><style type="text/css"></style></defs><path d="M179.176 499.222m-113.245 0a113.245 113.245 0 1 0 226.49 0 113.245 113.245 0 1 0-226.49 0Z" p-id="5718"></path><path d="M509.684 499.222m-113.245 0a113.245 113.245 0 1 0 226.49 0 113.245 113.245 0 1 0-226.49 0Z" p-id="5719"></path><path d="M846.175 499.222m-113.245 0a113.245 113.245 0 1 0 226.49 0 113.245 113.245 0 1 0-226.49 0Z" p-id="5720"></path></svg>
</a>
<ul class="more-box">
<li class="item"><a class="article-report">文章举报</a></li>
</ul>
</li>
</ul>
</div>
</div>
<div class="person-messagebox">
<div class="left-message"><a href="https://blog.csdn.net/NAMECZ">
<img src="https://profile.csdnimg.cn/6/0/D/3_namecz" class="avatar_pic" username="NAMECZ">
<img src="https://g.csdnimg.cn/static/user-reg-year/1x/2.png" class="user-years">
</a></div>
<div class="middle-message">
<div class="title"><span class="tit"><a href="https://blog.csdn.net/NAMECZ" data-report-click="{"mod":"popu_379"}" target="_blank">NAMECZ</a></span>
</div>
<div class="text"><span>发布了47 篇原创文章</span> · <span>获赞 206</span> · <span>访问量 25万+</span></div>
</div>
<div class="right-message">
<a href="https://im.csdn.net/im/main.html?userName=NAMECZ" target="_blank" class="btn btn-sm btn-red-hollow bt-button personal-letter">私信
</a>
<a class="btn btn-sm bt-button personal-watch" data-report-click="{"mod":"popu_379"}">关注</a>
</div>
</div>
</div>

前一段时间写了一个基于微信端的保险项目,用到了mint-ui的picker,当时在选择地区的三级联动这一块,确实徘徊很长时间,很大程度是因为不太理解mint-ui的文档,用了很多很复杂的方法,最后还是苦心钻研文档,才发现,官方提供的方法写起来非常简单。现在回过头来,觉得有必要记录一下,指引那些和我曾经一样懵懂的少年。ok,抒情到此为止,介绍一下背景,项目没有搭建vue脚手架,引入的vue和mint-ui的cdn,写法上有些许不同,但是思路完全一下,各位看官大人不必惊慌。我已经努力把代码整理的尽可能的详细,大家不要头晕,我只说重点。