5 案例5:自定义监控案例
5.1 问题
沿用前面的练习,使用自定义key监控常用监控项目,实现以下目标:
监控Nginx状态
监控网络连接状态
- 1
- 2
5.2 步骤
实现此案例需要按照如下步骤进行。
步骤一:监控Nginx服务状态
1)准备环境,部署nginx软件
安装nginx软件,开启status模块
[root@web1 nginx-1.12.2]# ./configure \
> --with-http_stub_status_module
[root@web1 nginx-1.12.2]# make && make install
[root@web1 ~]# cat /usr/local/nginx/conf/nginx.conf
… …
location /status {
                stub_status on;
        }
… …
[root@web1 ~]# curl  http://192.168.4.5/status
Active connections: 1
server accepts handled requests
10 10 3
Reading: 0 Writing: 1 Waiting: 0
- 1
- 2
- 3
- 4
- 5
- 6
- 7
- 8
- 9
- 10
- 11
- 12
- 13
- 14
2)自定义监控key
语法格式:
UserParameter=key,command
UserParameter=key[*],
key里的所有参数,都会传递给后面命令的位置变量
如:
UserParameter=ping[*],echo $1
ping[0], 返回的结果都是0
ping[aaa], 返回的结果都是aaa
注意:被监控端修改配置文件,注意要允许自定义key并设置Include!
创建自定义key
[root@web1 ~]# vim /usr/local/etc/zabbix_agentd.conf.d/nginx.status
UserParameter=nginx.status[*],/usr/local/bin/nginx_status.sh $1
[root@web1 ~]# killall zabbix_agentd
[root@web1 ~]# zabbix_agentd
- 1
- 2
- 3
- 4
自定义监控脚本(仅供参考,未检测完整状态)
[root@web1 ~]# vim /usr/local/bin/nginx_status.sh
#!/bin/bash
case $1 in
active)
    curl -s http://192.168.2.100/status |awk '/Active/{print $NF}';;
waiting)
    curl -s http://192.168.2.100/status |awk '/Waiting/{print $NF}';
accepts)
    curl -s http://192.168.2.100/status |awk 'NR==3{print $2 }';;
esac
[root@web1 ~]# chmod +x  /usr/local/bin/nginx_status.sh
- 1
- 2
- 3
- 4
- 5
- 6
- 7
- 8
- 9
- 10
- 11
测试效果:
[root@web1 ~]# zabbix_get -s 192.168.2.100 -k 'nginx.status[accepts]'
- 1
登陆Zabbix监控Web,创建监控项目item,点击Configuration(配置)–>Hosts(主机),点击主机后面的items(项目),点击Create item(创建项目)。修改项目参数如图-36所示。

图-36
步骤二:监控网络连接状态
1)了解TCP协议
熟悉TCP三次握手,参考图-37。
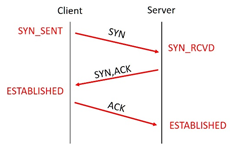
图-37
熟悉TCP连接的四次断开,参考图-38。
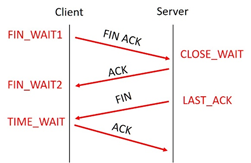
图-38
2)查看网络连接状态
模拟多人并发连接
[root@web1 ~]# ab -c 1000 -n 100000 http://192.168.2.100/
- 1
查看网络连接状态,仔细观察、分析第二列的数据
[root@web1 ~]# ss -antup
//-a显示所有
//-t显示TCP连接状态
//-u显示UDP连接状态
//-n以数字形式显示端口号和IP地址
//-p显示连接对应的进程名称
- 1
- 2
- 3
- 4
- 5
- 6
3)创建自定义key
注意:被监控端修改配置文件,注意要允许自定义key并设置Include。
[root@web1 ~]# vim /usr/local/etc/zabbix_agentd.conf.d/net.status
UserParameter=net.status[*],/usr/local/bin/net_status.sh $1
[root@web1 ~]# killall zabbix_agentd
[root@web1 ~]# zabbix_agentd
- 1
- 2
- 3
- 4
自定义监控脚本(仅供参考,未检测完整状态)
[root@web1 ~]# vim /usr/local/bin/net_status.sh
#!/bin/bash
case $1 in
estab)
    ss -antp |awk '/^TIME-WAIT/{x++} END{print x}';;
close_wait)
    ss -antp |awk '/^CLOSE-WAIT/{x++} END{print x}';;
time_wait)
    ss -antp |awk '/^TIME-WAIT/{x++} END{print x}';;
esac
[root@web1 ~]# chmod +x  /usr/local/bin/net_status.sh
- 1
- 2
- 3
- 4
- 5
- 6
- 7
- 8
- 9
- 10
- 11
测试效果:
[root@web1 ~]# zabbix_get -s 192.168.2.100 -k 'net.status[time_wait]'
- 1
- 监控netstatus
在监控服务器,添加监控项目item,Configuration–>Hosts点击主机后面的items
点击Create item,如图-39所示。

图-39
</div>
<link href="https://csdnimg.cn/release/phoenix/mdeditor/markdown_views-b6c3c6d139.css" rel="stylesheet">
<div class="more-toolbox">
<div class="left-toolbox">
<ul class="toolbox-list">
<li class="tool-item tool-active is-like "><a href="javascript:;"><svg class="icon" aria-hidden="true">
<use xlink:href="#csdnc-thumbsup"></use>
</svg><span class="name">点赞</span>
<span class="count"></span>
</a></li>
<li class="tool-item tool-active is-collection "><a href="javascript:;" data-report-click="{"mod":"popu_824"}"><svg class="icon" aria-hidden="true">
<use xlink:href="#icon-csdnc-Collection-G"></use>
</svg><span class="name">收藏</span></a></li>
<li class="tool-item tool-active is-share"><a href="javascript:;" data-report-click="{"mod":"1582594662_002"}"><svg class="icon" aria-hidden="true">
<use xlink:href="#icon-csdnc-fenxiang"></use>
</svg>分享</a></li>
<!--打赏开始-->
<!--打赏结束-->
<li class="tool-item tool-more">
<a>
<svg t="1575545411852" class="icon" viewBox="0 0 1024 1024" version="1.1" xmlns="http://www.w3.org/2000/svg" p-id="5717" xmlns:xlink="http://www.w3.org/1999/xlink" width="200" height="200"><defs><style type="text/css"></style></defs><path d="M179.176 499.222m-113.245 0a113.245 113.245 0 1 0 226.49 0 113.245 113.245 0 1 0-226.49 0Z" p-id="5718"></path><path d="M509.684 499.222m-113.245 0a113.245 113.245 0 1 0 226.49 0 113.245 113.245 0 1 0-226.49 0Z" p-id="5719"></path><path d="M846.175 499.222m-113.245 0a113.245 113.245 0 1 0 226.49 0 113.245 113.245 0 1 0-226.49 0Z" p-id="5720"></path></svg>
</a>
<ul class="more-box">
<li class="item"><a class="article-report">文章举报</a></li>
</ul>
</li>
</ul>
</div>
</div>
<div class="person-messagebox">
<div class="left-message"><a href="https://blog.csdn.net/xie_qi_chao">
<img src="https://profile.csdnimg.cn/B/F/6/3_xie_qi_chao" class="avatar_pic" username="xie_qi_chao">
<img src="https://g.csdnimg.cn/static/user-reg-year/1x/2.png" class="user-years">
</a></div>
<div class="middle-message">
<div class="title"><span class="tit"><a href="https://blog.csdn.net/xie_qi_chao" data-report-click="{"mod":"popu_379"}" target="_blank">解启超</a></span>
</div>
<div class="text"><span>发布了329 篇原创文章</span> · <span>获赞 52</span> · <span>访问量 3万+</span></div>
</div>
<div class="right-message">
<a href="https://im.csdn.net/im/main.html?userName=xie_qi_chao" target="_blank" class="btn btn-sm btn-red-hollow bt-button personal-letter">私信
</a>
<a class="btn btn-sm attented bt-button personal-watch" data-report-click="{"mod":"popu_379"}">已关注</a>
</div>
</div>
</div>
</article>

5 案例5:自定义监控案例
5.1 问题
沿用前面的练习,使用自定义key监控常用监控项目,实现以下目标:
监控Nginx状态
监控网络连接状态
- 1
- 2
5.2 步骤
实现此案例需要按照如下步骤进行。
步骤一:监控Nginx服务状态
1)准备环境,部署nginx软件
安装nginx软件,开启status模块
[root@web1 nginx-1.12.2]# ./configure \
> --with-http_stub_status_module
[root@web1 nginx-1.12.2]# make && make install
[root@web1 ~]# cat /usr/local/nginx/conf/nginx.conf
… …
location /status {
                stub_status on;
        }
… …
[root@web1 ~]# curl  http://192.168.4.5/status
Active connections: 1
server accepts handled requests
10 10 3
Reading: 0 Writing: 1 Waiting: 0
- 1
- 2
- 3
- 4
- 5
- 6
- 7
- 8
- 9
- 10
- 11
- 12
- 13
- 14
2)自定义监控key
语法格式:
UserParameter=key,command
UserParameter=key[*],
key里的所有参数,都会传递给后面命令的位置变量
如:
UserParameter=ping[*],echo $1
ping[0], 返回的结果都是0
ping[aaa], 返回的结果都是aaa
注意:被监控端修改配置文件,注意要允许自定义key并设置Include!
创建自定义key
[root@web1 ~]# vim /usr/local/etc/zabbix_agentd.conf.d/nginx.status
UserParameter=nginx.status[*],/usr/local/bin/nginx_status.sh $1
[root@web1 ~]# killall zabbix_agentd
[root@web1 ~]# zabbix_agentd
- 1
- 2
- 3
- 4
自定义监控脚本(仅供参考,未检测完整状态)
[root@web1 ~]# vim /usr/local/bin/nginx_status.sh
#!/bin/bash
case $1 in
active)
    curl -s http://192.168.2.100/status |awk '/Active/{print $NF}';;
waiting)
    curl -s http://192.168.2.100/status |awk '/Waiting/{print $NF}';
accepts)
    curl -s http://192.168.2.100/status |awk 'NR==3{print $2 }';;
esac
[root@web1 ~]# chmod +x  /usr/local/bin/nginx_status.sh
- 1
- 2
- 3
- 4
- 5
- 6
- 7
- 8
- 9
- 10
- 11
测试效果:
[root@web1 ~]# zabbix_get -s 192.168.2.100 -k 'nginx.status[accepts]'
- 1
登陆Zabbix监控Web,创建监控项目item,点击Configuration(配置)–>Hosts(主机),点击主机后面的items(项目),点击Create item(创建项目)。修改项目参数如图-36所示。
图-36
步骤二:监控网络连接状态
1)了解TCP协议
熟悉TCP三次握手,参考图-37。
图-37
熟悉TCP连接的四次断开,参考图-38。
图-38
2)查看网络连接状态
模拟多人并发连接
[root@web1 ~]# ab -c 1000 -n 100000 http://192.168.2.100/
- 1
查看网络连接状态,仔细观察、分析第二列的数据
[root@web1 ~]# ss -antup
//-a显示所有
//-t显示TCP连接状态
//-u显示UDP连接状态
//-n以数字形式显示端口号和IP地址
//-p显示连接对应的进程名称
- 1
- 2
- 3
- 4
- 5
- 6
3)创建自定义key
注意:被监控端修改配置文件,注意要允许自定义key并设置Include。
[root@web1 ~]# vim /usr/local/etc/zabbix_agentd.conf.d/net.status
UserParameter=net.status[*],/usr/local/bin/net_status.sh $1
[root@web1 ~]# killall zabbix_agentd
[root@web1 ~]# zabbix_agentd
- 1
- 2
- 3
- 4
自定义监控脚本(仅供参考,未检测完整状态)
[root@web1 ~]# vim /usr/local/bin/net_status.sh
#!/bin/bash
case $1 in
estab)
    ss -antp |awk '/^TIME-WAIT/{x++} END{print x}';;
close_wait)
    ss -antp |awk '/^CLOSE-WAIT/{x++} END{print x}';;
time_wait)
    ss -antp |awk '/^TIME-WAIT/{x++} END{print x}';;
esac
[root@web1 ~]# chmod +x  /usr/local/bin/net_status.sh
- 1
- 2
- 3
- 4
- 5
- 6
- 7
- 8
- 9
- 10
- 11
测试效果:
[root@web1 ~]# zabbix_get -s 192.168.2.100 -k 'net.status[time_wait]'
- 1
- 监控netstatus
在监控服务器,添加监控项目item,Configuration–>Hosts点击主机后面的items
点击Create item,如图-39所示。
图-39
</div>
<link href="https://csdnimg.cn/release/phoenix/mdeditor/markdown_views-b6c3c6d139.css" rel="stylesheet">
<div class="more-toolbox">
<div class="left-toolbox">
<ul class="toolbox-list">
<li class="tool-item tool-active is-like "><a href="javascript:;"><svg class="icon" aria-hidden="true">
<use xlink:href="#csdnc-thumbsup"></use>
</svg><span class="name">点赞</span>
<span class="count"></span>
</a></li>
<li class="tool-item tool-active is-collection "><a href="javascript:;" data-report-click="{"mod":"popu_824"}"><svg class="icon" aria-hidden="true">
<use xlink:href="#icon-csdnc-Collection-G"></use>
</svg><span class="name">收藏</span></a></li>
<li class="tool-item tool-active is-share"><a href="javascript:;" data-report-click="{"mod":"1582594662_002"}"><svg class="icon" aria-hidden="true">
<use xlink:href="#icon-csdnc-fenxiang"></use>
</svg>分享</a></li>
<!--打赏开始-->
<!--打赏结束-->
<li class="tool-item tool-more">
<a>
<svg t="1575545411852" class="icon" viewBox="0 0 1024 1024" version="1.1" xmlns="http://www.w3.org/2000/svg" p-id="5717" xmlns:xlink="http://www.w3.org/1999/xlink" width="200" height="200"><defs><style type="text/css"></style></defs><path d="M179.176 499.222m-113.245 0a113.245 113.245 0 1 0 226.49 0 113.245 113.245 0 1 0-226.49 0Z" p-id="5718"></path><path d="M509.684 499.222m-113.245 0a113.245 113.245 0 1 0 226.49 0 113.245 113.245 0 1 0-226.49 0Z" p-id="5719"></path><path d="M846.175 499.222m-113.245 0a113.245 113.245 0 1 0 226.49 0 113.245 113.245 0 1 0-226.49 0Z" p-id="5720"></path></svg>
</a>
<ul class="more-box">
<li class="item"><a class="article-report">文章举报</a></li>
</ul>
</li>
</ul>
</div>
</div>
<div class="person-messagebox">
<div class="left-message"><a href="https://blog.csdn.net/xie_qi_chao">
<img src="https://profile.csdnimg.cn/B/F/6/3_xie_qi_chao" class="avatar_pic" username="xie_qi_chao">
<img src="https://g.csdnimg.cn/static/user-reg-year/1x/2.png" class="user-years">
</a></div>
<div class="middle-message">
<div class="title"><span class="tit"><a href="https://blog.csdn.net/xie_qi_chao" data-report-click="{"mod":"popu_379"}" target="_blank">解启超</a></span>
</div>
<div class="text"><span>发布了329 篇原创文章</span> · <span>获赞 52</span> · <span>访问量 3万+</span></div>
</div>
<div class="right-message">
<a href="https://im.csdn.net/im/main.html?userName=xie_qi_chao" target="_blank" class="btn btn-sm btn-red-hollow bt-button personal-letter">私信
</a>
<a class="btn btn-sm attented bt-button personal-watch" data-report-click="{"mod":"popu_379"}">已关注</a>
</div>
</div>
</div>
</article>