有朋友私信我问我为啥很久不更新博客,是不是转行了...我当然不可能承认自己懒啊,只能回复说太忙了.不过项目开发中,确实很难有时间和心力去总结和思考一些东西,不过现在忙完一些项目以后,我又回来了.
渲染技术这个东西,在项目前期我并没有投入太多精力去思考,在当时的环境下我更看中手游的性能,我做端游,可以无限地挖掘电脑的性能,比如多线程去处理角色的软件蒙皮之类,但是做手游,则要保护手机的硬件资源,防止手机耗电快发热.比如限帧30fps.直到两年前经历了一次美术和技术的撕逼以后,我才重新思考了一下这个东西.整个过程也很有趣,老板觉得游戏画面不行,其实是美术做得不好,但是美术领导用了一堆次世代的技术名词来忽悠老板说我们技术不行,啥都不支持...一个页游公司的美术整天吹嘘次世代我也是醉了,真正做过次世代的我反而成了外行...次世代本身就是个大坑,手游上投入的性价比更低,很多大点的公司都深陷次世代的泥潭,我要对游戏的技术负责和把关,撕逼是难免的.但是撕逼归撕逼,想要画面好是大家的共同心愿,能不能在保证效率和投入性价比的情况下,提升一些画面呢?
我的想法是,一些牛逼技术是一定是要有的,如果性能有问题,那么尽量优化,甚至限制性的使用,有总比没有好,不管是为了应付美术,还是老板,当然这不是我的初衷.我作为一个热爱引擎的程序员,画面好本身就是我们追求的东西.做技术的一定要有追求.
然后对整个渲染技术架构思考了几天,做出了一个大胆的想法,就是升级Unity4到Unity5,然后放弃Unity自带的surface shader和实时光照,利用Unity5新增的shader_feature功能自己写一套比较万能通用的standard shader,而避免整个项目一堆乱七八糟混乱的shader.至于为什么要这么干,主要原因有几个.
1.角色的动态光照,用全局shader参数来模拟灯光,比在Unity场景里面摆几个光源的效率更高一些.
2.surface shader的一些默认的定制会占据一些texture interpolator,对于我实现扩展一些效果有限制.而且不够清爽.
3.一些特殊效果需要场景所有对象shader的支持,比如天气系统的渐变过渡.如果所有shader都自己写的,那会特别方便.
4.Unity4的时候,光照图和Unity的动态光源是不能叠加的,如果自己实现的动态光源,就可以叠加的,当然Unity5后来是可以叠加的.
我这套shader基本涵盖了场景中的所有对象:
1.物件用SceneStandard.shader(有PBR版本)
2.角色用CharacterStandard.shader(有PBR版本)
3.粒子用ParticleStandard.shader
4.天空用SkyBox.shader
5.地形用TerrainT4M.shader
6.水面用Water.shader
7.小草用Grass.shader
整个场景的光照方案,场景用光照图 + 全局shader光源,角色用全局shader光源 + projector shadowmap.对于角色和场景,都有两套shader,一套传统光照模型,一套PBR光照模型.
以一个传统光照模型的SceneStandard.shader来说.
Shader "Luoyinan/Scene/SceneStandard"
{
	Properties
	{
		_Color ("Main Color", Color) = (1, 1, 1, 1)
		_MainTex("Main Texture RGB(Albedo) A(Gloss & Alpha)", 2D) = "white" {}
		_NormalTex("Normal Texture", 2D) = "bump" {}
		_GlossTex ("Gloss Texture", 2D) = "white" {}

		_HalfLambert("Half Lambert", Range (0.5, 1)) = 0.75

		_SpecularIntensity("Specular Intensity", Range (0, 2)) = 0
		_SpecularSharp("Specular Sharp",Float) = 32
		_SpecularLuminanceMask("Specular Luminance Mask", Range (0, 2)) = 0
	}

	SubShader
	{
		Tags
		{
			"Queue" = "Background"
			"RenderType" = "Opaque" // 支持渲染到_CameraDepthNormalsTexture
		}

		Pass
		{
			Lighting Off
			CGPROGRAM

			#pragma vertex vert
			#pragma fragment frag
			#pragma multi_compile_fog
			#pragma fragmentoption ARB_precision_hint_fastest
			#include "UnityCG.cginc"

			#pragma shader_feature _NORMAL_MAP
			#pragma shader_feature _LUMINANCE_MASK_ON

			#pragma multi_compile LIGHTMAP_OFF LIGHTMAP_ON
			#pragma multi_compile __ _FADING_ON
			#pragma multi_compile __ _POINT_LIGHT
			#pragma multi_compile __ _FANCY_STUFF

			struct appdata_lightmap
			{
				float4 vertex : POSITION;
				half2 texcoord : TEXCOORD0;
				half2 texcoord1 : TEXCOORD1;
#if _FANCY_STUFF
				half3 normal : NORMAL;
	#if _NORMAL_MAP
				half4 tangent : TANGENT;
	#endif
#endif
			};

			// SM2.0的texture interpolator只有8个,要合理规划.
			struct v2f
			{
				float4 pos : SV_POSITION;
				half2 uv0 : TEXCOORD0;
#ifndef LIGHTMAP_OFF
				half2 uv1 : TEXCOORD1;
#endif
				UNITY_FOG_COORDS(2)
				float3 posWorld : TEXCOORD3;
#if _FANCY_STUFF
				half3 normalWorld : TEXCOORD4;
	#if _NORMAL_MAP
				half3 tangentWorld : TEXCOORD5;
				half3 binormalWorld : TEXCOORD6;
	#endif
#endif
			};

			fixed4 _Color;
			sampler2D _MainTex;
			half4 _MainTex_ST;

#if _POINT_LIGHT
			float4 _GlobalPointLightPos;
			fixed4 _GlobalPointLightColor;
			fixed _GlobalPointLightRange;
#endif

#ifndef LIGHTMAP_OFF
	#if _FADING_ON
			sampler2D _GlobalLightMap;
			fixed _GlobalFadingFactor;
	#endif
#endif

#if _FANCY_STUFF
			sampler2D _GlossTex;
			fixed _HalfLambert;

			fixed _SpecularIntensity;
			fixed _SpecularSharp;
			half4 _GlobalMainLightDir;
			fixed4 _GlobalMainLightColor;
			half4 _GlobalBackLightDir;
			fixed4 _GlobalBackLightColor;

	#if _LUMINANCE_MASK_ON
			fixed _SpecularLuminanceMask;
	#endif

	#if _NORMAL_MAP
			uniform sampler2D _NormalTex;
			half4 _NormalTex_ST;
	#endif
#endif

			v2f vert(appdata_lightmap i)
			{
				v2f o;
				o.pos = mul(UNITY_MATRIX_MVP, i.vertex);
				o.uv0 = TRANSFORM_TEX(i.texcoord, _MainTex);
#ifndef LIGHTMAP_OFF
				o.uv1 = i.texcoord1.xy * unity_LightmapST.xy + unity_LightmapST.zw;
#endif
				o.posWorld = mul(unity_ObjectToWorld, i.vertex).xyz;
#if _FANCY_STUFF
				o.normalWorld = UnityObjectToWorldNormal(i.normal);
	#if _NORMAL_MAP
				o.tangentWorld = UnityObjectToWorldDir(i.tangent);
				o.binormalWorld = cross(o.normalWorld, o.tangentWorld) * i.tangent.w;
	#endif
#endif
				UNITY_TRANSFER_FOG(o, o.pos);
				return o;
			}

			fixed4 frag(v2f i) : COLOR
			{
				fixed4 mainColor = tex2D(_MainTex, i.uv0);
				fixed alpha = mainColor.a;
				fixed4 finalColor = mainColor * _Color;

				// lightmap
#ifndef LIGHTMAP_OFF
				fixed3 lm = DecodeLightmap(UNITY_SAMPLE_TEX2D(unity_Lightmap, i.uv1));
	#if _FADING_ON
				fixed3 lm_fading = DecodeLightmap(UNITY_SAMPLE_TEX2D(_GlobalLightMap, i.uv1));
				lm = lerp(lm, lm_fading, _GlobalFadingFactor);
	#endif
	#if _FANCY_STUFF && _LUMINANCE_MASK_ON
				half lumin = saturate(Luminance(lm) * _SpecularLuminanceMask);
	#endif
				finalColor.rgb *= lm;
#endif

#if _FANCY_STUFF
				// gloss
				alpha *= tex2D(_GlossTex, i.uv0).r;

				// normalmap
	#if _NORMAL_MAP
				fixed3x3 tangentToWorld = fixed3x3(i.tangentWorld, i.binormalWorld, i.normalWorld);
				half3 normalMap = UnpackNormal(tex2D(_NormalTex, i.uv0));
				half3 fixedNormal = normalize(mul(normalMap, tangentToWorld));
	#else
				half3 fixedNormal = normalize(i.normalWorld);
	#endif

				// main light diffuse
	#if _NORMAL_MAP || LIGHTMAP_OFF
				half nl = dot(fixedNormal, normalize(_GlobalMainLightDir.xyz));
				half diff = saturate(nl) * (1 - _HalfLambert) + _HalfLambert;
				finalColor *= diff;
	#endif

	#if _NORMAL_MAP
				// main light specular
				half3 viewDir = normalize(_WorldSpaceCameraPos - i.posWorld);
				half3 h = normalize(normalize(_GlobalMainLightDir.xyz) + viewDir);
				half nh = saturate(dot(fixedNormal, h));
				nh = pow(nh, _SpecularSharp) * _SpecularIntensity;
		#if _LUMINANCE_MASK_ON && LIGHTMAP_ON
				finalColor.rgb += _GlobalMainLightColor.rgb * nh * alpha * _GlobalMainLightColor.a * lumin;
		#else
				finalColor.rgb += _GlobalMainLightColor.rgb * nh * alpha * _GlobalMainLightColor.a;
		#endif

				// back light specular
				h = normalize(normalize(_GlobalBackLightDir.xyz) + viewDir);
				nh = saturate(dot(fixedNormal, h));
				nh = pow(nh, _SpecularSharp) * _SpecularIntensity;
		#if _LUMINANCE_MASK_ON && LIGHTMAP_ON
				finalColor.rgb += _GlobalBackLightColor.rgb * nh * alpha * _GlobalBackLightColor.a * lumin;
		#else
				finalColor.rgb += _GlobalBackLightColor.rgb * nh * alpha * _GlobalBackLightColor.a;
		#endif

	#endif

	#if _POINT_LIGHT
				half3 toLight = _GlobalPointLightPos.xyz - i.posWorld ;
				half ratio = saturate(length(toLight) / _GlobalPointLightRange);
				//half attenuation = 1 - ratio; // linear attenuation
				ratio *= ratio;
				half attenuation = 1.0 / (1.0 + 0.01 * ratio) * (1 - ratio); // quadratic attenuation
				if (attenuation > 0) // performance
				{
					// point light diffuse
					toLight = normalize(toLight);
					half intensity = 8;
					half nl2 = max(0, dot(fixedNormal, toLight));
					finalColor.rgb += mainColor.rgb * _GlobalPointLightColor.rgb * nl2 * attenuation * intensity;

					// point light specular
		#if _NORMAL_MAP
					h = normalize(toLight + viewDir);
					nh = saturate(dot(fixedNormal, h));
					nh = pow(nh, _SpecularSharp) * _SpecularIntensity;
					intensity *= _GlobalPointLightColor.a;
					finalColor.rgb += _GlobalPointLightColor.rgb * nh * alpha * attenuation * intensity;
		#endif
				}
	#endif

#endif
				UNITY_APPLY_FOG(i.fogCoord, finalColor);

				// 没有高光贴图,alpha默认为0,便于处理Bloom的Alpha Gloss
#if _NORMAL_MAP
				finalColor.a = alpha;
#else
				finalColor.a = 0;
#endif
				return  finalColor;
			}
			ENDCG
		}

		// 没用Unity自带的阴影,只是用来来渲染_CameraDepthsTexture.
		Pass
		{
			Tags { "LightMode" = "ShadowCaster" }

			Fog { Mode Off }
			ZWrite On
			Offset 1, 1

			CGPROGRAM

			#pragma vertex vert
			#pragma fragment frag
			#pragma multi_compile_shadowcaster
			#pragma fragmentoption ARB_precision_hint_fastest
			#include "UnityCG.cginc"

			struct v2f
			{
				V2F_SHADOW_CASTER;
			};

			v2f vert(appdata_base v)
			{
				v2f o;
				TRANSFER_SHADOW_CASTER(o)
				return o;
			}

			fixed4 frag(v2f i) : COLOR
			{
				SHADOW_CASTER_FRAGMENT(i)
			}

			ENDCG
		}
	}

	Fallback off
	CustomEditor "SceneStandard_ShaderGUI"
}
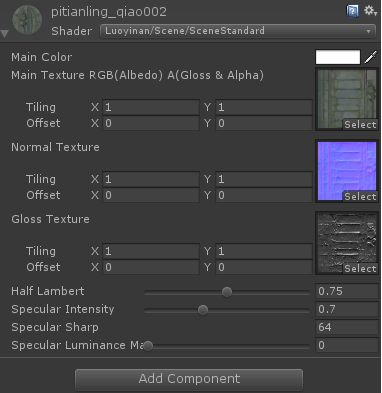
这shader比较简单,主要用于场景中的物件,实现了几个功能
1.光照图和光照图的融合过渡.
光照图过渡用于天气系统的渐变效果处理,比如白天的光照图和夜晚的光照图的渐变处理.
2.法线贴图和高光贴图
法线贴图可用高模去生成,投入有限的公司建议直接工具生成,效果差点但是性价比高,高光贴图的分辨率可减半,效果差不多.高光贴图的通道渲染进屏幕的alpha通道,对于后期生成基于gloss的bloom效果很有用.
3.光照图阴影区域的高光处理
理论上来说,静态阴影区域不应该有高光效果的,但是Unity的光照图,没用alpha通道来存储阴影区域的掩码,导致我们无法知道阴影区域,这也是我一直吐槽Unity的地方,较新版本的Unity已经支持光照图阴影掩码...但是我们不可能升级到最新的Unity版本...所以只好选用了一个有些开销的方案来处理,就是用亮度来判断这是否是阴影区域.然后淡化高光.
4.点光源
我原来只打算用全局shader参数模拟两盏方向光,对于有些地宫的暗黑场景,确实需要点光源的支持,这样角色走到哪里,就能照亮到哪里,最早考虑过一个面片叠加的假的光源绑定在角色身上,但是效果一般,最后还是模拟了一个实时点光源.逐像素的.对于点光源的衰减处理,Unity是用一张图来处理,我试了几种曲线函数,最终选用
half attenuation = 1.0 / (1.0 + 0.01 * ratio) * (1 - ratio); // quadratic attenuation
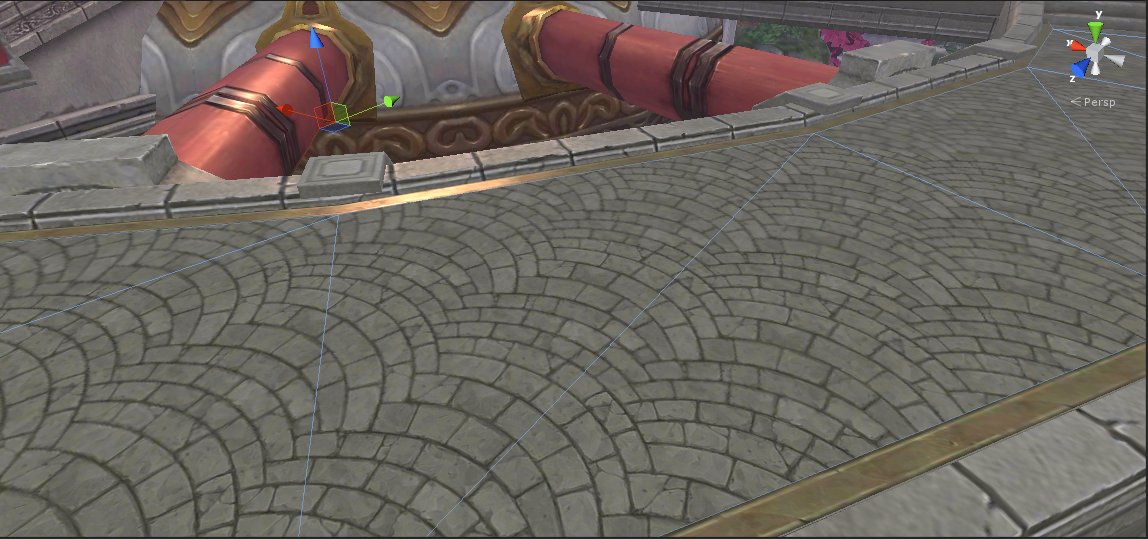
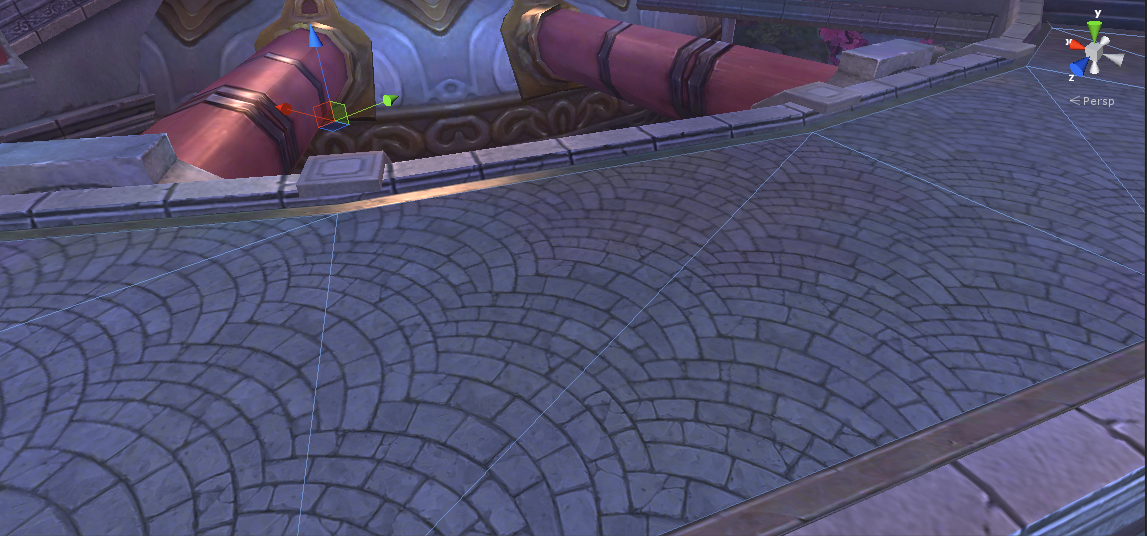
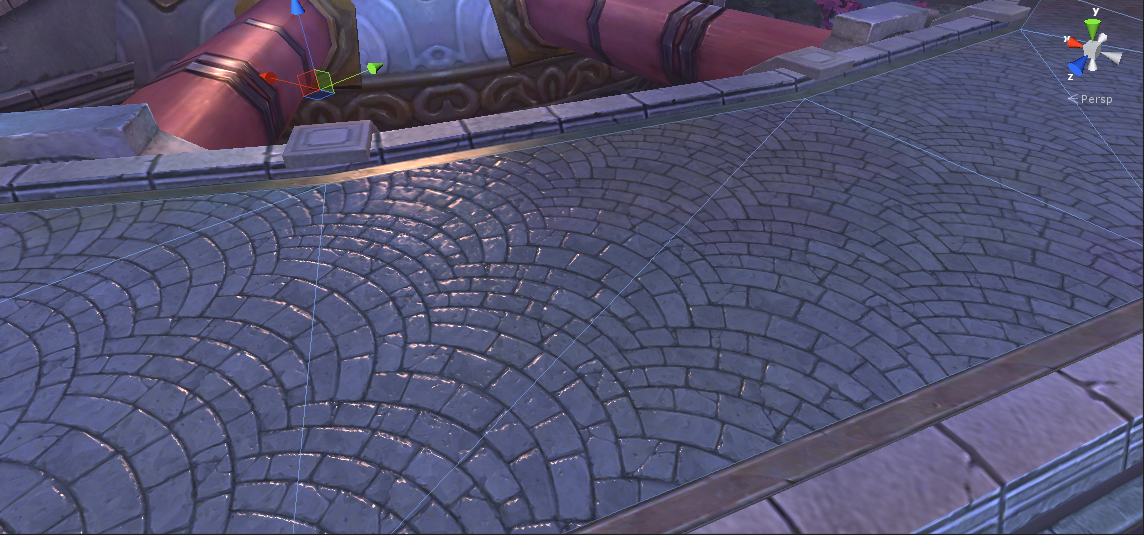
这个shader的效果图如下:
漫反射贴图:
漫反射贴图 + 光照图:
漫反射贴图 + 光照图 + 高光:
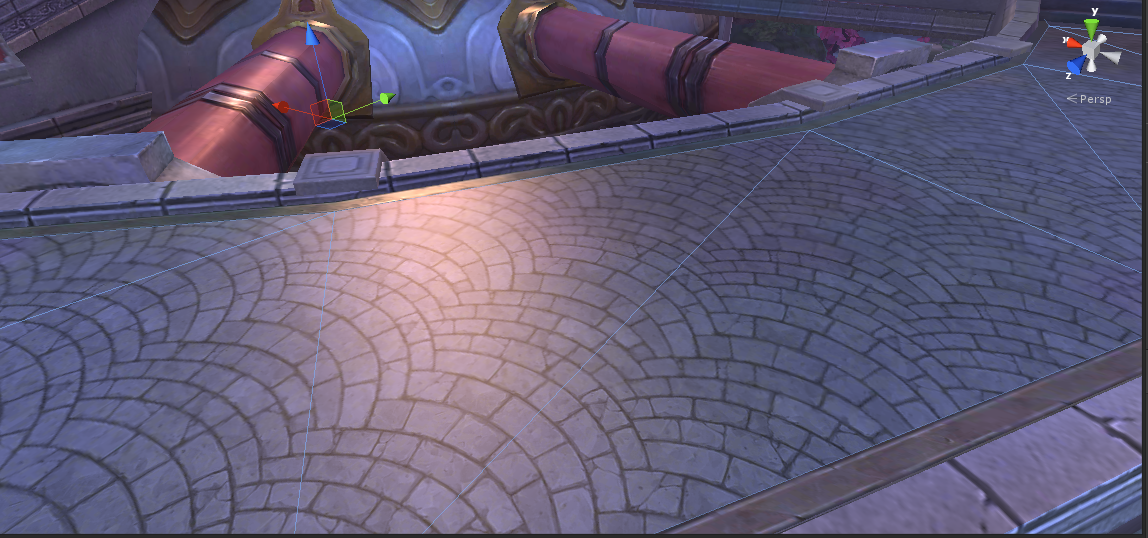
漫反射贴图 + 光照图 + 高光 + 法线贴图 + 高光贴图:
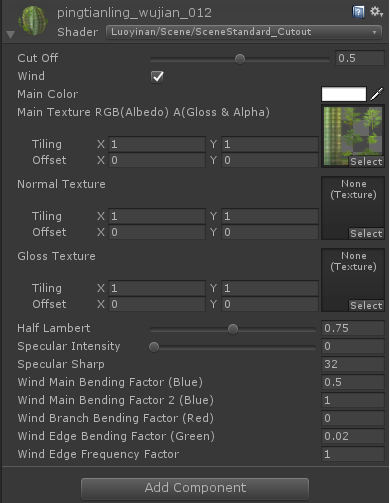
对于SceneStardard来说,有个功能,就是植被的随风摆动问题,原来集成在一起的,后来独立开来了一个shader.
Shader "Luoyinan/Scene/SceneStandard_Cutout"
{
	Properties
	{
		_Color ("Main Color", Color) = (1, 1, 1, 1)
		_MainTex("Main Texture RGB(Albedo) A(Gloss & Alpha)", 2D) = "white" {}
		_NormalTex("Normal Texture", 2D) = "bump" {}
		_GlossTex ("Gloss Texture", 2D) = "white" {}

		_HalfLambert("Half Lambert", Range (0.5, 1)) = 0.75

		_SpecularIntensity("Specular Intensity", Range (0, 2)) = 0
		_SpecularSharp("Specular Sharp",Float) = 32

		_MainBendingFactor ("Wind Main Bending Factor (Blue)", float) = 0.25
		_MainBendingFactor2 ("Wind Main Bending Factor 2 (Blue)", float) = 1.0
		_BranchBendingFactor ("Wind Branch Bending Factor (Red)", float) = 2.5
		_EdgeBendingFactor ("Wind Edge Bending Factor (Green)", float) = 1.0
		_EdgeFrequencyFactor ("Wind Edge Frequency Factor", float) = 1.0

		[HideInInspector] _DoubleSided("", Float) = 2.0
		[HideInInspector] _WindOn("", Float) = 1.0
		[HideInInspector] _Cutoff("", Float) = 0.2
	}
自定义了shader以后,那么shader编辑器,也需要自定义.
// 2016.5.14 luoyinan 自定义shader的编辑器
using UnityEditor;
using UnityEngine;
using UnityEngine.Rendering;

public class SceneStandard_Cutout_ShaderGUI : ShaderGUI
{
    MaterialProperty cutOff = null;
    MaterialProperty wind = null;

    public void FindProperties(MaterialProperty[] props)
    {
        wind = FindProperty("_WindOn", props);
        cutOff = FindProperty("_Cutoff", props);
    }

    public override void OnGUI(MaterialEditor materialEditor, MaterialProperty[] props)
    {
        FindProperties(props);

        // Check change
        EditorGUI.BeginChangeCheck();
        {
            float co = cutOff.floatValue;
            cutOff.floatValue = EditorGUILayout.Slider("Cut Off", co, 0f, 1f);

            bool w = wind.floatValue == 0;
            wind.floatValue = EditorGUILayout.Toggle("Wind", w) ? 0 : 1;

            // Render the default gui
            base.OnGUI(materialEditor, props);
        }

        if (EditorGUI.EndChangeCheck())
        {
            foreach (var obj in materialEditor.targets)
            {
                MaterialChanged((Material)obj);
            }
        }
    }

    public static void MaterialChanged(Material material)
    {
        float value = material.GetFloat("_Cutoff");
        material.SetFloat("_Cutoff", value);
        if (value > 0)
        {
            material.EnableKeyword("_ALPHA_TEST_ON");
            material.SetFloat("_DoubleSided", (float)CullMode.Off);
        }
        else
        {
            material.DisableKeyword("_ALPHA_TEST_ON");
            material.SetFloat("_DoubleSided", (float)CullMode.Back);
        }

        value = material.GetFloat("_WindOn");
        material.SetFloat("_WindOn", value);
        SetKeyword(material, "_WIND_ON", value == 0);

        // 有纹理就自动开启
        SetKeyword(material, "_NORMAL_MAP", material.GetTexture("_NormalTex"));
    }

    private static void SetKeyword(Material mat, string keyword, bool enable)
    {
        if (enable)
            mat.EnableKeyword(keyword);
        else
            mat.DisableKeyword(keyword);
    }
}
传统光照模型的效果,除了反射,基本都实现了,那么反射呢,我是去掉了,移到了PBR里面,因为传统光照模型的环境反射效果其实并不好,要用反射,可用PBR的shader代替.
Shader "Luoyinan/Scene/SceneStandard_PBR"
{
	Properties
	{
		_Color ("Main Color", Color) = (1, 1, 1, 1)
		_MainTex("Main Texture RGB(Albedo) A(Gloss & Alpha)", 2D) = "white" {}
		_NormalTex("Normal Texture", 2D) = "bump" {}
		_GlossTex ("Gloss Texture", 2D) = "white" {}
        _SpecularColor ("Specular Color", Color) = (1, 1, 1, 0.5)
		_Roughness ("Roughness", Range (0, 1)) = 0
	    _RefectionTex("Refection Texture (Cubemap)", Cube) = "" {}
        _RefectionColor ("Refection Color", Color) = (1, 1, 1, 1)

        [HideInInspector] _UseRoughness("", Float) = 0
	}
如果要集成很多效果在一个shader里面,就需要利用multi_compile和shader_feature设置好各种效果的功能开关,高中低的画质的切换也特别方便.
以上主要是对场景shader的介绍,由于内容太多了,今天我就先写到这里,下一篇我会对其他渲染技术做一些分享.