セレン及びユニットテストに基づいて、WebUIの自動テストフレームワーク。
セレン及びユニットテストに基づいたWeb UIテスト自動化フレームワーク。
機能
- デフォルトCSSのポジショニング、複数の位置決め方法をサポートしながら(ID \名\クラス\ LINK_TEXT \ XPathの\ CSS)。
- 第二のパッケージに基づいたセレンは、より簡単に使用します。
- すぐにテスト自動化プロジェクトを生成するために、足場を提供します。
- 自動生成/レポート/ディレクトリ、およびHTML形式のテストレポートの生成。
- 自分のアサーション、アサーションのタイトル、URLおよびテキスト。
- 例は、サポートをパラメータ化。
インストール
> pip install -U git+https://github.com/defnngj/pyse.git@masterpyseコマンド
1、ヘルプを参照してください。
> pyse -h
usage: pyse [-h] [-V] [--startproject STARTPROJECT] [-r R]

WebUI automation testing framework based on Selenium.

optional arguments:
  -h, --help            show this help message and exit
  -V, --version         show version
  --startproject STARTPROJECT
                        Specify new project name.
  -r R                  run test case
2、プロジェクトを作成します。
>pyse --startproject mypro

2019-11-07 00:24:57,783 - INFO - Start to create new test project: mypro

2019-11-07 00:24:57,784 - INFO - CWD: D:\

2019-11-07 00:24:57,785 - INFO - created folder: mypro
2019-11-07 00:24:57,786 - INFO - created folder: mypro\test_dir
2019-11-07 00:24:57,787 - INFO - created folder: mypro\reports
2019-11-07 00:24:57,788 - INFO - created file: mypro\test_dir\test_sample.py
2019-11-07 00:24:57,789 - INFO - created file: mypro\run.py
3、プロジェクトを実行します。
> cd mypro\
> pyse -r run.py
Python 3.7.1

 ______  __   __  _______  _______
|   _  ||  | |  ||  _____||   ____|
|  |_| ||  |_|  || |_____ |  |____
|   ___||_     _||_____  ||   ____|
|  |      |   |   _____| ||  |____
|__|      |___|  |_______||_______|
generated html file: file:///D:\mypro\reports\2019_11_12_22_28_53_result.html
.1
4. [レポートの表示
あなたは、に行くことができますmypro\reports\テストレポートを表示するディレクトリ。
APIドキュメント
簡単なデモ
参照test_sample.pyファイルを
import pyse

class BaiduTest(pyse.TestCase):

    def test_baidu(self):
        ''' baidu search key : pyse '''
        self.open("https://www.baidu.com/")
        self.type("#kw", "pyse")
        self.click("#su")
        self.assertTitle("pyse_百度搜索")

if __name__ == '__main__':
    pyse.main("test_sample.py", debug=True)
説明:
- テストクラスの必須の継承を作成します
pyse.TestCase。 - テストケースファイルに名前を付ける必要があります
test最初に。 - CSSの構文デフォルトモードを使用して要素を配置する
#kw、あなたはまた、ディスプレイを使用することができますcss=>#kw。 - pyseカプセル化
assertTitle、assertUrlおよびassertText他のアサーション。 - することで
main()、テストケースメソッドを実行しています。
API
pyse提供API
self.accept_alert()

self.clear("css=>#el")

self.click("css=>#el")

self.click_text("新闻")

self.dismiss_alert()

self.double_click("css=>#el")

self.drag_and_drop("css=>#el","css=>#ta")

self.get_alert_text()

self.get_attribute("css=>#el","type")

self.get_display("css=>#el")

self.get_text("css=>#el")

self.get_title()

self.get_url()

self.js("window.scrollTo(200,1000);")

self.max_window()

self.move_to_element("css=>#el")

self.open("https://www.baidu.com")

self.open_new_window("link_text=>注册")

self.close()

self.quit()

self.refresh()

self.right_click("css=>#el")

self.screenshots('/Screenshots/foo.png')

self.select("#nr", '20')
self.select("xpath=>//[@name='NR']", '20')

self.set_window(wide, high)

self.submit("css=>#el")

self.switch_to_frame("css=>#el")

self.switch_to_frame_out()

self.type("css=>#el","selenium")

self.wait(10)
main()メソッド
pyse.main(path="./",
browser="chrome",
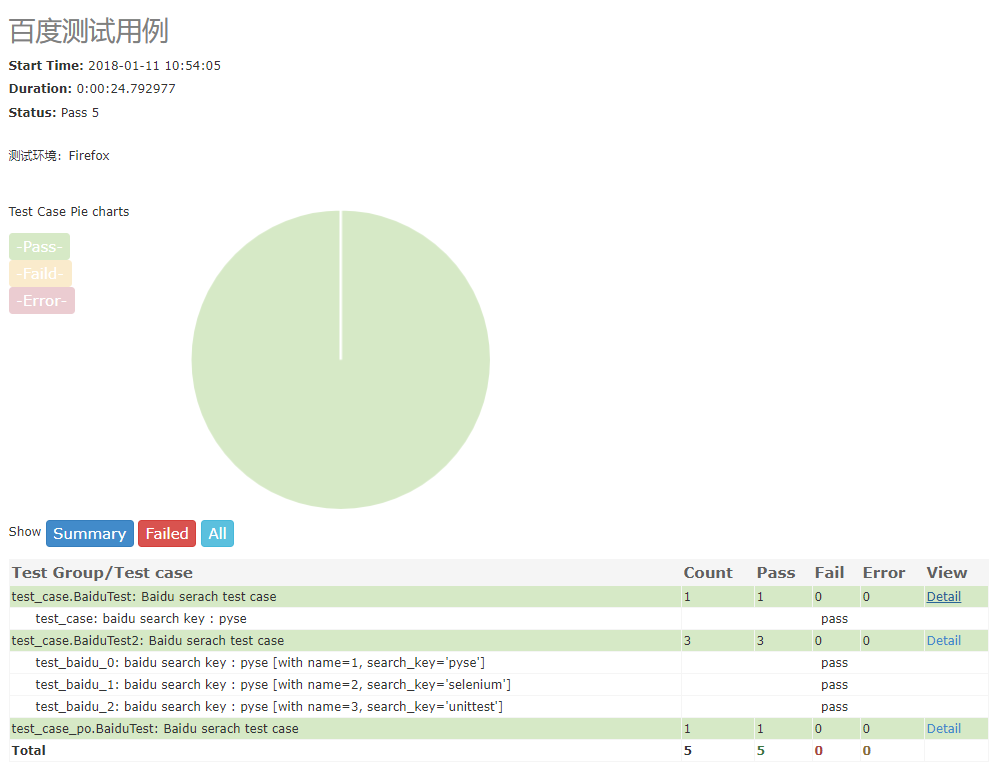
title="百度测试用例",
description="测试环境:Firefox",
debug=True
)説明:
- パス:testディレクトリを指定します。
- ブラウザ:指定テストブラウザ、デフォルトクローム。
- タイトル:テストプロジェクトのタイトルを指定します。
- 説明:テストの説明を指定します。
- デバッグ:デバッグモード、HTMLテスト・テストを生成せずにtrueに設定されています。
テストを実行
pyse.main(path="./")  # 当前目录下的所有测试文件
pyse.main(path="./test_dir/")  # 指定目录下的所有测试文件
pyse.main(path="./test_dir/test_sample.py")  # 指定目录下的测试文件
pyse.main(path="test_sample.py")  # 指定当前目录下的测试文件
説明:
- 指定されたディレクトリ場合は、テストファイルがなければなりません
testで始まります。 - あなたがサブディレクトリ内のファイルを実行したい場合はサブディレクトリに追加する必要があります
__init__.pyファイル。
サポートされているブラウザとドライブ
あなたが別のブラウザで実行するテストケースを指定したい場合、それは、するだけの非常にシンプルであるpyse.main()方法の合格browserセットを。
if __name__ == '__main__':
    pyse.main(browser="firefox")
サポートされているブラウザは"chrome"、次のとおり"firefox"、"ie"、"opera"、"edge"、、"chrome_headless"とになります。
異なるブラウザドライバーのダウンロードアドレス:
geckodriver(Firefoxの)します。https://github.com/mozilla/geckodriver/releases
Chromedriver(クローム)します。https://sites.google.com/a/chromium.org/chromedriver/home
IEDriverServer(IE):のhttp://selenium-release.storage.googleapis.com/index.html
operadriver(オペラ)します。https://github.com/operasoftware/operachromiumdriver/releases
MicrosoftWebDriver(エッジ)します。https://developer.microsoft.com/en-us/microsoft-edge/tools/webdriver
================================================== ========
位置決め要素
pyseターゲット方法、ID、名前、クラス、リンクテキスト、XPathとCSSの様々なサポート。位置決め方法および位置決めコンテンツ統合し、より簡潔に書きました。
<form id="form" class="fm" action="/s" name="f">
    <span class="bg s_ipt_wr quickdelete-wrap">
        <input id="kw" class="s_ipt" name="wd">
位置決めモード(推奨CSS):
# 默认支持CSS语法
self.type(".s_ipt","pyse")     #css
self.type("#su","pyse")        #css

# id
self.type("id=>kw", "pyse")  #id

# class name
self.type("class=>s_ipt", "pyse")  #class定位

# name
self.type("name=>wd", "pyse")  #name

# xpath
self.type("xpath=>//*[@class='s_ipt']","pyse")  #xpath
self.type("xpath=>//*[@id='kw']","pyse")        #xpath

# link text
self.click_text("新闻") #link text (点击百度首页上的"新闻"链接)
CSSセレクタリファレンスマニュアル:
http://www.w3school.com.cn/cssref/css_selectors.asp
パラメータ化されたテストケース
pyseは統合パラメトリックテストをサポートパラメータ化を。
import pyse
from pyse import ddt


class BaiduTest(pyse.TestCase):

    @ddt.data([
        (1, 'pyse'),
        (2, 'selenium'),
        (3, 'unittest'),
    ])
    def test_baidu(self, name, keyword):
        """
         used parameterized test
        :param name: case name
        :param search_key: search keyword
        """
        self.open("https://www.baidu.com")
        self.clear("id=>kw")
        self.type("id=>kw", keyword)
        self.click("css=>#su")
        self.assertTitle(keyword)