Autor: equipo del servidor de Internet vivo-Wang Fei
Redis es un servicio TCP basado en el modelo cliente-servidor y solicitud/respuesta. Cuando se encuentra con la ejecución de comandos por lotes, Redis proporciona Pipelining para mejorar el rendimiento del procesamiento por lotes. Este artículo combina la práctica para analizar los principios de soporte de las funciones de Pipeline por parte del cliente Lettuce de Redis y el cliente Redisson en el marco Spring Boot, y analiza los problemas encontrados durante la práctica, lo que puede ayudar a los desarrolladores a comprender los principios de soporte de Pipeline por parte de diferentes clientes y evitarlos. Problemas en el uso real.
Redis ya proporciona comandos por lotes como mget y mset, pero algunas operaciones no admiten o no admiten operaciones por lotes en absoluto, lo que va en contra del alto rendimiento de Redis. Con este fin, Redis proporciona nuevas funciones de Redis Pipeline basadas en el mecanismo de canalización. Redis Pipeline es una tecnología que reduce la latencia de ida y vuelta y mejora el rendimiento operativo al enviar múltiples comandos a la vez y devolver los resultados a la vez después de la ejecución, lo que reduce la cantidad de comunicaciones entre el cliente y redis. Actualmente, Redis Pipeline es compatible con muchas versiones de clientes de Redis.
2. Análisis de los principios subyacentes de Pipeline
2.1 Pasos básicos para la ejecución de un solo comando de Redis
Redis es un servicio TCP basado en el modelo cliente-servidor y solicitud/respuesta. Una solicitud iniciada por el cliente Redis generalmente seguirá los siguientes pasos después de que el servidor responda:
El cliente inicia una solicitud (consulta/inserción) y escucha el retorno del socket. Generalmente está en modo esperando una respuesta del servidor Redis.
El servidor procesa el comando y devuelve los resultados del procesamiento al cliente.
El cliente recibe el resultado devuelto del servicio y el programa regresa del código de bloqueo.
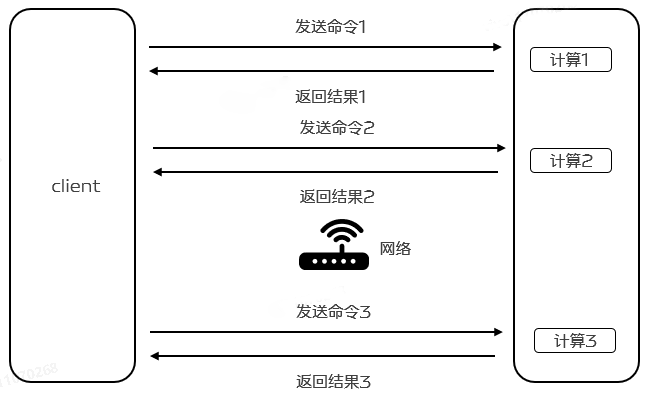
2.2 tiempo RTT
Los datos se transmiten entre el cliente Redis y el servidor a través de una conexión de red. El tiempo que tarda el paquete de datos en llegar del cliente al servidor y los datos en devolverse del servidor al cliente se denomina RTT (tiempo de ida y vuelta). ). Podemos darnos cuenta fácilmente de que cuando Redis solicita continuamente al servidor, si el tiempo de RTT es de 250 ms, incluso si Redis puede manejar 100.000 solicitudes por segundo, solo procesará un máximo de 4 solicitudes por segundo porque la transmisión de la red requiere mucho tiempo. , lo que resulta en una disminución en el rendimiento general.

2.3 Canalización de Redis
Para mejorar la eficiencia, en este momento aparece Pipeline. La canalización no solo reduce el RRT, sino que también aumenta en gran medida la cantidad de operaciones ejecutadas a la vez. Esto se debe a que si no se utiliza Pipelining, el costo de ejecutar un solo comando cada vez es muy bajo desde la perspectiva de acceder a la estructura de datos y generar una respuesta en el lado del servidor. Pero desde la perspectiva de realizar IO de red, su costo es en realidad muy alto. Implica llamadas al sistema de lectura () y escritura (), lo que significa que es necesario cambiar del modo de usuario al modo kernel, y el costo de este cambio de contexto es enorme.
Cuando se usa Pipeline, permite leer múltiples comandos a través de una operación de lectura () y múltiples respuestas de comando para usar una operación de escritura (). Permite al cliente enviar múltiples comandos a la vez sin esperar la ejecución del comando anterior. resultado. No solo reduce el RTT, sino que también reduce la cantidad de llamadas IO (las llamadas IO implican cambiar entre el modo de usuario y el modo kernel), lo que en última instancia mejora la eficiencia de ejecución y el rendimiento del programa. Como se muestra abajo:
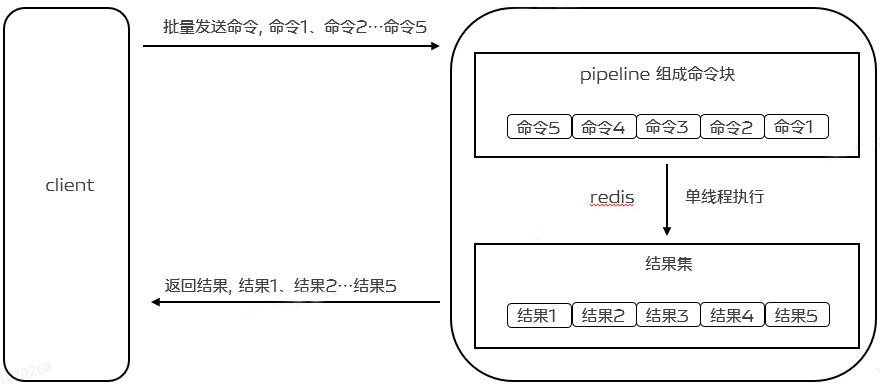
Para admitir Pipeline, en realidad se requiere soporte tanto del lado del servidor como del lado del cliente. Para el servidor, lo que se necesita es poder procesar múltiples comandos enviados por un cliente a través de la misma conexión TCP. Se puede entender que aquí se dividen múltiples comandos, al igual que procesar un solo comando. . El cliente necesita almacenar en caché varios comandos, enviarlos cuando el búfer esté lleno, luego escribir en el búfer y finalmente procesar la respuesta de Redis.
3. Comparación básica de uso y rendimiento de Pipeline
Tomemos el siguiente ejemplo de inserción de un valor entero en 100.000 estructuras establecidas, usando jedis para insertar un solo comando, jedis para usar el modo Pipeline para insertar y redisson para usar el modo Pipeline para insertar y probar su consumo de tiempo.
@Slf4jpublic class RedisPipelineTestDemo { public static void main(String[] args) { Jedis jedis = new Jedis("10.101.17.180", 6379); String zSetKey = "Pipeline-test-set"; int size = 100000; long begin = System.currentTimeMillis(); for (int i = 0; i < size; i++) { jedis.sadd(zSetKey + i, "aaa"); } log.info("Jedis逐一给每个set新增一个value耗时:{}ms", (System.currentTimeMillis() - begin)); begin = System.currentTimeMillis(); for (int i = 0; i < size; i++) { Pipeline.sadd(zSetKey + i, "bbb"); } Pipeline.sync(); log.info("Jedis Pipeline模式耗时:{}ms", (System.currentTimeMillis() - begin)); Config config = new Config(); config.useSingleServer().setAddress("redis://10.101.17.180:6379"); RedissonClient redisson = Redisson.create(config); RBatch redisBatch = redisson.createBatch(); begin = System.currentTimeMillis(); for (int i = 0; i < size; i++) { redisBatch.getSet(zSetKey + i).addAsync("ccc"); } redisBatch.execute(); log.info("Redisson Pipeline模式耗时:{}ms", (System.currentTimeMillis() - begin)); jedis.close(); redisson.shutdown(); }}
Los resultados de la prueba son los siguientes:
Se necesitan Jedis para agregar un valor a cada conjunto uno por uno: 162655 ms
El modo Jedis Pipeline tarda 504 ms
El modo Redisson Pipeline tarda 1399 ms
Descubrimos que el rendimiento correspondiente al uso del modo Pipeline es significativamente mejor que el de la ejecución de un solo comando.
4. Aplicación práctica en proyectos
En el uso real, existe un escenario en el que muchas aplicaciones necesitan actualizar el estilo del icono de la aplicación durante los días festivos. Cuando la operación realiza una configuración en segundo plano, el estilo del icono que debe emitirse a un solo usuario se puede calcular previamente y almacenar en función del. Etiquetas de usuario seleccionadas en Redis, para mejorar el rendimiento, esto implica el problema de las operaciones por lotes de Redis. El proceso de negocio es el siguiente:
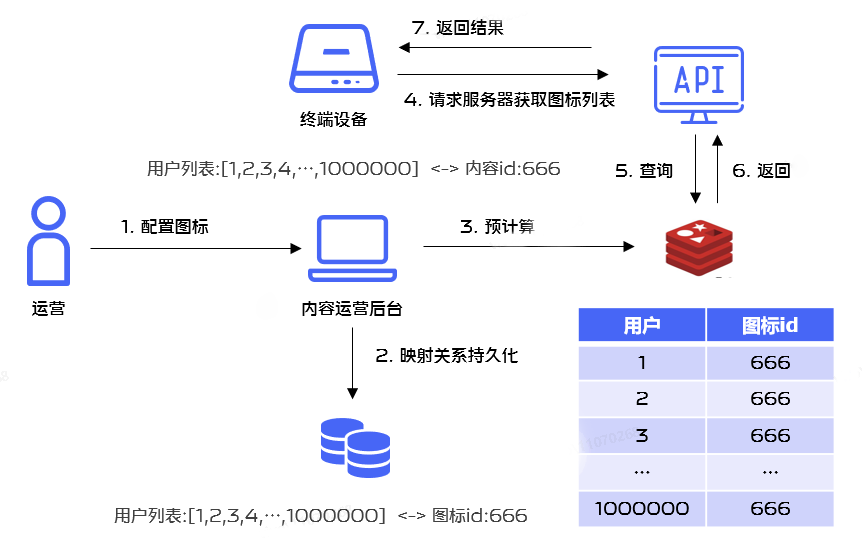
Para mejorar el rendimiento operativo de Redis, decidimos utilizar el mecanismo Redis Pipelining para la ejecución por lotes.
4.1 Comparación del cliente Redis
Para la pila de tecnología Java, los clientes más utilizados para Redis son Jedis, Lettuce y Redisson.
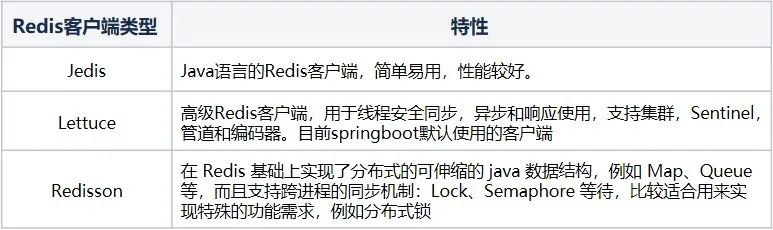
El proyecto actual se desarrolla principalmente en base a SpringBoot. Para Redis, su cliente predeterminado es Lettuce, por lo que realizamos análisis basados en el cliente Lettuce.
4.2 Implementación de Pipeline por el cliente Lettuce en el entorno Spring
En el entorno Spring, también es muy sencillo utilizar Redis Pipeline. spring-data-redis proporciona
StringRedisTemplate simplifica el funcionamiento de Redis. Solo necesita llamar al método ejecutarPipelined de StringRedisTemplate, pero proporciona dos métodos de devolución de llamada en los parámetros: SessionCallback y RedisCallback .
Los dos métodos de uso son los siguientes (aquí, tomamos como ejemplo la operación de la estructura establecida):
Cómo utilizar RedisCallback:
public void testRedisCallback() { List<Integer> ids= Arrays.asList(1, 2, 3, 4, 5, 6, 7, 8, 9); Integer contentId = 1; redisTemplate.executePipelined(new InsertPipelineExecutionA(ids, contentId)); } @AllArgsConstructor private static class InsertPipelineExecutionA implements RedisCallback<Void> { private final List<Integer> ids; private final Integer contentId; @Override public Void doInRedis(RedisConnection connection) DataAccessException { RedisSetCommands redisSetCommands = connection.setCommands(); ids.forEach(id-> { String redisKey = "aaa:" + id; String value = String.valueOf(contentId); redisSetCommands.sAdd(redisKey.getBytes(), value.getBytes()); }); return null; } }
Cómo utilizar SessionCallback:
public void testSessionCallback() { List<Integer> ids= Arrays.asList(1, 2, 3, 4, 5, 6, 7, 8, 9); Integer contentId = 1; redisTemplate.executePipelined(new InsertPipelineExecutionB(ids, contentId)); } @AllArgsConstructor private static class InsertPipelineExecutionB implements SessionCallback<Void> { private final List<Integer> ids; private final Integer contentId; @Override public <K, V> Void execute(RedisOperations<K, V> operations) throws DataAccessException { SetOperations<String, String> setOperations = (SetOperations<String, String>) operations.opsForSet(); ids.forEach(id-> { String redisKey = "aaa:" + id; String value = String.valueOf(contentId); setOperations.add(redisKey, value); }); return null; } }
4.3 Comparación entre RedisCallBack y SessionCallback
1. Tanto RedisCallBack como SessionCallback pueden implementar devoluciones de llamada, a través de las cuales se pueden ejecutar múltiples comandos de Redis al mismo tiempo en la misma conexión.
2. RedisCallback usa nativo
RedisConnection es más problemático de usar. Por ejemplo, al realizar la operación de agregar establecida anteriormente, es necesario convertir la clave y el valor, lo cual no es legible. Sin embargo, la API nativa proporciona funciones relativamente completas.
3. SessionCalback proporciona una buena encapsulación y puede optar por utilizar este método de devolución de llamada primero.
La implementación final del código es la siguiente:
public void executeB(List<Integer> userIds, Integer iconId) { redisTemplate.executePipelined(new InsertPipelineExecution(userIds, iconId));} @AllArgsConstructorprivate static class InsertPipelineExecution implements SessionCallback<Void> { private final List<Integer> userIds; private final Integer iconId; @Override public <K, V> Void execute(RedisOperations<K, V> operations) throws DataAccessException { SetOperations<String, String> setOperations = (SetOperations<String, String>) operations.opsForSet(); userIds.forEach(userId -> { String redisKey = "aaa:" + userId; String value = String.valueOf(iconId); setOperations.add(redisKey, value); }); return null; }}
4.4 Análisis del código fuente
Entonces, ¿por qué el uso del método Pipeline mejora enormemente el rendimiento? Comencemos con el código fuente y analicémoslo:
4.4.1 Análisis de principios relacionados para obtener conexiones en modo Pipeline:
@Override public List<Object> executePipelined(SessionCallback<?> session, @Nullable RedisSerializer<?> resultSerializer) { Assert.isTrue(initialized, "template not initialized; call afterPropertiesSet() before using it"); Assert.notNull(session, "Callback object must not be null"); RedisConnectionFactory factory = getRequiredConnectionFactory(); RedisConnectionUtils.bindConnection(factory, enableTransactionSupport); try { return execute((RedisCallback<List<Object>>) connection -> { connection.openPipeline(); boolean PipelinedClosed = false; try { Object result = executeSession(session); if (result != null) { throw new InvalidDataAccessApiUsageException( "Callback cannot return a non-null value as it gets overwritten by the Pipeline"); } List<Object> closePipeline = connection.closePipeline(); PipelinedClosed = true; return deserializeMixedResults(closePipeline, resultSerializer, hashKeySerializer, hashValueSerializer); } finally { if (!PipelinedClosed) { connection.closePipeline(); } } }); } finally { RedisConnectionUtils.unbindConnection(factory); } }
① Obtenga la fábrica de conexiones de Redis correspondiente. Para usar la función Pipeline aquí, debe usarla.
Método LettuceConnectionFactory, la fábrica de conexiones obtenida aquí es LettuceConnectionFactory.
② El proceso de conexión vinculante se refiere específicamente a vincular la conexión actual al hilo actual. El método principal es: doGetConnection.
public static RedisConnection doGetConnection(RedisConnectionFactory factory, boolean allowCreate, boolean bind, boolean enableTransactionSupport) { Assert.notNull(factory, "No RedisConnectionFactory specified"); RedisConnectionHolder connHolder = (RedisConnectionHolder) TransactionSynchronizationManager.getResource(factory); if (connHolder != null) { if (enableTransactionSupport) { potentiallyRegisterTransactionSynchronisation(connHolder, factory); } return connHolder.getConnection(); } ...... RedisConnection conn = factory.getConnection(); if (bind) { RedisConnection connectionToBind = conn; ...... connHolder = new RedisConnectionHolder(connectionToBind); TransactionSynchronizationManager.bindResource(factory, connHolder); ...... return connHolder.getConnection(); } return conn; }
Hay una clase principal RedisConnectionHolder, echemos un vistazo
RedisConnectionHolder connHolder =
(RedisConnectionHolder)
TransactionSynchronizationManager.getResource(factory);
@Nullable public static Object getResource(Object key) { Object actualKey = TransactionSynchronizationUtils.unwrapResourceIfNecessary(key); Object value = doGetResource(actualKey); if (value != null && logger.isTraceEnabled()) { logger.trace("Retrieved value [" + value + "] for key [" + actualKey + "] bound to thread [" + Thread.currentThread().getName() + "]"); } return value; }
里面有一个核心方法doGetResource
(actualKey),大家很容易猜测这里涉及到一个map结构,如果我们看源码,也确实是这样一个结构。
@Nullable private static Object doGetResource(Object actualKey) { Map<Object, Object> map = resources.get(); if (map == null) { return null; } Object value = map.get(actualKey); if (value instanceof ResourceHolder && ((ResourceHolder) value).isVoid()) { map.remove(actualKey); if (map.isEmpty()) { resources.remove(); } value = null; } return value; }
resources是一个ThreadLocal类型,这里会涉及到根据RedisConnectionFactory获取到连接connection的逻辑,如果下一次是同一个actualKey,那么就直接使用已经存在的连接,而不需要新建一个连接。第一次这里map为null,就直接返回了,然后回到doGetConnection方法,由于这里bind为true,我们会执行TransactionSynchronizationManager.bindResource(factory, connHolder);,也就是将连接和当前线程绑定了起来。
public static void bindResource(Object key, Object value) throws IllegalStateException { Object actualKey = TransactionSynchronizationUtils.unwrapResourceIfNecessary(key); Assert.notNull(value, "Value must not be null"); Map<Object, Object> map = resources.get(); if (map == null) { map = new HashMap<>(); resources.set(map); } Object oldValue = map.put(actualKey, value); ...... }
③ 我们回到executePipelined,在获取到连接工厂,将连接和当前线程绑定起来以后,就开始需要正式去执行命令了, 这里会调用execute方法
@Override@Nullablepublic <T> T execute(RedisCallback<T> action) { return execute(action, isExposeConnection());}
这里我们注意到execute方法的入参为RedisCallback<T>action,RedisCallback对应的doInRedis操作如下,这里在后面的调用过程中会涉及到回调。
connection.openPipeline();boolean PipelinedClosed = false;try { Object result = executeSession(session); if (result != null) { throw new InvalidDataAccessApiUsageException( "Callback cannot return a non-null value as it gets overwritten by the Pipeline"); } List<Object> closePipeline = connection.closePipeline(); PipelinedClosed = true; return deserializeMixedResults(closePipeline, resultSerializer, hashKeySerializer, hashValueSerializer);} finally { if (!PipelinedClosed) { connection.closePipeline(); }}
我们再来看execute(action,
isExposeConnection())方法,这里最终会调用
<T>execute(RedisCallback<T>action, boolean exposeConnection, boolean Pipeline)方法。
@Nullablepublic <T> T execute(RedisCallback<T> action, boolean exposeConnection, boolean Pipeline) { Assert.isTrue(initialized, "template not initialized; call afterPropertiesSet() before using it"); Assert.notNull(action, "Callback object must not be null"); RedisConnectionFactory factory = getRequiredConnectionFactory(); RedisConnection conn = null; try { if (enableTransactionSupport) { conn = RedisConnectionUtils.bindConnection(factory, enableTransactionSupport); } else { conn = RedisConnectionUtils.getConnection(factory); } boolean existingConnection = TransactionSynchronizationManager.hasResource(factory); RedisConnection connToUse = preProcessConnection(conn, existingConnection); boolean PipelineStatus = connToUse.isPipelined(); if (Pipeline && !PipelineStatus) { connToUse.openPipeline(); } RedisConnection connToExpose = (exposeConnection ? connToUse : createRedisConnectionProxy(connToUse)); T result = action.doInRedis(connToExpose); if (Pipeline && !PipelineStatus) { connToUse.closePipeline(); } return postProcessResult(result, connToUse, existingConnection); } finally { RedisConnectionUtils.releaseConnection(conn, factory, enableTransactionSupport); }}
我们看到这里最开始也是获取对应的连接工厂,然后获取对应的连接
(enableTransactionSupport=false),具体调用是
RedisConnectionUtils.getConnection(factory)方法,最终会调用
RedisConnection doGetConnection(RedisConnectionFactory factory, boolean allowCreate, boolean bind, boolean enableTransactionSupport),此时bind为false
public static RedisConnection doGetConnection(RedisConnectionFactory factory, boolean allowCreate, boolean bind, boolean enableTransactionSupport) { Assert.notNull(factory, "No RedisConnectionFactory specified"); RedisConnectionHolder connHolder = (RedisConnectionHolder) TransactionSynchronizationManager.getResource(factory); if (connHolder != null) { if (enableTransactionSupport) { potentiallyRegisterTransactionSynchronisation(connHolder, factory); } return connHolder.getConnection(); } ...... return conn;}
前面我们分析过一次,这里调用
RedisConnectionHolder connHolder =
(RedisConnectionHolder) TransactionSynchronizationManager.getResource(factory);会获取到之前和当前线程绑定的Redis,而不会新创建一个连接。
然后会去执行T result = action.
doInRedis(connToExpose),这里的action为RedisCallback,执行doInRedis为:
connection.openPipeline();boolean PipelinedClosed = false;try { Object result = executeSession(session); if (result != null) { throw new InvalidDataAccessApiUsageException( "Callback cannot return a non-null value as it gets overwritten by the Pipeline"); } List<Object> closePipeline = connection.closePipeline(); PipelinedClosed = true; return deserializeMixedResults(closePipeline, resultSerializer, hashKeySerializer, hashValueSerializer);} finally { if (!PipelinedClosed) { connection.closePipeline(); }}
这里最开始会开启Pipeline功能,然后执行
Object result = executeSession(session);
private Object executeSession(SessionCallback<?> session) { return session.execute(this);}
这里会调用我们自定义的execute方法
@AllArgsConstructorprivate static class InsertPipelineExecution implements SessionCallback<Void> { private final List<Integer> userIds; private final Integer iconId; @Override public <K, V> Void execute(RedisOperations<K, V> operations) throws DataAccessException { SetOperations<String, String> setOperations = (SetOperations<String, String>) operations.opsForSet(); userIds.forEach(userId -> { String redisKey = "aaa:" + userId; String value = String.valueOf(iconId); setOperations.add(redisKey, value); }); return null; }}
进入到foreach循环,执行DefaultSetOperations的add方法。
@Overridepublic Long add(K key, V... values) { byte[] rawKey = rawKey(key); byte[][] rawValues = rawValues((Object[]) values); return execute(connection -> connection.sAdd(rawKey, rawValues), true);}
这里会继续执行redisTemplate的execute方法,里面最终会调用我们之前分析过的<T>T execute(RedisCallback<T>action, boolean exposeConnection, boolean Pipeline)方法。
@Nullablepublic <T> T execute(RedisCallback<T> action, boolean exposeConnection, boolean Pipeline) { Assert.isTrue(initialized, "template not initialized; call afterPropertiesSet() before using it"); Assert.notNull(action, "Callback object must not be null"); RedisConnectionFactory factory = getRequiredConnectionFactory(); RedisConnection conn = null; try { ...... T result = action.doInRedis(connToExpose); ...... return postProcessResult(result, connToUse, existingConnection); } finally { RedisConnectionUtils.releaseConnection(conn, factory, enableTransactionSupport); }}
这里会继续执行T result =
action.doInRedis(connToExpose);,这里其实执行的doInRedis方法为:
connection -> connection.sAdd(rawKey, rawValues)
4.4.2 Pipeline方式下执行命令的流程分析:
① 接着上面的流程分析,这里的sAdd方法实际调用的是DefaultStringRedisConnection的sAdd方法
@Overridepublic Long sAdd(byte[] key, byte[]... values) { return convertAndReturn(delegate.sAdd(key, values), identityConverter);}
② 这里会进一步调用
DefaultedRedisConnection的sAdd方法
@Override@Deprecateddefault Long sAdd(byte[] key, byte[]... values) { return setCommands().sAdd(key, values);}
③ 接着调用LettuceSetCommands的sAdd方法
@Overridepublic Long sAdd(byte[] key, byte[]... values) { Assert.notNull(key, "Key must not be null!"); Assert.notNull(values, "Values must not be null!"); Assert.noNullElements(values, "Values must not contain null elements!"); try { if (isPipelined()) { Pipeline(connection.newLettuceResult(getAsyncConnection().sadd(key, values))); return null; }
if (isQueueing()) { transaction(connection.newLettuceResult(getAsyncConnection().sadd(key, values))); return null; } return getConnection().sadd(key, values); } catch (Exception ex) { throw convertLettuceAccessException(ex); }}
这里我们开启了Pipeline, 实际会调用
Pipeline(connection.newLettuceResult(getAsyncConnection().sadd(key, values))); 也就是获取异步连接getAsyncConnection,然后进行异步操作sadd,而常规模式下,使用的是同步操作,所以在Pipeline模式下,执行效率更高。
从上面的获取连接和具体命令执行相关源码分析可以得出使用Lettuce客户端Pipeline模式高效的根本原因:
普通模式下,每执行一个命令都需要先打开一个连接,命令执行完毕以后又需要关闭这个连接,执行下一个命令时,又需要经过连接打开和关闭的流程;而Pipeline的所有命令的执行只需要经过一次连接打开和关闭。
普通模式下命令的执行是同步阻塞模式,而Pipeline模式下命令的执行是异步非阻塞模式。
前面介绍了涉及到批量操作,可以使用Redis Pipelining机制,那是不是任何批量操作相关的场景都可以使用呢,比如list类型数据的批量移除操作,我们的代码最开始是这么写的:
public void deleteSet(String updateKey, Set<Integer> userIds) { if (CollectionUtils.isEmpty(userIds)) { return; } redisTemplate.executePipelined(new DeleteListCallBack(userIds, updateKey)); } @AllArgsConstructorprivate static class DeleteListCallBack implements SessionCallback<Object> { private Set<Integer> userIds; private String updateKey; @Override public <K, V> Object execute(RedisOperations<K, V> operations) throws DataAccessException { ListOperations<String, String> listOperations = (ListOperations<String, String>) operations.opsForList(); userIds.forEach(userId -> listOperations.remove(updateKey, 1, userId.toString())); return null; }}
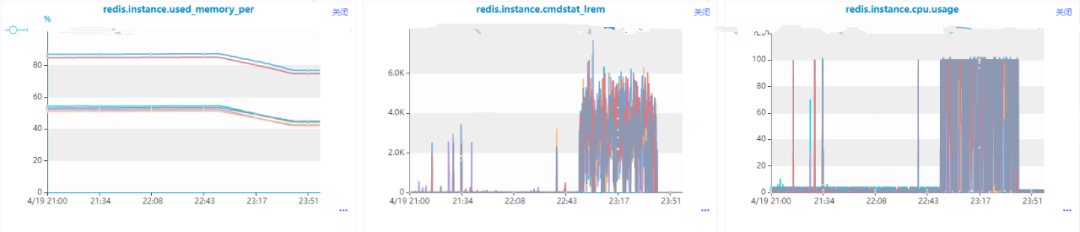
在数据量比较小的时候没有出现问题,直到有一条收到了Redis的内存和cpu利用率的告警消息,我们发现这么使用是有问题的,核心原因在于list的lrem操作的时间复杂度是O(N+M),其中N是list的长度, M是要移除的元素的个数,而我们这里还是一个一个移除的,当然会导致Redis数据积压和cpu每秒ops升高导致cpu利用率飚高。也就是说,即使使用Pipeline进行批量操作,但是由于单次操作很耗时,是会导致整个Redis出现问题的。
后面我们进行了优化,选用了list的ltrim命令,一次命令执行批量remove操作:
public void deleteSet(String updateKey, Set<Integer> deviceIds) { if (CollectionUtils.isEmpty(deviceIds)) { return; } int maxSize = 10000; redisTemplate.opsForList().trim(updateKey, maxSize + 1, -1); }
由于ltrim本身的时间复杂度为O(M), 其中M要移除的元素的个数,相比于原始方案的lrem,效率提升很多,可以不需要使用Redis Pipeline,优化结果使得Redis内存利用率和cpu利用率都极大程度得到缓解。
六、Redisson 对 Redis Pipeline 特性支持
在redisson官方文档中额外特性介绍中有说到批量命令执行这个特性, 也就是多个命令在一次网络调用中集中发送,该特性是RBatch这个类支持的,从这个类的描述来看,主要是为Redis Pipeline这个特性服务的,并且主要是通过队列和异步实现的。
public interface RBatch { <K, V> RStreamAsync<K, V> getStream(String name); <K, V> RStreamAsync<K, V> getStream(String name, Codec codec); ...... <V> RListAsync<V> getList(String name); <V> RListAsync<V> getList(String name, Codec codec); ...... BatchResult<?> execute() throws RedisException; RFuture<BatchResult<?>> executeAsync(); void discard(); RFuture<Void> discardAsync(); }
简单的测试代码如下:
@Slf4jpublic class RedisPipelineTest { public static void main(String[] args) { Config config = new Config(); config.useSingleServer().setAddress("redis://xx.xx.xx.xx:6379"); RedissonClient redisson = Redisson.create(config); RBatch redisBatch = redisson.createBatch(); int size = 100000; String zSetKey = "Pipeline-test-set"; long begin = System.currentTimeMillis(); for (int i = 0; i < size; i++) { redisBatch.getSet(zSetKey + i).addAsync("ccc"); } redisBatch.execute(); log.info("Redisson Pipeline模式耗时:{}ms", (System.currentTimeMillis() - begin)); redisson.shutdown(); }}
核心方法分析:
1.建Redisson客户端RedissonClient redisson = redisson.create(config), 该方法最终会调用Reddison的构造方法Redisson(Config config)。
protected Redisson(Config config) { this.config = config; Config configCopy = new Config(config); connectionManager = ConfigSupport.createConnectionManager(configCopy); RedissonObjectBuilder objectBuilder = null; if (config.isReferenceEnabled()) { objectBuilder = new RedissonObjectBuilder(this); } commandExecutor = new CommandSyncService(connectionManager, objectBuilder); evictionScheduler = new EvictionScheduler(commandExecutor); writeBehindService = new WriteBehindService(commandExecutor);}
该构造方法中会新建异步命名执行器CommandAsyncExecutor commandExecutor和用户删除超时任务的EvictionScheduler evictionScheduler。
2.创建RBatch实例RBatch redisBatch = redisson.createBatch(), 该方法会使用到步骤1中的commandExecutor和evictionScheduler实例对象。
@Overridepublic RBatch createBatch(BatchOptions options) { return new RedissonBatch(evictionScheduler, commandExecutor, options);} public RedissonBatch(EvictionScheduler evictionScheduler, CommandAsyncExecutor executor, BatchOptions options) { this.executorService = new CommandBatchService(executor, options); this.evictionScheduler = evictionScheduler;}
其中的options对象会影响后面批量执行命令的流程。
3. 异步给set集合添加元素的操作addAsync,这里会具体调用RedissonSet的addAsync方法
@Overridepublic RFuture<Boolean> addAsync(V e) { String name = getRawName(e); return commandExecutor.writeAsync(name, codec, RedisCommands.SADD_SINGLE, name, encode(e));}
(1)接着调用CommandAsyncExecutor的异步写入方法writeAsync。
@Overridepublic <T, R> RFuture<R> writeAsync(String key, Codec codec, RedisCommand<T> command, Object... params) { RPromise<R> mainPromise = createPromise(); NodeSource source = getNodeSource(key); async(false, source, codec, command, params, mainPromise, false); return mainPromise;}
(2) 接着调用批量命令执行器
CommandBatchService的异步发送命令。
@Overridepublic <V, R> void async(boolean readOnlyMode, NodeSource nodeSource, Codec codec, RedisCommand<V> command, Object[] params, RPromise<R> mainPromise, boolean ignoreRedirect) { if (isRedisBasedQueue()) { boolean isReadOnly = options.getExecutionMode() == ExecutionMode.REDIS_READ_ATOMIC; RedisExecutor<V, R> executor = new RedisQueuedBatchExecutor<>(isReadOnly, nodeSource, codec, command, params, mainPromise, false, connectionManager, objectBuilder, commands, connections, options, index, executed, latch, referenceType); executor.execute(); } else { RedisExecutor<V, R> executor = new RedisBatchExecutor<>(readOnlyMode, nodeSource, codec, command, params, mainPromise, false, connectionManager, objectBuilder, commands, options, index, executed, referenceType); executor.execute(); } }
(3) 接着调用了RedisBatchExecutor.
execute方法和BaseRedisBatchExecutor.
addBatchCommandData方法。
@Overridepublic void execute() { addBatchCommandData(params);} protected final void addBatchCommandData(Object[] batchParams) { MasterSlaveEntry msEntry = getEntry(source); Entry entry = commands.get(msEntry); if (entry == null) { entry = new Entry(); Entry oldEntry = commands.putIfAbsent(msEntry, entry); if (oldEntry != null) { entry = oldEntry; } } if (!readOnlyMode) { entry.setReadOnlyMode(false); } Codec codecToUse = getCodec(codec); BatchCommandData<V, R> commandData = new BatchCommandData<V, R>(mainPromise, codecToUse, command, batchParams, index.incrementAndGet()); entry.getCommands().add(commandData);}
这里的commands以主节点为KEY,以待发送命令队列列表为VALUE(Entry),保存一个MAP.然后会把命令都添加到entry的commands命令队列中, Entry结构如下面代码所示。
public static class Entry { Deque<BatchCommandData<?, ?>> commands = new LinkedBlockingDeque<>(); volatile boolean readOnlyMode = true; public Deque<BatchCommandData<?, ?>> getCommands() { return commands; } public void setReadOnlyMode(boolean readOnlyMode) { this.readOnlyMode = readOnlyMode; } public boolean isReadOnlyMode() { return readOnlyMode; } public void clearErrors() { for (BatchCommandData<?, ?> commandEntry : commands) { commandEntry.clearError(); } } }
4. 批量执行命令redisBatch.execute(),这里会最终调用CommandBatchService的executeAsync方法,该方法完整代码如下,我们下面来逐一进行拆解。
public RFuture<BatchResult<?>> executeAsync() { ...... RPromise<BatchResult<?>> promise = new RedissonPromise<>(); RPromise<Void> voidPromise = new RedissonPromise<Void>(); if (this.options.isSkipResult() && this.options.getSyncSlaves() == 0) { ...... } else { voidPromise.onComplete((res, ex) -> { ...... }); } AtomicInteger slots = new AtomicInteger(commands.size()); ...... for (Map.Entry<MasterSlaveEntry, Entry> e : commands.entrySet()) { RedisCommonBatchExecutor executor = new RedisCommonBatchExecutor(new NodeSource(e.getKey()), voidPromise, connectionManager, this.options, e.getValue(), slots, referenceType); executor.execute(); } return promise; }
里面会用到我们在3.3步骤所生成的commands实例。
(1)接着调用了基类RedisExecutor的execute方法
public void execute() { ...... connectionFuture.onComplete((connection, e) -> { if (connectionFuture.isCancelled()) { connectionManager.getShutdownLatch().release(); return; } if (!connectionFuture.isSuccess()) { connectionManager.getShutdownLatch().release(); exception = convertException(connectionFuture); return; } sendCommand(attemptPromise, connection); writeFuture.addListener(new ChannelFutureListener() { @Override public void operationComplete(ChannelFuture future) throws Exception { checkWriteFuture(writeFuture, attemptPromise, connection); } }); }); ...... }
(2)接着调用
RedisCommonBatchExecutor的sendCommand方法,里面会将多个命令放到一个List<commanddata> list列表里面。
@Override protected void sendCommand(RPromise<Void> attemptPromise, RedisConnection connection) { boolean isAtomic = options.getExecutionMode() != ExecutionMode.IN_MEMORY; boolean isQueued = options.getExecutionMode() == ExecutionMode.REDIS_READ_ATOMIC || options.getExecutionMode() == ExecutionMode.REDIS_WRITE_ATOMIC; List<CommandData<?, ?>> list = new ArrayList<>(entry.getCommands().size()); if (source.getRedirect() == Redirect.ASK) { RPromise<Void> promise = new RedissonPromise<Void>(); list.add(new CommandData<Void, Void>(promise, StringCodec.INSTANCE, RedisCommands.ASKING, new Object[] {})); } for (CommandData<?, ?> c : entry.getCommands()) { if ((c.getPromise().isCancelled() || c.getPromise().isSuccess()) && !isWaitCommand(c) && !isAtomic) { continue; } list.add(c); } ...... writeFuture = connection.send(new CommandsData(attemptPromise, list, options.isSkipResult(), isAtomic, isQueued, options.getSyncSlaves() > 0)); }
(3)接着调用RedisConnection的send方法,通过Netty通信发送命令到Redis服务器端执行,这里也验证了Redisson客户端底层是采用Netty进行通信的。
public ChannelFuture send(CommandsData data) { return channel.writeAndFlush(data);}
5. 接收返回结果,这里主要是监听事件是否完成,然后组装返回结果, 核心方法是步骤4提到的CommandBatchService的executeAsync方法,里面会对返回结果进行监听和处理, 核心代码如下:
public RFuture<BatchResult<?>> executeAsync() { ...... RPromise<BatchResult<?>> promise = new RedissonPromise<>(); RPromise<Void> voidPromise = new RedissonPromise<Void>(); if (this.options.isSkipResult() && this.options.getSyncSlaves() == 0) { ...... } else { voidPromise.onComplete((res, ex) -> { executed.set(true); ...... List<Object> responses = new ArrayList<Object>(entries.size()); int syncedSlaves = 0; for (BatchCommandData<?, ?> commandEntry : entries) { if (isWaitCommand(commandEntry)) { syncedSlaves = (Integer) commandEntry.getPromise().getNow(); } else if (!commandEntry.getCommand().getName().equals(RedisCommands.MULTI.getName()) && !commandEntry.getCommand().getName().equals(RedisCommands.EXEC.getName()) && !this.options.isSkipResult()) { ...... Object entryResult = commandEntry.getPromise().getNow(); ...... responses.add(entryResult); } } BatchResult<Object> result = new BatchResult<Object>(responses, syncedSlaves); promise.trySuccess(result); ...... }); } ...... return promise;}
这里会把单个命令的执行结果放到responses里面,最终返回RPromise<batchresult>promise。
从上面的分析来看,Redisson客户端对Redis Pipeline的支持也是从多个命令在一次网络通信中执行和异步处理来实现的。
Redis提供了Pipelining进行批量操作的高级特性,极大地提高了部分数据类型没有批量执行命令导致的执行耗时而引起的性能问题,但是我们在使用的过程中需要考虑Pipeline操作中单个命令执行的耗时问题,否则带来的效果可能适得其反。最后扩展分析了Redisson客户端对Redis Pipeline特性的支持原理,可以与Lettuce客户端对Redis Pipeline支持原理进行比较,加深Pipeline在不同Redis客户端实现方式的理解。
