Reimpreso de: https://blog.csdn.net/weixin_43570367/article/details/104960677
Directorio de artículos
-
-
- 1. Un análisis de la clase de entrada y su código fuente
- En segundo lugar, el análisis del código fuente del objeto SpringApplication instanciado
- Tres, análisis del código fuente del método run ()
-
- 1. Inicie el temporizador
- 2. Establezca el valor de la propiedad del sistema.
- 3. Oyente
- 4. Inicialice los parámetros predeterminados
- 5. Crea un entorno de primavera
- 6. Impresora
- 7. Cree el contexto de la aplicación Spring
- 8. Cree una instancia del reportero de excepciones
- 9. Preprocesamiento del contexto de primavera
- 10. Actualización de contexto de primavera
- 11. Postprocesamiento del contexto de primavera
- 12. Detén el cronómetro
- 13. Publicar el evento de finalización de inicio del contexto de Spring
- 14. Ejecuta todos los corredores Runner
- 15. Publicar el evento Spring Context Ready
-
1. Un análisis de la clase de entrada y su código fuente
Clase de entrada
@SpringBootApplication
public class DevServiceApplication {

    public static void main(String[] args) {
        SpringApplication.run(DevServiceApplication.class,args);
    }
}

Comience con anotaciones y analice:
@SpringBootApplication anotación
La anotación de la aplicación Spring Boot en una determinada clase indica que esta clase es la clase de configuración principal de SpringBoot, y SpringBoot debe ejecutar el método principal de esta clase para iniciar la aplicación SpringBoot
源码剖析
@Target(ElementType.TYPE)
@Retention(RetentionPolicy.RUNTIME)
@Documented
@Inherited
@SpringBootConfiguration
@EnableAutoConfiguration
@ComponentScan(excludeFilters = { @Filter(type = FilterType.CUSTOM, classes = TypeExcludeFilter.class),
		@Filter(type = FilterType.CUSTOM, classes = AutoConfigurationExcludeFilter.class) })
public @interface SpringBootApplication {
Como se puede ver en el código fuente, esta anotación es una combinación de las tres anotaciones @SpringBootConfiguration, @EnableAutoConfiguration y @ComponentScan
① @ SpringBootConfiguration
La clase de configuración de Spring Boot; marcada en una determinada clase, lo que significa que una clase proporciona una aplicación Spring Boot
@Target(ElementType.TYPE)
@Retention(RetentionPolicy.RUNTIME)
@Documented
@Configuration
public @interface SpringBootConfiguration {
@ Configuración : Anote esta anotación en la clase de configuración;
@Target(ElementType.TYPE)
@Retention(RetentionPolicy.RUNTIME)
@Documented
@Component
public @interface Configuration {
Nota :
La clase de configuración es equivalente al archivo de configuración; la clase de configuración también es un componente en el contenedor, que usa la anotación @Component.
② @ EnableAutoConfiguration
Dígale a SpringBoot que active la función de configuración automática, para que la configuración automática pueda tener efecto.
Con la ayuda de @import, escanee y cree una instancia de los beans configurados automáticamente que cumplan con las condiciones, y luego cárguelos en el contenedor IOC
@Target(ElementType.TYPE)
@Retention(RetentionPolicy.RUNTIME)
@Documented
@Inherited
@AutoConfigurationPackage
@Import(AutoConfigurationImportSelector.class)
public @interface EnableAutoConfiguration {

	String ENABLED_OVERRIDE_PROPERTY = "spring.boot.enableautoconfiguration";

	/**
	 * Exclude specific auto-configuration classes such that they will never be applied.
	 * @return the classes to exclude
	 */
	Class<?>[] exclude() default {};

	/**
	 * Exclude specific auto-configuration class names such that they will never be
	 * applied.
	 * @return the class names to exclude
	 * @since 1.3.0
	 */
	String[] excludeName() default {};

}
@ AutoConfigurationPackage : paquete de configuración automática
@ Import (EnableAutoConfigurationImportSelector.class): importar componentes al contenedor
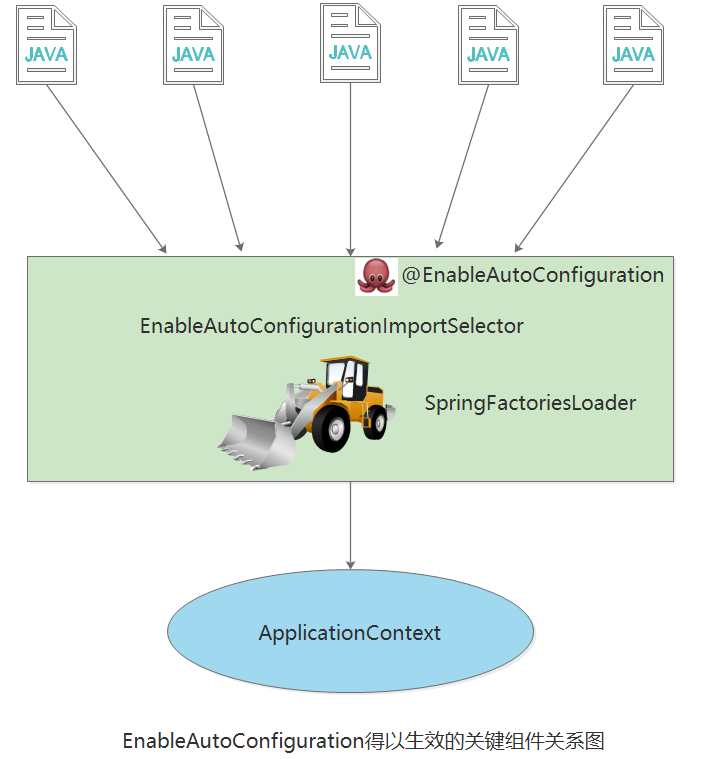
Use la
anotación @EnableAutoConfiguration para activar el escaneo automático, luego use select para seleccionar archivos que cumplan con las condiciones y use SpringFactoriesLoader para la creación de instancias. Finalmente, se carga en el contenedor IOC, que es ApplicationContext.
③ @ ComponentScan
@ComponentScan es para escanear y cargar automáticamente componentes calificados (como @Component y @Repository, etc.) o definiciones de bean, y finalmente cargar estas definiciones de bean en el contenedor IOC.
En segundo lugar, el análisis del código fuente del objeto SpringApplication instanciado
源码剖析
/**
 * Create a new {@link SpringApplication} instance. The application context will load
 * beans from the specified primary sources (see {@link SpringApplication class-level}
 * documentation for details. The instance can be customized before calling
 * {@link #run(String...)}.
 * @param resourceLoader the resource loader to use
 * @param primarySources the primary bean sources
 * @see #run(Class, String[])
 * @see #setSources(Set)
 */
@SuppressWarnings({ "unchecked", "rawtypes" })
public SpringApplication(ResourceLoader resourceLoader, Class<?>... primarySources) {
	// 初始化资源加载器
	this.resourceLoader = resourceLoader;
	// 资源加载类不能为 null
	Assert.notNull(primarySources, "PrimarySources must not be null");
	// 初始化加载资源类集合并去重
	this.primarySources = new LinkedHashSet<>(Arrays.asList(primarySources));
	// 推断应用程序是不是web应用
	this.webApplicationType = WebApplicationType.deduceFromClasspath();
	// 设置初始化器(Initializer)
	setInitializers((Collection) getSpringFactoriesInstances(ApplicationContextInitializer.class));
	// 设置监听器
	setListeners((Collection) getSpringFactoriesInstances(ApplicationListener.class));
	// 推断出主应用入口类
	this.mainApplicationClass = deduceMainApplicationClass();
}
Entre ellos, se llama al método deduceFromClasspath () al inferir si la aplicación es una aplicación web
源码剖析
static WebApplicationType deduceFromClasspath() {
		if (ClassUtils.isPresent(WEBFLUX_INDICATOR_CLASS, null) && !ClassUtils.isPresent(WEBMVC_INDICATOR_CLASS, null)
				&& !ClassUtils.isPresent(JERSEY_INDICATOR_CLASS, null)) {
			// springboot2.0提出的响应式web应用
			return WebApplicationType.REACTIVE;
		}
		for (String className : SERVLET_INDICATOR_CLASSES) {
			// 如果两个包路径都没有的话,就是普通应用
			if (!ClassUtils.isPresent(className, null)) {
				// 普通的应用
				return WebApplicationType.NONE;
			}
		}
		// 其实最后返回的就是这个servlet,因为是web应用
		return WebApplicationType.SERVLET;
	}
1. Configure el inicializador (Inicializador)
inicializadores es un atributo de instancia en SpringApplication
源码剖析
/**
 * Sets the {@link ApplicationContextInitializer} that will be applied to the Spring
 * {@link ApplicationContext}.
 * @param initializers the initializers to set
 */
public void setInitializers(Collection<? extends ApplicationContextInitializer<?>> initializers) {
	this.initializers = new ArrayList<>(initializers);
}
initailizer implementa la interfaz ApplicationContextInitializer
源码剖析
para resumir:
- La función de la interfaz ApplicationContextInitializer es inicializar el contexto Spring antes de que se actualice. Normalmente, como en aplicaciones web, registrando fuentes de propiedad o activando perfiles. Property Sources es más fácil de entender, es decir, el archivo de configuración. Perfiles es una entidad abstraída por Spring para cargar diferentes elementos de configuración en diferentes entornos (como DEV, TEST, PRODUCTION, etc.).
- Llame al método initialize () para cargar la implementación ApplicationContextInitializer inicializada en SpringApplication
Obtenga la clase de implementación a través del método getSpringFactoriesInstances ( ApplicationContextInitializer.class)
源码剖析
private <T> Collection<T> getSpringFactoriesInstances(Class<T> type) {
	return getSpringFactoriesInstances(type, new Class<?>[] {});
}

private <T> Collection<T> getSpringFactoriesInstances(Class<T> type, Class<?>[] parameterTypes, Object... args) {
	ClassLoader classLoader = getClassLoader();
	// Use names and ensure unique to protect against duplicates
	// 使用 Set保存names
	Set<String> names = new LinkedHashSet<>(SpringFactoriesLoader.loadFactoryNames(type, classLoader));
	// 根据names进行实例化
	List<T> instances = createSpringFactoriesInstances(type, parameterTypes, classLoader, args, names);
	// 对实例进行排序
	AnnotationAwareOrderComparator.sort(instances);
	return instances;
}
源码剖析
/**
 * Sets the {@link ApplicationListener}s that will be applied to the SpringApplication
 * and registered with the {@link ApplicationContext}.
 * @param listeners the listeners to set
 */
public void setListeners(Collection<? extends ApplicationListener<?>> listeners) {
	this.listeners = new ArrayList<>(listeners);
}
Heredar la interfaz ApplicationListener ()
源码剖析
/**
 * Interface to be implemented by application event listeners.
 *
 * <p>Based on the standard {@code java.util.EventListener} interface
 * for the Observer design pattern.
 *
 * <p>As of Spring 3.0, an {@code ApplicationListener} can generically declare
 * the event type that it is interested in. When registered with a Spring
 * {@code ApplicationContext}, events will be filtered accordingly, with the
 * listener getting invoked for matching event objects only.
 *
 * @author Rod Johnson
 * @author Juergen Hoeller
 * @param <E> the specific {@code ApplicationEvent} subclass to listen to
 * @see org.springframework.context.ApplicationEvent
 * @see org.springframework.context.event.ApplicationEventMulticaster
 * @see org.springframework.context.event.EventListener
 */
@FunctionalInterface
public interface ApplicationListener<E extends ApplicationEvent> extends EventListener {

	/**
	 * Handle an application event.
	 * @param event the event to respond to
	 */
	void onApplicationEvent(E event);

}
Resumen :
Aquí se utiliza el modo de observador. Hay un observador y muchos observadores. Cuando el estado del observador cambia, todos los observadores deben ser notificados para realizar algunas operaciones.
3. Deduzca la clase de entrada de la aplicación principal
源码剖析
private Class<?> deduceMainApplicationClass() {
	try {
		// 构造一个异常类
		StackTraceElement[] stackTrace = new RuntimeException().getStackTrace();
		for (StackTraceElement stackTraceElement : stackTrace) {
			// 通过main的栈帧推断出入口类的名字
			if ("main".equals(stackTraceElement.getMethodName())) {
				return Class.forName(stackTraceElement.getClassName());
			}
		}
	}
	catch (ClassNotFoundException ex) {
		// Swallow and continue
	}
	return null;
}
Tres, análisis del código fuente del método run ()
源码剖析
/**
 * Run the Spring application, creating and refreshing a new
 * {@link ApplicationContext}.
 * @param args the application arguments (usually passed from a Java main method)
 * @return a running {@link ApplicationContext}
 */
public ConfigurableApplicationContext run(String... args) {
	// 记时器,统计应用启动的时间
	StopWatch stopWatch = new StopWatch();
	stopWatch.start();
	// 初始化应用上下文和异常报告集合
	ConfigurableApplicationContext context = null;
	// SpringBootExceptionReporter 是异常处理器,启动的时候通过它把异常信息展示出来
	Collection<SpringBootExceptionReporter> exceptionReporters = new ArrayList<>();
	 // 设置系统属性java.awt.headless的值,默认为true
	configureHeadlessProperty();
	// 监听器,SpringApplicationRunListeners实际上是一个集合
	SpringApplicationRunListeners listeners = getRunListeners(args);
	// 回调所有的获取SpringApplicationRunListener.starting()方法
	listeners.starting();
	try {
		// 初始化默认参数
		ApplicationArguments applicationArguments = new DefaultApplicationArguments(args);
		// 准备 Spring 环境
		ConfigurableEnvironment environment = prepareEnvironment(listeners, applicationArguments);
		// 创建环境完成后回调,配置bean
		configureIgnoreBeanInfo(environment);
		// 打印器,springboot启动的时候会打印springboot的标志以及对应的版本
		Banner printedBanner = printBanner(environment);
		// 创建Spring应用上下文,来决定创建web的ioc还是普通的ioc
		context = createApplicationContext();
		// 实例化异常报告器
		exceptionReporters = getSpringFactoriesInstances(SpringBootExceptionReporter.class,
				new Class[] { ConfigurableApplicationContext.class }, context);
		//准备上下文环境
        // Spring上下文前置处理
		prepareContext(context, environment, listeners, applicationArguments, printedBanner);
		// prepareContext运行完成以后回调所有的SpringApplicationRunListener的contextLoaded();
		// Spring上下文刷新,表示刷新完成,进行后续的一些操作
		refreshContext(context);
        // Spring上下文后置处理
		afterRefresh(context, applicationArguments);
		// 停止计时器
		stopWatch.stop();
		// 输出日志记录的类名、时间信息
		if (this.logStartupInfo) {
			new StartupInfoLogger(this.mainApplicationClass).logStarted(getApplicationLog(), stopWatch);
		}
		// 发布应用上下文启动完成事件
		listeners.started(context);
		// 执行所有 Runner 运行器
		callRunners(context, applicationArguments);
	}
	catch (Throwable ex) {
		handleRunFailure(context, ex, exceptionReporters, listeners);
		throw new IllegalStateException(ex);
	}

	try {
		// 发布应用上下文就绪事件
		listeners.running(context);
	}
	catch (Throwable ex) {
		handleRunFailure(context, ex, exceptionReporters, null);
		throw new IllegalStateException(ex);
	}
	// 返回应用上下文
	return context;
}
Inicie el temporizador para contar el tiempo que se inició la aplicación
public void start() throws IllegalStateException {
		// 传入一个空字符串作为当前任务的名称
        this.start("");
    }

    public void start(String taskName) throws IllegalStateException {
        if (this.currentTaskName != null) {
        	// 如果当前任务名字不为空,抛出异常
            throw new IllegalStateException("Can't start StopWatch: it's already running");
        } else {
        	// 否则,记录当前任务的开始时间
            this.currentTaskName = taskName;
            this.startTimeNanos = System.nanoTime();
        }
    }
- Primero, pase una cadena vacía como el nombre de la tarea actual
- En segundo lugar, determine si el nombre de la tarea actual está vacío, si está vacío, registre la hora de inicio del inicio de la aplicación actual
2. Establezca el valor de la propiedad del sistema.
El valor predeterminado de la propiedad del sistema es verdadero y el valor de la propiedad del sistema proviene de System.getProperty ().
private void configureHeadlessProperty() {
		System.setProperty(SYSTEM_PROPERTY_JAVA_AWT_HEADLESS,
				System.getProperty(SYSTEM_PROPERTY_JAVA_AWT_HEADLESS, Boolean.toString(this.headless)));
	}
private SpringApplicationRunListeners getRunListeners(String[] args) {
		// 类加载对应的监听器
		Class<?>[] types = new Class<?>[] { SpringApplication.class, String[].class };
		// 创建SpringApplicationRunListener实例
		return new SpringApplicationRunListeners(logger,
				getSpringFactoriesInstances(SpringApplicationRunListener.class, types, this, args));
	}
4. Inicialice los parámetros predeterminados
ApplicationArguments applicationArguments = new DefaultApplicationArguments(args);
5. Crea un entorno de primavera
private ConfigurableEnvironment prepareEnvironment(
        SpringApplicationRunListeners listeners,
        ApplicationArguments applicationArguments) {
    // 获取环境。如果存在就直接返回,否则先创建一个再返回
    ConfigurableEnvironment environment = getOrCreateEnvironment();
    // 配置环境
    configureEnvironment(environment, applicationArguments.getSourceArgs());
    // 准备监听器环境
    listeners.environmentPrepared(environment);
    // 将环境绑定到SpringApplication上面
    bindToSpringApplication(environment);
    // 如果不是web应用环境,将环境转换成StandardEnvironment
    if (this.webApplicationType == WebApplicationType.NONE) {
        environment = new EnvironmentConverter(getClassLoader())
                .convertToStandardEnvironmentIfNecessary(environment);
    }
    ConfigurationPropertySources.attach(environment);
    // 返回环境
    return environment;
}
Resumen :
- Consiga el medio ambiente. Si existe, regrese directamente, de lo contrario cree uno y regrese
- Entorno de configuración
- Preparar el entorno de escucha
- Vincular el entorno a SpringApplication
- Si no es un entorno de aplicación web, convierta el entorno a StandardEnvironment
- Finalmente regresa al medio ambiente
Cuando se inicia springboot, imprimirá el logotipo de springboot y la versión correspondiente
private Banner printBanner(ConfigurableEnvironment environment) {
		if (this.bannerMode == Banner.Mode.OFF) {
			return null;
		}
		ResourceLoader resourceLoader = (this.resourceLoader != null) ? this.resourceLoader
				: new DefaultResourceLoader(getClassLoader());
		SpringApplicationBannerPrinter bannerPrinter = new SpringApplicationBannerPrinter(resourceLoader, this.banner);
		if (this.bannerMode == Mode.LOG) {
			return bannerPrinter.print(environment, this.mainApplicationClass, logger);
		}
		return bannerPrinter.print(environment, this.mainApplicationClass, System.out);
	}
7. Cree el contexto de la aplicación Spring
protected ConfigurableApplicationContext createApplicationContext() {
	// 首先进行判断有没有指定的实现类
	Class<?> contextClass = this.applicationContextClass;
	// 如果没有,则根据应用类型选择
	if (contextClass == null) {
		try {
			// 根据webApplicationType的类型去反射创建ConfigurableApplicationContext的具体实例
			switch (this.webApplicationType) {
			case SERVLET:
				contextClass = Class.forName(DEFAULT_SERVLET_WEB_CONTEXT_CLASS);
				break;
			case REACTIVE:
				contextClass = Class.forName(DEFAULT_REACTIVE_WEB_CONTEXT_CLASS);
				break;
			default:
				contextClass = Class.forName(DEFAULT_CONTEXT_CLASS);
			}
		}
		catch (ClassNotFoundException ex) {
			throw new IllegalStateException(
					"Unable create a default ApplicationContext, please specify an ApplicationContextClass", ex);
		}
	}
	// 通过反射,得到创建的对象
	return (ConfigurableApplicationContext) BeanUtils.instantiateClass(contextClass);
}
Resumen :
- Primero, juzgue si hay una clase de implementación especificada; si no, elija según el tipo de aplicación;
- Según el tipo de webApplicationType a reflejar para crear una instancia específica de ConfigurableApplicationContext;
- Finalmente, a través de la reflexión, se obtiene el objeto creado.
Para aplicaciones web, el tipo de contexto es DEFAULT_WEB_CONTEXT_CLASS.
8. Cree una instancia del reportero de excepciones
Utilice el método getSpringFactoriesInstances () para obtener el nombre de la clase de excepción configurada y crear una instancia de todas las clases de excepción.
源码剖析
private <T> Collection<T> getSpringFactoriesInstances(Class<T> type, Class<?>[] parameterTypes, Object... args) {
	ClassLoader classLoader = getClassLoader();
	// Use names and ensure unique to protect against duplicates
	// 使用名称并确保唯一,以防止重复
	Set<String> names = new LinkedHashSet<>(SpringFactoriesLoader.loadFactoryNames(type, classLoader));
	List<T> instances = createSpringFactoriesInstances(type, parameterTypes, classLoader, args, names);
	AnnotationAwareOrderComparator.sort(instances);
	return instances;
}
9. Preprocesamiento del contexto de primavera
源码剖析
private void prepareContext(ConfigurableApplicationContext context, ConfigurableEnvironment environment,
			SpringApplicationRunListeners listeners, ApplicationArguments applicationArguments, Banner printedBanner) {
	// 给IOC容器设置一些环境属性
	context.setEnvironment(environment);
	// 给IOC容器注册一些组件
	postProcessApplicationContext(context);
	// 调用初始化方法
	applyInitializers(context);
	// 监听器,触发contextPrepared 事件
	listeners.contextPrepared(context);
	// 记录启动过程中的日志
	if (this.logStartupInfo) {
		logStartupInfo(context.getParent() == null);
		logStartupProfileInfo(context);
	}
	// Add boot specific singleton beans
	// 添加特定的单例beans
	ConfigurableListableBeanFactory beanFactory = context.getBeanFactory();
	beanFactory.registerSingleton("springApplicationArguments", applicationArguments);
	if (printedBanner != null) {
		beanFactory.registerSingleton("springBootBanner", printedBanner);
	}
	if (beanFactory instanceof DefaultListableBeanFactory) {
		((DefaultListableBeanFactory) beanFactory)
				.setAllowBeanDefinitionOverriding(this.allowBeanDefinitionOverriding);
	}
	if (this.lazyInitialization) {
		context.addBeanFactoryPostProcessor(new LazyInitializationBeanFactoryPostProcessor());
	}
	// Load the sources
	// 加载所有资源
	Set<Object> sources = getAllSources();
	Assert.notEmpty(sources, "Sources must not be empty");
	// 加载启动类,将启动类注入到容器中去
	load(context, sources.toArray(new Object[0]));
	// 触发contextLoaded 事件
	listeners.contextLoaded(context);
}
10. Actualización de contexto de primavera
Una vez completada la actualización, se realizarán algunas operaciones de seguimiento
源码剖析
private void refreshContext(ConfigurableApplicationContext context) {
	// 调用父类的refresh操作
	refresh(context);
	if (this.registerShutdownHook) {
		try {
			// 注册一个关闭容器时的钩子函数,在JVM关机的时候关闭这个上下文。
			context.registerShutdownHook();
		}
		catch (AccessControlException ex) {
			// Not allowed in some environments.
		}
	}
}
Se llama al método registerShutdownHook ()
/**
 * Register a shutdown hook {@linkplain Thread#getName() named}
 * {@code SpringContextShutdownHook} with the JVM runtime, closing this
 * context on JVM shutdown unless it has already been closed at that time.
 * <p>Delegates to {@code doClose()} for the actual closing procedure.
 * @see Runtime#addShutdownHook
 * @see ConfigurableApplicationContext#SHUTDOWN_HOOK_THREAD_NAME
 * @see #close()
 * @see #doClose()
 */
@Override
public void registerShutdownHook() {
	if (this.shutdownHook == null) {
		// No shutdown hook registered yet.
		this.shutdownHook = new Thread(SHUTDOWN_HOOK_THREAD_NAME) {
			@Override
			public void run() {
				synchronized (startupShutdownMonitor) {
					// 调用doClose方法,进行容器销毁时的清理工作
					doClose();
				}
			}
		};
		Runtime.getRuntime().addShutdownHook(this.shutdownHook);
	}
}
11. Postprocesamiento del contexto de primavera
La llamada se realiza después de que el contenedor Spring actualiza el contexto y, a su vez, se llama a los Runners registrados.
/**
 * Called after the context has been refreshed.
 * @param context the application context
 * @param args the application arguments
 */
protected void afterRefresh(ConfigurableApplicationContext context, ApplicationArguments args) {
}

private void callRunners(ApplicationContext context, ApplicationArguments args) {
	List<Object> runners = new ArrayList<>();
	runners.addAll(context.getBeansOfType(ApplicationRunner.class).values());
	runners.addAll(context.getBeansOfType(CommandLineRunner.class).values());
	AnnotationAwareOrderComparator.sort(runners);
	// CommandLineRunner、ApplicationRunner 这两个接口,是在容器启动成功后的最后一步进行回调
	for (Object runner : new LinkedHashSet<>(runners)) {
		if (runner instanceof ApplicationRunner) {
			callRunner((ApplicationRunner) runner, args);
		}
		if (runner instanceof CommandLineRunner) {
			callRunner((CommandLineRunner) runner, args);
		}
	}
}
Las dos interfaces, CommandLineRunner y ApplicationRunner, son devoluciones de llamada en el último paso después de que el contenedor se inicia correctamente.
Realice el monitor de tiempo para detener la operación y cuente alguna información de ejecución de tareas
public void stop() throws IllegalStateException {
    if (this.currentTaskName == null) {
        throw new IllegalStateException("Can't stop StopWatch: it's not running");
    } else {
        long lastTime = System.nanoTime() - this.startTimeNanos;
        this.totalTimeNanos += lastTime;
        this.lastTaskInfo = new StopWatch.TaskInfo(this.currentTaskName, lastTime);
        if (this.keepTaskList) {
            this.taskList.add(this.lastTaskInfo);
        }

        ++this.taskCount;
        this.currentTaskName = null;
    }
}
13. Publicar el evento de finalización de inicio del contexto de Spring
void started(ConfigurableApplicationContext context) {
	for (SpringApplicationRunListener listener : this.listeners) {
		listener.started(context);
	}
}
14. Ejecuta todos los corredores Runner
private void callRunners(ApplicationContext context, ApplicationArguments args) {
	List<Object> runners = new ArrayList<>();
	runners.addAll(context.getBeansOfType(ApplicationRunner.class).values());
	runners.addAll(context.getBeansOfType(CommandLineRunner.class).values());
	AnnotationAwareOrderComparator.sort(runners);
	for (Object runner : new LinkedHashSet<>(runners)) {
		if (runner instanceof ApplicationRunner) {
			callRunner((ApplicationRunner) runner, args);
		}
		if (runner instanceof CommandLineRunner) {
			callRunner((CommandLineRunner) runner, args);
		}
	}
}
15. Publicar el evento Spring Context Ready
void running(ConfigurableApplicationContext context) {
	for (SpringApplicationRunListener listener : this.listeners) {
		listener.running(context);
	}
}
El método para activar el evento en ejecución de todos los oyentes SpringApplicationRunListener.
Sobre la base del blogger original, he agregado algunos pasos importantes que creo que son limitados, así que no rocíe. ¡El énfasis está en compartir el progreso mutuo!