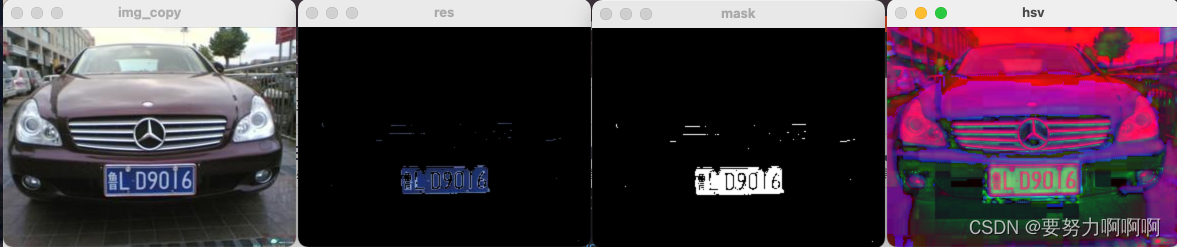
1. hsv en la imagen
extracto de hsv parte azul
# hsv提取蓝色部分
def hsv_color_find(img):
    img_copy = img.copy()
    cv2.imshow('img_copy', img_copy)
    """
    提取图中的蓝色部分 hsv范围可以自行优化
    cv2.inRange()
    参数介绍:
    第一个参数:hsv指的是原图
    第二个参数:在图像中低于这个数值的全部变为0
    第二个参数:在图像中高于这个数值的全部变为0
    在之间的变为255
    图像中0-255。是变得越来越亮的
    """
    hsv = cv2.cvtColor(img_copy, cv2.COLOR_BGR2HSV)
    cv2.imshow('hsv',hsv)
    low_hsv = np.array([100, 80, 80])#这里的阈值是自己进行设置的
    high_hsv = np.array([124, 255, 255])
    # 设置HSV的阈值
    mask = cv2.inRange(hsv, lowerb=low_hsv, upperb=high_hsv)
    cv2.imshow('mask',mask)
    #show_pic('hsv_color_find', mask)#这里是得到黑白颜色的图片
    # 将掩膜与图像层逐像素相加
    #cv2.bitwise_and()是对二进制数据进行“与”操作,即对图像(灰度图像或彩色图像均可)每个像素值进行二进制“与”操作,1&1=1,1&0=0,0&1=0,0&0=0
    res = cv2.bitwise_and(img_copy, img_copy, mask=mask)
    cv2.imshow('res',res)
    cv2.waitKey(0)
    cv2.destroyAllWindows()
    #show_pic('hsv_color_find2',res)#在这里得到蓝底黑字的照片
    print('hsv提取蓝色部分完毕')

    return res
2. Ajustar el tamaño de la imagen
Pero este código no se usa en la segunda imagen de prueba, por lo que no explicaré demasiado.
def resize_photo(imgArr,MAX_WIDTH = 1000):
    """
    这个函数的作用就是来调整图像的尺寸大小,当输入图像尺寸的宽度大于阈值(默认1000),我们会将图像按比例缩小
    输入: imgArr是输入的图像数字矩阵
    输出:  经过调整后的图像数字矩阵
    拓展:OpenCV自带的cv2.resize()函数可以实现放大与缩小,函数声明如下:
            cv2.resize(src, dsize[, dst[, fx[, fy[, interpolation]]]]) → dst
        其参数解释如下:
            src 输入图像矩阵
            dsize 二元元祖(宽,高),即输出图像的大小
            dst 输出图像矩阵
            fx 在水平方向上缩放比例,默认值为0
            fy 在垂直方向上缩放比例,默认值为0
            interpolation 插值法,如INTER_NEAREST,INTER_LINEAR,INTER_AREA,INTER_CUBIC,INTER_LANCZOS4等
    """
    img = imgArr
    rows, cols= img.shape[:2]     #获取输入图像的高和宽
    if cols >  MAX_WIDTH:
        change_rate = MAX_WIDTH / cols
        img = cv2.resize(img ,( MAX_WIDTH ,int(rows * change_rate) ), interpolation = cv2.INTER_AREA)
    return img
3. Realizar principalmente la conversión de formularios avanzados aquí
Encuentre algunas áreas en forma de distancia que pueden ser placas de matrícula y utilice principalmente la operación de apertura y la operación de cierre para cambiar.

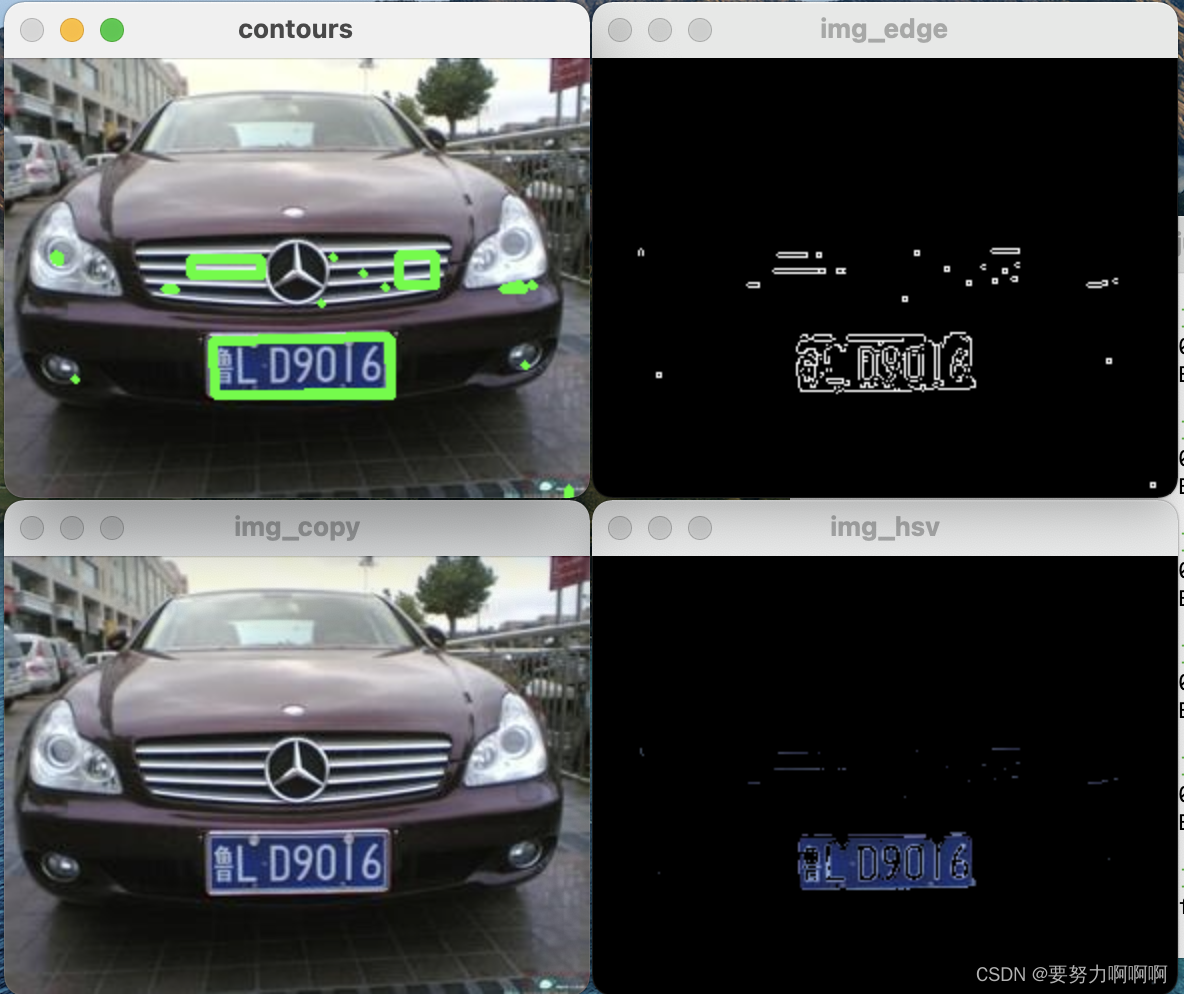
4. Dibuja el contorno
# 根据findContours返回的contours 画出轮廓
def draw_contours(img, contours):
    for c in contours:
        x, y, w, h = cv2.boundingRect(c)#这个函数就是用来返回值使用的。
        """
        传入一个轮廓图像,返回 x y 是左上角的点, w和h是矩形边框的宽度和高度
        """
        cv2.rectangle(img, (x, y), (x + w, y + h), (0, 255, 0), 2)#进行画图使用
        """
        画出矩形
            img 是要画出轮廓的原图
            (x, y) 是左上角点的坐标
            (x+w, y+h) 是右下角的坐标
            0,255,0)是画线对应的rgb颜色
            2 是画出线的宽度
        """

        # 获得最小的矩形轮廓 可能带旋转角度
        rect = cv2.minAreaRect(c)
        # 计算最小区域的坐标
        box = cv2.boxPoints(rect)
        # 坐标规范化为整数
        box = np.int0(box)
        # 画出轮廓
        cv2.drawContours(img, [box], 0, (0, 255, 0), 3)


    #show_pic('contours', img)
    cv2.imshow("contours", img)
    cv2.waitKey(0)
    cv2.destroyAllWindows()
5. Filtra el rectángulo resultante según algunas características físicas (área, etc.) de la placa
def chose_licence_plate(contours, Min_Area=2000):
    """
    这个函数根据车牌的一些物理特征(面积等)对所得的矩形进行过滤
    输入:contours是一个包含多个轮廓的列表,其中列表中的每一个元素是一个N*1*2的三维数组
    输出:返回经过过滤后的轮廓集合

    拓展:
    (1) OpenCV自带的cv2.contourArea()函数可以实现计算点集(轮廓)所围区域的面积,函数声明如下:
            contourArea(contour[, oriented]) -> retval
        其中参数解释如下:
            contour代表输入点集,此点集形式是一个n*2的二维ndarray或者n*1*2的三维ndarray
            retval 表示点集(轮廓)所围区域的面积
    (2) OpenCV自带的cv2.minAreaRect()函数可以计算出点集的最小外包旋转矩形,函数声明如下:
             minAreaRect(points) -> retval
        其中参数解释如下:
            points表示输入的点集,如果使用的是Opencv 2.X,则输入点集有两种形式:一是N*2的二维ndarray,其数据类型只能为 int32
                                    或者float32, 即每一行代表一个点;二是N*1*2的三维ndarray,其数据类型只能为int32或者float32
            retval是一个由三个元素组成的元组,依次代表旋转矩形的中心点坐标、尺寸和旋转角度(根据中心坐标、尺寸和旋转角度
                                    可以确定一个旋转矩形)
    (3) OpenCV自带的cv2.boxPoints()函数可以根据旋转矩形的中心的坐标、尺寸和旋转角度,计算出旋转矩形的四个顶点,函数声明如下:
             boxPoints(box[, points]) -> points
        其中参数解释如下:
            box是旋转矩形的三个属性值,通常用一个元组表示,如((3.0,5.0),(8.0,4.0),-60)
            points是返回的四个顶点,所返回的四个顶点是4行2列、数据类型为float32的ndarray,每一行代表一个顶点坐标
    """
    temp_contours = []
    for contour in contours:
        if cv2.contourArea(contour) > Min_Area:
            temp_contours.append(contour)
    car_plate1 = []
    car_plate2 = []
    car_plate3 = []
    for temp_contour in temp_contours:
        rect_tupple = cv2.minAreaRect(temp_contour)
        rect_width, rect_height = rect_tupple[1]
        if rect_width < rect_height:
            rect_width, rect_height = rect_height, rect_width
        aspect_ratio = rect_width / rect_height
        # 中国:蓝牌和黑牌是440×140,黄牌前牌尺寸同,后牌为440×220;摩托车及轻便摩托车前牌是220×95,后牌是220×140。
        # 车牌正常情况下宽高比在2 - 3.15之间 稍微放宽点范围
        if aspect_ratio > 1.5 and aspect_ratio < 4.65:
            car_plate1.append(temp_contour)
            rect_vertices = cv2.boxPoints(rect_tupple)
            rect_vertices = np.int0(rect_vertices)
            # print(temp_contour)
    print('一次筛查后,符合比例的矩形有' + str(len(car_plate1)) + '个')

    # 二次筛查 如果符合尺寸的矩形大于1,则缩小宽高比
    if len(car_plate1) > 1:
        for temp_contour in car_plate1:
            rect_tupple = cv2.minAreaRect(temp_contour)
            rect_width, rect_height = rect_tupple[1]
            if rect_width < rect_height:
                rect_width, rect_height = rect_height, rect_width
            aspect_ratio = rect_width / rect_height
            # 中国:蓝牌和黑牌是440×140,黄牌前牌尺寸同,后牌为440×220;摩托车及轻便摩托车前牌是220×95,后牌是220×140。
            # 车牌正常情况下宽高比在2 - 3.15之间 稍微放宽点范围
            if aspect_ratio > 1.6 and aspect_ratio < 4.15:
                car_plate2.append(temp_contour)
                rect_vertices = cv2.boxPoints(rect_tupple)
                rect_vertices = np.int0(rect_vertices)
    print('二次筛查后,符合比例的矩形还有' + str(len(car_plate2)) + '个')

    # 三次筛查 如果符合尺寸的矩形大于1,则缩小宽高比
    if len(car_plate2) > 1:
        for temp_contour in car_plate2:
            rect_tupple = cv2.minAreaRect(temp_contour)
            rect_width, rect_height = rect_tupple[1]
            if rect_width < rect_height:
                rect_width, rect_height = rect_height, rect_width
            aspect_ratio = rect_width / rect_height
            # 中国:蓝牌和黑牌是440×140,黄牌前牌尺寸同,后牌为440×220;摩托车及轻便摩托车前牌是220×95,后牌是220×140。
            # 车牌正常情况下宽高比在2 - 3.15之间 稍微放宽点范围
            if aspect_ratio > 1.8 and aspect_ratio < 3.35:
                car_plate3.append(temp_contour)
                rect_vertices = cv2.boxPoints(rect_tupple)
                rect_vertices = np.int0(rect_vertices)
    print('三次筛查后,符合比例的矩形还有' + str(len(car_plate3)) + '个')

    if len(car_plate3) > 0:
        return car_plate3
    if len(car_plate2) > 0:
        return car_plate2
    return car_plate1

# 根据得到的车牌定位,将车牌从原始图像中截取出来,并存在指定目录中。
def license_segment(car_plates, out_path):
    """
    此函数根据得到的车牌定位,将车牌从原始图像中截取出来,并存在指定目录中。
    输入: car_plates是经过初步筛选之后的车牌轮廓的点集
    输出:   out_path是车牌的存储路径
    """
    i = 0
    if len(car_plates) == 1:
        for car_plate in car_plates:
            row_min, col_min = np.min(car_plate[:, 0, :], axis=0)
            row_max, col_max = np.max(car_plate[:, 0, :], axis=0)
            cv2.rectangle(img, (row_min, col_min), (row_max, col_max), (0, 255, 0), 2)
            card_img = img[col_min:col_max, row_min:row_max, :]
            cv2.imwrite(out_path + "/card_img" + str(i) + ".jpg", card_img)
            #cv2.imshow("card_img" + str(i) + ".jpg", card_img)
            i += 1
            # cv2.waitKey(0)
            # cv2.destroyAllWindows()

    print('共切出' + str(i) + '张车牌图。')

    return out_path + "/card_img0.jpg"
6. Esta función intercepta la matrícula de la imagen original según la ubicación de la matrícula obtenida y la guarda en el directorio especificado.
def license_segment(car_plates, out_path):
    """
    此函数根据得到的车牌定位,将车牌从原始图像中截取出来,并存在指定目录中。
    输入: car_plates是经过初步筛选之后的车牌轮廓的点集
    输出:   out_path是车牌的存储路径
    """
    i = 0
    if len(car_plates) == 1:
        for car_plate in car_plates:
            row_min, col_min = np.min(car_plate[:, 0, :], axis=0)
            row_max, col_max = np.max(car_plate[:, 0, :], axis=0)
            cv2.rectangle(img, (row_min, col_min), (row_max, col_max), (0, 255, 0), 2)#hauchu画出来外接矩形
            card_img = img[col_min:col_max, row_min:row_max, :]
            cv2.imwrite(out_path + "/card_img" + str(i) + ".jpg", card_img)

            i += 1
            #显示图片所用
            # cv2.imshow("card_img" + str(i) + ".jpg", card_img)
            # cv2.waitKey(0)
            # cv2.destroyAllWindows()

    print('共切出' + str(i) + '张车牌图。')

    return out_path + "/card_img0.jpg"

7.
Enlace de referencia:
https://blog.csdn.net/lukas_ten/article/details/115149086
https://blog.csdn.net/sunny2038/article/details/9137759
https://blog.csdn.net/wzh191920/article /detalles/79589506
https://blog.csdn.net/weixin_41695564/article/detalles/79712393
https://blog.csdn.net/Ikaros_521/article/detalles/121516173