" Zabbix Network map " can be simply understood as a dynamic network topology can be configured for business zabbix map by map can understand the overall status of the application: the server is abnormal, whether the network is faulty, what is the current status of the application. If you do not need these things, at least you can draw a map the network topology by network. See results
Create a network map
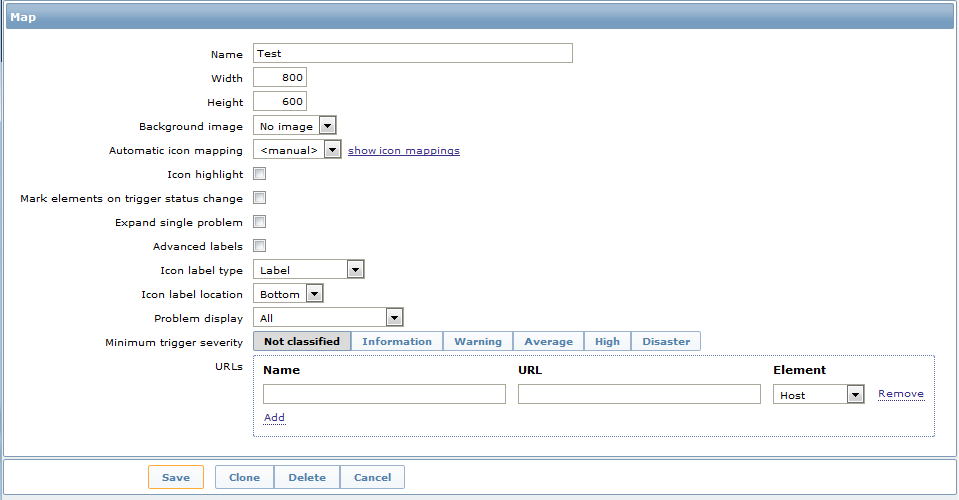
Click Configuration → Maps -> Create map
Parameter Description
| parameter | description |
| Name | Name, can not be repeated |
| Width | A width, in pixels |
| Height | Height in pixels |
| Background image | Background image: No Image - no background image (white background) Image - you can select a picture as the background, does not support zoom (zabbix why I do not have this option) |
| Automatic icon mapping | Icon map, Administration → General → Icon mapping. |
| Icon highlighting | Highlight chart |
| Mark elements on trigger status change | Highlight the trigger status |
| Expand single problem | Fault display name |
| Advanced labels | Define different tags for different types of elements |
| Icon label type | Icon names: the Label - icon label name IP address - IP address Element name - element name (eg: host name) Status only - status (OK or PROBLEM) Nothing - not displayed |
| Icon label location | 图标名称位置: Bottom - 图标下方 Left - 图标左边 Right - 图标邮编 Top - 图标上方 |
| Problem display | 显示故障次数: All - 所有次数 Separated - 分别显示未确认的故障与总故障数 Unacknowledged only - 只显示未确认故障的数量 |
| Minimum trigger severity | 低于选择故障严重性级别的故障将不会显示在map中。例如,选择了“Warning ”,故障级别为“Information ”和“Not classified”的触发器事件都不会反映到map中。Zabbix 2.2加入此参数. |
| URLs | monitoring--map--你的map--点击你的元素会出现一个菜单,如果有指定urls,那么url会出现在当前菜单中。你可以点击当前url来跳转到具体页面。urls可以使用macros: {MAP.ID}, {HOSTGROUP.ID}, {HOST.ID}, {TRIGGER.ID} |
添加元素到map中
点击上方的图标"+"可以添加元素(host、group、trigger等),然后左上角会出现一个主机,这时候我们任意拖动它,也可以点击图标"-"来删除它。点击这个元素,在弹出的属性框里面录入它的一些信息,一个元素就添加完成了。
我们可以注意到在上方有“Grid [ Shown | On ] 20x20”,点击shown当前map的表格消失(此时文章变成了hidden),再点击一次,表格又回来了。On表示当前map里面的元素都会按着表格对齐(和windows的桌面一样),点击On文字变为Off,表示当前map里的元素可以任意拖动摆放。后面的20x20是一个下拉列表,表示表格的大小。
看看map元素属性
| 属性 | 描述 |
| Type | 元素类型: Host - 代表主机,他所有的触发器状态都会反映到图标上 Map - map元素图标,点击之后会链接到相应的map Trigger - 单个触发器状态 Host group - 代表组机组图标,组内所有主机的触发器状态都会反映到图标上 Image - 图标,不指向任何资源 |
| Label | 元素名称,可以使用macros,支持多行文本 |
| Label location | 名称所在位置: Default - 默认位置,一般是bottom Bottom - 图标底部 Left - 图标左边 Right - 图标右边 Top - 图标上方 |
| Host | 如果当前元素类型为Host,可选择相应的host,需要搜索 |
| Map | 如果当前元素类型为map,可选择相应的map |
| Trigger | 如果当前元素类型为trigger,可选择相应的trigger |
| Host group | 如果当前元素类型为Host Group,可选相应的group,需要搜索 |
| Icon (default) | 图标. |
| Automatic icon selection | 使用icon mapping 来决定使用哪个图表 |
| Icons | 元素在不同状态下不同的图表: default, problem, maintenance, disabled. |
| Coordinate X | map元素横坐标 |
| Coordinate Y | map元素纵坐标 |
| URLs | monitoring--map--你的map--点击你的元素会出现一个菜单,如果有指定urls,那么url会出现在当前菜单中。你可以点击当前url来跳转到具体页面。urls可以使用macros: {MAP.ID}, {HOSTGROUP.ID}, {HOST.ID}, {TRIGGER.ID} |
备注:大家一定要记得点击上面的“save”按钮,否则你所有的更改都白费了,zabbix这点很讨厌,不会自动保存,我已经多次忘记点击save,然后一切重来。在我们未保存的情况下离开map页面,zabbix提示我们保存,那多好,可惜zabbix竟然没有这么做。为什么?
批量修改map元素
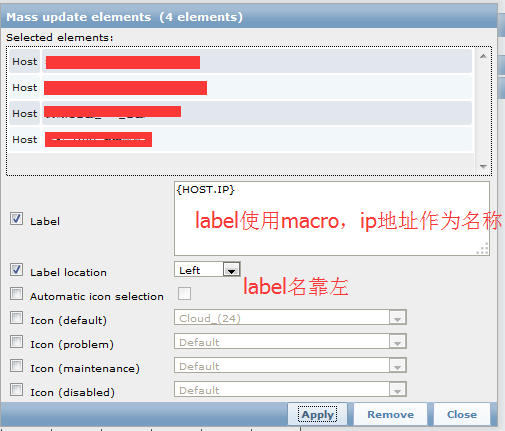
按住Ctrl的同时,鼠标选中多个map元素,如下图:
我们批量修改了元素名称,使用macro{HOST.IP},并且label名称在元素的左边,效果如下
map元素相连接
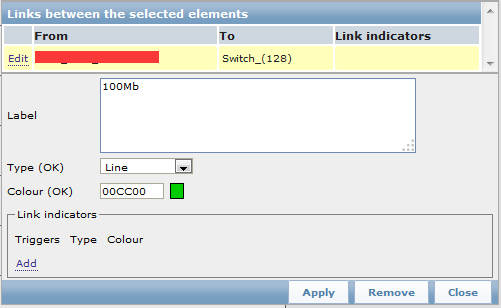
网络拓扑上有了服务器、交换机、路由器,还差一条网线把他们连在一起,并且标明他们之间的链路速度。按住Ctrl并且选中两个设备,点击上方LINK后边的"+",在弹出的属性框最后将会增加一条链路属性,点击edit,输入相关信息,如下:
属性说明
Lable:线路名称
| 属性 | 说明 |
| Label | 线路名称,可以使用macro |
| Connect to | 当前元素与哪个元素连接 |
| Type (OK) | 连接线风格: Line - 细线 Bold line - 粗线 Dot - 点线 Dashed line - 虚线 |
| Colour (OK) | 线条颜色. |
| Link indicators | 链路状态,触发器有故障都会显示到链路上 |
链路效果如下


