In today's article, we will introduce a Elastic important applications: application performance management (Application Performance Monitoring / Management), referred to as APM. So in the end what is APM it?
With the development of our IT infrastructure more complex, such as:

Our server system more and more and more devices are deployed in the cloud. Complex systems and even thousands of micro-services architecture and composed, then our service request may require one or more services together to complete. So now the question is, if our request is very slow, we want to know is which part of the problem in the end of it? Experienced programmers or system designer may find the answer from a number of log in. But when we log it becomes very large, and our interface is also growing for a long time, this time, maybe we can not do anything.
When we design or request page, often encounter the above situation this waiting. There may be individual tools can solve part of the problem, but how the entire system from the inside to locate and complete analysis of this problem. Elastic launched APM solution can be the perfect solution to these problems. It provides a way to quickly locate our system designers or programmers.
APM in the end what is it?
Let's look at the following chart:

As shown above, when we asked at different times, we found an error occurs in a request 17:36:30 Why takes nearly eight seconds, while the other was a request to return points occurs 17:36:30 code?
Elastic APM program is the world's first open source APM solutions:
- Other tracking slow operation occurred APM records database queries, as well as external HTTP requests during the application request
- It makes it easy for programmers to see the time each part of the application at run time spent
- It collects unhandled errors and exceptions
- It allows programmers to debug error tolerance
- Before the customer face to locate performance bottlenecks and errors to the problem
- Improve development team productivity
APM is suitable for Elastic Stack position
APM how the data is stored in Elasticsearch and provides analysis? We look at the following composition:

As shown above, we see one of the most typical of APM architecture diagram:
- 我们需要架设一台专门的APM服务器,虽然也可以和Elastic Stack的其它服务器处于同一台服务器中
- AMP agent专门收集数据并发送数据到APM服务器中。这里的APM agents包含:

- APM服务器把数据发送到Elasticsearch中,并进行数据分析
- Kibana可以帮我们把数据进行展示并显示在Dashboard之中
总体来说,APM数据仅仅是另外Elasticsearch索引。在Kibana中已经有一个现成的APM应用可以被我们所使用。我们也可以根据需求自己定制自己的Dashboard。APM可以完美地结合机器学习和告警。
APM术语
- Service: 在apm agent配置中进行设置,以将特定的apm agent组标识为单个服务,这是一种逻辑上标识一组事务的方法
- Transaction: 组成一个服务的请求和响应,例如 登录api调用,每个调用由单独的span组成。
- Span: 事务中的单个事件,例如方法调用,数据库查询或缓存插入或检索,即需要花费时间才能完成的任何事件。
- Erorrs:具有匹配的异常或日志消息的异常组
它们之间的关系可以用如下的图来表示:

分布式tracing:

例子
在今天的练习中,我们将以Java Spring boot为例来展示如何使用Elastic APM。
下载Spring boot代码
首先,我们在terminal中打入如下的命令:
git clone https://github.com/liu-xiao-guo/elastic-apm-demo上面的一个例子是一个简单的Spring boot应用。它有一下的几个特点:
- 它可以REST接口访问MySQL的数据库进行添加数据,请求数据
- 它可以通过REST接口进行访问百度天气接口来获得天气数据
下面是它的部分代码:
        @PostMapping(path="/add") // Map ONLY POST Requests
        public @ResponseBody String addNewUser (@RequestParam String name
                , @RequestParam String email) {
            // @ResponseBody means the returned String is the response, not a view name
            // @RequestParam means it is a parameter from the GET or POST request

            User n = new User();
            n.setName(name);
            n.setEmail(email);
            userRepository.save(n);
            return "Saved";
        }

        @GetMapping(path="/all")
        public @ResponseBody Iterable<User> getAllUsers() {
            // This returns a JSON or XML with the users
            return userRepository.findAll();
        }

        @GetMapping(path="/weather")
        public @ResponseBody String getBaiduWeather() throws InterruptedException {
            // Add some random delays before getting the info
            double delay = Math.random() * 10;
            System.out.println("delay: " + delay);
            TimeUnit.SECONDS.sleep((long)delay);

            String weather = getWeatherInform("北京");

            return weather;
        }
在获得天气(weather)的接口中,我故意加入了一下随机数的延迟,这样来模拟每一次请求的时间是不同的。
我们可以在应用的根目录下打入如下的命令:
./mvnw clean package这样它将会在当前目录下的target子目录下生产一个叫做accessing-data-mysql-0.0.1-SNAPSHOT.jar的文件。
    $ ls ./target/accessing-data-mysql-0.0.1-SNAPSHOT.jar
    ./target/accessing-data-mysql-0.0.1-SNAPSHOT.jar
我们可以把这个文件拷入到我们想要的任何一个目录中。针对我的情况,我把它拷入到我的home目录下的data/apm目录中。
    $ pwd
    /Users/liuxg/data/apm
    liuxg-2:apm liuxg$ ls accessing-data-mysql-0.0.1-SNAPSHOT.jar
    accessing-data-mysql-0.0.1-SNAPSHOT.jar
安装MySQL
我们可以按照文档的需求来安装我们的MySQL。我们在一个terminal中打入如下的命令:
mysql -uroot -p我们打入root用户的密码进入到MySQL之中。为了创建一个数据库,我们在MySQL的prompt中打入如下的命令:
    mysql> create database db_example; -- Creates the new database
    mysql> create user 'springuser'@'%' identified by 'ThePassword'; -- Creates the user
    mysql> grant all on db_example.* to 'springuser'@'%'; -- Gives all privileges to the new user on the newly created database
上面的命令创建了一个叫做db_example的数据库。同时,它也创建了一个叫做springuser的用户及其密码ThePassword。我们可以通过Navicat工具来查看:

运行Elastic Stack
安装及运行我们的Elasticsearch及Kibana。我们打开我们的Kibana界面,并点击左上角的部分:

然后,我们按照上面的步骤一步一步地进行安装:
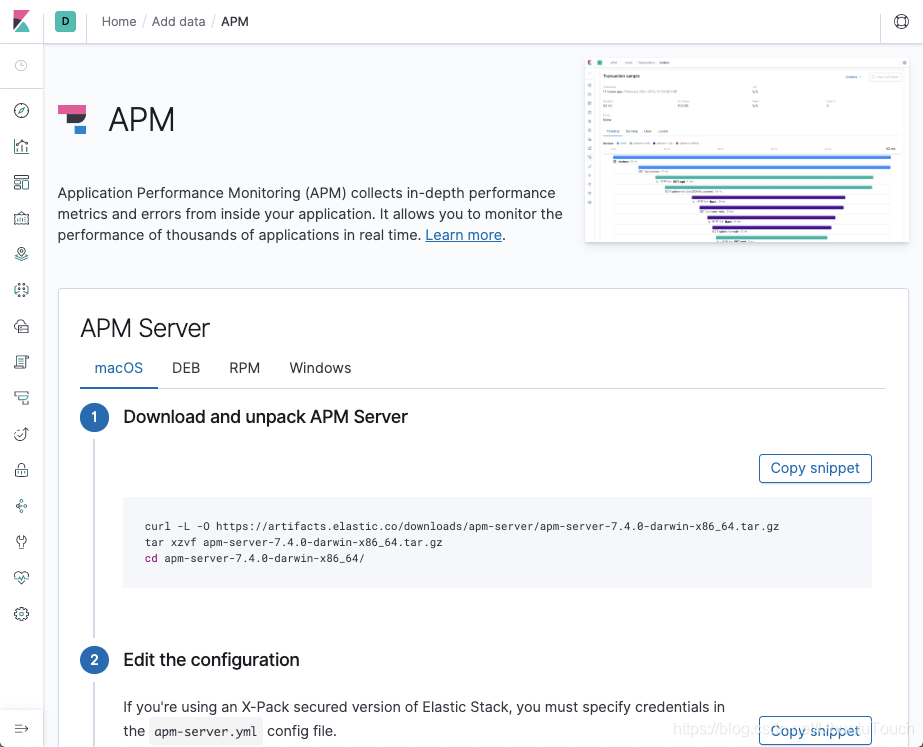

上面的步骤非常详细。对于APM agent的选择来讲,因为我们是Java应用,所以我们选择Java agent。我们下载相应的agent jar文件,并存放于我们上面放置spring boot的jar文件所处的文件夹。针对我的情况是home目录下的data/apm。
    $ pwd
    /Users/liuxg/data/apm
    liuxg-2:apm liuxg$ ls elastic-apm-agent-1.10.0.jar
    elastic-apm-agent-1.10.0.jar
在这个时候,我们可以开始运行我们的Spring Java应用了。我们可以通过如下的命令来运行:
    java -javaagent:./elastic-apm-agent-1.10.0.jar \
         -Delastic.apm.service_name=sample_apm \
         -Delastic.apm.server_url=http://localhost:8200 \
         -Delastic.apm.secret_token= \
         -Delastic.apm.application_packages=accessing-data-mysql \
         -jar accessing-data-mysql-0.0.1-SNAPSHOT.jar
注意:这里的sample_apm是我给取的一个服务名称。你可以根据自己的需求取一个独特的名字。如果你不想这么麻烦,你可以在当前的目录下生产一个叫做elasticapm.properties的文件。它的内容如下:
    service_name=sample_apm
    application_packages=accessing-data-mysql
    server_url=http://localhost:8200
那么我们可以通过如下的命令来运行:
    java -javaagent:./elastic-apm-agent-1.10.0.jar \
         -Delastic.apm.secret_token= \
         -jar accessing-data-mysql-0.0.1-SNAPSHOT.jar
等我们的Spring Boot应用完全起来后,我们点击Kibana中的“Check agent status”按钮。这个时候可能显示没有任何的数据。我们可以打开我们的浏览器,并在浏览器的地址栏中输入如下的地址:

我们可以看到我们得到了一下天气的数据信息。那么这个时候我们可以在Agent status中看到信息:

启动APM应用
如果你已经运行到这里,那么你基本上已经把整个的环境运行起来了。我们可以在terminal中打入如下的命令:
curl localhost:8080/demo/add -d name=First -d [email protected]上面的应用是向我们的数据中写入一条记录。
curl 'localhost:8080/demo/all'运行上面的命令可以展示已经输入的所有的记录
curl 'localhost:8080/demo/weather'运行上面的命令可以获得百度天气API接口所带给我们的天气信息。
上面的所有的信息我们都可以在浏览器中的地址栏中输入。
点击Kibana中的APM应用图标:

在上面我们可以看到应用的四个接口的统计情况。

我们在这个APM应用的dashboard上可以看到我们所有的API的调用情况。比如:

因为在我的应用中,我故意加入了一些延迟,所以导致我们的整个getBaiduWeather的请求时间为9.157秒才完成,而api.map.baidu.com的时间只有149ms。
到这里我的讲解就完成了。剩下的留给大家自己去挖掘哈!
参考:
【1】Accessing data with MySQL(https://spring.io/guides/gs/accessing-data-mysql/)