Load balancing species
The first: the load addressed by hardware, a common NetScaler, F5, Radware, and Array and other commercial load balancer, the price is more expensive
The second: the load addressed by software, common software LVS, Nginx, apache, etc., they are based on Linux and open source system load balancing strategy.
nginx Profile
Nginx is a high performance http server / reverse proxy server and e-mail (IMAP / POP3) proxy server. The program developed by Russian designer Igor Sysoev, the official test nginx support can support 50,000 concurrent links, and cpu, memory and other resource consumption is very low, running very stable.
nginx scenarios
1) http server. Nginx is a service provided independently http http service. You can do a static web page server.
2) the virtual host. It can be implemented in a single server virtualized multiple sites. Such as web hosting personal Web site.
3) reverse proxy, load balancing. When the site's traffic reaches a certain level, a single server can not meet the user's request, the need to use multiple servers clusters can be used to make nginx reverse proxy. And multiple servers can share the load average, the situation will not be a high server load down a server while idle.
Environment Configuration
OS: Centos Linux 7.6
nginx version: nginx-1.16.1
server configuration
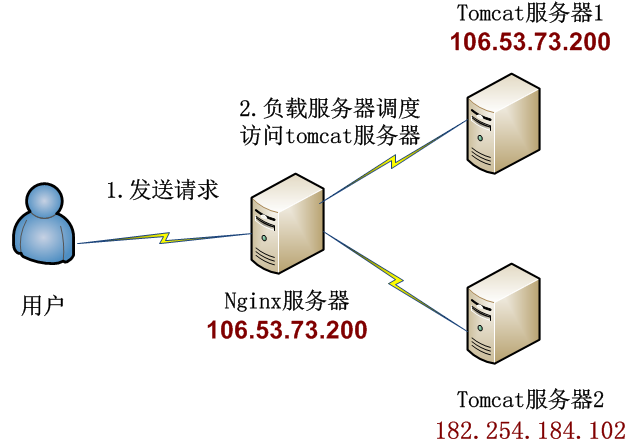
Server 1: 106.53.73.200 nginx as a load service (tomcat service 1)
Server 2: 182.254.184.102 (tomcat service 2)
Structure chart
Installation and deployment
Good nginx download the installation package: wget http://nginx.org/download/nginx-1.16.1.tar.gz
1. Install Nginx (server 1)
1) First, install the build environment
1 [root@VM_0_10_centos tmp]# yum -y install gcc gcc-c++ pcre pcre-devel zlib zlib-devel openssl openssl-devel
2) extract the nginx
1 [root@VM_0_10_centos tmp]# tar -zxf nginx-1.16.1.tar.gz
Switch to the extracted directory

3) compile and install
First create a temporary file nginx, stored in / var / tmp / nginx
1 [root@VM_0_10_centos nginx-1.16.1]# mkdir -p /var/tmp/nginx
Excuting an order
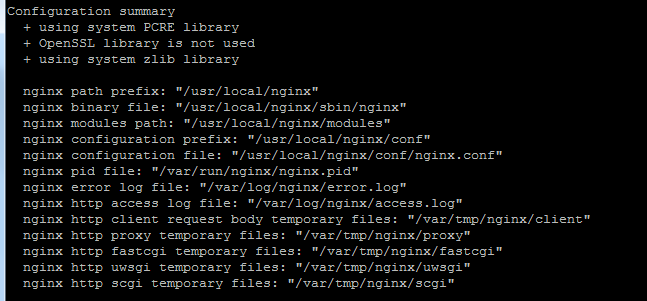
./configure \
--prefix=/usr/local/nginx \
--pid-path=/var/run/nginx/nginx.pid \
--lock-path=/var/lock/nginx.lock \
--error-log-path=/var/log/nginx/error.log \
--http-log-path=/var/log/nginx/access.log \
--with-http_gzip_static_module \
--http-client-body-temp-path=/var/tmp/nginx/client \
--http-proxy-temp-path=/var/tmp/nginx/proxy \
--http-fastcgi-temp-path=/var/tmp/nginx/fastcgi \
--http-uwsgi-temp-path=/var/tmp/nginx/uwsgi \
--http-scgi-temp-path=/var/tmp/nginx/scgi
That success appears as shown below
Compile the source code, install nginx
1 [root@VM_0_10_centos nginx-1.16.1]# make
2 [root@VM_0_10_centos nginx-1.16.1]# make install
The installation is complete, view the installation directory

4) Start nginx Service
1 [root@VM_0_10_centos nginx]# cd sbin/
2 [root@VM_0_10_centos sbin]# ./nginx -c /usr/local/nginx/conf/nginx.conf
View nginx process is started
1 [root@VM_0_10_centos sbin]# ps -aux | grep nginx

Note: The process in which the master-based worker to worker process
5) Exit nginx
1 [root@VM_0_10_centos sbin]# ./nginx -s quit
6) Restart nginx
1 [root@VM_0_10_centos sbin]# pwd
2 /usr/local/nginx/sbin
3 [root@VM_0_10_centos sbin]# ./nginx -s reload
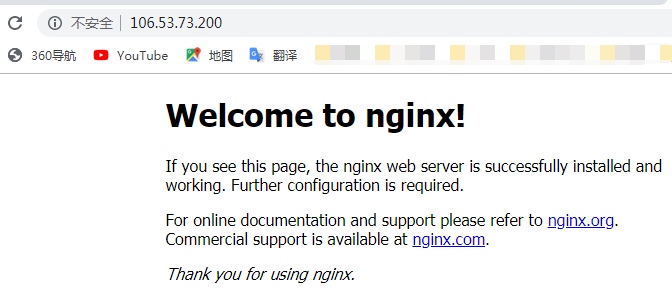
7) test nginx
By ip access in the browser: http: // localhost, the following interface that is success
2. Install tomcat service (server 1, server 2)
下载tomcat:https://tomcat.apache.org/

Download wget: wget http://mirrors.tuna.tsinghua.edu.cn/apache/tomcat/tomcat-8/v8.5.45/bin/apache-tomcat-8.5.45.tar.gz
I chose tomcat8 version

1) unzip to a specific directory
1 [root@VM_0_10_centos tmp]# tar -zxf apache-tomcat-8.5.45.tar.gz -C /usr/local/
tomcat depends on jdk, tomcat before installing the service configure jdk environment, you can refer to my previous article jdk installation configuration, not introduced here
2) Configuration tomcat service
Modify tomcat port
1 [root@VM_0_10_centos tmp]# cd /usr/local/apache-tomcat-8.5.45/conf
2 [root@VM_0_10_centos conf]# pwd
3 /usr/local/apache-tomcat-8.5.45/conf
4 [root@VM_0_10_centos conf]# vi server.xml
The default startup port 8080 changed to 8888 ports

After modifying save and exit
3) Start tomcat service
Enter the tomcat bin directory, start startup.sh startup script
1 [root@VM_0_10_centos bin]# pwd
2 /usr/local/apache-tomcat-8.5.45/bin
3 [root@VM_0_10_centos bin]# ./startup.sh

Check whether to open success

4) Test whether to open service
Browser to http: // ip: port number. Success is shown below 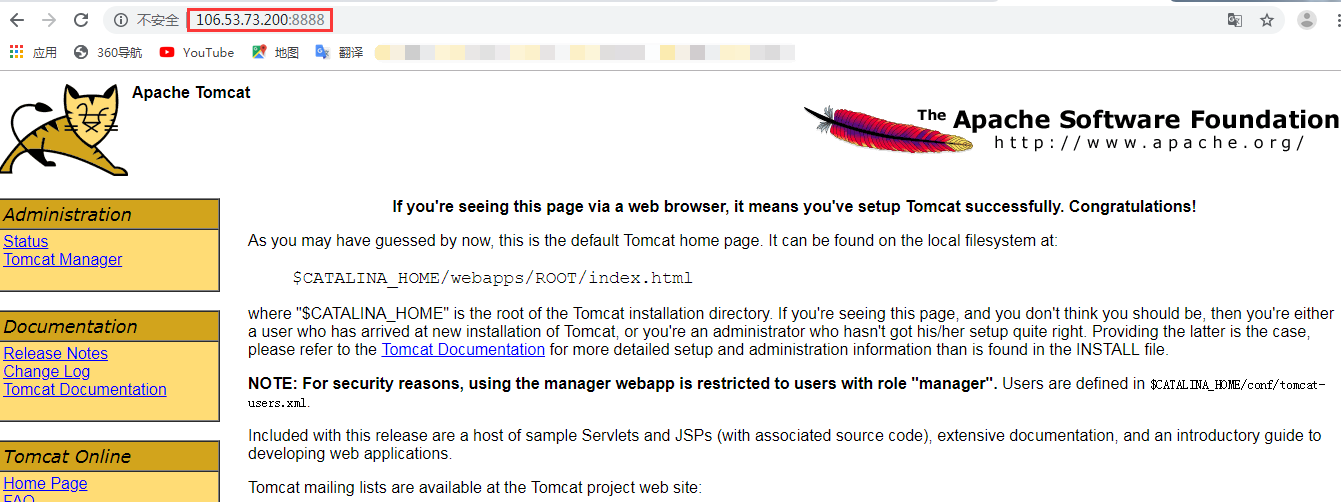
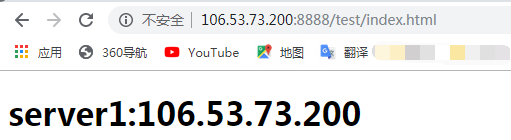
5) index.html file write test load
Create a test directory for test page
Server 1:
[root@VM_0_10_centos webapps]# pwd
/usr/local/apache-tomcat-8.5.45/webapps/
[root@VM_0_10_centos webapps]# mkdir -p test
[root@VM_0_10_centos webapps]# ls test/
index.html
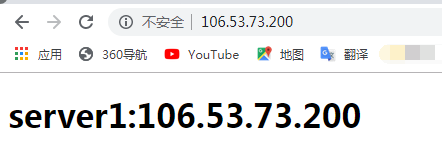
[root@VM_0_10_centos webapps]# vi test/index.html
<!DOCTYPE html>
<html lang="en">
    <head>
        <meta charset="UTF-8" />
        <title>106.53.73.200</title>
    </head>
    <body>
        <h1>server1:106.53.73.200</h1>
    </body>
</html>
Server 2:
[root@VM_0_10_centos webapps]# pwd /usr/local/apache-tomcat-8.5.45/webapps/ [root@VM_0_10_centos webapps]# mkdir -p test
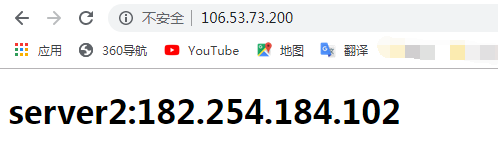
[root@VM_0_10_centos webapps]# ls test/ index.html [root@VM_0_10_centos webapps]# vi test/index.html <!DOCTYPE html> <html lang="en"> <head> <meta charset="UTF-8" /> <title>182.254.184.102</title> </head> <body> <h1>server2:182.254.184.102</h1> </body> </html>
By http: // ip: port / project name / test page views

So far tomcat installation is complete
3. Configure nginx load (server 1)
1) modify the configuration file nginx.conf
[root@VM_0_10_centos ~]# cd /usr/local/nginx/conf/
[root@VM_0_10_centos conf]# vi nginx.conf
Configure load balancing, complete configuration save and exit
# 20190827 Add
    {upstream testTomcat
        weight higher priority access to # decentralized setting, right
        Server 106.53 . 73.200 : 8888 weight = . 1 ;
        Server 182.254 . 184.102 : 8888 weight = . 1 ;
    }

    Server {
        the listen        80 ;
        server_name localhost;

        #charset KOI8 - R & lt ;

        #access_log logs / host.access.log main;

        # all requests are assigned here to find
        LOCATION /  {
            #root HTML;
            index index.html index.htm;
            # test using an allocation rule, i.e. just upstream node to add custom
            proxy_pass HTTP: // testTomcat / test /;
        }
 }
Restart nginx service
1 [root@VM_0_10_centos conf]# /usr/local/nginx/sbin/nginx -s reload
2) test load balancing
Ip access load through a browser, the following figure appears that is loaded successfully