A brief introduction to Nginx and the construction of load balancing using Nginx under linux
Today, let's discuss some simple understanding and knowledge about Nginx. First, let's give a brief introduction to Nginx.
1. Introduction to Nginx
Nginx is a high-performance http server/reverse proxy server and email (IMAP/POP3) proxy server. Developed by Russian programmer Igor Sysoev, the official test nginx can support 50,000 concurrent connections, and the consumption of resources such as cpu and memory is very low, and the operation is very stable.
2. Nginx application scenarios
1. http server. Nginx is an http service that can provide http services independently. It can be used as a static web server.
2, virtual host. Multiple websites can be virtualized on one server. For example, web hosting used by personal websites.
3. Reverse proxy, load balancing. When the traffic of the website reaches a certain level, when a single server cannot meet the user's request, it is necessary to use multiple server clusters to use nginx as a reverse proxy. In addition, multiple servers can share the load equally, and there will be no situation where a server is idle due to a high load of a certain server.
3. Concept explanation
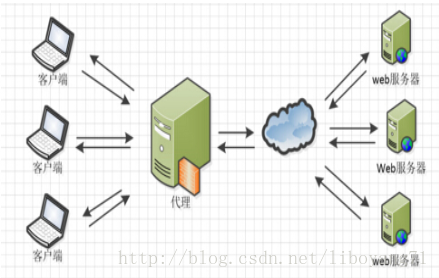
3.1 Forward proxy
The so-called forward proxy is actually the same as what we usually do over the wall. For example: when we want to visit some foreign ** websites, we cannot access them for some reason. At this time, we can find an agent, an agent To have the ability to access that website, we just need access to the proxy. You can get the content of that website. And the agent can decide whether to tell the user information to the website.
In general, a forward proxy is a proxy server located between the client and the origin server. In order to obtain content from the origin server, the client sends a request to the proxy and specifies the target server (the origin server), and then the proxy server sends a request to the origin server. The server forwards the request and gets the content to the target server. The client must make special settings to use the forward proxy.
As shown below.
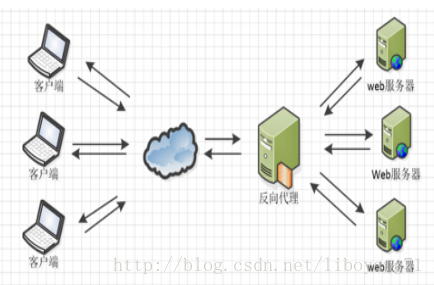
3.2 Reverse proxy
Contrary to the forward proxy, for example: when a user accesses the content under a server, the server does not have the content, but the server obtains the content the user wants from another server through the reverse proxy, and returned to the user. The user thinks that the content is obtained under this server, but it is not.
In general, the reverse proxy user does not need to perform special settings, for the user he thinks that the access is obtained from the original server. In fact, the client sends a normal request to the namespace of the reverse proxy, and then the reverse proxy will determine where (original server) to forward the request, and return the obtained content to the client, just as the content is itself the same. as the picture shows
4. Install Nginx
4.1 Download
Go to http://nginx.org/en/download.html to download nginx, I am using nginx1.8.0 version.
4.2 Installation
4.2.1 Installation Environment
The installation of nginx requires the following environment
: 1. gcc
compilation depends on the gcc environment, if there is no gcc environment, you need to install gcc
yum install gcc-c++ - 1
2.PCRE
PCRE (Perl Compatible Regular Expressions) is a Perl library, including a perl-compatible regular expression library. The http module of nginx uses pcre to parse regular expressions, so the pcre library needs to be installed on linux.
yum install -y pcre pcre-devel- 1
3. The zlib
lib library provides many ways to compress and decompress. nginx uses zlib to gzip the content of the http package, so the zlib library needs to be installed on linux.
yum install -y zlib zlib-devel- 1
4.openssl
OpenSSL 是一个强大的安全套接字层密码库,囊括主要的密码算法、常用的密钥和证书封装管理功能及SSL协议,并提供丰富的应用程序供测试或其它目的使用。
nginx不仅支持http协议,还支持https(即在ssl协议上传输http),所以需要在linux安装openssl库。
yum install -y openssl openssl-devel- 1
4.2.2 编译安装
将nginx-1.8.0.tar.gz拷贝至linux服务器。
解压:
tar -zxvf nginx-1.8.0.tar.gz
cd nginx-1.8.0
执行如下命令
./configure \
--prefix=/usr/local/nginx \
--pid-path=/var/run/nginx/nginx.pid \
--lock-path=/var/lock/nginx.lock \
--error-log-path=/var/log/nginx/error.log \
--http-log-path=/var/log/nginx/access.log \
--with-http_gzip_static_module \
--http-client-body-temp-path=/var/temp/nginx/client \
--http-proxy-temp-path=/var/temp/nginx/proxy \
--http-fastcgi-temp-path=/var/temp/nginx/fastcgi \
--http-uwsgi-temp-path=/var/temp/nginx/uwsgi \
--with-http_stub_status_module \
--with-http_ssl_module \
--http-scgi-temp-path=/var/temp/nginx/scgi- 1
- 2
- 3
- 4
- 5
- 6
- 7
- 8
- 9
- 10
- 11
- 12
- 13
- 14
注意:上边将临时文件目录指定为/var/temp/nginx,需要在/var下创建temp/nginx目录
开始编译和安装
make
make install
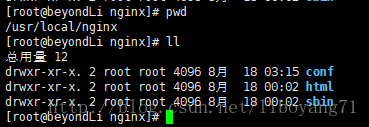
安装成功查看安装目录 :
4.3启动Nginx
启动
cd /usr/local/nginx/sbin/
./nginx- 1
- 2
查看
ps -aux | grep nginx- 1

其中6844为Nginx的主进程id,6845为Nginx的工作进程id
4.3退出Nginx
cd /usr/local/nginx/sbin
./nginx -s quit- 1
- 2
4.4 重启Nginx
cd /usr/local/nginx/sbin
./nginx -s reload- 1
- 2
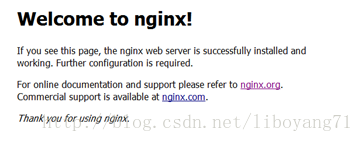
4.5 Nginx测试
访问对应安装Nginx的linux的ip,出现如下界面即安装成功。
5.搭建负载均衡
5.1 什么是负载均衡
负载均衡 建立在现有网络结构之上,它提供了一种廉价有效透明的方法扩展网络设备和服务器的带宽、增加吞吐量、加强网络数据处理能力、提高网络的灵活性和可用性。
负载均衡,英文名称为Load Balance,其意思就是分摊到多个操作单元上进行执行,例如Web服务器、FTP服务器、企业关键应用服务器和其它关键任务服务器等,从而共同完成工作任务。
5.2 负载均衡的优点
简单的来说。可以减少服务器的压力,将原本一台服务器所要承受的访问量分给了多台,并提高了项目的可用性,当一台服务器挂掉的时候也不会导致整个项目瘫痪。
5.3 nginx implements load balancing
Nginx acts as a load balancing server. User requests arrive at nginx first, and then nginx forwards the requests to the tomcat server according to the load configuration.
nginx load balancing server: 192.168.14.129
tomcat1 server: 192.168.14.131
tomcat2 server: 192.168.14.134
We put two identical projects on the 131 and 134 servers respectively. When we access the project interface through the 129 load, nginx will automatically assign the request to 131 and 134 in turn for execution.
5.4 Configuration
Open the nginx.conf configuration file in vim mode
cd /usr/local/nginx/conf/
vi nginx.conf- 1
- 2
Configure load balancing in the nginx.conf file according to the above requirements, as follows:
#在server上添加此upstream节点
upstream mytomcat{
    #分权 即访问131与134的次数比例为1比1
        server 192.168.14.131:8080 weight=1;
        server 192.168.14.134:8080 weight=1;
        }

    server {
        listen 80;
        server_name localhost;
        #即所有请求都到这里去找分配
        location / {
       #使用mytomcat分配规则,即刚自定义添加的upstream节点
           proxy_pass http://mytomcat;
        }
}- 1
- 2
- 3
- 4
- 5
- 6
- 7
- 8
- 9
- 10
- 11
- 12
- 13
- 14
- 15
- 16
Configuration is complete, save and exit.
5.5 Test Results
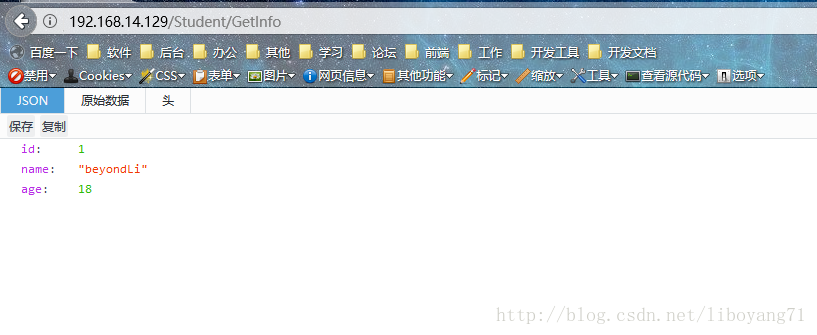
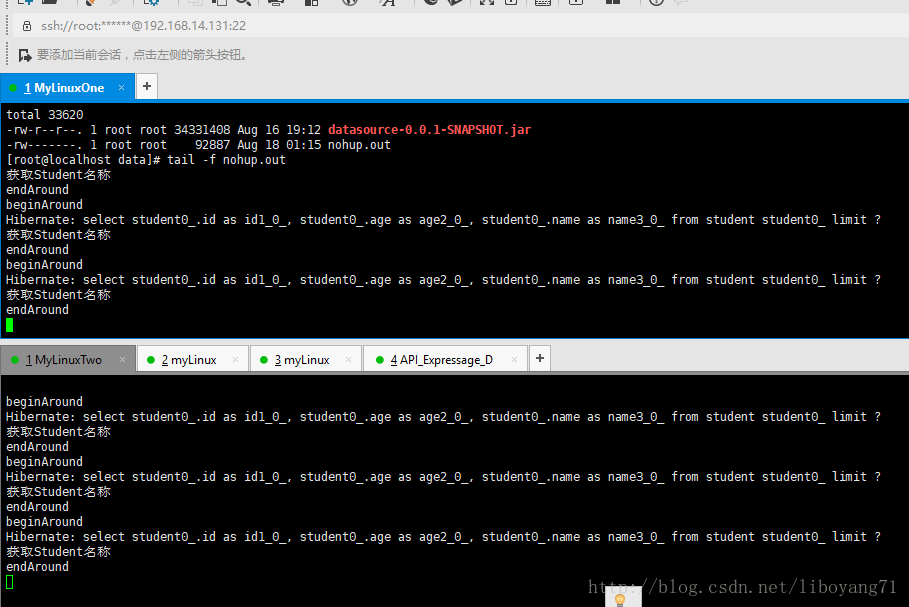
Access this interface multiple times. Through the background log, we found that the two interfaces were called in turn, so a simple load was built.