 Copyright: Attribution, allow others to create paper-based, and must distribute paper (based on the original license agreement with the same license Creative Commons )
rackRay Profile
Su light, the English name "TrackRay", meaning the line backlight, a light source traceability. At the same time pay tribute security ring predecessors developed "Su snow", "streamer."
Su just an open-source plug-in technology penetration testing framework, the framework itself realized the vulnerability scanning capabilities, integration of well-known security tools: Metasploit, Nmap, Sqlmap, AWVS and so on.
Su light written in Java, SpringBoot as a basic framework, JPA + HSQLDB embedded database as persistence, Maven
manage dependencies, Jython achieve Python plug-in calls, quartz do the task scheduling, freemarker + thymeleaf
do view layer, Websocket achieve interactive command-line plug-ins .Framework can be highly scalable to support Java, Python, JSON
, etc. to write plug-ins, the "vulnerability scanning plug-in", "crawler plug-in", "MVC plug-in", "internal plug-in", "non-interactive plug-ins" and "interactive plug-in" and other plug-in type.
function display
Home

Log

task to create a

task list

task details

no interactive interface plug-in calls

MVC plugins example

interactive console plug-

MSF console

depend on the environment
·JDK 1.8
·Python 2.7
·Maven
·Git
·Metasploit
· Nmap (recommended installation)
· SQLMAP (recommended installation)
·AWVS
** must be bold for the environment, there is no installation program can not properly compile and run
不论是 Windows 还是 linux 一定需要先安装 JDK1.8 和 Maven。安装过程这里不做演示。保证 JDK 和 Maven 都在系统环境变量,能执行java -version 和 mvn –version即可。
安装过程
第一步
手动启动 AWVS 服务

登录后台,生成一个API密匙。

复制密匙和 AWVS 的地址。
找到web/src/main/resources/application.properties配置文件。
修改如下部分

第二步
找到你 python 的第三方库目录。
Windows 的一般在 python 安装目录下的/Lib/site-packages
Linux 下可以通过输出 sys.path 来找第三方包路径

我的是 D:/Python2/Lib/site-packages
同样找到web/src/main/resources/application.properties配置文件。
修改python.package.path参数

第三步
安装 Maven 后找到仓库位置。
如果没有在 settings.xml 里配置指定仓库目录,默认会在当前用户目录中生成一个 .m2的目录
Linux /root/.m2/repository

Windows C:/Users/blue/.m2/repository
找到仓库目录后修改 application.properties 的 maven.repository.path参数

第四步
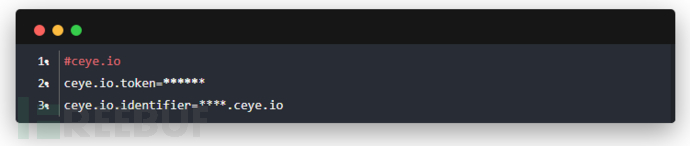
这个是 DNSLOG 回显检测漏洞时需要的。
去 ceye.io 注册一个账号,拿到给你分配的域名和 TOKEN。

修改配置文件
第五步
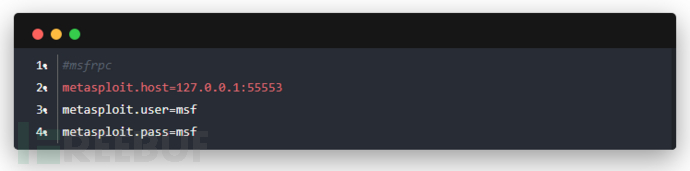
启动 msf 和 sqlmapapi。
如果你是 kali 操作系统,可以直接运行startdep.sh。
如果是其他系统,则要找到 metasploit 和 sqlmap 的目录分别执行


启动成功后修改配置文件

第六步
编译打包程序
Windows 下运行package.bat

Linux 下运行 package.sh
等待依赖下载完成和编译完成,如果以上操作都没有出现问题则会提示 BUILD SUCCESS

编译成功后会在当前目录打包一个trackray.jar就是溯光的主程序。
然后直接执行startup.bat或startup.sh溯光就会启动服务。

没有抛出异常或ERROR日志,访问 8080 端口正常。
服务启动正常后,登录 iZone 社区账号。
开发插件建议使用 Intellij IDEA IDE,需要安装 lombok 插件。
目录结构

插件
AbstractPlugin
这是交互式插件和非交互式插件的父类。
BASE常量
其中的静态常量 BASE 是 /resources/include/ 的所在目录。
如果你的插件需要额外的静态资源,那么你可以在 /resources/include 目录里创建一个和插件 KEY 相同的文件夹,便于识别,如果没有在 @Plugin 注解中设置 value 则默认的插件 KEY 就是当前类名首字母小写。
如 Typecho001 = typecho001
check(Map<String,Object> param)

这是用于检验是否合规的方法,需要被强制重写,当返回 true 时才会调用 start() 方法
param 参数是从前台传过来的参数键值对。
常被用于检验参数格式是否正确或漏洞是否存在。
after()
在 start() 方法之前调用
before()
在 start() 方法之后调用
start()

这是一个抽象方法,所有继承了该类的子类都需要重写这个方法。
在 check 方法通过后会调用 start() 方法
start() 方法返回值最终会会当做插件结果,响应给前台。
shell()
调用当前系统 shell 来辅助完成插件功能。
executor()
插件执行的主方法
crawlerPage
http请求对象(不推荐使用)
fetcher
执行 http 请求对象(不推荐使用)
errorMsg
当校验不通过时,返回给前台的信息。
param
前台传过来的参数键值对
requests
HTTP 发包工具(推荐使用)
hackKit
hack 常用工具包
无交互插件
无交互插件需要你填写好所有要填写的参数,直接请求接口来执行插件。
默认需要去继承 CommonPlugin类。

这是一个抽象类,继承了 AbstractPlugin
主要多出来两个属性:request 和 response。
继承了 CommonPlugin 的类可以通过调用这两个属性来控制请求和响应内容。
Type 和 Charset 枚举类,用于在插件注解里声明当前接口返回的数据格式和编码类型。
无交互插件同时也需要使用 @Rule 和 @Plugin 插件,这两个注解后面会讲到。
在 http://127.0.0.1:8080/api,找到相应的插件填写好参数提交即可完成调用。
或直接调用接口。
http://127.0.0.1:8080/plugin/use?key=插件KEY&参数=参数值
交互式插件
交互式插件一般在命令行控制台中调用,可以允许你通过命令行交互来完成插件的调用。
交互式插件由 Websocket 实现,想要写一个交互式插件,首先要继承 WebSocketPlugin 类。
同时设置 @Rule 注解的 websocket 参数为 true ,如果需要异步交互需要将 sync 也设置为 true。


内部插件
所属包:con.trackray.module.inner
内部插件是不可以通过外部去调用的,需要继承 InnerPlugin 并使用 @Plugin 注解,通常在漏洞扫描时时会调用。
例如 “网页爬虫”,“指纹识别”,“端口扫描” 等,都是通过调用内部插件实现的。
还有用于检测 SSRF 等漏洞用的 FuckCeye 插件也属于内部插件。
通过 spring 的自动注入,来注入内部插件到当前对象。
例子可参考 WebLogicWLSRCE.java
爬虫插件
所属包:con.trackray.module.crawler
爬虫插件会在扫描任务被勾选“网页爬虫”时调用,每爬取一条请求就会调用一次爬虫插件。
爬虫插件需要继承 CrawlerPlugin,继承该类必须重写 check 和 process 方法。
check 方法用于检验请求是否符合插件规则,以免产生多余请求。
当 check 方法返回为 true 时会调用 process 方法。
process 方法里写插件主要检测代码。
addVulnerable()
当插件检测出漏洞时,可以通过调用 addVulnerable() 方法来向数据库插入一条漏洞。
requests
requests 属性为请求工具包,处理 https 和 http 都很方便。
response
response 属性为当前爬虫得到的 HTTP 响应。
task
task 属性为当前任务对象,如果你的爬虫插件不是检测漏洞而希望是检测一些敏感信息的话可以修改 task.getResult() 里的属性。
参考 FingerProbe.java 或 InfoProbe.java。
target
爬虫爬取到的 URL 对象。
fetcher & crawlerPage
http 请求对象(不建议使用)。
漏洞扫描插件
漏洞扫描插件会在,扫描任务中勾选“漏洞攻击模块”时调用。
漏洞扫描插件分为三种
1.独立插件
com.trackray.module.exploit
独立的漏洞扫描插件需要继承 AbstractExploit 并使用 @Plugin 或 @Exploit
AbstractExploit 中有以下需要了解的方法和属性。
requests
http / https 发包工具
target
当前扫描任务的地址。
task
当前扫描任务对象。
check()
check 是一个抽象方法,需要被子类强制重写。
该方法一般用于检验是否符合当前漏洞扫描插件的规则,以免产生多与请求。
attack()
attack 也是一个抽象方法,需要被子类强制重写。
该方法是检测漏洞的主方法。
before()
在 attack 方法前执行
after()
在 attack 方法后执行
addVulnerable()
当插件检测出漏洞时,可以通过调用 addVulnerable() 方法来向数据库插入一条漏洞。
fetcher & crawlerPage
http 请求对象(不建议使用)。
2.漏洞规则
位于
com.trackray.module.inner.SimpleVulRule
实际上这是一个“内部插件”,会在勾选漏洞模块攻击时调用。
有一些漏洞检测方法很简单,只通过简单的判断响应体就能识别出来,也就没有必要再去写一个独立的插件而占用空间了。
在 doSwitch() 方法中会先去根据当前任务的指纹识别结果走一遍 switch 流程。
swtich 的每一个 case 都是 WEB 指纹的枚举对象。
当 switch 找到当前任务 WEB 指纹对应的 case 后,case 内的代码会通过构建一个漏洞规则添加到 loaders 集合里。
如果规则是通用的,可以写在 switch 的外面。
例:phpcms 的 authkey 泄漏漏洞规则

3.kunpeng JSON插件
kunpeng 是一个 go 语言编写的 poc 测试框架,这里我对 kunpeng 的 JSON 插件做了一个支持。
只需要按照 kunpeng json 插件的格式规范创建一个 json 文件到 /resources/json 目录。
在扫描任务勾选“漏洞攻击模块”时会被调用,或通过 MVC 插件调用 http://127.0.0.1:8080/apps/json。
MVC 插件
位于
com.trackray.module.mvc
MVC 插件的特点在于,他可以像是在写一个功能一样,而非简单的接口式调用。
MVC 插件需要继承 MVCPlugin 类,并使用 @Rule,@Plugin 注解。
MVCPlugin 内置了一个 ModelAndView 对象, 是 SpringMVC 提供的。
可以通过 setViewName() 来指定视图层的网页模板。
通过 addObject(key,value) 向视图层网页模板注入参数。
这里的视图层是使用 thymeleaf 实现的,需要懂 thymeleaf 的语法。
例子可以参考:com.trackray.module.inner.JSONPlugin
继承 MVCPlugin 必须要重写一个 index 方法,这是插件的入口。
如果需要写其他的功能,就得再创建一个 public 返回值为 void 的无参方法。
并且要在该方法上使用 @Function 注解,该注解的 value 参数如果不填写的话则默认的 requestMapping 地址为方法名。
例如

http://127.0.0.1:8080/plugin/mvc/pentest/index 对应 index()

http://127.0.0.1:8080/plugin/mvc/pentest/foo 对应 fooTest()
最后还需要在 /module/src/main/resources/templates 创建一个目录名为插件 KEY 的目录。
里面存放扩展名为 .html 的模板文件。

Python 插件
python 插件有两种实现方式。
1.通过命令行实现
这种方式最为简单,通过在 include 里写一个 python 脚本。
然后在插件里调用 shell() 方法来执行系统命令。
案例可参考 com.trackray.module.plugin.windows.smb.MS17010
但这样还需要再写 java 的代码,对于没有学过 java 的人来说很不友好。
2.通过jython实现
jython 是一个 Python 语言在 Java 中的完全实现。
我将它的调用过程写成了一个交互式插件。
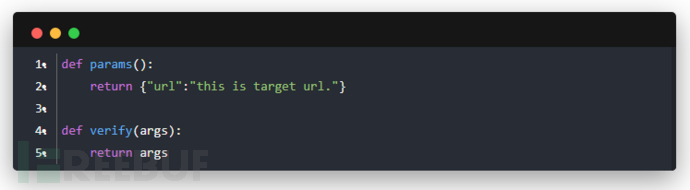
你可以通过在 /resources/python/ 目录下安装如下规范去创建一个 python 文件。
在这个 python 文件中需要写两个方法。
params(): 返回字典对象,key 为 参数,value 为参数的说明。

verify(args): args 是一个字典类型,是从前台传过来的参数。

关于注解
com.trackray.base.annotation
@Rule
Generally used in the "plug-interactive" and "no interaction plug-in" type.

params () is most commonly used, it is used to declare which of several parameters of this plug-in needs.

Examples: Thinkphp51and52RCE.java

@Plugin
It is a comment that all plug-in must be used, only declares this annotation can be used.

WEB fingerprint
By the way here to tell you how to add a fingerprint database.
com.trackray.base.enums.FingerPrint
Fingerprint database located base module, is an enumeration class.
You can add a new enumeration in the header or tail, try to use the beginning of the $.
The first parameter is the name of a fingerprint, and if the second parameter of type String is a description of the fingerprint.
FingerBean class fingerprint matching objects.

dedecms 指纹示例
