Haproxy is currently more popular cluster scheduling tool, there are a lot of similar cluster scheduling tools, such as LVS and Nginx. In comparison, LVS best performance, but to build relatively complex, built LVS cluster can refer Bowen: build: LVS + Keepalived high availability clustered Web services environment ; Nginx the upstream module supports clustering capabilities, but relatively cluster node health check is not strong, performance is not good Haproxy, more application in the enterprise intranet environment. Nginx cluster can refer Bowen: CentOS 7 Tomcat deployment and load balancing configuration in detail .
Above several web cluster scheduler belong to the type of software, there are many hardware cluster scheduler, hardware generally use relatively large number of F5, there are a lot of companies use some domestic products such as pike, the Green League and so on. Hardware cluster schedulers have some of the more obvious shortcomings, if say the problem, but also manufacturers need technical support, our factory will also be required to maintain error log, in the event of a problem to solve the problem this time, it may be a month's time It's in the past. If using a software-based cluster scheduler, so long as we have excellent technical operation and maintenance personnel, identify problems and to solve problems quickly.
About Haproxy commonly used scheduling algorithms, configuration files and parameter optimization can refer Bowen:
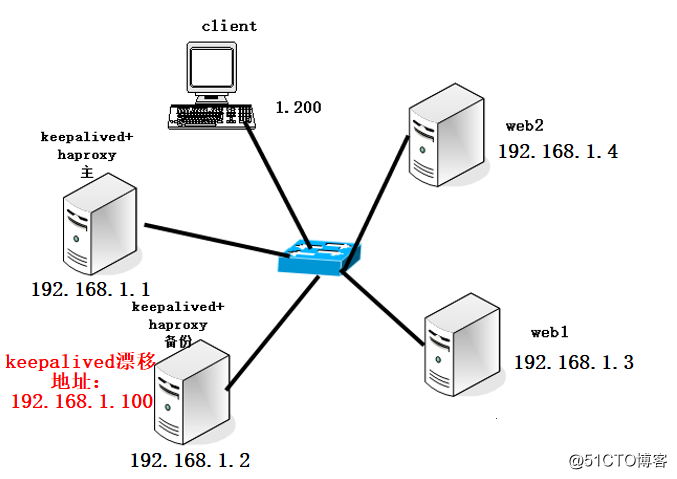
Now in the following circumstances, be keepalived build a high availability web cluster (on highly available storage servers, omitted here, to write how to build highly available storage server in a future article), the environment is as follows:
First, the preparatory work:
1, transferred through the network, firewall release relevant traffic (me directly to the firewall turned off);
2, image preparation system, to configure the local yum (configurable).
3, download haproxy source package, you can download from the link network disk I provide: haproxy download link
extraction code: 54iv.
4, web site using apache, Nginx, Tomcat can be set up, as long as you can access on the line, to build their own here, and I in order to facilitate testing, system image directly using the built-in httpd service, web site building can refer to: Linux-based build Apache website service configuration in detail ; to build Nginx web server on centos 7
5, I used here are all centos 7 system, pay attention to the environment is not a production environment, if in a production environment, there must have back-end storage to store the page file, read the page on the web server storage server back to the client . This way can ensure the consistency of web content.
Second, we began to build:
1, the configuration keepalived + haproxy primary server:
[root@haproxy1 ~]# yum -y install keepalived pcre-devel bzip2-devel
#挂载系统映像,安装相关软件包
[root@haproxy1 media]# tar zxf haproxy-1.5.19.tar.gz -C /usr/src/     #解包
[root@haproxy1 media]# cd /usr/src/haproxy-1.5.19/       #切换至源码包目录
[root@haproxy1 haproxy-1.5.19]# make TARGET=linux26 && make install
#编译安装,TARGET配置项表示64位系统。haproxy无须./configure配置。
[root@haproxy1 haproxy-1.5.19]# mkdir /etc/haproxy             #创建配置文件目录
[root@haproxy1 haproxy-1.5.19]# cp examples/haproxy.cfg /etc/haproxy/
#将源码包自带的配置文件目录复制过来。
[root@haproxy1 haproxy-1.5.19]# cd
[root@haproxy1 ~]# vim /etc/haproxy/haproxy.cfg
#编辑主配置文件,根据当前环境,将主配置文件修改如下:
# this config needs haproxy-1.1.28 or haproxy-1.2.1

global
        log /dev/log    local0 info
        log /dev/log    local0 notice
        #log loghost    local0 info
        maxconn 4096
        #chroot /usr/share/haproxy             #将该行注释掉
        uid 99
        gid 99
        daemon
        #debug
        #quiet

defaults
        log     global
        mode    http
        option  httplog
        option  dontlognull
     retries 3
        redispatch
        maxconn 2000
        contimeout      5000
        clitimeout      50000
        srvtimeout      50000

listen  webcluster 0.0.0.0:80    #webcluster为群集名称,可自定义,修改后面的端口号。
        option  httpchk /index.html
        balance roundrobin        #表示采用轮询算法。
        server  inst1 192.168.1.3:80 check inter 2000 fall 3             #web节点1
         server  inst2 192.168.1.4:80 check inter 2000 fall 3  #web节点2,注意相关端口号
#注意,在配置文件下,有很多listen配置项,找到和我们需要的差不多的listen项复制到
#default配置项下,然后将后面所有的配置项删除,若不删除,可能服务启动时会报错。
[root@haproxy1 ~]# cd /usr/src/haproxy-1.5.19/examples/           #切换至指定目录
[root@haproxy1 examples]# cp haproxy.init /etc/init.d/haproxy    #复制服务控制脚本
[root@haproxy1 examples]# ln -s /usr/local/sbin/haproxy /usr/sbin/haproxy
#创建软连接
[root@haproxy1 examples]# chmod +x /etc/init.d/haproxy          #赋予文件执行权限
[root@haproxy1 examples]# chkconfig --add /etc/init.d/haproxy       #添加为系统服务
[root@haproxy1 examples]# systemctl restart haproxy              #启动haproxy服务
[root@haproxy1 examples]# netstat -anpt | grep 80                #查看是否在监听
#haproxy服务默认监听80端口
tcp        0      0 0.0.0.0:80    0.0.0.0:*      LISTEN  12640/haproxy
[root@haproxy1 ~]# vim /etc/rsyslog.d/haproxy.conf              #配置haproxy日志,写入下面内容

if ($programname == 'haproxy' and $syslogseverity-text == 'info') then -/var/log/haproxy/haproxy-info.log
& ~
if ($programname == 'haproxy' and $syslogseverity-text == 'notice') then -/var/log/haproxy/haproxy-notice.log
& ~
#写入后,保存退出即可。以下部分开始配置keepalived,haproxy已经配置完成了,
#现在client可以访问该服务器IP地址,看看是否可以刷到两个web服务器提供的网页。
#需要多刷新几次,web服务器准备不一样的网页才可看到效果。
[root@haproxy1 ~]# vim /etc/keepalived/keepalived.conf    #编辑keepalived配置文件
#只改动以下标注的配置项即可
! Configuration File for keepalived

global_defs {
   notification_email {
     [email protected]
     [email protected]
     [email protected]
   }
   notification_email_from [email protected]
   smtp_server 192.168.200.1
   smtp_connect_timeout 30
   router_id LVS_DEVEL1             #定义服务器名称,不可与其他服务器名称冲突
   vrrp_skip_check_adv_addr
   vrrp_strict
   vrrp_garp_interval 0
   vrrp_gna_interval 0
}

vrrp_instance VI_1 {
    state MASTER
    interface ens33            #修改承载漂移IP地址的物理网卡
    virtual_router_id 51
    priority 100
    advert_int 1
    authentication {
        auth_type PASS
        auth_pass 1111
    }
    virtual_ipaddress {
    192.168.1.100              #指定漂移IP地址
    }
}
#配置项至此保存退出就可以了,将后面的所有配置项删除,以免影响服务启动。
[root@haproxy1 ~]# systemctl restart keepalived               #重启keepalived服务。
2, the backup server configuration keepalived + haproxy:
[root@haproxy2 ~]# systemctl stop firewalld          #关闭防火墙
[root@haproxy2 ~]# yum -y install keepalived pcre-devel bzip2-devel
#挂载系统映像,安装相关软件包
[root@haproxy2 media]# tar zxf haproxy-1.5.19.tar.gz -C /usr/src            #解包
[root@haproxy2 media]# cd /usr/src/haproxy-1.5.19/
[root@haproxy2 haproxy-1.5.19]# make TARGET=linux26 && make install    #安装
[root@haproxy2 haproxy-1.5.19]# cd
[root@haproxy2 ~]# mkdir /etc/haproxy            #创建配置文件目录
[root@haproxy2 ~]# scp [email protected]:/etc/haproxy/haproxy.cfg /etc/haproxy/
#直接将主服务器的haproxy配置文件复制过来
[email protected] s password:          #输入主服务器的用户密码
haproxy.cfg                                 100%  566   460.5KB/s   00:00
[root@haproxy2 ~]# scp [email protected]:/etc/init.d/haproxy /etc/init.d/haproxy
[email protected] password:
haproxy                                     100% 2553     2.1MB/s   00:00
[root@haproxy2 ~]# ln -s /usr/local/sbin/haproxy /usr/sbin/haproxy        #创建链接文件
[root@haproxy2 ~]# chkconfig --add /etc/init.d/haproxy            #添加为系统服务
[root@haproxy2 ~]# systemctl start haproxy              #启动服务
[root@haproxy1 examples]# netstat -anpt | grep 80                #查看是否在监听
#haproxy服务默认监听80端口
tcp        0      0 0.0.0.0:80    0.0.0.0:*      LISTEN  12640/haproxy
[root@haproxy1 ~]# vim /etc/rsyslog.d/haproxy.conf              #配置haproxy日志,写入下面内容

if ($programname == 'haproxy' and $syslogseverity-text == 'info') then -/var/log/haproxy/haproxy-info.log
& ~
if ($programname == 'haproxy' and $syslogseverity-text == 'notice') then -/var/log/haproxy/haproxy-notice.log
& ~
#写完保存退出即可。
[root@haproxy2 ~]# systemctl restart rsyslog                  #重启日志服务
[root@haproxy2 ~]# scp [email protected]:/etc/keepalived/keepalived.conf /etc/keepalived/
#将主服务器的keepalived配置文件复制过来
[email protected] password:                  #输入主服务器的用户密码
keepalived.conf                             100%  630   622.3KB/s   00:00
[root@haproxy2 ~]# vim /etc/keepalived/keepalived.conf
#修改下面三个配置项:
                     ................
router_id LVS_DEVEL2       #将服务器名称改一下,别和主服务器冲突
                     ..............
state BACKUP            #将状态改为BACKUP
                     ...............
priority 90            #修改一下优先级,要比主服务器优先级低

#改完以上三行,保存退出即可。
[root@haproxy2 ~]# systemctl start keepalived           #启动keepalived服务
So far, keepalived + haproxy on the configuration is complete, you can use the client to access testing, simulation host server downtime and other issues, test availability.