First, prepare the environment
1 deployment environment:
The number of servers: 3 sets
Ip Address: 192.168.1.191 (Main)
192.168.1.192 (from)
192.168.1.193 (from)
Operating System: CentOS Linux release 7.6.1810 (Core)
Cpu: 2 nuclear
Memory: 4G
20GB storage
2 pre-deployment preparations:
2.1 turn off the firewall
Bash(all):
iptables -F
systemctl stop firewalld
systemctl disable firewalld
2.2 modify the hosts file
Bash(all):
vim /etc/hosts
192.168.1.191 m191
192.168.1.192 m192
192.168.1.193 m193
2.3 modify the hostname
Bash(all):
Hostname m191
Hostname m191
Hostname m191
2.4 update hostname
Bash(all):
bash
Second, install SQL Server
1 Install mssql server:
1.1 Download Microsoft SQL Server 2019 Red Hat repository configuration file:
Sudo curl -o /etc/yum.repos.d/mssql-server.repo https://packages.microsoft.com/config/rhel/7/mssql-server-2019.repo
1.2 Run the following command to install SQL Server:
sudo yum install -y mssql-server
When the package installation is complete, run the mssql-conf setup command and follow the prompts to set the SA password, and then select the version (I chose 6).
sudo /opt/mssql/bin/mssql-conf setup
Be sure to specify a strong password for the SA account (at least eight characters, including uppercase and lowercase letters, decimal numbers and / or non-alphanumeric symbols).
1.3 After configuration is complete, verify that the service is running:
systemctl status mssql-server
1.4 To allow remote connections, open SQL Server ports on the firewall on RHEL.
The default SQL Server port TCP 1433. If you use FirewallD firewall, you can use the following command:
sudo firewall-cmd --zone=public --add-port=1433/tcp --permanent
sudo firewall-cmd --reload
In this case, SQL Server 2019 RHEL running on your computer and ready to use!
1.5 Start SQL Server Agent (installed by default, can not be installed separately)
yum install mssql-server-agent
/opt/mssql/bin/mssql-conf set sqlagent.enabled true
2 Install SQL Server command-line tool
To create the database, you need to use a tool to run Transact-SQL statements to connect on SQL Server. The following steps to install SQL Server command-line tool: the sqlcmd and BCP .
2.1 download Microsoft Red Hat repository configuration file.
Sudo curl -o /etc/yum.repos.d/msprod.repo https://packages.microsoft.com/config/rhel/7/prod.repo
2.2 If you have a previous version mssql tools installed, please remove any older unixODBC package.
sudo yum remove unixODBC-utf16 unixODBC-utf16-devel
2.3 Run the following commands to install mssql-tools and developers unixODBC package.
sudo yum install -y mssql-tools unixODBC-devel
2.4 / opt / mssql-tools / bin / to the PATH environment variable.
So that you can not specify a full path when you run the tool. Run the following command to modify PATH login sessions and interactive / non-login session:
echo 'export PATH="$PATH:/opt/mssql-tools/bin"' >> ~/.bash_profile
echo 'export PATH="$PATH:/opt/mssql-tools/bin"' >> ~/.bashrc
source ~/.bashrc
3 local connection
3.1 The following steps use sqlcmd local connection to the new SQL Server instance.
Using SQL Server name (-S), user name (-U) and password (-P) argument run sqlcmd. In this tutorial, locally connected users, the server name to localhost. User name SA, password is the password provided for the SA account during the installation process.
Copy bash
sqlcmd -S localhost -U SA -P '<YourPassword>'
prompt
You may omit the password on the command line, in order to receive a password prompt.
prompt
If you later decide to connect remotely, specify the -S parameter of the computer name or IP address, and make sure that port 1433 on the firewall is turned on.
If successful, it should show sqlcmd command prompt: 1>.
If the connection fails, first try to diagnose the problem according to the error message. .
3.2 to create and query data
The following sections describe how to use sqlcmd will gradually create a new database, add data and run a simple query.
3.2.1 New Database
The following steps create a new database named TestDB of.
At the sqlcmd command prompt, paste the following Transact-SQL command to create a test database:
SQL replication
CREATE DATABASE TestDB
On the next line, write a query to return the names of all databases on the server:
SQL replication
SELECT Name from sys.Databases
The first two orders are not executed immediately. You must type in the new GO to execute the previous command line:
SQL replication
GO
3.3.2 Insert Data
Next, create a new table Inventory, then insert two new rows.
In sqlcmd command prompt, the context switch to the new database TestDB:
SQL replication
USE TestDB
Create a new table named Inventory:
SQL replication
CREATE TABLE Inventory (id INT, name NVARCHAR(50), quantity INT)
Insert data into the new table:
SQL replication
INSERT INTO Inventory VALUES (1, 'banana', 150); INSERT INTO Inventory VALUES (2, 'orange', 154);
To perform the above-mentioned type GO command:
SQL replication
GO
3.2.3 Select Data
Now, run the query to return data from the Inventory table.
Sqlcmd command prompt by entering a query, to return the number of rows in the table Inventory of greater than 152:
SQL replication
SELECT * FROM Inventory WHERE quantity > 152;
Excuting an order:
SQL replication
GO
Sqlcmd command prompt exit
To end the sqlcmd session, type QUIT:
SQL replication
QUIT
Three, SQL Server Configuration certificates and permissions
Sql server版本:Microsoft SQL Server 2019 (CTP2.4) - 15.0.1400.75 (X64) Mar 16 2019 11:53:26 Copyright (C) 2019 Microsoft Corporation Enterprise Edition (64-bit) on Linux (CentOS Linux 7 (Core)) <X64>
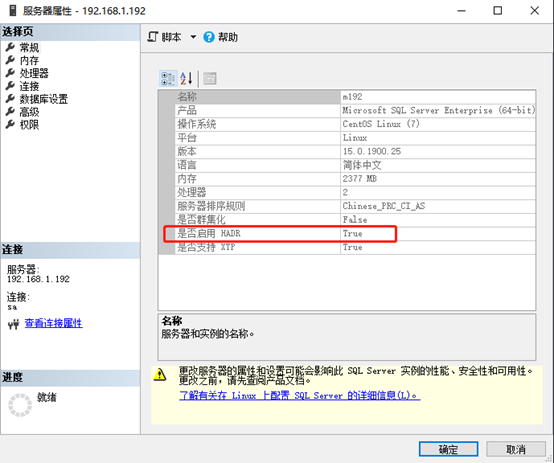
1 Always On Availability Group feature is activated
Bash(all):
sudo /opt/mssql/bin/mssql-conf set hadr.hadrenabled 1
sudo systemctl restart mssql-server
1.1 All server: SQL Server AlwaysOn AG to install Linux resource agent
Cluster Resource Agents mssql-server-ha is the interface between SQL Server and Pacemaker
Bash(all)
yum install -y mssql-server-ha
yum info mssql-server-ha
2 Enable AlwaysOn_health event session
Sql(all):
ALTER EVENT SESSION AlwaysOn_health ON SERVER WITH (STARTUP_STATE=ON);
GO
3 Create a library mirroring endpoint (endPoint) user on all nodes
(On linux need to create a login name (login) for the dbm_login and user name (user) for users dbm_user, which is dedicated to the endpoint, note the use of strong passwords)
Sql(all):
CREATE LOGIN dbm_login WITH PASSWORD = '1111.aaa';
CREATE USER dbm_user FOR LOGIN dbm_login;
4 Create a certificate in the master node
SQL (Main):
CREATE MASTER KEY ENCRYPTION BY PASSWORD = '1111.aaa';
CREATE CERTIFICATE dbm_certificate WITH SUBJECT = 'dbm';
BACKUP CERTIFICATE dbm_certificate
TO FILE = '/var/opt/mssql/data/dbm_certificate.cer'
WITH PRIVATE KEY (
FILE = '/var/opt/mssql/data/dbm_certificate.pvk',
ENCRYPTION BY PASSWORD = '1111.aaa'
);
4.1 In this case, the above data in the main directory will produce two files:
Bash (Main):
dbm_certificate.cer ## certificate
dbm_certificate.pvk ## private

4.2 Then these two files to the same directory from the server all the
Bash (Main):
cd /var/opt/mssql/data/
scp dbm_certificate.* 192.168.1.192:/var/opt/mssql/data/
scp dbm_certificate.* 192.168.1.193:/var/opt/mssql/data/

4.3 pairs a certificate from the server for authorization
Bash (from);
cd /var/opt/mssql/data/
chown mssql.mssql dbm_certificate.*
5 Create a certificate on the secondary node
Sql (from):
CREATE MASTER KEY ENCRYPTION BY PASSWORD = '1111.aaa';
CREATE CERTIFICATE dbm_certificate
AUTHORIZATION dbm_user
FROM FILE = '/var/opt/mssql/data/dbm_certificate.cer'
WITH PRIVATE KEY (
FILE = '/var/opt/mssql/data/dbm_certificate.pvk',
DECRYPTION BY PASSWORD = '1111.aaa'
);
6 Create a database mirroring endpoint
Sql(all);
CREATE ENDPOINT [Hadr_endpoint]
AS TCP (LISTENER_PORT = 5022)
FOR DATABASE_MIRRORING (
ROLE = ALL,
AUTHENTICATION = CERTIFICATE dbm_certificate,
ENCRYPTION = REQUIRED ALGORITHM AES
);
ALTER ENDPOINT [Hadr_endpoint] STATE = STARTED;
GRANT CONNECT ON ENDPOINT::[Hadr_endpoint] TO [dbm_login];
After finished in (all) above to see if the corresponding port is enabled and open port 5022

sudo firewall-cmd --zone=public --add-port=5022/tcp --permanent
sudo firewall-cmd --reload
7 created on the master node AG
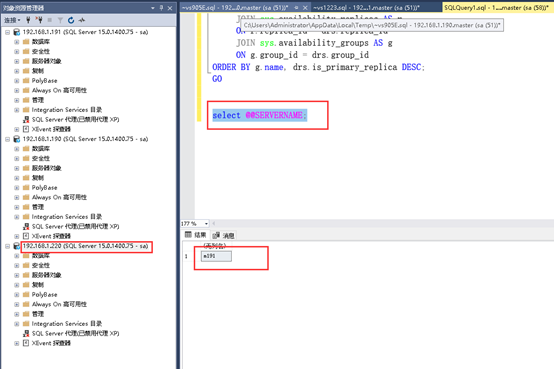
7.1 Check the host name to sqlserver
Sql(all);
select @@SERVERNAME;
The right words will be displayed:
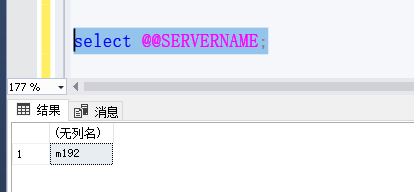
Incorrect then be modified in order;
8.1.1 select * from Sys.SysServers; // system name to view all
8.1.2 sp_dropserver 'localhost' 删除 // server-name localhost
8.1.3 sp_addserver 'm192', 'LOCAL' // modify the host name m190,
When you're done be sure to restart the sqlserver service to take effect.
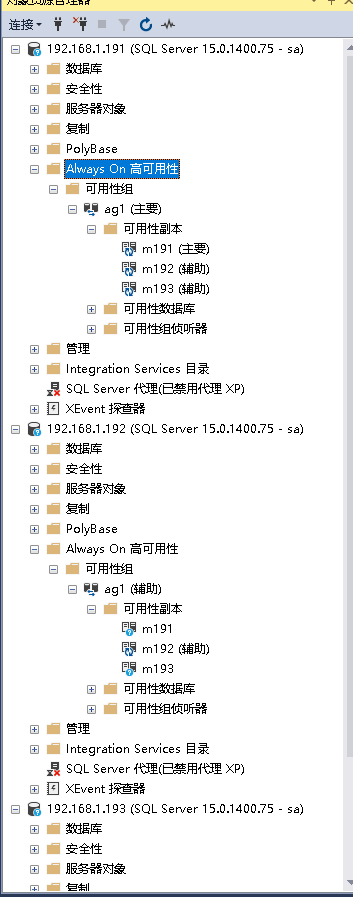
7.2 Creating AG on the primary node
SQL (Main):
CREATE AVAILABILITY GROUP [AG1]
WITH (DB_FAILOVER = ON, CLUSTER_TYPE = EXTERNAL)
FOR REPLICA ON
N'm191 '
WITH (
ENDPOINT_URL = N'tcp://m192:5022',
AVAILABILITY_MODE = SYNCHRONOUS_COMMIT,
FAILOVER_MODE = EXTERNAL,
SEEDING_MODE = AUTOMATIC,
SECONDARY_ROLE (ALLOW_CONNECTIONS = ALL)
),
N'm192'
WITH (
ENDPOINT_URL = N'tcp://m192:5022',
AVAILABILITY_MODE = SYNCHRONOUS_COMMIT,
FAILOVER_MODE = EXTERNAL,
SEEDING_MODE = AUTOMATIC,
SECONDARY_ROLE (ALLOW_CONNECTIONS = ALL)
),
N'm193'
WITH (
ENDPOINT_URL = N'tcp://m193:5022',
AVAILABILITY_MODE = SYNCHRONOUS_COMMIT,
FAILOVER_MODE = EXTERNAL,
SEEDING_MODE = AUTOMATIC,
SECONDARY_ROLE (ALLOW_CONNECTIONS = ALL)
);
ALTER AVAILABILITY GROUP [AG1] GRANT CREATE ANY DATABASE;
7.3 将从节点添加进去
Sql(从):
ALTER AVAILABILITY GROUP [AG1] JOIN WITH (CLUSTER_TYPE = EXTERNAL);
ALTER AVAILABILITY GROUP [AG1] GRANT CREATE ANY DATABASE
7.4 测试创建数据库db1
Sql(主):
CREATE DATABASE [db1];
ALTER DATABASE [db1] SET RECOVERY FULL;
BACKUP DATABASE [db1]
TO DISK = N'/var/opt/mssql/data/db1.bak';
ALTER AVAILABILITY GROUP [AG1] ADD DATABASE [db1];
7.5 在从节点上面再次点击db1,发现可以点开
至此AG配置已经完成,但是塔仅同步并不能shi先真正的高可用,还需要进行故障转移,毕竟在企业中你不可能只管理一个数据库,下章《配置集群管理器Pacemaker》,是主推的高可用技术,AlwaysON当然也要提供一定的功能来实现这种“透明”切换,它提供了虚拟IP(vip)的感念。
7.6 AG操作
删除可用性组
DROP AVAILABILITY GROUP group_name
四、配置集群管理器Pacemaker
1 安装必备工具包
Red Hat Enterprise Linux (RHEL)
Bash(all)
- 使用以下语法注册服务器。 系统会提示输入有效的用户名和密码。
sudo subscription-manager register
列出可用的注册池。
sudo subscription-manager list –available
运行以下命令,将 RHEL 高可用性与订阅相关联
sudo subscription-manager attach --pool=<PoolID>
其中,“PoolId”是上一步中高可用性订阅的池 ID 。
使存储库能够使用高可用性加载项。
sudo subscription-manager repos --enable=rhel-ha-for-rhel-7-server-rpms
Bash(all):
yum install pacemaker pcs resource-agents corosync fence-agents-all -y
2 对所有节点配置公共密码
Bash(all):
passwd hacluster (这里密码一定要设置成一样的,我这设置的是123456.com)
3 启动相应服务
Bash(all):
sudo systemctl enable pcsd
sudo systemctl start pcsd
sudo systemctl enable pacemaker

3.1在所有群集节点上,打开 Pacemaker 防火墙端口。 若要使用 firewalld 打开这些端口,请运行以下命令:
firewall-cmd --add-service=high-availability --zone=public --permanent
firewall-cmd --zone=public --add-port=2224/tcp --permanent
firewall-cmd --zone=public --add-port=3121/tcp –permanent
firewall-cmd --zone=public --add-port=5405/udp --permanent
firewall-cmd --reload
4 创建集群
为防止集群中的异常文件残留,需要先删除已经存在的集群。
Bash(all):
sudo pcs cluster destroy
sudo systemctl enable pacemaker
创建对应的集群,此处需要一个节点(一般在主节点)运行
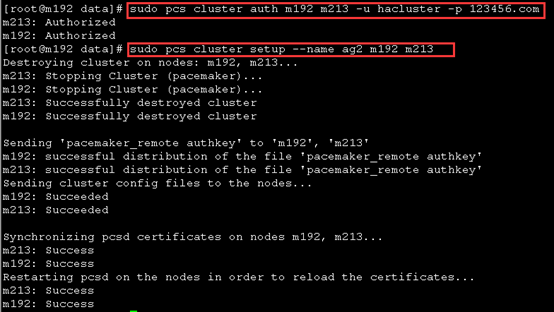
Bash(主):
sudo pcs cluster auth m191 m192 m193 -u hacluster -p 123456.com
sudo pcs cluster setup --name AG1 m191 m192 m193
chown -R hacluster.haclient /var/log/cluster
pcs cluster start --all
pcs cluster enable –all
4.1查看当前集群状态:
pcs cluster status
4.2检查pacemaker服务:
ps aux | grep pacemaker
4.3检验Corosync的安装及当前corosync状态:
corosync-cfgtool -s
corosync-cmapctl | grep members
pcs status corosync
4.4检查配置是否正确(假若没有输出任何则配置正确):
crm_verify -L -V
4.5禁用STONITH(all):
pcs property set stonith-enabled=false
4.6无法仲裁时候,选择忽略(all):
pcs property set no-quorum-policy=ignore

5 所有节点隔离(STONITH)资源
隔离的目的是确保在配置资源过程中引起服务中断时,不会发生数据损坏,为了测试环境相对简单,需要禁用隔离,在实际环境中需要与管理员和设备供应商讨论是否需要启用。
Bash(all):
sudo pcs property set stonith-enabled=false
6 在所有节点安装资源包
Bash(all):
yum install mssql-server-ha –y
sudo systemctl restart mssql-server
7 设置群集属性群集重新检查间隔(可不配置)
cluster-recheck-interval 指示检查群集资源参数、 约束或其他群集选项中的更改的轮询间隔。 如果副本出现故障,群集将尝试重新启动的时间间隔,由绑定的副本failure-timeout值和cluster-recheck-interval值。 例如,如果failure-timeout设置为 60 秒和cluster-recheck-interval设置为 120 秒,在重新启动尝试的时间间隔大于 60 秒,但不超过 120 秒。 我们建议将故障超时设置为 60 秒和群集重新检查的间隔超过 60 秒的值。 不建议将群集重新检查间隔设置为较小的值。
若要将属性值更新为2 minutes运行:
sudo pcs property set cluster-recheck-interval=2min
(包括 RHEL 7.3 和 7.4) 的所有使用最新可用 Pacemaker 包 1.1.18-11.el7 分布引入开始失败-是的致命群集设置的行为更改其值为 false。 此更改会影响故障转移工作流。 如果主副本发生服务中断,群集应故障转移到其中一个可用的辅助副本。 相反,用户会注意到该群集会一直尝试启动失败的主副本。 如果该主永远不会处于联机状态 (由于的永久中断),群集永远不会故障转移到另一个可用的辅助副本。 由于此更改,以前推荐的配置来设置开始失败-是的致命将不再有效,需要恢复回其默认值设置true。 此外,需要更新,以包含 AG 资源failover-timeout属性。
若要将属性值更新为true运行:
sudo pcs property set start-failure-is-fatal=true
若要更新ag_cluster资源属性failure-timeout到60s运行:
pcs resource update AG1 meta failure-timeout=60s
8.1 在所有节点上创建基于Pacemaker的使用账户
Sql(all):
USE [master]
GO
CREATE LOGIN [pacemakerLogin] with PASSWORD= N'1111.aaa';
ALTER SERVER ROLE [sysadmin] ADD MEMBER [pacemakerLogin]
9 所有节点保存登陆信息
Bash(all):
sudo echo 'pacemakerLogin' >> ~/pacemaker-passwd
sudo echo '1111.aaa' >> ~/pacemaker-passwd
sudo mv ~/pacemaker-passwd /var/opt/mssql/secrets/passwd
sudo chown root:root /var/opt/mssql/secrets/passwd
sudo chmod 400 /var/opt/mssql/secrets/passwd [ge1]
10 搭建主节点配置AG,创建虚拟IP
搭建好集群之后,就可以创建虚拟Ip,这里选用192.168.1.220为VIP
Bash(主)
sudo pcs resource create ag_cluster ocf:mssql:ag ag_name=AG1 meta failure-timeout=60s master notify=true
sudo pcs resource create virtualip ocf:heartbeat:IPaddr2 ip=192.168.1.220
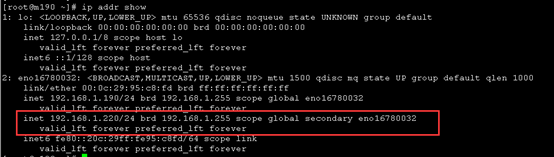
执行完之后查看是否绑定成功
ip addr show
11 设置主节点(或副本)执行集群依赖关系和启动顺序
11.1目的在于当集群拥有两个以上的节点,且发生故障转移时,应选择哪一节点作为新的主节点。
11.1.1用户问题pcs resource move到可用性组主副本从节点 1 到节点 2。
11.1.2节点 1 上虚拟 IP 资源停止。
11.1.3节点 2 上虚拟 IP 资源启动。
此时,IP 地址暂时指向节点 2,同时节点 2 仍为故障转移前的次要副本。
11.1.4节点 1 上的可用性组主要副本降级为次要副本。
11.1.5节点 2 上的可用性组次要副本升级为主要副本。
Bash(主)
sudo pcs constraint colocation add virtualip ag_cluster-master INFINITY with-rsc-role=Master
sudo pcs constraint order promote ag_cluster-master then start virtualip

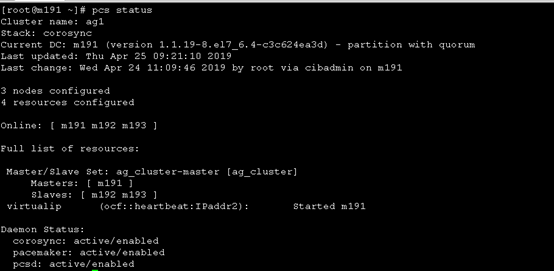
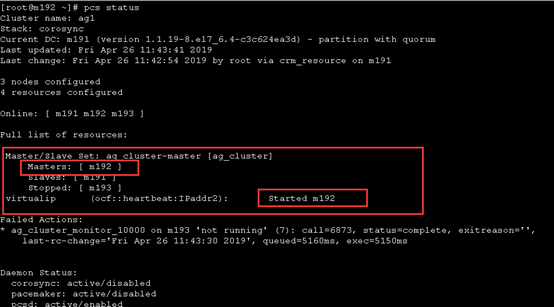
11.2 查看集群状态
sudo pcs status
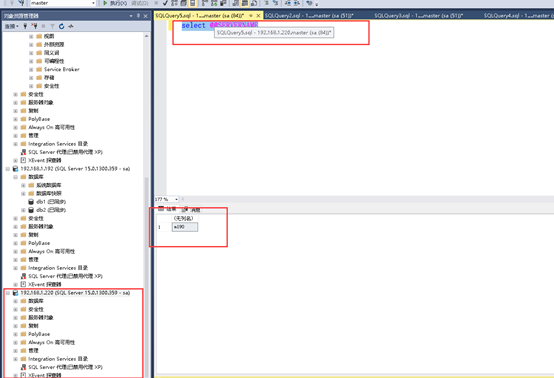
12 访问VIP
这次使用vip访问sqlserver服务器,一般情况下,1433端口可以不加(sa,密码123456.com)
如下图我们顺利完成了搭建,在无故障的情况下,当前DB(注意我们使用vip连接,也就是可能你不知道具体的主节点在哪里)如图;
Sql(VIP):
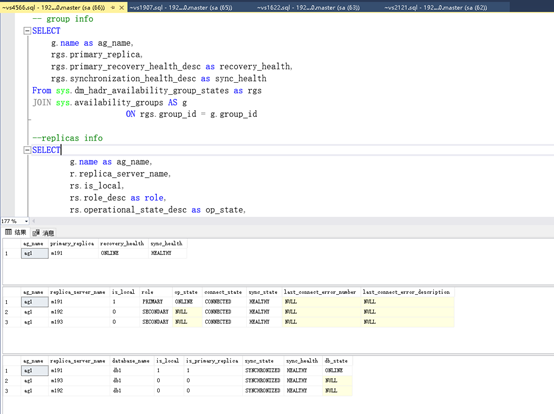
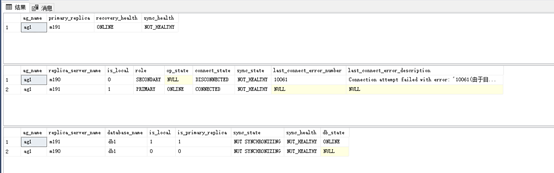
13 首先我们要了解当前状态,使用下面语句查看AG信息
Sql(VIP):
-- group info
SELECT
g.name as ag_name,
rgs.primary_replica,
rgs.primary_recovery_health_desc as recovery_health,
rgs.synchronization_health_desc as sync_health
From sys.dm_hadr_availability_group_states as rgs
JOIN sys.availability_groups AS g
ON rgs.group_id = g.group_id
--replicas info
SELECT
g.name as ag_name,
r.replica_server_name,
rs.is_local,
rs.role_desc as role,
rs.operational_state_desc as op_state,
rs.connected_state_desc as connect_state,
rs.synchronization_health_desc as sync_state,
rs.last_connect_error_number,
rs.last_connect_error_description
From sys.dm_hadr_availability_replica_states AS rs
JOIN sys.availability_replicas AS r
ON rs.replica_id = r.replica_id
JOIN sys.availability_groups AS g
ON g.group_id = r.group_id
--DB level
SElECT
g.name as ag_name,
r.replica_server_name,
DB_NAME(drs.database_id) as [database_name],
drs.is_local,
drs.is_primary_replica,
synchronization_state_desc as sync_state,
synchronization_health_desc as sync_health,
database_state_desc as db_state
FROM sys.dm_hadr_database_replica_states AS drs
JOIN sys.availability_replicas AS r
ON r.replica_id = drs.replica_id
JOIN sys.availability_groups AS g
ON g.group_id = drs.group_id
ORDER BY g.name, drs.is_primary_replica DESC;
GO
-
14 模拟故障转移
使用命令停掉主节点的sql server服务(我们期望它能发生自动故障转移,并且希望在本例中主节点能转移到m191或m192上面,同时又保证VIP能继续使用,等待少许时间后/故障转移需要一定的时间,特别是繁忙的大型系统,可能需要数秒到几分钟/)
14.1 故障转移(手动)
Sql(主):
将m192转换为主数据库
sudo pcs resource move ag_cluster-master m192 --master

14.2 查看vip地址是否可以漂移到m192上
14.3 至此,集群模式搭建完成
[ge1] Only readable by root