This section mainly learns the overview of AHproxy, installation, scheduling algorithm, configuration file, load balancing, syslog log configuration, keepalived+haproxy to achieve high availability.
Table of contents
3. Create a configuration file
5. Add 3 and 5 run levels to start automatically
Monitoring status is not supported
Seven, keepalived +haproxy achieve high availability
3. Restart the two services separately
I. Overview
1 Introduction
HAProxy is a free load balancing software that can run on most mainstream Linux operating systems (CentOS, Ubuntu, Debian, OpenSUSE, Fedora, Kirin, Euler, UOS).
HAProxy provides L4 (TCP) and L7 (HTTP) load balancing capabilities with rich functions. HAProxy has the performance and stability comparable to commercial load balancers.
2. Core functions
| load balancing | L4 and L7 modes, support RR/static RR/LC/IP Hash/URI Hash/URL_PARAM Hash/HTTP_HEADER Hash and other rich load balancing algorithms |
| health examination | Support TCP and HTTP two health check modes |
| session hold | For application clusters that do not implement session sharing, session persistence can be achieved through Insert Cookie/Rewrite Cookie/Prefix Cookie, as well as the above-mentioned multiple Hash methods |
| SSL | HAProxy can parse the HTTPS protocol, and can decrypt the request to HTTP and transmit it to the backend |
| HTTP | Request rewriting and redirection |
| Monitoring and Statistics | HAProxy provides a web-based statistics page showing health status and traffic data. Based on this function, users can develop monitoring programs to monitor the status of HAProxy |
3. Key features
It adopts a single-threaded, event-driven, non-blocking model, reduces the consumption of context switching, and can process hundreds of requests within 1ms. And each session only takes a few KB of memory.
A large number of fine performance optimizations, such as O(1) complex event checker, delayed update technology, Single-buffereing, Zero-copy forwarding, etc., these technologies make HAProxy only occupy extremely low CPU resources under medium load.
HAProxy makes extensive use of the functional features of the operating system itself, enabling it to exert extremely high performance when processing requests. Normally, HAProxy itself only takes up 15% of the processing time, and the remaining 85% is completed at the system kernel layer.
The author of HAProxy conducted a test using version 1.4 8 years ago (2009). The processing capacity of a single HAProxy process exceeded 100,000 requests/s, and easily occupied 10Gbps of network bandwidth.
4. Application scenarios
In occasions with high concurrency requirements
2. Installation
1. Kernel configuration
net.ipv4.tcp_tw_reuse = 1
net.ipv4.ip_local_port_range = 1024 65023
net.ipv4.tcp_max_syn_backlog = 10240
net.ipv4.tcp_max_tw_buckets = 400000
net.ipv4.tcp_max_orphans = 60000
net.ipv4.tcp_synack_retries = 3
net.core.somaxconn = 10000

2. Compile and install
wget https://www.haproxy.org/download/1.7/src/haproxy-1.7.2.tar.gz
make PREFIX=/usr/local/haproxy TARGET=linux2628
make install PREFIX=/usr/local/haproxy

3. Create a configuration file
Obtain the path of the configuration file "/etc/haproxy/haproxy.cfg" from init.haproxy under examples in the haproxy source package
mkdir /etc/haproxy
touch /etc/haproxy/haproxy.cfg
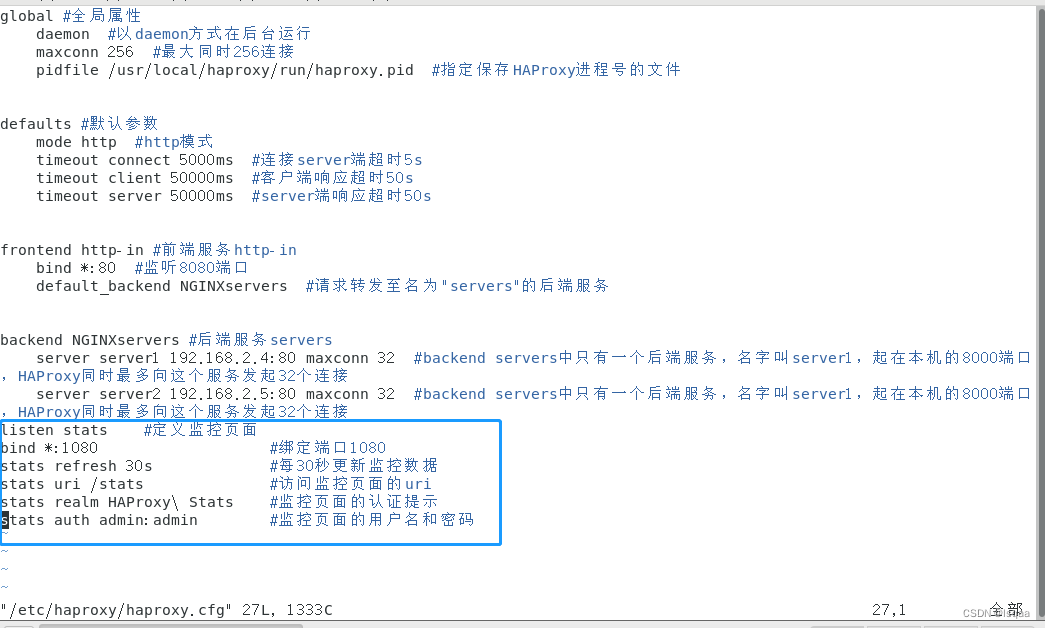
| global #Global attribute daemon #Run maxconn in the background in daemon mode 256 #Maximum 256 connections at the same time pidfile /home/ha/haproxy/conf/haproxy.pid #Specify the file to save the HAProxy process number defaults #Default parameter mode http #http mode timeout connect 5000ms #Connect server-side timeout 5s timeout client 50000ms #Client response timeout 50s timeout server 50000ms #Server-side response timeout 50s frontend http-in #Front-end service http-in bind *:8080 #Listen to port 8080 default_backend servers #Request forwarded to The backend service named "servers" backend servers #backend service servers server server1 127.0.0.1:8000 maxconn 32 #backend servers There is only one backend service, the name is server1, starting from port 8000 of this machine, and HAProxy has the most at the same time Initiate 32 connections to this service |
4. Add as a system service
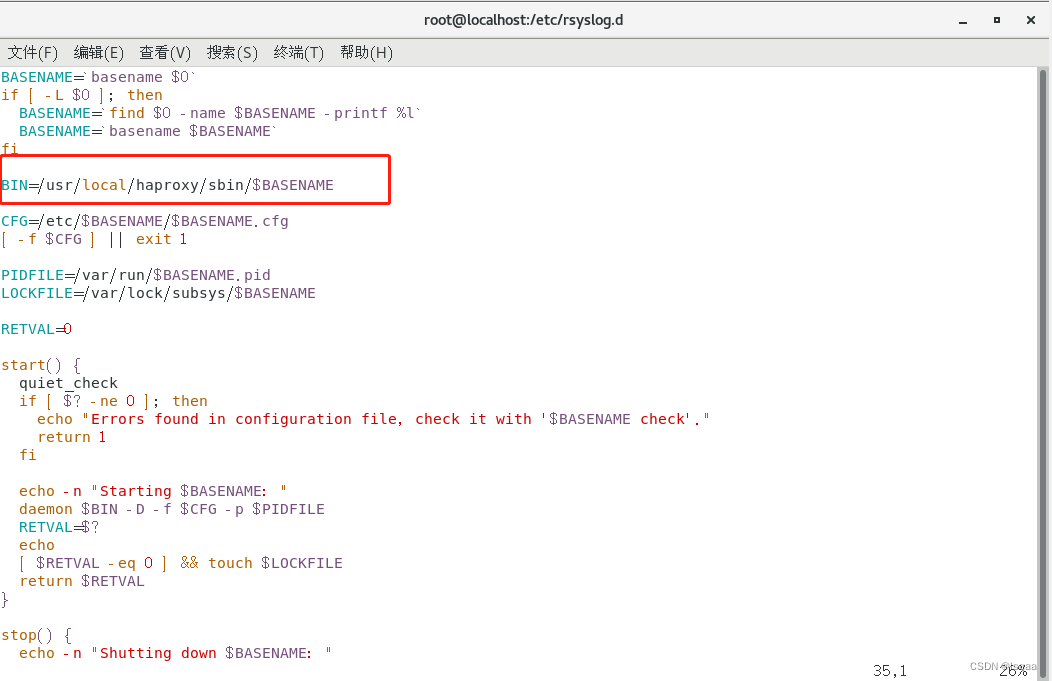
cp /root/haproxy-1.7.2/examples/haproxy.init /etc/init.d/haproxy
vim /etc/init.d/haproxy
Modification: The content of line 35 is BIN=/usr/local/haproxy/sbin/$BASENAME
chmod +x /etc/init.d/haproxy
chkconfig --add /etc/init.d/haproxy
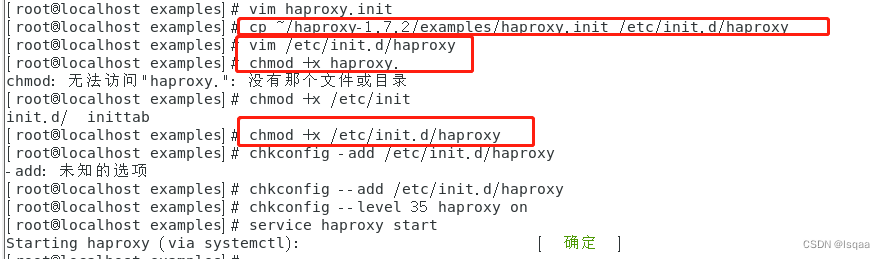
5. Add 3 and 5 run levels to start automatically
chkconfig haproxy --level 35 on

chkconfig --list

6. Start haproxy

3. Scheduling algorithm
| roundrobin: Indicates simple round robin. |
| static-rr: Indicates according to the weight. |
| leastconn: Indicates that the least connected person is processed first. |
| source: Indicates the source IP of the request, similar to Nginx's IP_hash mechanism. |
| ri: indicates the requested URI. |
| rl_param: indicates that each HTTP request is locked according to the HTTP request header. |
| rdp-cookie(name): means to lock and hash each TCP request according to cookie(name). |
4. Configuration file
| global | Used to configure global parameters |
| default | Used to configure default properties for all frontends and backends |
| frontend | Used to configure the front-end service (that is, the service provided by HAProxy itself) instance |
| backend | Used to configure the instance group of the backend service (that is, the service behind HAProxy) |
| listen | The combined configuration of frontend+backend can be understood as a more concise configuration method |

| global #全局属性
|
五、负载均衡
1、7层负载
配置负载
| global |

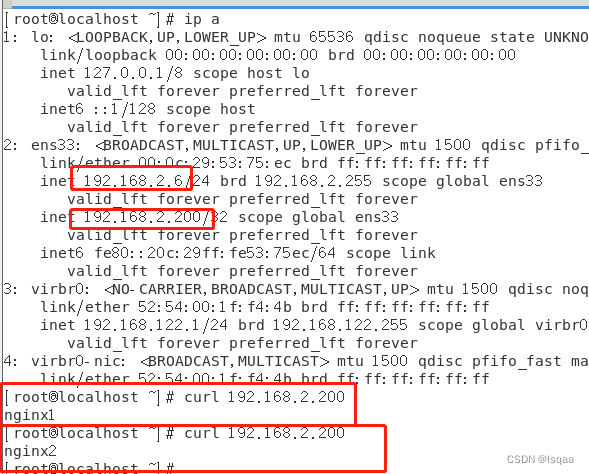
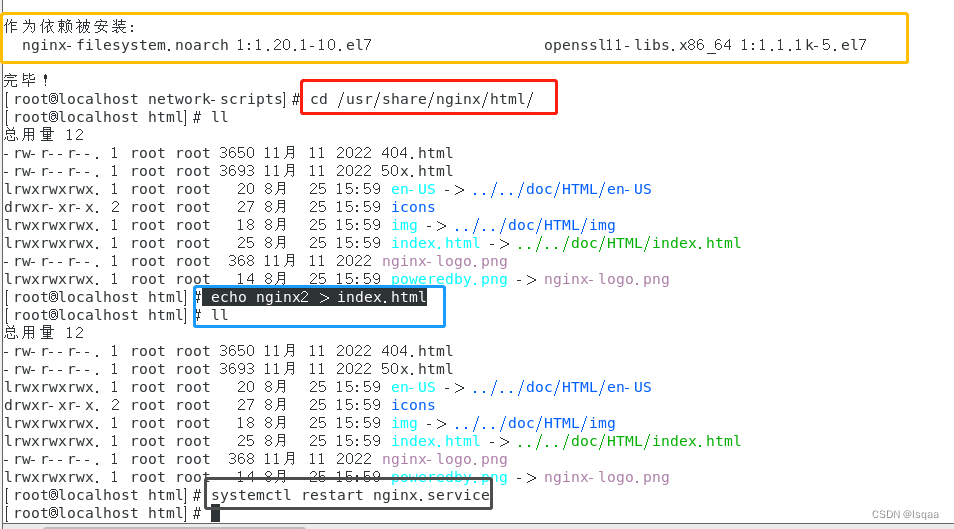
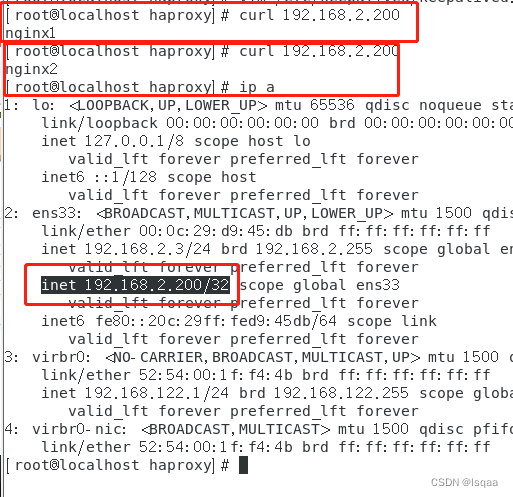
设置好两个web服务器
nginx1
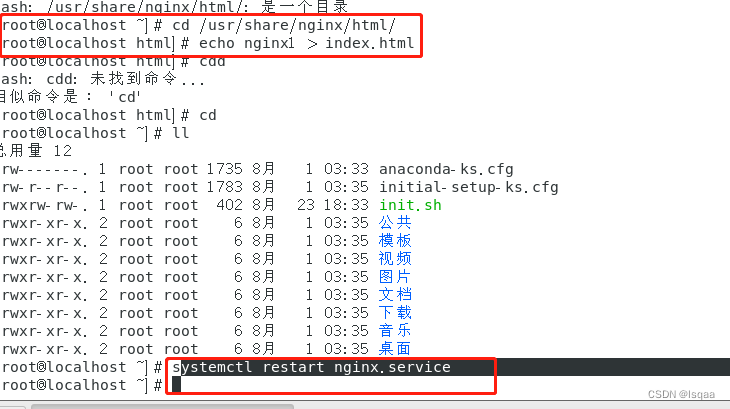
nginx2
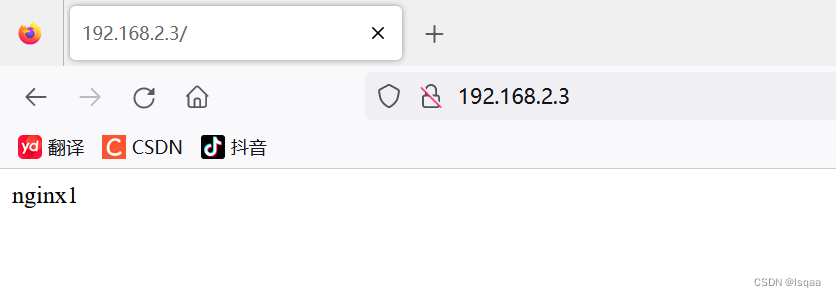
浏览器查看

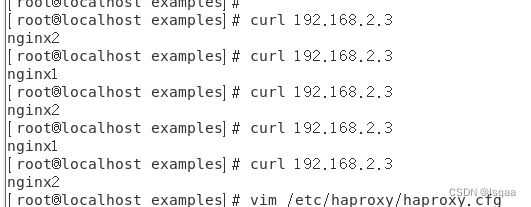
命令查看
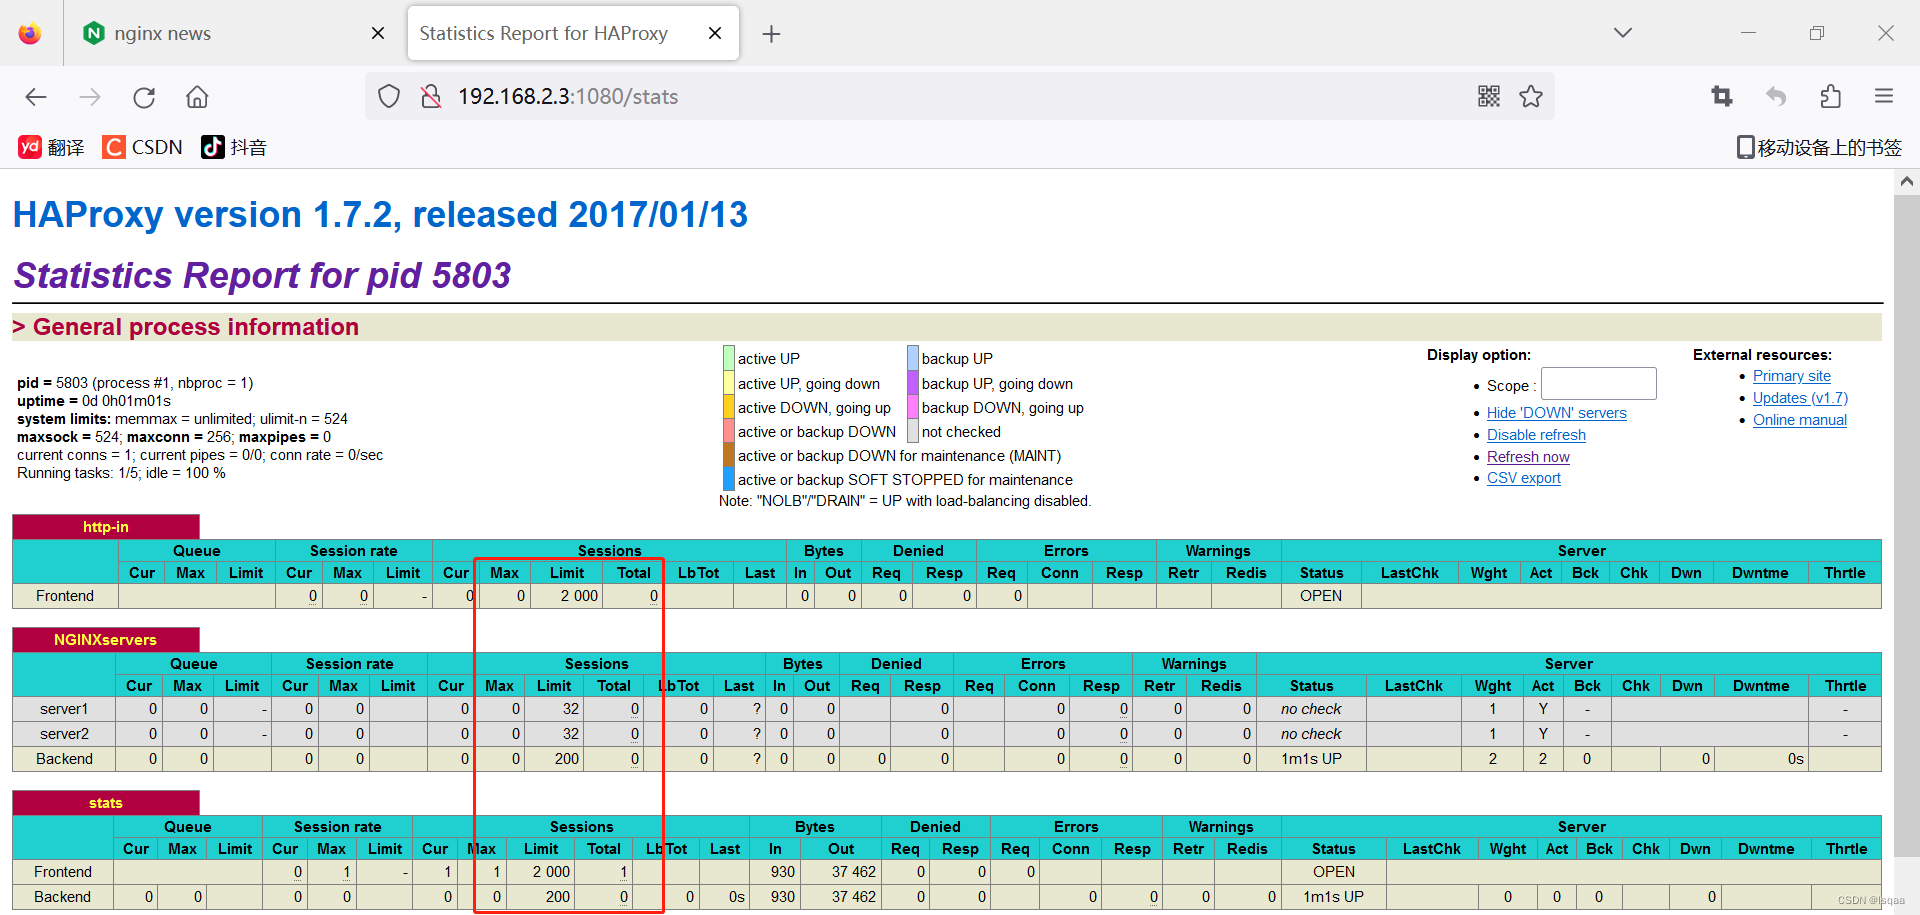
配置监控页面
| listen stats #定义监控页面 bind *:1080 #绑定端口1080 stats refresh 30s #每30秒更新监控数据 stats uri /stats #访问监控页面的uri stats realm HAProxy\ Stats #监控页面的认证提示 stats auth admin:admin #监控页面的用户名和密码 |
浏览器查看

2、4层负载
配置负载
| global daemon maxconn 256 pidfile /var/run/haproxy/haproxy.pid defaults mode tcp timeout connect 5000ms timeout client 50000ms timeout server 50000ms frontend http-in bind *:8080 default_backend servers backend servers balance roundrobin #轮询 #balance source #保持会话 server server1 127.0.0.1:8000 maxconn 32 server server2 127.0.0.1:8090 maxconn 32 |
不支持监控状态
六、配置syslog
| touch /etc/rsyslog.d/haproxy.conf $ModLoad imudp |


七、keepalived +haproxy实现高可用
1、keepalived配置
| global_defs {
vrrp_instance HA_1 {
|

2、haproxy配置
| global |

3、分别重启两个服务

4、测试
keepalived+haproxy1
keepalived+haproxy2
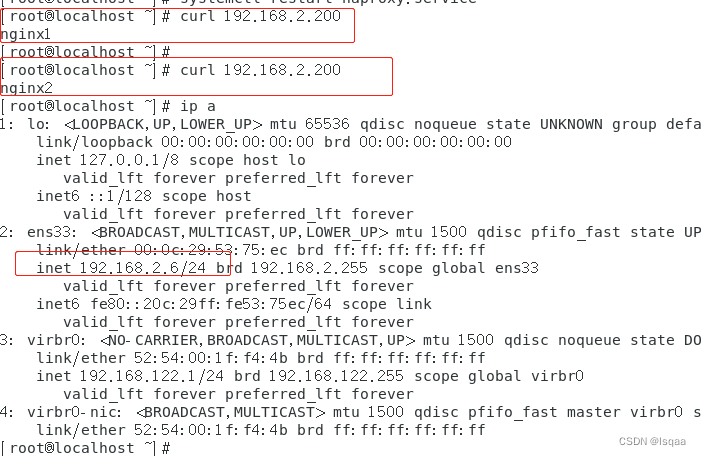
将keepalived+haproxy1 的keepalived服务停掉

查看keepalived+haproxy2的地址