Installation under petalinux ubuntu16.04
Reference https://www.cnblogs.com/vacajk/p/6146146.html
Installation Environment:
1. ubuntu 16.04
2. petalinux-v2015.4
3. Target board: zynq 7010 SOC
installation steps:
1. Create a new directory in the home two folders: petalinux petalinux_installer two folders and the folder into the installation package petalinux-v2015.4-final-installer-dec.run petalinux_installer.
2. Replace the apt-get update source (sometimes discover that comes with ubuntu source library can not download files).
sudo su
cd /etc/apt
cp sources.list sources.list1
gedit sources.list
The contents of sources.list replace ubuntu 16.04 Ali cloud sources, reads as follows:
# deb cdrom:[Ubuntu 16.04 LTS _Xenial Xerus_ - Release amd64 (20160420.1)]/ xenial main restricted
deb-src http://archive.ubuntu.com/ubuntu xenial main restricted #Added by software-properties
deb http://mirrors.aliyun.com/ubuntu/ xenial main restricted
deb-src http://mirrors.aliyun.com/ubuntu/ xenial main restricted multiverse universe #Added by software-properties
deb http://mirrors.aliyun.com/ubuntu/ xenial-updates main restricted
deb-src http://mirrors.aliyun.com/ubuntu/ great-updates main restricted universe multiverse #ADDED by software-properties
deb http: // mirrors.aliyun.com/ubuntu/ great universe
deb http: // mirrors.aliyun.com/ubuntu/ great -updates universe
deb http: // mirrors.aliyun.com/ubuntu/ great multiverse
deb http: // mirrors.aliyun.com/ubuntu/ great-updates multiverse
deb http: // mirrors.aliyun.com/ubuntu/ xenial- backports main restricted universe multiverse
deb -SR http: // mirrors.aliyun.com/ubuntu/ great-backports main restricted universe multiverse #ADDED by software-properties
deb http: //archive.canonical.com/ubuntu great partner
deb -SR http: // archive.canonical.com/ubuntu great partner
deb http: // mirrors.aliyun.com/ubuntu/ great-security main restricted
deb -SR http: // mirrors.aliyun.com/ubuntu/ great-security main restricted universe multiverse #ADDED by software-properties
deb http: // mirrors.aliyun.com/ubuntu/ great-security universe
deb http: // mirrors.aliyun.com/ubuntu / great-security multiverse
After storing content, execute:
apt-get update
3. Before installing petalinux need dependent libraries, as follows:
apt-get install tofrodos:i386
apt-get install iproute2:i386
apt-get install gawk:i386
apt-get install cpp-5:i386
apt-get install cpp-5:i386
apt-get install cpp:i386
apt-get install binutils:i386
apt-get install gcc-5:i386
apt-get install gcc:i386
apt-get install make:i386
apt-get install net-tools:i386
apt-get install libncurses5-dev:i386
apt-get install zlib1g-dev:i386
apt-get install libssl-dev:i386
apt-get install flex:i386
apt-get install bison:i386
apt-get install libselinux1:i386
apt-get install libncurses5 libncurses5-dev
apt-get install libc6:i386
apt-get install libstdc++6:i386
apt-get install zlib1g:i386
apt-get install libssl-dev
apt-get install tftpd tftp openbsd-inetd
apt-get install gcc
apt-get install openssl
4. Installation tftp:
gedit /etc/inetd.conf
Add the following in the file:
tftp dgram udp wait nobody /usr/sbin/tcpd /usr/sbin/in.tftpd /tftproot

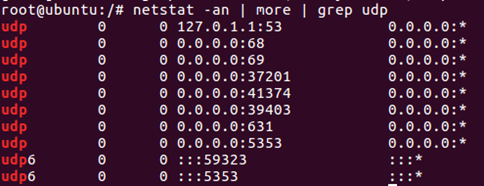
mkdir /tftproot
chmode 777 /tftproot
/etc/init.d/openbsd-inetd restart
netstat -an | more | grep udp
The following output represents the installation was successful:
5. formally start the installation petalinux:
(With normal user mode installation, Ubuntu 16.04 version can not be installed after the super user mode, but may be 16.04 installation supervisor mode, the user may be common)
Get back to normal user mode, then press the edge execute:
cd petalinux_installer (placed the installation package to the folder)
the chmod + X PetaLinux-V2015. . 4 .run
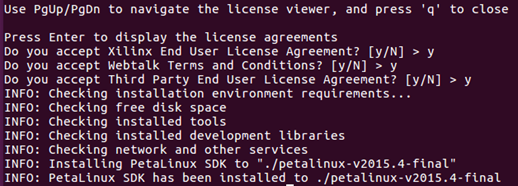
There are three license installation process, q quit reading, y confirm accept the license.
The following figure shows the installation was successful screen:
ug1144 said, and the use of / bin / sh is bash commands need, but the default Ubuntu / bin / sh is dash, so directly to the original delete, connect / bin / sh to bash disk.
sudo cp /bin/sh /bin/sh1
sudo rm /bin/sh
sudo ln -s /bin/bash /bin/sh
ls -al /bin/sh
The following figure shows the success of the interface:

Each time you need to perform the following statement uses petalinux:
source /home/honglei/petalinux_installer/petalinux-v2015.4-final/settings.sh
This is a little trouble, so set the open terminal and execute this command:
cd ~
sudo gedit .bashrc
Add instruction at the end of the document:
source /home/honglei/petalinux_installer/petalinux-v2015.4-final/settings.sh
So each time you open a terminal, will execute the command.
echo $PETALINUX
Instruction will see the top of the mounting position of petalinux.
6. Establish petalinux project:
cd petalinux a document (original) created folders
mkdir Project
cd Project
petalinux-create --type project --template zynq --name zynq

The vivado generated hardware description file (.hdf file) folder into hw-description below.

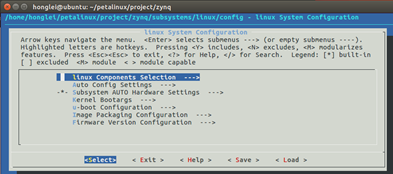
cd zynq
petalinux-config --get-hw-description=/home/honglei/petalinux/project/zynq/hw-description
![]()
Top of the statement will appear below the interface after the execution, without modification, directly save and exit.
Compile u-boot kernel rootfs
petalinux-config -c u-boot
petalinux-config -c kernel
petalinux-config -c rootfs
At last:
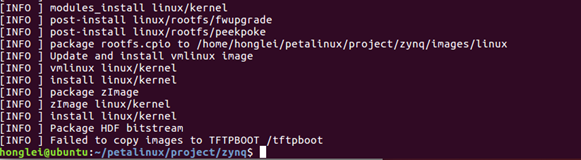
petalinux-build
Below is the interface after successful:
Finally, you can find the files we need in zynq / images / linux directory:

In Windows, open SDK Xilinx -> Create Boot Image, added in order zynq_fsbl.elf ---> IFC_TOP_wrapper.bit ---> u-boot.elf three files. Click the Create Image button to generate BOOT.bin file.
The resulting BOOT.bin image.ub file copy files to an SD card and an SD card into the board, power, port configuration.
If the board has a blue light, and there is text from the serial port issue is successful.
登录名和密码均为root。
下图为成功界面:

至此,petalinux安装完成。