Introduction
Store code structure generally consists of State , Getters , Mutation , the Actions four compositions can also be appreciated that a container Store, Store inside state of simple global variable is not the same, can not change the state of the store directly. Want to change the state of the store in only one way, explicitly submit mutation.
import Vue from 'vue'
import Vuex from 'vuex'

Vue.use(Vuex)

export default new Vuex.Store({
  state: {

  },
  getters:{

  },
  mutations: {

  },
  actions: {

  }
})
Simple Store
Children, if not installed vue-cli, do not look at this document, looked useless, Keke ..., vue project to create a straightforward, finding a suitable folder, open a terminal in this directory, use vue-cli command line to create a project (project called murenziwei)
view create murenziwei
You will be prompted to select a preset. You can choose the default contains the basic Babel + preset ESLint settings, you can also choose "manually select characteristics" to select the desired characteristics.

When you press Enter, and so on da vue project I just need a run on the line, command execution is completed, the folder will automatically generate a project vue
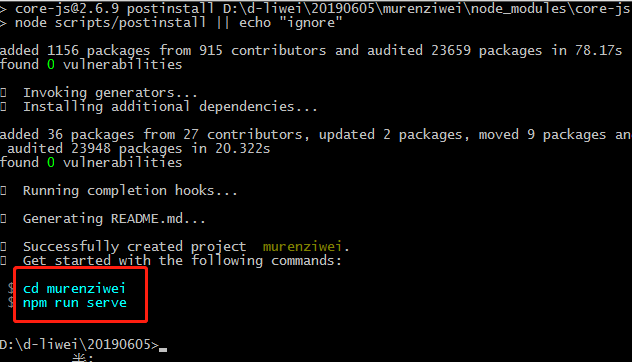
According to the command picture above the red box to perform
/ * Change directory * /
cd murenziwei
/ Startup Items * * /
npm serve RUN
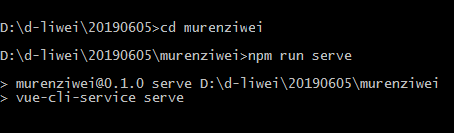
After starting the project is completed, open the browser, enter the URL obtained from the terminal

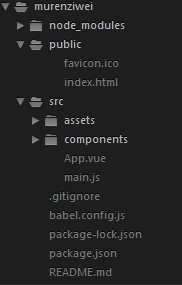
With this, we begin to install router, vuex. At this time, the structure shown in the following items
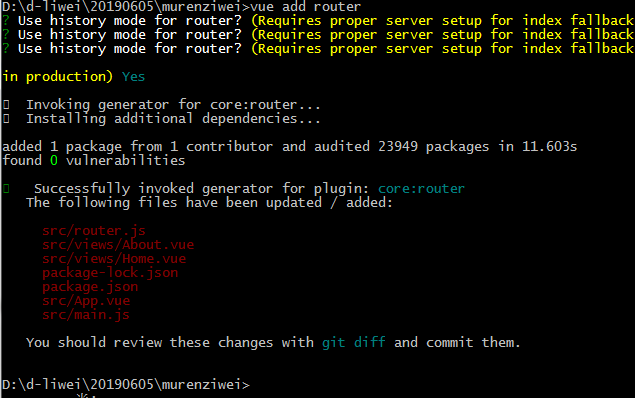
Ctrl + C to exit the start, continue vue-cli, router and plug-ins to install scaffolding began vuex
Plug router
vue add router
Enter a capital Y, press Enter
Plug vuex
Same as above
vue add vuex

At this time we re-look at the project structure, and more router.js store.js, other relevant documents may also be modified

Start vue project, npm run serve, add a new count in the state in store.js
import Vue from 'vue'
import Vuex from 'vuex'

Vue.use(Vuex)

export default new Vuex.Store({
  state: {
  	count:1
  },
  mutations: {

  },
  actions: {

  }
})
Modify the component HelloWorld, start using the new Store in state registration
<template>
  <div class="hello">
    <h1>{{ this.$store.state.count }}</h1>

  </div>
</template>

<script>
export default {
  name: 'HelloWorld',
  props: {
    msg: String
  }
}
</script>

<!-- Add "scoped" attribute to limit CSS to this component only -->
<style scoped>
h3 {
  margin: 40px 0 0;
}
ul {
  list-style-type: none;
  padding: 0;
}
li {
  display: inline-block;
  margin: 0 10px;
}
a {
  color: #42b983;
}
</style>
浏览效果

往store.js里的mustations添加改变状态值的加减功能,
import Vue from 'vue'
import Vuex from 'vuex'

Vue.use(Vuex)

export default new Vuex.Store({
  state: {
  	count:1
  },
  mutations: {
  	addmu(state){state.count++},
  	lessmu(state){state.count--}
  },
  actions: {

  }
})
回到HelloWorld组件, 添加增加和减少按钮,用来提交store的mutation
<template>
  <div class="hello">
    <h1>{{ this.$store.state.count }}</h1>
    <div>
      <button @click="addfn()">增加</button>
      <button @click="lessfn()">减少</button>
    </div>

  </div>
</template>

<script>
export default {
  name: 'HelloWorld',
  props: {
    msg: String
  },
  methods:{
    addfn(){
       //提交名为addmu的mutations
       this.$store.commit('addmu');
    },
    lessfn(){
       //提交名为lessmu的mutations
       this.$store.commit('lessmu');
    }
  }
}
</script>

<!-- Add "scoped" attribute to limit CSS to this component only -->
<style scoped>
h3 {
  margin: 40px 0 0;
}
ul {
  list-style-type: none;
  padding: 0;
}
li {
  display: inline-block;
  margin: 0 10px;
}
a {
  color: #42b983;
}
</style>
效果如下

由于mutation必须同步执行的限制,不方便实现复杂的功能。不过,别担心,看见了那个Actions吗?它就不受约束!我们可以在 它内部执行异步操作
修改store.js
import Vue from 'vue'
import Vuex from 'vuex'

Vue.use(Vuex)

export default new Vuex.Store({
  state: {
  	count:1
  },
  mutations: {
  	addmu(state){state.count++},
  	lessmu(state){state.count--}
  },
  actions: {
  	addac({commit}){commit('addmu')},
  	lessac({commit}){commit('lessmu')}
  }
})
修改HelloWorld组件,将提交mutation改为分发Action,Actions支持载荷方式和对象方式
<template>
  <div class="hello">
    <h1>{{ this.$store.state.count }}</h1>
    <div>
      <button @click="addfn()">增加</button>
      <button @click="lessfn()">减少</button>
    </div>

  </div>
</template>

<script>
export default {
  name: 'HelloWorld',
  props: {
    msg: String
  },
  methods:{
    addfn(){
       //以载荷方式分发
       this.$store.dispatch('addac');
    },
    lessfn(){
       //以对象方式分发
       this.$store.dispatch({type:'lessac'});
    }
  }
}
</script>

<!-- Add "scoped" attribute to limit CSS to this component only -->
<style scoped>
h3 {
  margin: 40px 0 0;
}
ul {
  list-style-type: none;
  padding: 0;
}
li {
  display: inline-block;
  margin: 0 10px;
}
a {
  color: #42b983;
}
</style>
效果如下

为了更直观的感受下Store的魅力,在views文件夹中添加一个About.vue也使用store状态
About.vue
<template>
  <div class="about">
    <h1>This is an about page</h1>
    <HelloWorld/>
  </div>
</template>
<script>
// @ is an alias to /src
import HelloWorld from '@/components/HelloWorld.vue'

export default {
  name: 'home',
  components: {
    HelloWorld
  }
}
</script>
跳转About.vue或者Home.vue,store里面的状态值是怎么样的就是怎么样的?

