Text detection is a very important part of the process of character recognition, text detection main objective is to position the text area detected in the picture, in order to facilitate character recognition back, only to find a text area where it can carry out its contents recognition.
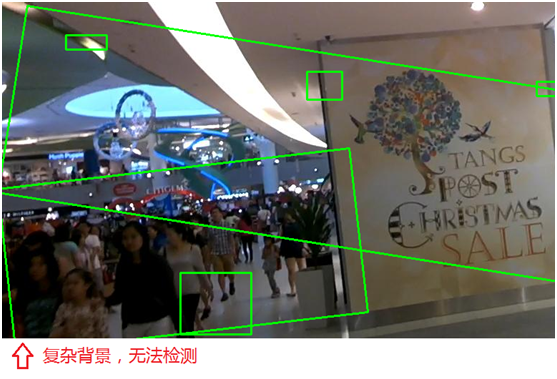
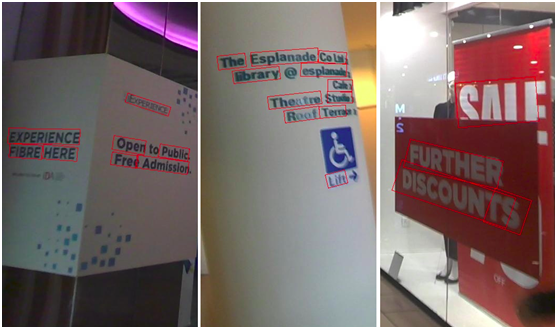
Text detection scene is divided into two types, one is a simple scene, the other is a complex scene. Among them, the text simple scene detection is relatively simple, such as scanning books, screen shots, or high definition, regular photographs; and complex scenes, mainly refers to the natural scene, the situation is more complex, such as street billboards, product packaging, instructions on the device, trademarks, etc., there is a complex background, flickering light, the angle of inclination, distortion, lack of clarity, and other cases, the text detection more difficult. As shown below:
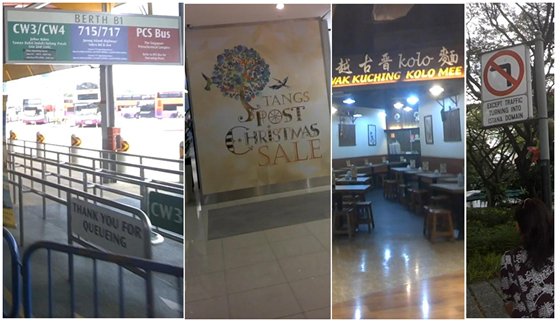
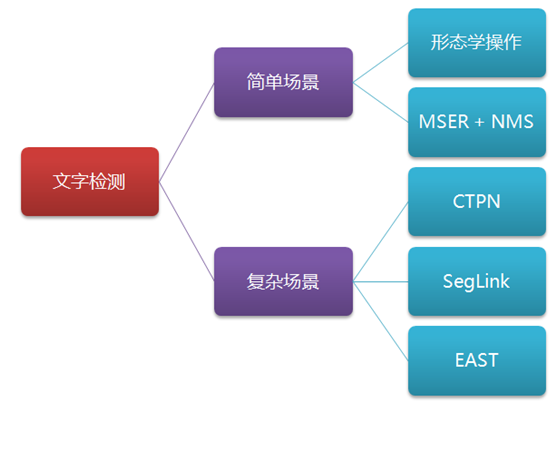
This article describes a simple scenario, complex scene popular word detection methods including morphological operations, MSER + NMS, CTPN, SegLink, EAST and other methods, and the main character in the scene image dataset ICDAR describes how to use these methods, as shown below:
1, simple scene: morphological operations Law
By using computer vision image morphological operations, including expansion, corrosion basic operation, the scene can be simple text detection, for example, the text area position detecting screenshots, as shown below:
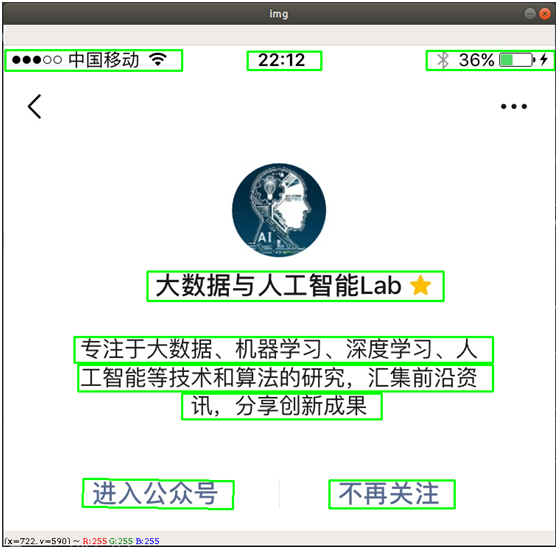
Wherein, "expansion" is the highlight portion of the image to expand, so that the white area increases; "corrosion" is the highlight portion of the image is eroded, so that the black area increases. By expansion, corrosion of a series of operations, outline text area can be highlighted and eliminated some of the border line, then it calculates the position of the text area by looking contour method. The main steps are as follows:
- Read the image, and converted to grayscale
- Pictures of the binary, or to noise reduction after binarization, in order to simplify processing
- Expansion, corrosion operation, highlight the contours and eliminate border line
- Find profile, remove the text does not meet the characteristics of the border
- Return text detection results border
By OpenCV, will be able to easily achieve the above process, the core code is as follows:
# -*- coding: utf-8 -*-

import cv2
import numpy as np

# 读取图片 imagePath = '/data/download/test1.jpg' img = cv2.imread(imagePath) # 转化成灰度图 gray = cv2.cvtColor(img, cv2.COLOR_BGR2GRAY) # 利用Sobel边缘检测生成二值图 sobel = cv2.Sobel(gray, cv2.CV_8U, 1, 0, ksize=3) # 二值化 ret, binary = cv2.threshold(sobel, 0, 255, cv2.THRESH_OTSU + cv2.THRESH_BINARY) # 膨胀、腐蚀 element1 = cv2.getStructuringElement(cv2.MORPH_RECT, (30, 9)) element2 = cv2.getStructuringElement(cv2.MORPH_RECT, (24, 6)) # 膨胀一次,让轮廓突出 dilation = cv2.dilate(binary, element2, iterations=1) # 腐蚀一次,去掉细节 erosion = cv2.erode(dilation, element1, iterations=1) # 再次膨胀,让轮廓明显一些 dilation2 = cv2.dilate(erosion, element2, iterations=2) # 查找轮廓和筛选文字区域 region = [] contours, hierarchy = cv2.findContours(dilation2, cv2.RETR_TREE, cv2.CHAIN_APPROX_SIMPLE) for i in range(len(contours)): cnt = contours[i] # 计算轮廓面积,并筛选掉面积小的 area = cv2.contourArea(cnt) if (area < 1000): continue # 找到最小的矩形 rect = cv2.minAreaRect(cnt) print ("rect is: ") print (rect) # box是四个点的坐标 box = cv2.boxPoints(rect) box = np.int0(box) # 计算高和宽 height = abs(box[0][1] - box[2][1]) width = abs(box[0][0] - box[2][0]) # 根据文字特征,筛选那些太细的矩形,留下扁的 if (height > width * 1.3): continue region.append(box) # 绘制轮廓 for box in region: cv2.drawContours(img, [box], 0, (0, 255, 0), 2) cv2.imshow('img', img) cv2.waitKey(0) cv2.destroyAllWindows()
The image processing procedure is shown below:
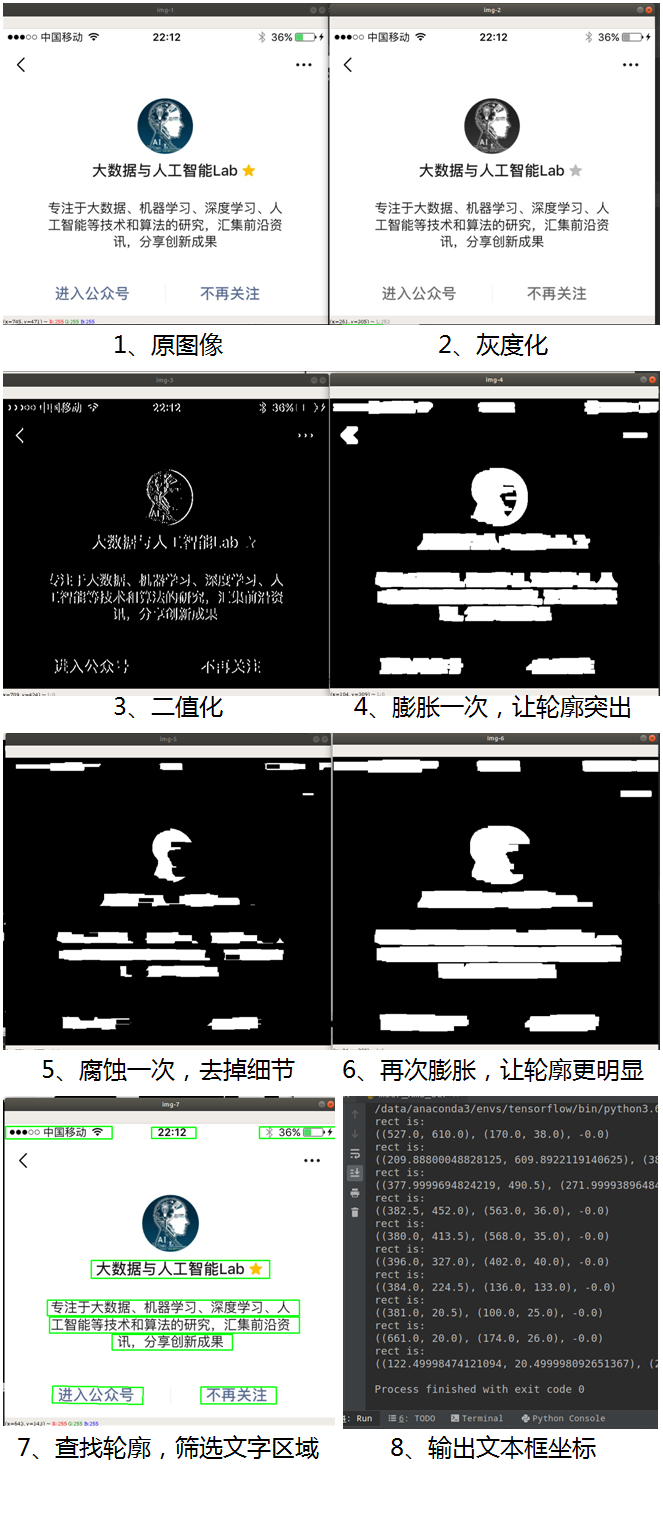
We can see the ultimate success of the text area detected in the image.
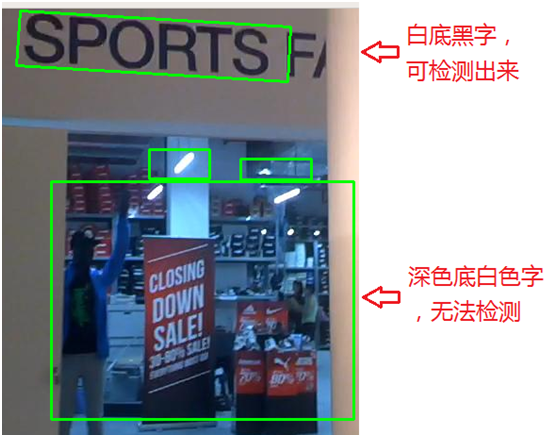
这种方法的特点是计算简单、处理起来非常快,但在文字检测中的应用场景非常有限,例如如果图片是拍照的,光线有明有暗或者角度有倾斜、纸张变形等,则该方法需要不断重新调整才能检测,而且效果也不会很好,如下图。例如上面介绍的代码是针对白底黑字的检测,如果是深色底白色字则需要重新调整代码,如果有需要,可再私信我交流。
2、简单场景:MSER+NMS检测法
MSER(Maximally Stable Extremal Regions,最大稳定极值区域)是一个较为流行的文字检测传统方法(相对于基于深度学习的AI文字检测而言),在传统OCR中应用较广,在某些场景下,又快又准。
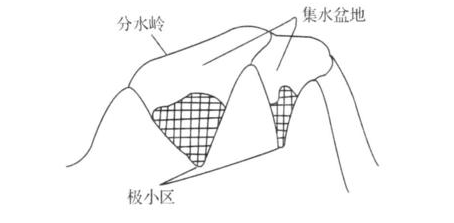
MSER算法是在2002提出来的,主要是基于分水岭的思想进行检测。分水岭算法思想来源于地形学,将图像当作自然地貌,图像中每一个像素的灰度值表示该点的海拔高度,每一个局部极小值及区域称为集水盆地,两个集水盆地之间的边界则为分水岭,如下图:
MSER的处理过程是这样的,对一幅灰度图像取不同的阈值进行二值化处理,阈值从0至255递增,这个递增的过程就好比是一片土地上的水面不断上升,随着水位的不断上升,一些较低的区域就会逐渐被淹没,从天空鸟瞰,大地变为陆地、水域两部分,并且水域部分在不断扩大。在这个“漫水”的过程中,图像中的某些连通区域变化很小,甚至没有变化,则该区域就被称为最大稳定极值区域。在一幅有文字的图像上,文字区域由于颜色(灰度值)是一致的,因此在水平面(阈值)持续增长的过程中,一开始不会被“淹没”,直到阈值增加到文字本身的灰度值时才会被“淹没”。该算法可以用来粗略地定位出图像中的文字区域位置。
听起来这个处理过程似乎非常复杂,好在OpenCV中已内置了MSER的算法,可以直接调用,大大简化了处理过程。
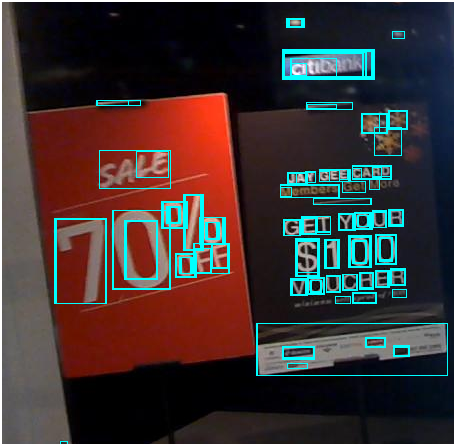
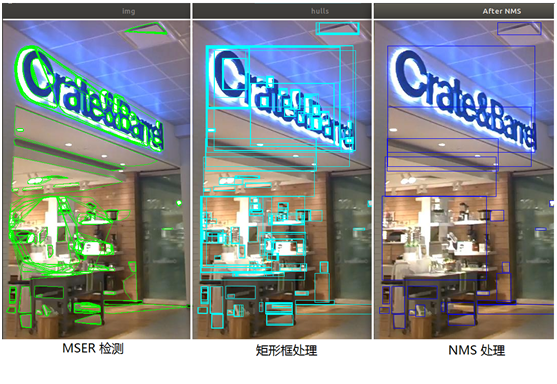
检测效果如下图:

检测后的结果是存在各种不规则的检测框形状,通过对这些框的坐标作重新处理,变成一个个的矩形框。如下图:
核心代码如下:
# 读取图片
imagePath = '/data/download/test2.jpg'
img = cv2.imread(imagePath)

# 灰度化
gray = cv2.cvtColor(img, cv2.COLOR_BGR2GRAY)
vis = img.copy()
orig = img.copy()

# 调用 MSER 算法
mser = cv2.MSER_create()
regions, _ = mser.detectRegions(gray)  # 获取文本区域 hulls = [cv2.convexHull(p.reshape(-1, 1, 2)) for p in regions] # 绘制文本区域 cv2.polylines(img, hulls, 1, (0, 255, 0)) cv2.imshow('img', img) # 将不规则检测框处理成矩形框 keep = [] for c in hulls: x, y, w, h = cv2.boundingRect(c) keep.append([x, y, x + w, y + h]) cv2.rectangle(vis, (x, y), (x + w, y + h), (255, 255, 0), 1) cv2.imshow("hulls", vis)
从上图可以看出,检测框有很多是重叠的,大框里面有小框,框与框之间有交叉,有些框只是圈出了汉字的偏旁或者某些笔划,而我们期望是能圈出文字的外边框,这样便于后续的文字识别。为了处理这些很多重叠的大小框,一般会采用NMS方法(Non Maximum Suppression,非极大值抑制),也就是抑制非极大值的元素,即抑制不是最大尺寸的框,相当于去除大框中包含的小框,达到去除重复区域,找到最佳检测位置的目的。
NMS算法的主要流程如下:
- 将所有框按置信度得分进行排序(如果边框没有置信度得分,也可以按坐标进行排序)
- 取其中得分最高的框出来
- 遍历该框与其余框的重叠面积(IoU)
- 删除IoU大于某个阈值的框(阈值可按需设定,例如0.3、0.5、0.8等)
- 取下一个得分最高的框出来,重复以上过程
经过以上步骤,最后剩下的就是不包含重叠部分的文本检测框了。核心代码如下:
# NMS 方法(Non Maximum Suppression,非极大值抑制)
def nms(boxes, overlapThresh): if len(boxes) == 0: return [] if boxes.dtype.kind == "i": boxes = boxes.astype("float") pick = [] # 取四个坐标数组 x1 = boxes[:, 0] y1 = boxes[:, 1] x2 = boxes[:, 2] y2 = boxes[:, 3] # 计算面积数组 area = (x2 - x1 + 1) * (y2 - y1 + 1) # 按得分排序(如没有置信度得分,可按坐标从小到大排序,如右下角坐标) idxs = np.argsort(y2) # 开始遍历,并删除重复的框 while len(idxs) > 0: # 将最右下方的框放入pick数组 last = len(idxs) - 1 i = idxs[last] pick.append(i) # 找剩下的其余框中最大坐标和最小坐标 xx1 = np.maximum(x1[i], x1[idxs[:last]]) yy1 = np.maximum(y1[i], y1[idxs[:last]]) xx2 = np.minimum(x2[i], x2[idxs[:last]]) yy2 = np.minimum(y2[i], y2[idxs[:last]]) # 计算重叠面积占对应框的比例,即 IoU w = np.maximum(0, xx2 - xx1 + 1) h = np.maximum(0, yy2 - yy1 + 1) overlap = (w * h) / area[idxs[:last]] # 如果 IoU 大于指定阈值,则删除 idxs = np.delete(idxs, np.concatenate(([last], np.where(overlap > overlapThresh)[0]))) return boxes[pick].astype("int")
经NMS处理后的检测结果如下图:

从上图可以看出,经MSER+NMS后,已能较好地将文字区域检测、圈出来。
MSER+NMS检测方法在传统的OCR应用中使用广泛,检测速度也非常快,能满足一定的文字识别场景。但当在复杂的自然场景中,特别是有复杂背景的,其检测效果也不尽人意,会将一些无关的因素也检测出来,如下图:
【重点来了】
接下来要介绍的方法,就主要是基于深度学习的AI文字检测法,可应用于复杂的自然场景中。
3、复杂场景:CTPN检测法
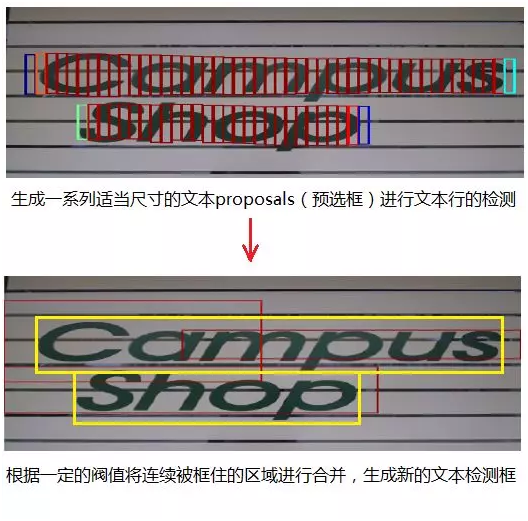
CTPN(Detecting Text in Natural Image with Connectionist Text Proposal Network,基于连接预选框网络的文本检测)是基于卷积神经网络和循环神经网络的文本检测方法,其基本做法是生成一系列适当尺寸的文本proposals(预选框)进行文本行的检测,示意图如下,具体的技术原理请见之前的文章(文章:大话文本检测经典模型:CTPN)
CTPN检测法能适应较为复杂的自然场景,是目前深度学习中作文字检测的常用方法之一。CTPN的原作者提供该算法的源代码(https://github.com/tianzhi0549/CTPN),是基于caffe深度学习框架的。大家对tensorflow可能会更加熟悉,于是有人在github上提供了tensorflow版本的CTPN程序(https://github.com/eragonruan/text-detection-ctpn),下面介绍如何使用该程序进行文字检测。
(1)下载源代码和模型
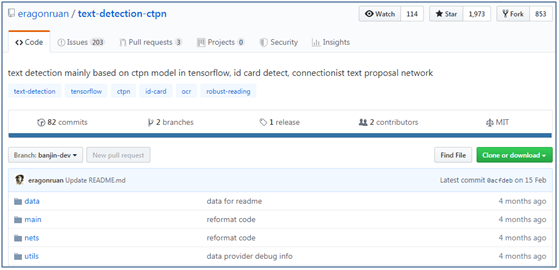
① 首先,将tensorflow版本的CTPN程序源代码下载下来,可直接下载成zip压缩包或者git克隆
git clone https://github.com/eragonruan/text-detection-ctpn.git② 接下来,进行编译安装,执行以下命令
cd utils/bbox
chmod +x make.sh
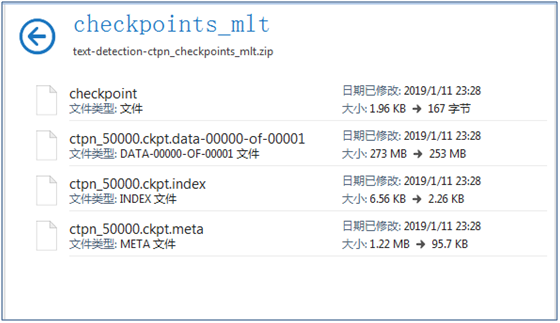
./make.sh③ 下载预训练好的模型,下载地址为 https://pan.baidu.com/s/1BNHt_9fiqRPGmEXPaxaFXw ,下载后的压缩文件为checkpoints_mlt.zip,新建目录text-detection-ctpn,将解压后将 checkpoints_mlt 文件夹放到text-detection-ctpn 目录中
(2)CTPN文本检测能力测试
将图片放到data/demo目录(默认有自带测试图片,如要检测自己的图片,则将自己的图片放于data/demo目录下),然后执行以下命令,就能使用CTPN进行文字检测
python ./main/demo.py
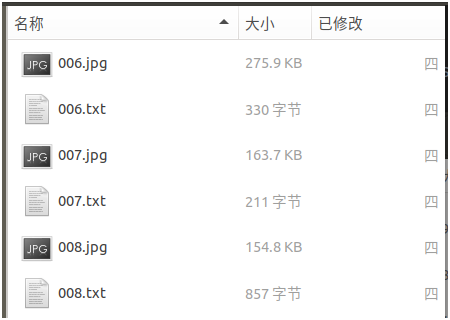
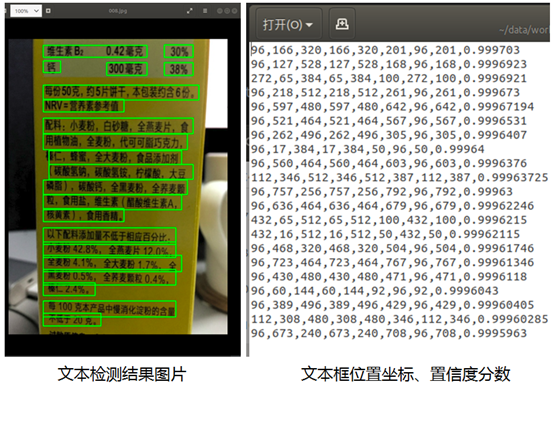
检测后的结果存放于 data/res 目录中,检测结果由图片和检测框位置、置信度分数信息两种文件组成,如下图所示:
打开文件后,如下图所示,可见已较好地将文字检测出来:
再打开其它图片,可看到检测结果如下,检测效果还不错,如下图:
(3)CTPN文本检测能力封装
通过对main/demo.py的程序稍微进行改造,就能将CTPN检测能力封装后提供给其它程序调用了,核心代码如下:
# 基于 CTPN 的文字检测方法
# 输入:图片
# 返回:文本框位置和置信度分数
def text_detect(image): with tf.get_default_graph().as_default(): # 模型参数定义 input_image = tf.placeholder(tf.float32, shape=[None, None, None, 3], name='input_image') input_im_info = tf.placeholder(tf.float32, shape=[None, 3], name='input_im_info') global_step = tf.get_variable('global_step', [], initializer=tf.constant_initializer(0), trainable=False) bbox_pred, cls_pred, cls_prob = model.model(input_image) variable_averages = tf.train.ExponentialMovingAverage(0.997, global_step) saver = tf.train.Saver(variable_averages.variables_to_restore()) with tf.Session(config=tf.ConfigProto(allow_soft_placement=True)) as sess: # 加载模型 ckpt_state = tf.train.get_checkpoint_state(checkpoint_dir) model_path = os.path.join(checkpoint_dir, os.path.basename(ckpt_state.model_checkpoint_path)) saver.restore(sess, model_path) # 预测文本框位置 img = image h, w, c = img.shape im_info = np.array([h, w, c]).reshape([1, 3]) bbox_pred_val, cls_prob_val = sess.run([bbox_pred, cls_prob], feed_dict={input_image: [img], input_im_info: im_info}) textsegs, _ = proposal_layer(cls_prob_val, bbox_pred_val, im_info) scores = textsegs[:, 0] textsegs = textsegs[:, 1:5] textdetector = TextDetector(DETECT_MODE='H') boxes = textdetector.detect(textsegs, scores[:, np.newaxis], img.shape[:2]) boxes = np.array(boxes, dtype=np.int) return boxes,scores
从以上的检测结果来看,CTPN检测法在复杂的自然场景下具有较好的检测效果。
4、复杂场景:SegLink检测法
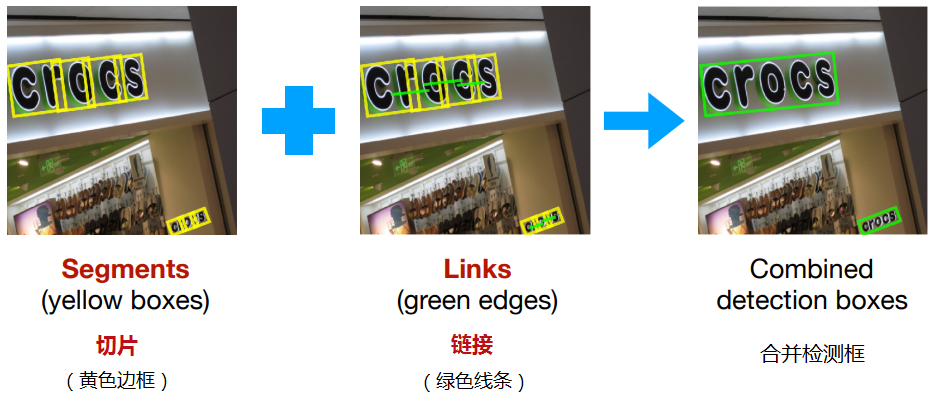
虽然CTPN在自然场景下的文字检测效果还不错,但CTPN的检测效果是基于水平方向的,对于非水平的文本检测效果并不好。在自然场景中,有很多的文本信息都是带有一定的旋转、倾斜角度的,例如街道上的广告牌。接下来介绍的SegLink检测法能够实现对旋转文本的多角度检测,该模型主要是对通过Segment(切片)、Link(链接)实现对文本的检测,示意图如下,具体的技术原理请见之前的文章(文章:大话文本检测经典模型:SegLink)
下面介绍如何使用SegLink来检测文本。
(1)下载源代码和模型
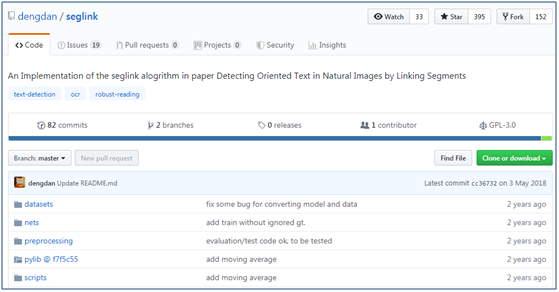
① 首先,在github上下载tensorflow版本的SegLink源代码(https://github.com/dengdan/seglink),可直接下载成zip压缩包或者git克隆
git clone https://github.com/dengdan/seglink.git② 下载pylib,下载路径为https://github.com/dengdan/pylib/tree/f7f5c5503fbb3d9593e6ac3bbf0b8508f53ee1cf ,解压后将src里面的util文件放到pylib目录下面,然后添加到环境变量,在test_seglink.py的前面加上
import sys

sys.path.append('/data/PycharmProjects/tensorflow/ocr/seglink/util')
或者在当前窗口执行以下命令,或在 /etc/profile,~/.bashrc 文件中添加以下命令
export PYTHONPATH=xx:$PYTHONPATH③ 下载预训练好的模型(基于SynthText、IC15数据集),作者提供了两个预训练好的模型seglink-384(基于384x384的图片)、seglink-512(基于512x512的图片),下载地址为 https://pan.baidu.com/s/1slqaYux
④ 安装依赖包
conda install -c cachemeorg setproctitle

#或以下命令

#pip install setproctitle
⑤ 如果python是使用了python3的,则需要进行以下修改(使用python 2.x的,请忽略)
- 修改test_seglink.py第69行、第133行、第139行、第144行、第145行、第146行,print后面加上括号
- 修改pylib/util/io_.py,修改第11行,将import cPickle as pkl修改为import pickle as pkl
- 修改pylib/util/io_.py,修改第12行,将import commands改为import subprocess as commands
- 修改pylib/util/caffe_.py,修改第29行、第46行、第47行、第50行,在print后面加上括号
- 修改pylib/util/tf.py,修改第41行,将xrange改为range
- 修改config.py,修改第129行,将xrange改为range
- 修改tf_extended/seglink.py,修改第337行、第625行、第626行、第759行、第761行,将xrange改为range
- 修改test_seglink.py,第153行,将print(util.cmd.cmd(cmd))注释掉
⑥ 修改./tf_extended/seglink.py,第808行,opencv3没有cv.BoxPoints() 函数,修改如下:
# points = cv2.cv.BoxPoints(bbox)   #opencv2.4.9

points = cv2.boxPoints(bbox)       #opencv3.1.0
(2)SegLink检测文本测试(文本框坐标)
通过运行以下命令进行测试
./scripts/test.sh 0 GPU_ID CKPT_PATH DATASET_DIR
该命令由三个参数组成,第1个表示GPU,第2个表示模型路径,第3个表示数据目录。例如我们使用刚才下载的seglink-384预训练模型,将要检测的图片放到指定的目录后进行测试(可使用自己的图片,或使用场景文字图片数据集ICDAR2015进行测试,下载地址为http://rrc.cvc.uab.es/?ch=4&com=downloads),那么执行的脚本如下:
./scripts/test.sh 0 ./models/seglink-512/model.ckpt-217867 ./dataset/ICDAR2015 /ch4_test_images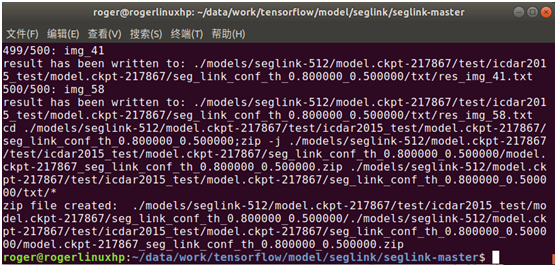
检测后,生成了图片检测出来的文本框位置(8个坐标点),并存放在txt文件中,如下图:

从这些检测的文本框位置结果来看,并不显性化,不知道在图片中的实际检测效果如何。
(3)SegLink检测文本测试(结果显性化)
为了能显性化地展现出文本检测 的图片结果,可通过以下命令进行展示,格式为
python visualize_detection_result.py \

    --image=检测的图片所在目录

    --det=经过test_seglink.py检测输出的文本框位置坐标

--output=指定将文本框位置绘制到图片上的输出目录
该命令由三个参数组成,第一个表示输入的图像,第二个表示输出检测结果的文本信息,第三个表示输出检测结果的图像
① 在visualize_detection_result.py添加环境变量
import sys

sys.path.append('/data/PycharmProjects/tensorflow/ocr/seglink/util')
② 如果python是使用了python3的,则对visualize_detection_result.py第65行,print后面加上括号
对刚才输出的检测结果信息进行可视化展示,调用的命令如下(以ICDAR2015测试图片集为例,如要使用自己的照片,请替换图片目录):
python visualize_detection_result.py www.hongchenyul.cn\

    --image=./dataset/ICDAR2015/ ch4_test_images/  \

    --det=./models/seglink-512/model.ckpt-217867/test/icdar2015_test/model.ckpt-217867/seg_link_conf_th_0.800000_0.500000/txt \

    --output=./dataset/output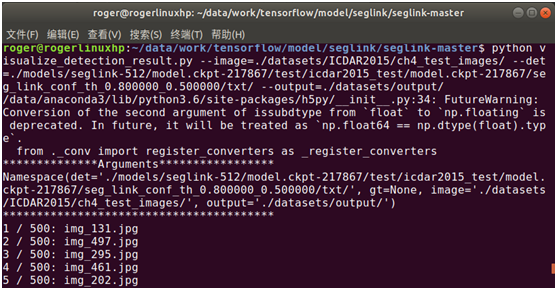
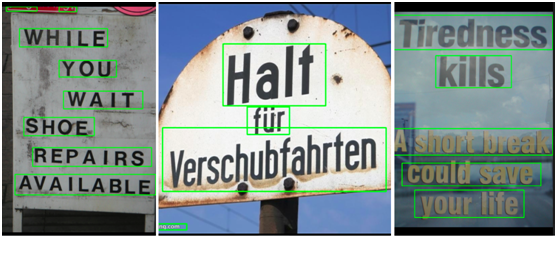
执行后,可看到直接输出了检测后的结果图片,如下图:
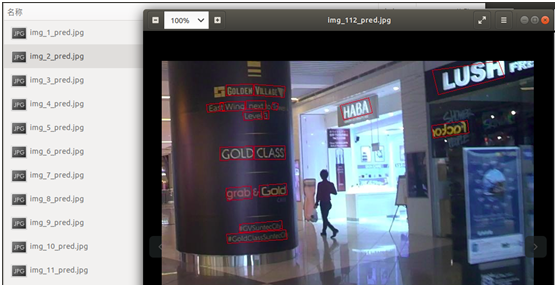
打开其它图片,检测效果如下:
从上面的检测结果来看,可较好地检测出自然场景中的文字,特别是其中还有一些带有一定倾斜或旋转角度的文字,也能检测出来。
(4)SegLink文本检测能力封装
为了方便在其它程序中调用SegLink的检测能力,在test_seglink.py, visualize_detection_result.py代码的基础上进行封装改造,就能将SegLink的检测能力进行封装提供给其它程序调用,核心代码如下:
# 基于 SegLink 的文字检测方法
# 输入:图片
# 返回:文本框位置
def text_detect(img): with tf.name_scope('eval'): with tf.variable_scope(tf.get_variable_scope(www.huishenggw.cn),reuse=True): # 模型参数 image = tf.placeholder(dtype=tf.int32, shape=[None, None, 3]) image_shape = tf.placeholder(dtype=tf.int32, shape=[3, ]) # 预处理图片 processed_image, _, _, _, _ = ssd_vgg_preprocessing.preprocess_image(image, None, None, None, None, out_shape=config.image_shape, data_format=config.data_format, is_training=False) b_image = tf.expand_dims(processed_image, axis=0) b_shape = tf.expand_dims(image_shape,www.guochengzy.com axis=0) # 预测文本框 net = seglink_symbol.SegLinkNet(inputs=b_
www.chengmingyuLe.com
image, data_format=config.data_format) bboxes_pred = seglink.tf_seglink_to_bbox(net.seg_scores, net.link_scores, net.seg_offsets, image_shape=b_shape, seg_conf_threshold=config.seg_conf_threshold, link_conf_threshold=config.link_conf_threshold) sess_config = tf.ConfigProto(log_device_placement=False, allow_soft_placement=True) sess_config.gpu_options.allow_growth =www.shengrenpt.com True saver = tf.train.Saver() if util.io.is_dir(checkpoint_dir): checkpoint = util.tf.get_latest_ckpt(checkpoint_dir) else: checkpoint = checkpoint_dir with tf.Session(config=sess_config) as sess: # 加载模型 saver.restore(sess, checkpoint) # 预测文本框 image_data = img image_bboxes = sess.run([bboxes_pred]www.chengmingyuLe.com, feed_dict={image: image_data, image_shape: image_data.shape}) bboxes = image_bboxes[0] return bboxes
5、复杂场景:EAST检测法
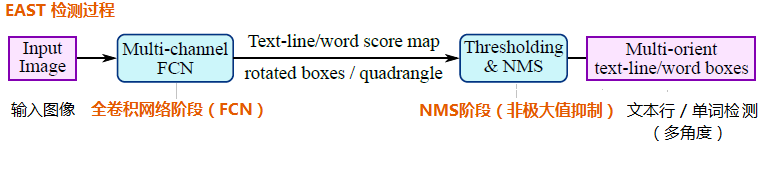
CTPN检测法、SegLink检测法是通过先预测proposals(预选框)、segment(切片),然后再回归、合并等方式实现对文本的检测,中间过程比较冗长。而接下来介绍的EAST检测法,则将中间过程缩减为只有FCN(全卷积网络)、NMS(非极大值抑制)两个阶段,而且输出结果支持文本行、单词的多个角度检测,既高效准确,又能适应多种自然应用场景,如下图所示,具体的技术原理请见之前的文章(文章:大话文本检测经典模型:EAST)
下面介绍如何使用EAST来检测文本。
(1)下载源代码和模型
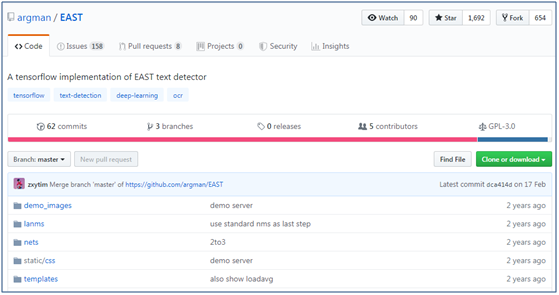
① 首先在github上下载EAST的源代码(https://github.com/argman/EAST),可直接下载成zip压缩包或者git克隆
git clone https://github.com/argman/EAST.git② 在百度网盘上下载预先训练好的模型文件(基于ICDAR 2013、ICDAR 2015数据集训练),下载地址为http://pan.baidu.com/s/1jHWDrYQ
③ 安装shapely依赖包,执行以下命令
conda install shapely

# 或执行以下命令

# pip install shapely
(2)EAST检测文本测试(demo页面)
进入EAST-master目录,然后执行以下命令,可启动demo页面
python run_demo_server.py –checkpoint_path model/east_icdar2015_resnet_v1_50_rbox/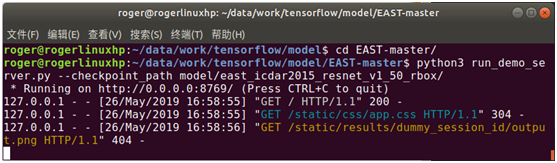
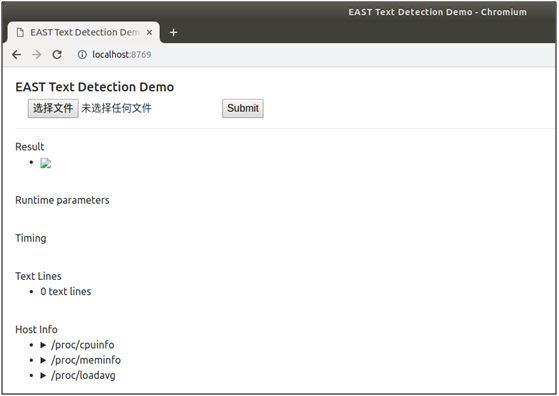
页面默认会加载输出的结果图片,首次加载时没有结果输出,所以会提示404,这不影响后面的使用。
执行命令后,即可启动web服务,在浏览器中输入http://localhost:8769,打开demo页面,如下图:
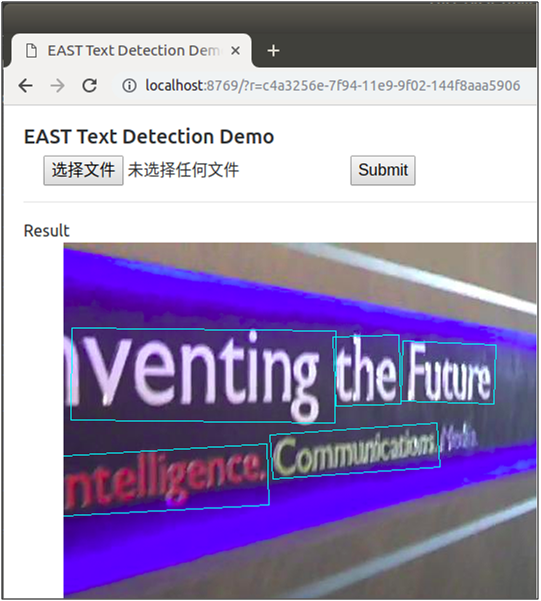
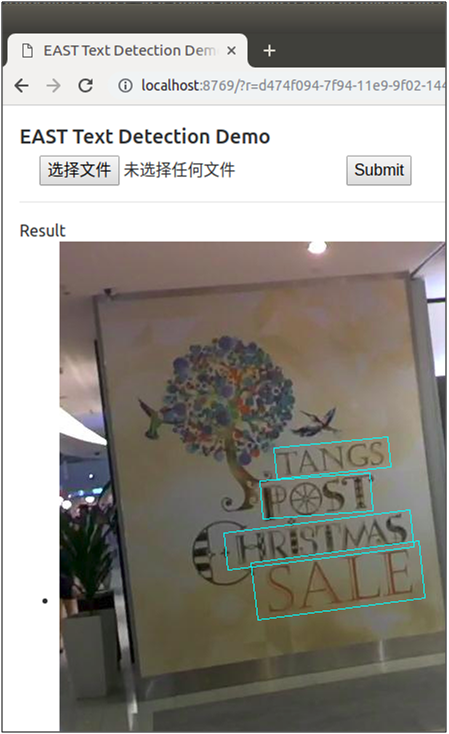
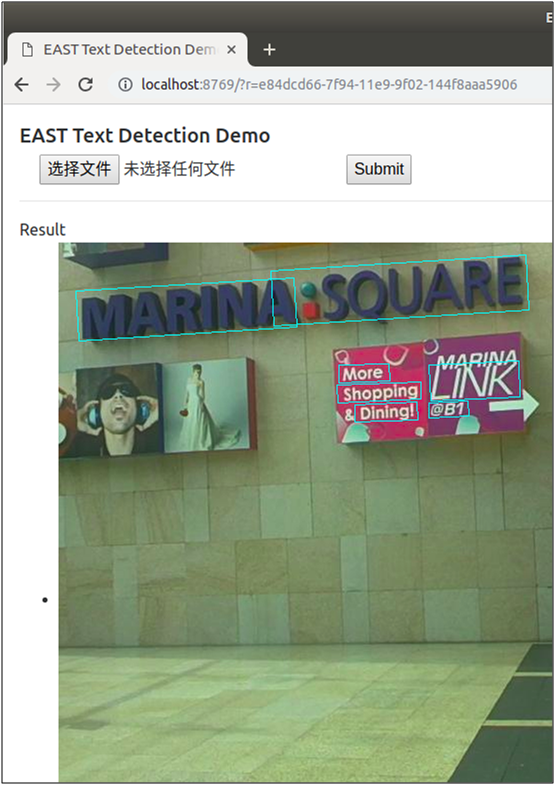
点击“选择文件”选择待检测的图片,点击“Submit”提交进行检测,检测后将在页面上返回显示检测后的图片,随机挑选了其中三张图片,检测效果如下图:
作者还很贴心地提供在在线的demo页面,让用户可直接进行体验使用,使用方式跟上面的demo页面一样,网站链接为http://east.zxytim.com/
(3)EAST检测文本测试(批量检测)
可通过命令行调用一批图片批量检测文本,还是以刚才的ICDAR图片数据集进行检测(如果要检测自己的图片,请替换数据目录),命令如下:
python eval.py –test_data_path=/data/work/tensorflow/model/seglink/ICDAR2015/ch4_test_images/ --checkpoint_path=model/east_icdar2015_resnet_v1_50_rbox/ --output_dir=/tmp/east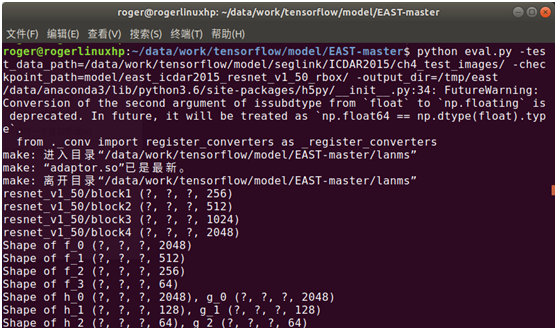
执行该命令后,将会批量读取图片进行检测,并输出检测结果,包括图片中检测到的文本框位置、检测结果框住文本后的图片,如下图所示:
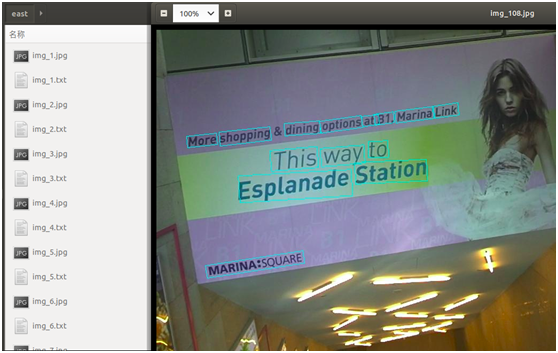
从上图也可以看出,EAST也能较好地检测出自然场景的文字,对其中一些带有旋转角度的文字也可准确地检测出来。
(4)EAST文本检测能力封装
为了方便将EAST提供给其它代码调用,通过对eval.py进行修改,封装EAST文本检测的方法,可直接供其它代码调用,代码如下:
# 基于 EAST 的文字检测方法
# 输入:图片
# 返回:文本框位置相关信息
def text_detect(img): # 模型路径 checkpoint_path='/data/PycharmProjects/tensorflow/ocr/east/model/east_icdar2015_resnet_v1_50_rbox/' # 模型参数 input_images = tf.placeholder(tf.float32, shape=[None, None, None, 3], name='input_images') global_step = tf.get_variable('global_step', [], initializer=tf.constant_initializer(0), trainable=False) f_score, f_geometry = model.model(input_images, is_training=False) variable_averages = tf.train.ExponentialMovingAverage(0.997, global_step) saver = tf.train.Saver(variable_averages.variables_to_restore()) sess = tf.Session(config=tf.ConfigProto(allow_soft_placement=True)) # 加载模型 ckpt_state = tf.train.get_checkpoint_state(checkpoint_path) model_path = os.path.join(checkpoint_path, os.path.basename(ckpt_state.model_checkpoint_path)) saver.restore(sess, model_path) # 预测文本框 im_resized, (ratio_h, ratio_w) = resize_image(img) score, geometry = sess.run( [f_score, f_geometry], feed_dict={input_images: [im_resized[:,:,::-1]]}) boxes,_ = detect(score_map=score, geo_map=geometry, timer=collections.OrderedDict([('net', 0),('restore', 0),('nms', 0)])) if boxes is not None: scores = boxes[:,8].reshape(-1) boxes = boxes[:, :8].reshape((-1, 4, 2)) boxes[:, :, 0] /= ratio_w boxes[:, :, 1] /= ratio_h text_lines = [] if boxes is not None: text_lines = [] for box, score in zip(boxes, scores): box = sort_poly(box.astype(np.int32)) if np.linalg.norm(box[0] - box[1]) < 5 or np.linalg.norm(box[3]-box[0]) < 5: continue tl = collections.OrderedDict(zip( ['x0', 'y0', 'x1', 'y1', 'x2', 'y2', 'x3', 'y3'], map(float, box.flatten()))) tl['score'] = float(score) text_lines.append(tl) ret = { 'text_lines': text_lines, } return ret
为方便介绍,以上CTPN、SegLink、EAST的文本检测能力封装时,将加载模型、文本框预测、图片绘制文本框等代码写在一起,而在实际生产使用中,一般是将其分开,在后台启动OCR服务能力时预先加载模型,然后提供核心的文本检测、识别能力,而输出结果是否将文本框绘制到图片上,则视具体需求场景而定。在生产环境中,如何更加有效地封装AI能力,可再私信进行交流。
推荐相关阅读
1、AI 实战系列
- 【AI实战】手把手教你文字识别(文字检测篇:MSER、CTPN、SegLink、EAST 等)
- 【AI实战】手把手教你文字识别(入门篇:验证码识别)
- 【AI实战】快速掌握TensorFlow(一):基本操作
- 【AI实战】快速掌握TensorFlow(二):计算图、会话
- 【AI实战】快速掌握TensorFlow(三):激励函数
- 【AI实战】快速掌握TensorFlow(四):损失函数
- 【AI实战】搭建基础环境
- 【AI实战】训练第一个模型
- 【AI实战】编写人脸识别程序
- 【AI实战】动手训练目标检测模型(SSD篇)
- 【AI实战】动手训练目标检测模型(YOLO篇)
2、大话深度学习系列
- 【精华整理】CNN进化史
- 大话文本识别经典模型(CRNN)
- 大话文本检测经典模型(CTPN)
- 大话文本检测经典模型(SegLink)
- 大话文本检测经典模型(EAST)
- 大话卷积神经网络(CNN)
- 大话循环神经网络(RNN)
- 大话深度残差网络(DRN)
- 大话深度信念网络(DBN)
- 大话CNN经典模型:LeNet
- 大话CNN经典模型:AlexNet
- 大话CNN经典模型:VGGNet
- 大话CNN经典模型:GoogLeNet
- 大话目标检测经典模型:RCNN、Fast RCNN、Faster RCNN
- 大话目标检测经典模型:Mask R-CNN
3、AI 杂谈
- 27种深度学习经典模型
- 浅说“迁移学习”
- 什么是“强化学习”
- AlphaGo算法原理浅析
- 大数据究竟有多少个V
4、大数据超详细系列
- Apache Hadoop 2.8 完全分布式集群搭建超详细教程
- Apache Hive 2.1.1 安装配置超详细教程
- Apache HBase 1.2.6 完全分布式集群搭建超详细教程
- 离线安装Cloudera Manager 5和CDH5(最新版5.13.0)超详细教程