Docker installation and deployment of ORACLE 11g database
background:
The latest data access module in the data center is being developed, in which many data types are designed, including ORACLE. Because it is for testing, I want to deploy the test quickly, so I use Docker to deploy Oracle. It is not recommended to use Docker for installation in the production environment.
1. Install Docker
The first choice is to ensure that Docker has been deployed on your machine. Centos7 installs and deploys docker containers https://blog.csdn.net/zhangli_li520/article/details/126847001
2. Pull the oracle Docker image
The oracle11g image file is very large, so you have to wait for a while.
[root@bigdata01 ~]# docker pull registry.cn-hangzhou.aliyuncs.com/helowin/oracle_11g
Using default tag: latest
latest: Pulling from helowin/oracle_11g
[DEPRECATION NOTICE] Docker Image Format v1, and Docker Image manifest version 2, schema 1 support will be removed in an upcoming release. Suggest the author of registry.cn-hangzhou.aliyuncs.com/helowin/oracle_11g:latest to upgrade the image to the OCI Format, or Docker Image manifest v2, schema 2. More information at https://docs.docker.com/go/deprecated-image-specs/
ed5542b8e0e1: Already exists
a3ed95caeb02: Already exists
1e8f80d0799e: Already exists
Digest: sha256:4c12b98372dfcbaafcd9564a37c8d91456090a5c6fb07a4ec18270c9d9ef9726
Status: Image is up to date for registry.cn-hangzhou.aliyuncs.com/helowin/oracle_11g:latest
registry.cn-hangzhou.aliyuncs.com/helowin/oracle_11g:latest
View the downloaded image
[root@bigdata01 ~]# docker images
REPOSITORY                                             TAG                                 IMAGE ID       CREATED         SIZE
registry.cn-hangzhou.aliyuncs.com/helowin/oracle_11g   latest                              3fa112fd3642   8 years ago     6.85GB
3. Create a startup container
[root@bigdata01 ~]# docker run -d -p 1521:1521 --name oracle11g registry.cn-hangzhou.aliyuncs.com/helowin/oracle_11g
95469043158a49b15ce1d290ffe0c23413b860aeed20eb7b6da24359fd3262e4
-d: means to start the container in the background.
-p 1521:1521: Maps the host's port to the container's port. Here, the host's 1521 port is mapped to the container's 1521 port, which is used to access the Oracle database.
–name oracle11g: Specify a name for the container, here is "oracle11g".
View container
[root@bigdata01 ~]# docker ps
CONTAINER ID   IMAGE                                                  COMMAND                   CREATED         STATUS         PORTS                                                  NAMES
95469043158a   registry.cn-hangzhou.aliyuncs.com/helowin/oracle_11g   "/bin/sh -c '/home/o…"   7 minutes ago   Up 2 minutes   0.0.0.0:1521->1521/tcp, :::1521->1521/tcp              oracle11g
4. Enter the Oracle container
[root@bigdata01 ~]# docker exec -it 95469043158a bash
# 切换 至 root 用户
[oracle@95469043158a /]$ su root
Password: helowin
# 编辑环境变量文件 profile
[root@95469043158a /]# vi /etc/profile
# 在文件末尾加上
export ORACLE_HOME=/home/oracle/app/oracle/product/11.2.0/dbhome_2
export ORACLE_SID=helowin
export PATH=$ORACLE_HOME/bin:$PATH
# 保存退出
# source 一下使得环境变量生效
[root@95469043158a /]# source /etc/profile
# 编辑环境变量文件 .bashrc
[root@95469043158a /]# vi /home/oracle/.bashrc
# 在文件末尾加上
export ORACLE_HOME=/home/oracle/app/oracle/product/11.2.0/dbhome_2
export ORACLE_SID=helowin
export PATH=$ORACLE_HOME/bin:$PATH
# 保存退出
# source 一下使得环境变量生效
[root@95469043158a /]# source /home/oracle/.bashrc
5. Set up the Oracle database
[root@95469043158a /]# su oracle
[oracle@95469043158a ~]$ sqlplus /nolog

SQL*Plus: Release 11.2.0.1.0 Production on Wed Mar 13 17:25:39 2024

Copyright (c) 1982, 2009, Oracle.  All rights reserved.
# 使用 SYSDBA 角色登录,该角色具有最高级别的数据库权限
SQL> CONNECT / AS SYSDBA;
Connected.
# 修改 system 密码
SQL> alter user system identified by oracle;
# 创建表空间
SQL> Create TableSpace test_tablespace_zl
SQL> DataFile '/home/oracle/app/oracle/oradata/helowin/test_tablespace_zl.dbf'
SQL> Size 100m
SQL> Autoextend on;
# 查看表空间
SQL> select name from v$TABLESPACE;
NAME
SYSTEM
SYSAUX
UNDOTBS1
USERS
EXAMPLE
TEMP
TEST_TABLESPACE_ZL
# 创建用户 分配表空间
SQL> CREATE USER zhangli
SQL> IDENTIFIED BY zhangli
SQL> DEFAULT TABLESPACE test_tablespace_zl
SQL> TEMPORARY TABLESPACE TEMP;

# 有了用户,要想使用用户账号管理自己的表空间,还得给它分权限:
SQL> GRANT CONNECT TO zhangli;
SQL> GRANT RESOURCE TO zhangli;
#  dba为最高级权限,可以创建数据库,表等。
SQL> GRANT dba TO zhangli;

# 查看用户
SQL> select * from dba_users;

# 创建表: student
SQL> create table zhangli.student (
SQL>   sno         number(10) constraint pk_si_sno primary key,
SQL>   sname       varchar2(10),
SQL>   sex         varchar2(2),
SQL>   create_date date
SQL> );

# 添加注释
SQL> comment on table zhangli.student is '学生信息表';
SQL> comment on column zhangli.student.sno is '学号';
SQL> comment on column zhangli.student.sname is '姓名';
SQL> comment on column zhangli.student.sex is '性别';
SQL> comment on column zhangli.student.create_date is '创建日期';

# 给其他用户授权 student 表的 权限
SQL> grant select, insert, update, delete on zhangli.student to other_user;

# 插入数据
SQL> insert into zhangli.student (sno, sname, sex, create_date)values (1, '张三', '1', sysdate);
SQL> insert into zhangli.student (sno, sname, sex, create_date)values (2, '李四', '2', sysdate);
SQL> insert into zhangli.student (sno, sname, sex, create_date)values (3, '王五', '1', sysdate);
SQL> insert into zhangli.student (sno, sname, sex, create_date)values (4, '赵六', '2', sysdate);
SQL> commit;
# 修改数据
SQL> update zhangli.student si
SQL> set si.sex = '2'
SQL> where si.sno = 3;
SQL> commit;

# 删除数据
SQL> delete zhangli.student si where si.sno = 1;
SQL> commit;

# 查询数据
SQL> select * from zhangli.student;
6. Set up remote connection
# 修改监听配置文件 tnsnames.ora , listener.ora 将文件里的 HOST 改成 访问的ip地址  测试环境 改 0.0.0.0 全部方通,现网环境需要注意
[oracle@95469043158a ~]$ cd /home/oracle/app/oracle/product/11.2.0/dbhome_2/network/admin
[oracle@95469043158a admin]$ ls
listener.ora  samples  shrept.lst  sqlnet.ora  tnsnames.ora
[oracle@95469043158a admin]$ vi listener.ora
# listener.ora Network Configuration File: /home/oracle/app/oracle/product/11.2.0/dbhome_2/network/admin/listener.ora
# Generated by Oracle configuration tools.

LISTENER =
  (DESCRIPTION_LIST =
    (DESCRIPTION =
      (ADDRESS = (PROTOCOL = IPC)(KEY = EXTPROC1521))
      (ADDRESS = (PROTOCOL = TCP)(HOST =0.0.0.0 )(PORT = 1521))
    )
  )

ADR_BASE_LISTENER = /home/oracle/app/oracle

[oracle@95469043158a admin]$ vi tnsnames.ora
# tnsnames.ora Network Configuration File: /home/oracle/app/oracle/product/11.2.0/dbhome_2/network/admin/tnsnames.ora
# Generated by Oracle configuration tools.

LISTENER_HELOWIN =
  (ADDRESS = (PROTOCOL = TCP)(HOST = 0.0.0.0)(PORT = 1521))


HELOWIN =
  (DESCRIPTION =
    (ADDRESS = (PROTOCOL = TCP)(HOST = 0.0.0.0)(PORT = 1521))
    (CONNECT_DATA =
      (SERVER = DEDICATED)
      (SERVICE_NAME = helowin)
    )
  )

# 修改完重启 oracle 容器
[root@bigdata01 ~]# docker restart 95469043158a
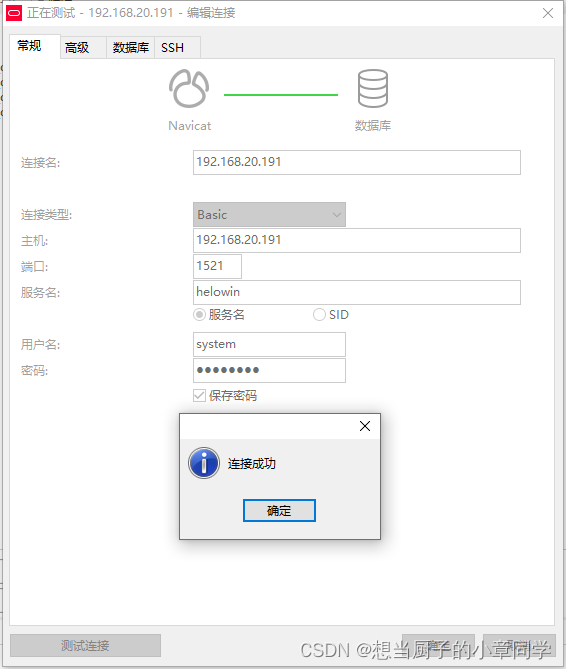
7. Use client tools to connect
Fill in the user name, password, service name and other parameters, click Test Connection, and the connection is successful.