Getting started with Keras
-
- 1.Environment configuration
- 2. Build a simple network
- 3. Multiple linear regression
- 4. Full link model handwritten digit recognition model
- 5. Optimize the handwritten digit recognition model
- 6. Logistic regression: Titanic determines life and death
- 7. Add convolutional layer for handwritten digit recognition
- 8. Practice multi-category recognition of cifar10 data set with convolutional network
- 9.CNN convolutional network example cat and dog data set classification
- 10. Model saving and loading
Learning video: A paper code collection website from bilibili gan: github
1.Environment configuration
Create a new virtual environment under anaconda.
Configuration:
tensorflow needs to be specified as version 2.0. Note that the versions of tensorflow and keras must correspond. Check them accordingly.
pip install tensorflow==2.0
pip install keras==2.3.1
2. Build a simple network
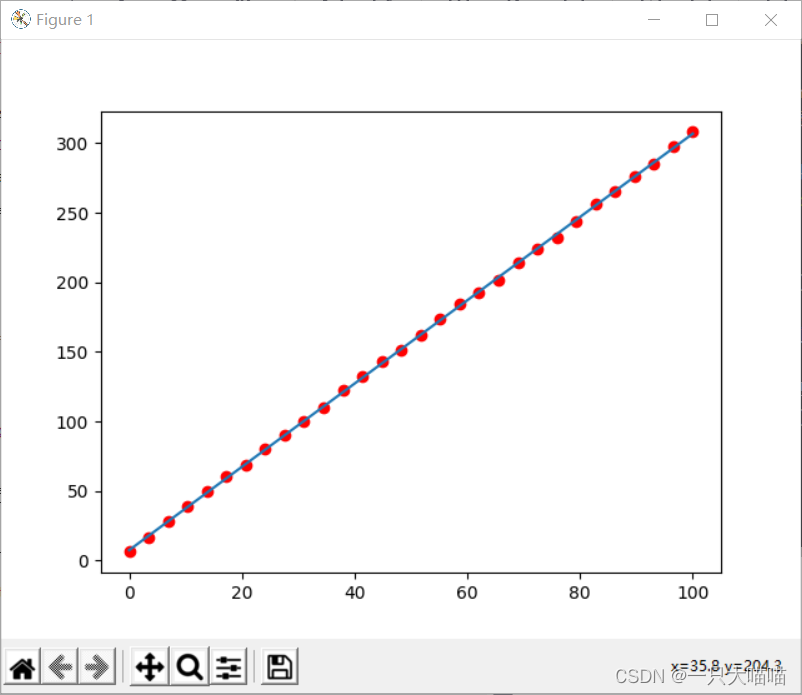
Build a network to get the formula y=3*x+7, which is a linear regression.
In addition to the above environment configuration, you also need to add
pip install matplotlib
import keras
import numpy as np
import matplotlib.pyplot as plt

x = np.linspace(0,100,30)#在0-100之间任取30个数
y=3*x+7+np.random.randn(30)

model = keras.Sequential()#初始化模型,顺序模型,里面的模块如同火车一样一节一节的
from keras import layers
model.add(layers.Dense(1,input_dim=1))#Dense(输出维度y1,y2...,y3,输入维度x1,x2...xn)全链接层y=ax+b
model.summary()#展示模型参数

#编译模型,确定优化算法,优化目标,确定损失函数,loss是什么,这么优化loss,找loss最小值
model.compile(optimizer='adam',loss='mse')#mse均方差

#训练模型
model.fit(x,y,epochs=30000)

z=model.predict([150])#预测y=150*a+b
print(z)
plt.scatter(x,y,c="r")#可视化原有数据集
plt.plot(x,model.predict(x))#可视化函数
plt.show()#可视化展示
3. Multiple linear regression
Multiple linear regression formula: Y = W1 X1+W2 X2+B
3.1 Prepare data set
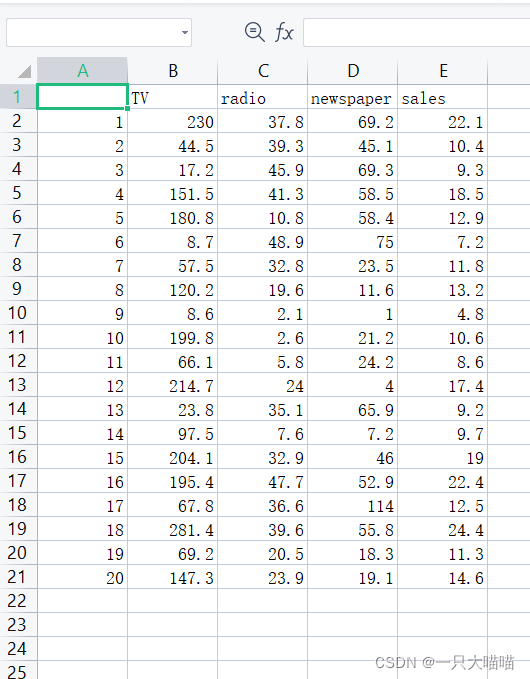
First prepare the data set. For example, in the figure below sales=a TV+b radio+c*newspaper+d,
find the relationship between sales volume and each advertisement [extraction code: 1024]
3.2 Environment configuration
Based on the environment configuration of 1 and 2, add:
pip install pandas
3.2 Code
It’s similar to the one-yuan code, but you can learn more about how to load external data sets.
import keras
import numpy as np
import matplotlib.pyplot as plt
import pandas as pd #pandas是很好用的数据预处理工具
data=pd.read_csv('D:/workspaceForMine/ForGan/ForKeras/data.csv')
#这是excel文件,注意WPS编辑下,可能会导致错误发生,最好使用office,没办法就在WPS保存中选择csv格式,不要直接修改后缀名
z=data.head()
print(z)#打印前几行
x=data[data.columns[1:-1]]#取前三列为x数组
y=data.iloc[:,-1]#取最后一列为y数组
from keras import layers
model= keras.Sequential()
model.add(layers.Dense(1,input_dim=3))#输出1维度,输入维度为3 y_pred=w1*x1+w2*x2+w3*x3+b
model.summary()
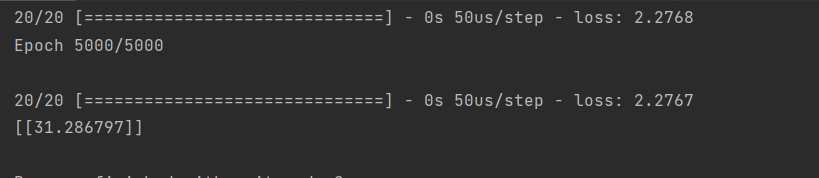
model.compile(optimizer='adam',loss='mse')#msejunfangc
model.fit(x,y,epochs=5000)
w=model.predict(pd.DataFrame([[300,68,60]]))
print(w)
3.4 Results
4. Full link model handwritten digit recognition model
Hahahahahaha, this is already similar to Holle World in deep learning.
This model and the above can learn softmax classification and its commonly used sparse_categorical_crossentropy (use this when the labels are arranged sequentially) and the loss cross entropy of categorical_crossentropy
mnist is directly in keras and does not need to be downloaded first.
import keras
from keras import layers
import matplotlib.pyplot as plt
import numpy as np
import keras.datasets.mnist as mnist #手写数据集是直接内嵌在keras里面的,要用会直接下载
(train_image,train_label),(test_image,test_label)=mnist.load_data()#加载keras里面的数据集,可能会慢,网上现下
print(train_image.shape)#(60000,28,28)由60000张28*28的图片构成
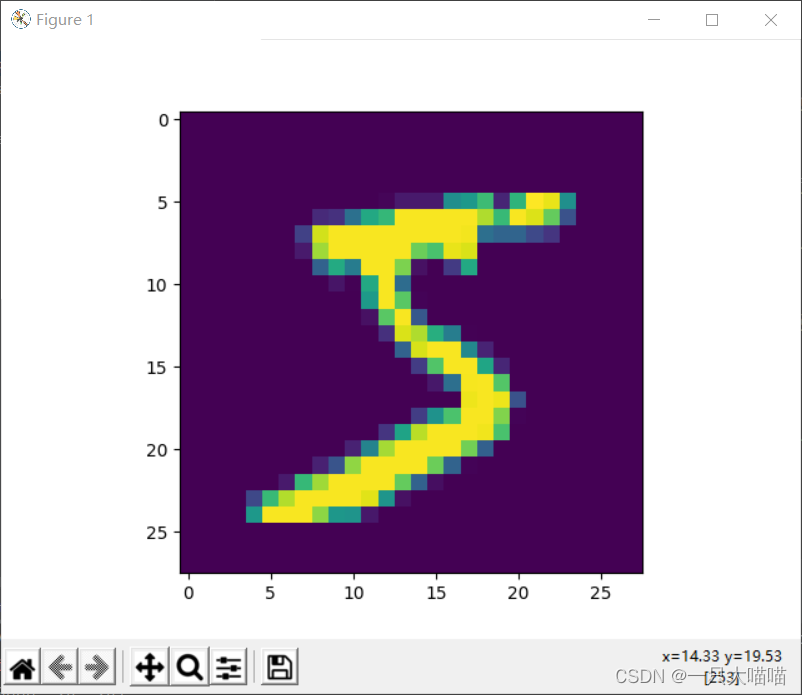
#plt.imshow(train_image[0])#显示第一张图片
plt.show()#plt.imshow()函数负责对图像进行处理,并显示其格式,而plt.show()则是将plt.imshow()处理后的函数显示出来
print(train_label[0])#k看看第一张的标签是啥
model = keras.Sequential()#初始化模型,顺序模型
model.add(layers.Flatten())#展平(60000.28.28)-》(60000,25*25)
model.add(layers.Dense(64,activation='relu'))#28*28链接到64
model.add(layers.Dense(10,activation='softmax'))
model.compile(optimizer='adam',loss='sparse_categorical_crossentropy',metrics=['acc']
)
model.fit(train_image,train_label,epochs=50,batch_size=512)
model.evaluate(test_image,test_label)#输入数据和标签,输出损失和精确度.第一个返回值是损失(loss),第二个返回值是准确率(acc
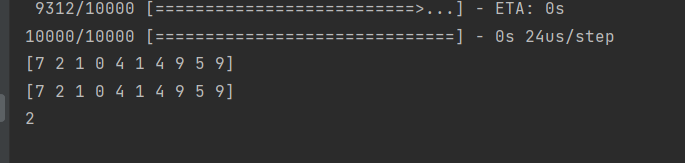
y=np.argmax(model.predict(test_image[:10]),axis=1)#测试测试集的前十张,输出1-10,十个数的可能概率
print(y)
print(test_label[:10])#打印测试集的前十个原来的标签
print(1+1)
5. Optimize the handwritten digit recognition model
General principles for building a network
1. Increase network capacity until overfitting
2. Take measures to suppress overfitting
3. Continue to increase network capacity until overfitting
Common methods for optimizing models include: adding more fully connected layers and increasing fully connected layer parameters.
import keras
from keras import layers
import matplotlib.pyplot as plt
import numpy as np
import keras.datasets.mnist as mnist #手写数据集是直接内嵌在keras里面的,要用会直接下载

(train_image,train_label),(test_image,test_label)=mnist.load_data()#加载keras里面的数据集,可能会慢,网上现下
print(train_image.shape)#(60000,28,28)由60000张28*28的图片构成
plt.imshow(train_image[0])#显示第一张图片
#plt.show()#plt.imshow()函数负责对图像进行处理,并显示其格式,而plt.show()则是将plt.imshow()处理后的函数显示出来
print(train_label[0])#k看看第一张的标签是啥
model = keras.Sequential()#初始化模型,顺序模型
model.add(layers.Flatten())#展平(60000.28.28)-》(60000,25*25)
model.add(layers.Dense(64,activation='relu'))#28*28链接到64
model.add(layers.Dense(64,activation='relu'))
model.add(layers.Dense(64,activation='relu'))
model.add(layers.Dense(10,activation='softmax'))

model.compile(optimizer='adam',loss='sparse_categorical_crossentropy',metrics=['acc']
              )

model.fit(train_image,train_label,epochs=50,batch_size=512,validation_data=(test_image,test_label
                                                                            ))

print(model.evaluate(test_image,test_label))#输入数据和标签,输出损失和精确度.第一个返回值是损失(loss),第二个返回值是准确率(acc
y=np.argmax(model.predict(test_image[:10]),axis=1)#测试测试集的前十张,输出1-10,十个数的可能概率
print(y)
print(test_label[:10])#打印测试集的前十个原来的标签
print(1+1)
6. Logistic regression: Titanic determines life and death
The difference from the above is that there is a lot of data preprocessing.
import keras
import pandas as pd
from keras import layers
import matplotlib.pyplot as plt
import numpy as np
data=pd.read_csv('D:/workspaceForMine/ForGan/ForKeras/Titanic/train.csv')
#print(data.head(5))
#print(data.info)
#y是是否获救
y=data.Survived
#x将有影响因素的类别提出来
x=data[['Pclass','Sex','Age','SibSp','Parch','Fare','Embarked']]
#查看Embarked有几类
print(x.Embarked.unique())
#读热编码:把非数值的数据数值化
x.loc[:,'Embarked_S']=(x.Embarked =='S').astype('int')
x.loc[:,'Embarked_C']=(x.Embarked =='C').astype('int')
x.loc[:,'Embarked_Q']=(x.Embarked =='Q').astype('int')

x.loc[:,'Sex']=(x.Sex =='male').astype('int')

x.loc[:,'Pclass1']=(x.Pclass==1).astype('int')
x.loc[:,'Pclass2']=(x.Pclass==2).astype('int')
x.loc[:,'Pclass3']=(x.Pclass==3).astype('int')

del x['Embarked']

del x['Pclass']
#填充数据中的Nan值
x['Age']=x.Age.fillna(x.Age.mean())
print(x)

#准备模型
model = keras.Sequential()
from keras import layers
model.add(layers.Dense(1,input_dim=11,activation='sigmoid'))
model.compile(optimizer='adam',loss='binary_crossentropy',metrics=['acc'])
history=model.fit(x,y,epochs=300)

plt.plot(range(300),history.history.get('acc'))
plt.show()
history.history.get('loss')
7. Add convolutional layer for handwritten digit recognition
CNN basics:
CNN work: take an image and let it go through the convolution layer, non-linear layer, pooling layer, pooling (downsampling layer), and fully connected layer, and finally get the output
Convolution is to apply a convolution kernel to all points of a certain Zhang Liang, and generate a filtered tensor by sliding the convolution kernel on the input tensor.
When an image containing certain features passes through a convolution kernel, some convolution kernels are activated and output specific signals.
When training images of cats and dogs, the convolution kernel will be trained. The result of the training is that the convolution kernel will be sensitive to different features of cats and dogs and output different results, thereby achieving the purpose of image recognition.
cnn architecture:
convolution layer: conv2d
non-linear transformation layer: relu/sigmoid/tanh
pooling layer: pool2d
fully connected layer: w*x+b
Without these layers, it is difficult for the model to match complex patterns because the network will have Multi-information filling, the function of these layers is to highlight important information and reduce noise
Three parameters of conv2d:
①ksize kernel size
② strides the span of convolution kernel movement
③padding edge filling
conv2d: image input shape: batch, height, width, channels
Pooling layer layers.MaxPooling2D() maximum pooling
Dimension increase:
a=np.array([1,2,3]) #a->[1,2,3] a.adim->1
np.expand_dims(a,axis=-1)#Dimension increase, in Dimension a->([1],[2],[3]) a.adim->2 on the last dimension
import keras
from keras import layers
import matplotlib.pyplot as plt
import numpy as np
import keras.datasets.mnist as mnist #手写数据集是直接内嵌在keras里面的,要用会直接下载

(train_image,train_label),(test_image,test_label)=mnist.load_data()#加载keras里面的数据集,可能会慢,网上现下

train_image=np.expand_dims(train_image,axis=-1)#增加维度将(6000,28,28)—-》(6000,28,28,1 )
test_image=np.expand_dims(test_image,axis=-1)
print(train_image.shape)

model=keras.Sequential()
model.add(layers.Conv2D(64,(3,3),activation='relu',input_shape=(28,28,1)))
model.add(layers.Conv2D(64,(3,3),activation='relu'))
model.add(layers.MaxPooling2D())
model.add(layers.Conv2D(64,(3,3),activation='relu',input_shape=(28,28,1)))
model.add(layers.Conv2D(64,(3,3),activation='relu'))
model.add(layers.MaxPooling2D())
model.add(layers.Flatten())
model.add(layers.Dense(256,activation='relu'))
model.add(layers.Dropout(0.5))
model.add(layers.Dense(10,activation='softmax'))

model.compile(optimizer='adam',loss='sparse_categorical_crossentropy',metrics=['acc'])
model.fit(train_image,train_label,epochs=50,batch_size=512,validation_data=(test_image,test_label))
y=np.argmax(model.predict(test_image[:10]),axis=1)#测试测试集的前十张,输出1-10,十个数的可能概率
print(y)
print(test_label[:10])#打印测试集的前十个原来的标签

8. Practice multi-category recognition of cifar10 data set with convolutional network
It is similar to the handwriting data set recognition above. It is a personal exercise
with one more normalization in preprocessing.
import keras
from keras import layers
import matplotlib.pyplot as plt
import numpy as np


cifar=keras.datasets.cifar10#cifar10是直接内嵌在keras里面的,要用会直接下载
(train_image,train_label),(test_image,test_label)=cifar.load_data()#加载keras里面的数据集,可能会慢,网上现下\

print(train_image.shape)
#plt.imshow(train_image[100])
#plt.show()
#归一化
train_image=train_image/255
test_image=test_image/255


model=keras.Sequential()
model.add(layers.Conv2D(64,(3,3),activation='relu',input_shape=(32,32,3)))
model.add(layers.Conv2D(64,(3,3),activation='relu'))
model.add(layers.MaxPooling2D())
model.add(layers.Flatten())
model.add(layers.Dense(256,activation='relu'))
model.add(layers.Dropout(0.5))
model.add(layers.Dense(10,activation='softmax'))

model.compile(optimizer='adam',loss='sparse_categorical_crossentropy',metrics=['acc'])
model.fit(train_image,train_label,epochs=50,batch_size=512,validation_data=(test_image,test_label))
y=np.argmax(model.predict(test_image[:10]),axis=1)#测试测试集的前十张,输出1-10,十个数的可能概率
print(y)
9.CNN convolutional network example cat and dog data set classification
9.1 Reading and preprocessing of images
Cat and Dog Data Set [Verification Code: 1024]
The function of the following code is to transfer the images from the original data set to a self-created directory. If it is run once and the directory is created, an error will be reported when running the second time. There is an existing directory. At this time, just comment out the few lines of code that create the directory.
import keras
import os
import shutil
from keras import layers
import matplotlib.pyplot as plt
import numpy as np

base_dir='./dataset/cat_dog'
train_dir=os.path.join(base_dir,'train')
train_dir_dog=os.path.join(train_dir,'dog')
train_dir_cat=os.path.join(train_dir,'cat')

test_dir=os.path.join(base_dir,'test')
test_dir_dog=os.path.join(test_dir,'dog')
test_dir_cat=os.path.join(test_dir,'cat')

#创建数据集目录
os.mkdir(base_dir)
os.mkdir(train_dir)
os.mkdir(train_dir_dog)
os.mkdir(train_dir_cat)
os.mkdir(test_dir)
os.mkdir(test_dir_dog)
os.mkdir(test_dir_cat)

dc_dir ='D:/workspaceForMine/ForGan/ForKeras/CatDog/dc/train'

#将原本数据集的图片放入准备的数据集
fnames = ['cat.{}.jpg'.format(i) for i in range(1000)]
for fname in fnames:
    s=os.path.join(dc_dir,fname)
    d=os.path.join(train_dir_cat,fname)
    shutil.copyfile(s,d)

fnames = ['cat.{}.jpg'.format(i) for i in range(1000,1500)]
for fname in fnames:
    s=os.path.join(dc_dir,fname)
    d=os.path.join(test_dir_cat,fname)
    shutil.copyfile(s,d)

fnames = ['dog.{}.jpg'.format(i) for i in range(1000)]
for fname in fnames:
    s=os.path.join(dc_dir,fname)
    d=os.path.join(train_dir_dog,fname)
    shutil.copyfile(s,d)

fnames = ['dog.{}.jpg'.format(i) for i in range(1000,1500)]
for fname in fnames:
    s=os.path.join(dc_dir,fname)
    d=os.path.join(test_dir_dog,fname)
    shutil.copyfile(s,d)
9.2 Complete training code
import keras
import os
import shutil
from keras import layers
import matplotlib.pyplot as plt
import numpy as np

base_dir='./dataset/cat_dog'
train_dir=os.path.join(base_dir,'train')
train_dir_dog=os.path.join(train_dir,'dog')
train_dir_cat=os.path.join(train_dir,'cat')

test_dir=os.path.join(base_dir,'test')
test_dir_dog=os.path.join(test_dir,'dog')
test_dir_cat=os.path.join(test_dir,'cat')

if not os.path.exists(base_dir):
    os.mkdir(base_dir)
    os.mkdir(train_dir)
    os.mkdir(train_dir_dog)
    os.mkdir(train_dir_cat)
    os.mkdir(test_dir)
    os.mkdir(test_dir_dog)
    os.mkdir(test_dir_cat)

    dc_dir = 'D:/workspaceForMine/ForGan/ForKeras/CatDog/dc/train'

    # 将原本数据集的图片放入准备的数据集
    fnames = ['cat.{}.jpg'.format(i) for i in range(1000)]
    for fname in fnames:
        s = os.path.join(dc_dir, fname)
        d = os.path.join(train_dir_cat, fname)
        shutil.copyfile(s, d)

    fnames = ['cat.{}.jpg'.format(i) for i in range(1000, 1500)]
    for fname in fnames:
        s = os.path.join(dc_dir, fname)
        d = os.path.join(test_dir_cat, fname)
        shutil.copyfile(s, d)

    fnames = ['dog.{}.jpg'.format(i) for i in range(1000)]
    for fname in fnames:
        s = os.path.join(dc_dir, fname)
        d = os.path.join(train_dir_dog, fname)
        shutil.copyfile(s, d)

    fnames = ['dog.{}.jpg'.format(i) for i in range(1000, 1500)]
    for fname in fnames:
        s = os.path.join(dc_dir, fname)
        d = os.path.join(test_dir_dog, fname)
        shutil.copyfile(s, d)

from keras.preprocessing.image  import  ImageDataGenerator
train_datagen =ImageDataGenerator(rescale=1/255)#rescale=1/255归一化
test_datagen =ImageDataGenerator(rescale=1/255)

train_generator=train_datagen.flow_from_directory(train_dir,target_size=(200,200),batch_size=20,class_mode='binary')
test_generator=train_datagen.flow_from_directory(test_dir,target_size=(200,200),batch_size=20,class_mode='binary')

model=keras.Sequential()

model.add(layers.Conv2D(64,(3*3),activation="relu",input_shape=(200,200,3)))
model.add(layers.Conv2D(64,(3*3),activation="relu"))
model.add(layers.MaxPooling2D())
model.add(layers.Dropout(0.25))#Dropout层防止过拟合
model.add(layers.Conv2D(64,(3*3),activation="relu"))
model.add(layers.Conv2D(64,(3*3),activation="relu"))
model.add(layers.MaxPooling2D())
model.add(layers.Dropout(0.25))
model.add(layers.Conv2D(64,(3*3),activation="relu"))
model.add(layers.Conv2D(64,(3*3),activation="relu"))
model.add(layers.MaxPooling2D())
model.add(layers.Dropout(0.25))

model.add(layers.Flatten())
model.add(layers.Dense(256,activation='relu'))
model.add(layers.Dropout(0.5))
model.add(layers.Dense(1,activation='sigmoid'))

model.compile(optimizer='adam',loss='binary_crossentropy',metrics=['acc'])

history=model.fit_generator(train_generator,epochs=30,steps_per_epoch=100,validation_data=test_generator,validation_steps=50)#steps_per_epoch训练多少步是一个epoch
9.3 Image enhancement
If the amount of data in the data set is too small, it will cause the model to be overfitted. If the data set cannot be increased, you can consider image enhancement operations
. Use the image enhancement parameters in the ImageDataGenerator function.
train_daragen=ImageDataGenerator(rescale=1/255,rotation_range=40,width_shift_range=0.2)
In practical applications, it is better to increase the real data set, the effect will be much better
10. Model saving and loading
10.1 Loading and saving the entire model
The entire model:
① The structure of the model, allowing you to recreate the model
② The weights of the model
③ Model configuration items (loss function, optimizer)
④ Optimizer status, allowing you to continue training from where you ended last time
Taking the CNN network of the handwriting model as an example,
the most important thing is actually two sentences.
import h5py
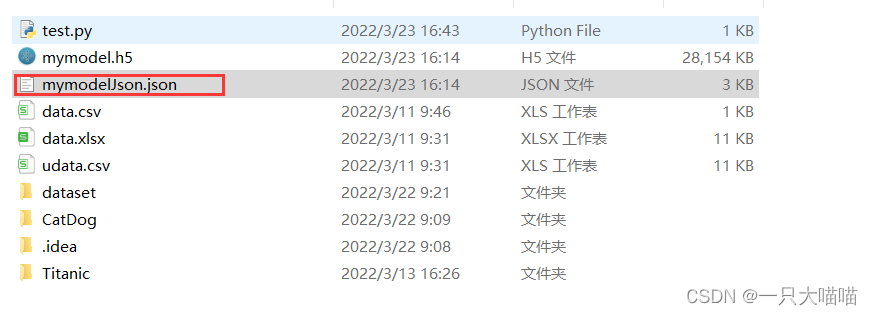
model.save('mymodel.h5')
1. Save the output model
import keras
from keras import layers
import matplotlib.pyplot as plt
import numpy as np
import keras.datasets.mnist as mnist #手写数据集是直接内嵌在keras里面的,要用会直接下载
(train_image,train_label),(test_image,test_label)=mnist.load_data()#加载keras里面的数据集,可能会慢,网上现下
train_image=np.expand_dims(train_image,axis=-1)#增加维度将(6000,28,28)—-》(6000,28,28,1 )
test_image=np.expand_dims(test_image,axis=-1)
print(train_image.shape)
model=keras.Sequential()
model.add(layers.Conv2D(64,(3,3),activation='relu',input_shape=(28,28,1)))
model.add(layers.Conv2D(64,(3,3),activation='relu'))
model.add(layers.MaxPooling2D())
model.add(layers.Flatten())
model.add(layers.Dense(256,activation='relu'))
model.add(layers.Dropout(0.5))
model.add(layers.Dense(10,activation='softmax'))
model.compile(optimizer='adam',loss='sparse_categorical_crossentropy',metrics=['acc'])
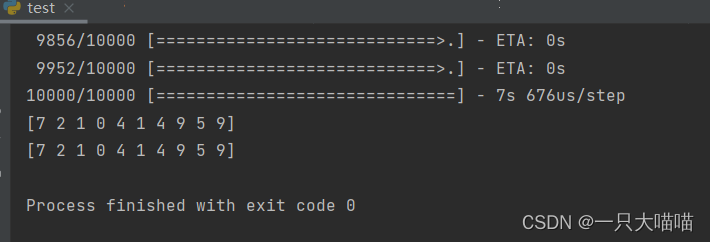
model.fit(train_image,train_label,epochs=20,batch_size=512,validation_data=(test_image,test_label))
y=np.argmax(model.predict(test_image[:10]),axis=1)#测试测试集的前十张,输出1-10,十个数的可能概率
print(y)
print(test_label[:10])#打印测试集的前十个原来的标签
import h5py
model.save('mymodel.h5')

2. Load the model and reason.
I encountered an error:
model_config = json.loads(model_config.decode('utf-8'))
AttributeError: 'str' object has no attribute 'decode'
needs to be in a virtual environment:pip install tensorflow h5py
import keras
from keras import layers
import matplotlib.pyplot as plt


import keras.datasets.mnist as mnist #手写数据集是直接内嵌在keras里面的,要用会直接下载
(train_image,train_label),(test_image,test_label)=mnist.load_data()#加载keras里面的数据集,可能会慢,网上现下


from keras.models import load_model
mymodel = load_model('mymodel.h5')

import numpy as np
test_image=np.expand_dims(test_image,axis=-1)
mymodel.evaluate(test_image,test_label)
y=np.argmax(mymodel.predict(test_image[:10]),axis=1)#测试测试集的前十张,输出1-10,十个数的可能概率
print(y)
print(test_label[:10])#打印测试集的前十个原来的标签
10.2 Only save and load model structure
1. Only save the model structure, without weights or configuration items.
The important code is as follows
my_model_json=model.to_json()
#model.to_json('mymodleJson')

with open('mymodelJson.json','w') as f:
    f.write(my_model_json)
Complete code:
import keras
from keras import layers
import matplotlib.pyplot as plt
import numpy as np
import keras.datasets.mnist as mnist #手写数据集是直接内嵌在keras里面的,要用会直接下载

(train_image,train_label),(test_image,test_label)=mnist.load_data()#加载keras里面的数据集,可能会慢,网上现下

train_image=np.expand_dims(train_image,axis=-1)#增加维度将(6000,28,28)—-》(6000,28,28,1 )
test_image=np.expand_dims(test_image,axis=-1)
print(train_image.shape)

model=keras.Sequential()
model.add(layers.Conv2D(64,(3,3),activation='relu',input_shape=(28,28,1)))
model.add(layers.Conv2D(64,(3,3),activation='relu'))
model.add(layers.MaxPooling2D())


model.add(layers.Flatten())
model.add(layers.Dense(256,activation='relu'))
model.add(layers.Dropout(0.5))
model.add(layers.Dense(10,activation='softmax'))

model.compile(optimizer='adam',loss='sparse_categorical_crossentropy',metrics=['acc'])
model.fit(train_image,train_label,epochs=10,batch_size=512,validation_data=(test_image,test_label))
y=np.argmax(model.predict(test_image[:10]),axis=1)#测试测试集的前十张,输出1-10,十个数的可能概率
print(y)
print(test_label[:10])#打印测试集的前十个原来的标签


import h5py
model.save('mymodel.h5')

#之保存模型结构而非其权重或训练配置项

my_model_json=model.to_json()
#model.to_json('mymodleJson')

with open('mymodelJson.json','w') as f:
    f.write(my_model_json)
2. Load and use the model structure
import keras
from keras import layers
import matplotlib.pyplot as plt


import keras.datasets.mnist as mnist #手写数据集是直接内嵌在keras里面的,要用会直接下载
(train_image,train_label),(test_image,test_label)=mnist.load_data()#加载keras里面的数据集,可能会慢,网上现下


with open('mymodelJson.json') as f:
   mymodelJson=f.read()

from keras.models import model_from_json
model=model_from_json(mymodelJson)

import numpy as np
test_image=np.expand_dims(test_image,axis=-1)
model.compile(optimizer='adam',loss='sparse_categorical_crossentropy',metrics=['acc'])
model.evaluate(test_image,test_label)
model.summary()
10.3 Save only the weights of the model
model.save_weights('my_model_weights.h5')
model.load_weights('my_model_weights.h5')
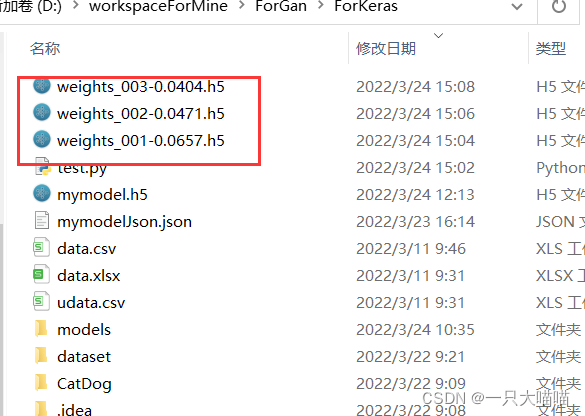
10.4 Saving checkpoints during training
Saving checkpoints during or at the end of training allows you to use a trained model without retraining it, or to continue from where you left off the last training to prevent interruptions in the training process.
Refer to other people's blogs: [1] , [2]
Important code: callback function
checkpoint_path='weights_{epoch:03d}-{val_loss:.4f}.h5'
cp_callback=keras.callbacks.ModelCheckpoint(checkpoint_path,period=1,save_weights_only=True)#可以通过参数调整是保存模型还是只是权重


model.fit(train_image,train_label,epochs=20,batch_size=512,validation_data=(test_image,test_label),callbacks=[cp_callback])
Complete code:
import keras
from keras import layers
import matplotlib.pyplot as plt
import numpy as np
import keras.datasets.mnist as mnist #手写数据集是直接内嵌在keras里面的,要用会直接下载

(train_image,train_label),(test_image,test_label)=mnist.load_data()#加载keras里面的数据集,可能会慢,网上现下

train_image=np.expand_dims(train_image,axis=-1)#增加维度将(6000,28,28)—-》(6000,28,28,1 )
test_image=np.expand_dims(test_image,axis=-1)
print(train_image.shape)

from keras.callbacks import ModelCheckpoint
checkpoint_path='weights_{epoch:03d}-{val_loss:.4f}.h5'
cp_callback=keras.callbacks.ModelCheckpoint(checkpoint_path,period=1,save_weights_only=True)#可以通过参数调整是保存模型还是只是权重

model=keras.Sequential()
model.add(layers.Conv2D(64,(3,3),activation='relu',input_shape=(28,28,1)))
model.add(layers.Conv2D(64,(3,3),activation='relu'))
model.add(layers.MaxPooling2D())


model.add(layers.Flatten())
model.add(layers.Dense(256,activation='relu'))
model.add(layers.Dropout(0.5))
model.add(layers.Dense(10,activation='softmax'))

model.compile(optimizer='adam',loss='sparse_categorical_crossentropy',metrics=['acc'])
model.fit(train_image,train_label,epochs=20,batch_size=512,validation_data=(test_image,test_label),callbacks=[cp_callback])
y=np.argmax(model.predict(test_image[:10]),axis=1)#测试测试集的前十张,输出1-10,十个数的可能概率
print(y)
print(test_label[:10])#打印测试集的前十个原来的标签


import h5py
model.save('mymodel.h5')