Article directory
1. ES6 Modularity
(1) Understanding ES6 modularity
1. JS modular classification
- Browser: AMD, CMD
- Server side: CommonJS
- Official universal: ES6 modularity
2. ES6 modular definition
- Each JS file is an independent module
- Import other modules using the import keyword
- Use the export keyword for externally shared modules
3. Experience ES6 modularity in node.js
- Install v14.15.1 or higher node.js
- npm init -y quickly generates package.json and adds "type": "module" to the root node.
(2) Basic grammar
1. Default export/import
- Default export: export default
导出成员 - NOTE: Each module is only allowed to be exported once
let n1 = 10 // 定义模块私有成员 n1
let n2 = 20 // 定义模块私有成员 n2,未导出故外界无法获取
function show(){

    } // 定义模块私有方法 show

export default{

     // 默认导出语法,向外共享两成员 n1 和 show
    n1,
    show
}
- Default import: import
接收名称from'模块标识符' - Note: The receiving name is optional but required
合法(仅支持字母开头)
// 从模块 n1文档.js 中导入 export default 向外共享的成员,并用名称 m1 接收
import m1 from './01文档.js'

console.log(m1) // n1 :10, show:[Function: show]
2. Export/import on demand
- Export on demand: export Export members on demand
- Notice
- Can be used in each module
多次Import on demand - Import and export members on demand
名称必须保持一致 - Support as keyword when importing on demand
重命名 - Supports on-demand import and default import at the same time
- Can be used in each module
export let s1 = 'aaa'
export let s2 = 'bbb'
export function dance(){

    }

export default {

     // 同时使用默认导出
    s3: 'ccc'
}
- Import on demand: import {name1, name2…} from ‘module identifier’
import {

    s1, s2 as S2, dance} from './02文档.js'
import info, {

    s1, S2, dance} from './02文档.js' // 同时使用 info 进行默认导入

console.log(s1) // aaa
console.log(s2) // bbb
console.log(dance) // [Function: dance]
3. Directly import and execute
- Direct import: import ‘module identifier’
- Note: Only execute the code in a module without getting the module's external shared members.
import './03文档.js'
2. Promise
(1) Callback hell
- Definition: Nesting of multi-layer callback functions into each other
- shortcoming
- Strong coupling and difficult to maintain
- Redundant codes are nested inside each other and have poor readability
- Solution: Add Promise in ES6 to solve the callback hell problem
(2) Basic concepts
1. Constructor
- Create an instance: const p = new Promise()
- Instance object: represents asynchronous operation
2、.then()
- Promise.prototype contains a .then() method
- Every instance object obtained by new Promise() can be accessed through
原型链.then() - The .then() method pre-specifies success/failure callback functions
- p.then(success callback function, failure callback function)
- Success callback is required, failure callback is optional.
p.then(result =>{

    }, error =>{

    })
(3) Basic usage
1. Based on then-fs
- The official fs module of node.js only supports the callback function method to read files, and does not support the Promise calling method.
- Install then-fs third-party package to support Promise calling method
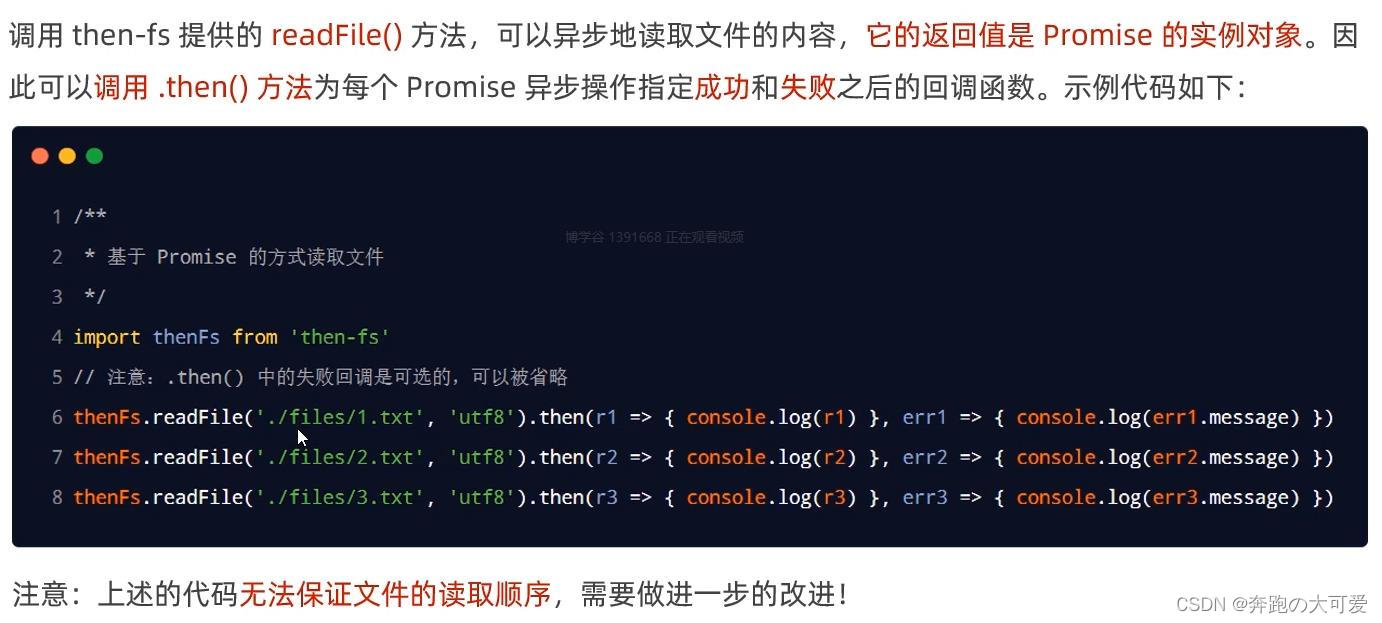
2. Chain call
- Promise supports chained calls to solve the callback hell problem
![[The external link image transfer failed. The source site may have an anti-leeching mechanism. It is recommended to save the image and upload it directly (img-X2IxBGST-1668997333718) (promise chain call.jpg)]](https://img-blog.csdnimg.cn/a13b6e979b04425b957ad011b8f5c554.jpeg)
3. .catch() captures errors
- Promise supports chained calls to solve the callback hell problem
![[The external link image transfer failed. The source site may have an anti-leeching mechanism. It is recommended to save the image and upload it directly (img-9XXHmkAs-1668997333719) (catch method.jpg)]](https://img-blog.csdnimg.cn/92643f5b6d334fa3b7a0f50289b09411.jpeg)
![[The external link image transfer failed. The source site may have an anti-leeching mechanism. It is recommended to save the image and upload it directly (img-HxvnmPMs-1668997333720) (catch method in advance.png)]](https://img-blog.csdnimg.cn/0ff5b875a35a4f388dc30b47c617f56b.png)
4、Promise.all()
![[The external link image transfer failed. The source site may have an anti-leeching mechanism. It is recommended to save the image and upload it directly (img-osGKCG5f-1668997333720) (promiseAll.png)]](https://img-blog.csdnimg.cn/fc9533d38fc040f9b211e9769d8c16fc.png)
5、Promise.race()
![[The external link image transfer failed. The source site may have an anti-leeching mechanism. It is recommended to save the image and upload it directly (img-THMILgbr-1668997333721)(promiserace.png)]](https://img-blog.csdnimg.cn/4acf0348050e43ebbd49696c888fe547.png)
6. Encapsulate files based on Promise
- Method name: getFile
- Formal parameter: fpath, the path to read the file
- Return value: Promise instance object
// 形式的异步操作,不确定具体功能读文件/发送 ajax
function getFile(fpath){


  return new Promise()
}

// 具体的异步操作,确定为读取文件
function getFile(fpath){


  return new Promise(function(resolve, reject){


    fs.readFile(fpath, 'utf-8', (err, dataStr) => {

    }) // 将具体的异步操作定义到 function 内部
  })
  getFile('路径').then(成功回调, 失败回调)

}
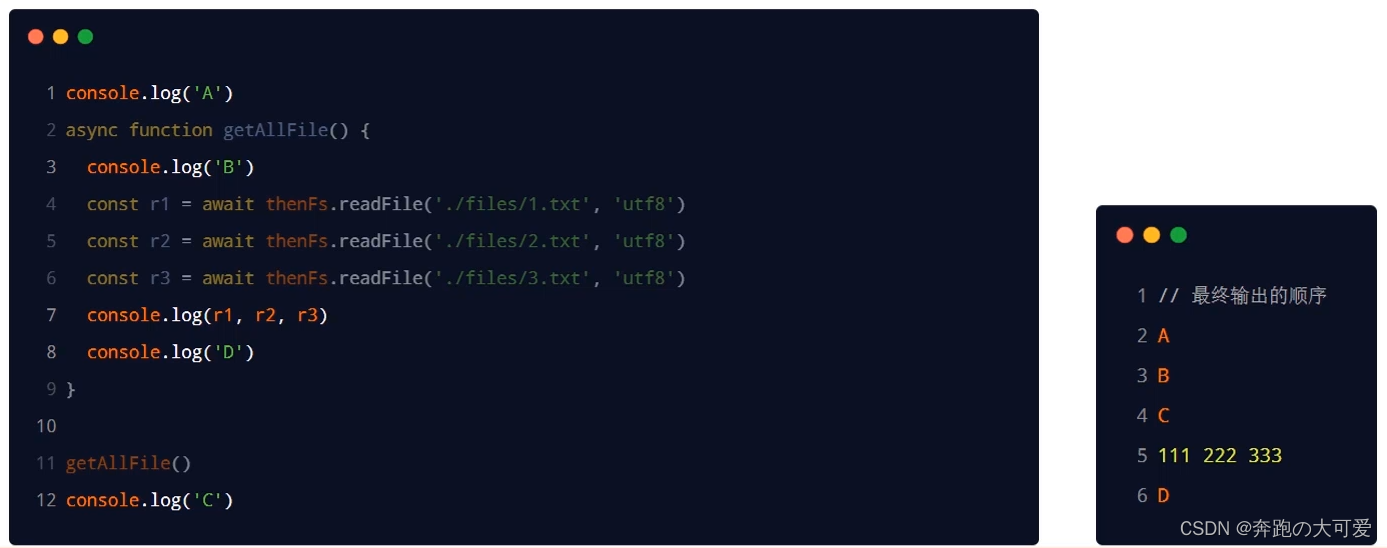
3. async/await
- Background: The .then() chain call operation is too redundant, poor readability, and difficult to understand.
- Function: The new syntax introduced in ES8 simplifies Promise asynchronous operations
- Notice
- Before using await on a promise instance object, async must be used together
- In the async method,
第一个 await 之前的代码同步执行, the subsequent code is executed asynchronously
4. EventLoop
(1) Synchronous tasks and asynchronous tasks
- JS is
单线程执行a programming language that can only do one thing at a time. When a single thread executes a task queue, if前一任务非常耗时, subsequent tasks will always wait, resulting in程序假死 - Synchronization task:
非耗时任务, queued in the main thread and executed in sequence - Asynchronous task:
耗时任务, delegated by JS to宿主环境执行, and JS will be notified after execution is completed主线程执行异步任务的回调函数
(2) Synchronous and asynchronous task execution mechanism
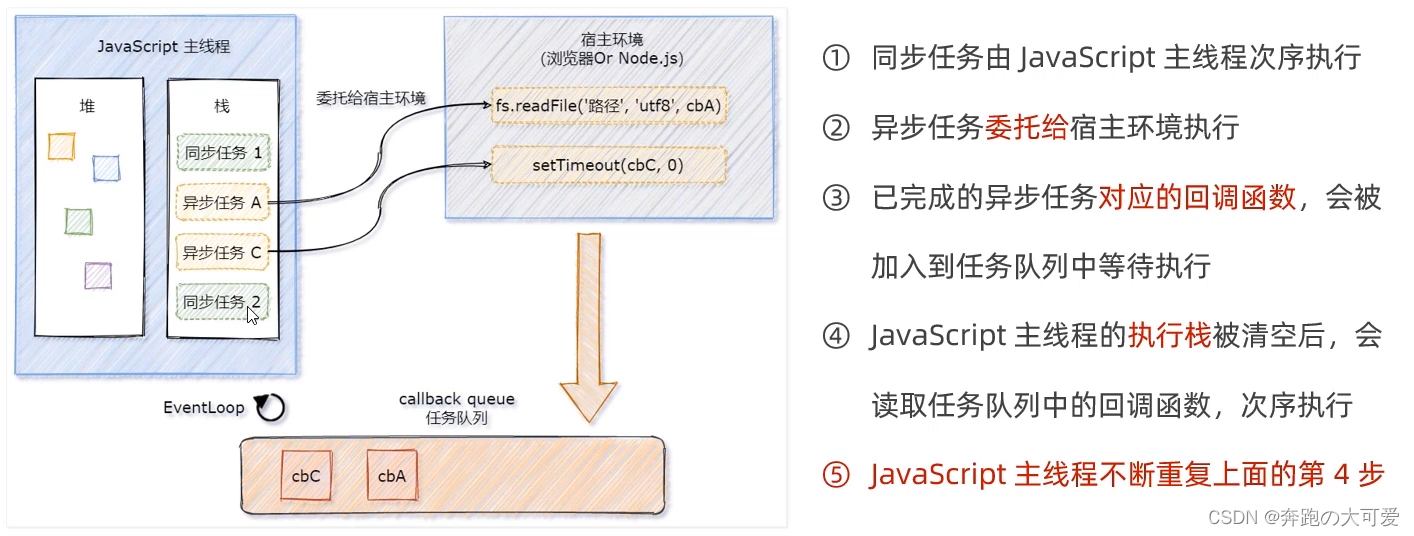
(3) EventLoop
- Event loop: The JS main thread continuously reads the callback functions of asynchronous tasks from the task queue and puts them on the execution stack for execution in sequence.
5. Macro tasks and micro tasks
(1) Concept
![[The external link image transfer failed. The source site may have an anti-leeching mechanism. It is recommended to save the image and upload it directly (img-1HbMh2Wl-1668997333723) (macro_microtask.png)]](https://img-blog.csdnimg.cn/d16f1a6334f54b6d8200035ea734b83e.png)
(2) Execution mechanism
-
Alternate execution: After each macrotask is completed, it will be checked
是否存在待执行的微任务, and all microtasks will be executed first before the next macrotask
![[The external link image transfer failed. The source site may have an anti-leeching mechanism. It is recommended to save the image and upload it directly (img-gtAwPViK-1668997333724) (macro_micro task execution sequence.png)]](https://img-blog.csdnimg.cn/ecf99a5cf52849afbf616087a8c035be.png)
-
scene analogy
![[The external link image transfer failed. The source site may have an anti-leeching mechanism. It is recommended to save the image and upload it directly (img-EGzR76PH-1668997333724) (bank business analogy macro_microtask.png)]](https://img-blog.csdnimg.cn/df31ecf2eda9433890b25b31e23c4620.png)
6. API interface case
(1) Case requirements
- Based on
MySQL 数据库 + Expressexternally provided API interface services用户列表 - Technical points
- Third-party packages express and mysql2
- ES6 Modularity
- Promise and async/await
(2) Implementation steps
-
Build the basic structure of the project
- ES6 modular support
- Install third-party dependency packages
npm install express@4.17.1 mysql2@2.2.5 -
Create a basic server
![[The external link image transfer failed. The source site may have an anti-leeching mechanism. It is recommended to save the image and upload it directly (img-CejBpGhH-1668997333725) (Create a basic server.png)]](https://img-blog.csdnimg.cn/7b8c6ccf1f374135982dfef30ba82e86.png)
-
Create db database operation module
![[The external link image transfer failed. The source site may have an anti-leeching mechanism. It is recommended to save the image and upload it directly (img-29yr6g4A-1668997333725) (Create db database operation module.png)]](https://img-blog.csdnimg.cn/8c76d841085345209a2c5b9f4ebccb7a.png)
-
Create user_ctrl business module
![[The external link image transfer failed. The source site may have an anti-leeching mechanism. It is recommended to save the image and upload it directly (img-h7acMuPr-1668997333726) (create user_ctrl module.png)]](https://img-blog.csdnimg.cn/de52661da45640f5b0cd67caeb99ba1f.png)
-
Create user_router routing module
![[The external link image transfer failed. The source site may have an anti-leeching mechanism. It is recommended to save the image and upload it directly (img-56UfrDom-1668997333727) (create user_router module.png)]](https://img-blog.csdnimg.cn/4385f1fd7dcb46659e98f4be9ca9ac71.png)
-
Import and mount routing module
![[The external link image transfer failed. The source site may have an anti-leeching mechanism. It is recommended to save the image and upload it directly (img-V1bRQb0M-1668997333727) (Import and mount the routing module.png)]](https://img-blog.csdnimg.cn/03dbc5ecc7c44332a73334d6e2688956.png)
-
Use try…catch to catch exceptions
![[The external link image transfer failed. The source site may have an anti-leeching mechanism. It is recommended to save the image and upload it directly (img-XZDrwGb7-1668997333728) (try_catch capture exception.png)]](https://img-blog.csdnimg.cn/31f5c786a6334e3fbc5010ea0ae8a9b1.png)
7. webpack
(1) Basic concepts
1. Essence
- Third-party packaging tools to integrate, compress, and escape codes
2. Function
- Supports packaging of all types of files and reduces the number of files
- Support less/sass to css, support ES6/7/8 to ES5
- Improve browser opening speed
(2) Usage steps
1. Preparation
- Initialize package environment package.json
yarn init // 传说中比 npm 更快的方式
- Install dependency packages
yarn add webpack webpack-cli -D
- package.json configures custom command scripts
"scripts":{


  "build":"webpack"
}
- Coding: All code must be introduced
入口文件
2. Basic use
- Packaging entry: create new src/index.js
- Operation function: Create a new src/operation function.js module and export it
- Import on demand: index.js imports modules and uses function output
- Package: execute
yarn buildcustom command to package and generate dist/main.js- After finding the configuration file, entry and dependencies, the packaged code is output to the specified location.
(3) Configuration
- New
webpack.config.jsConfigure - webpack default packaging
js 文件 - Write code in the development environment and run the code after packaging
- webpack-plugin: more features
- webpack-loader: handle more types of files
1. Modify the default entrance and exit
- Default entry: src/index.js
- Default exit: dist/main.js
- Modify the entry file name
- Configuration
module.exports = {


  entry: './src/main.js', // 入口
  output: {

     // 出口
    path: path.resolve(__dirname, 'dist'), // 出口路径
    filename: 'bundle.js', // 出口文件名
  },
};
- Pack
yarn build
2. Automatically generate html files
- Install
yarn add html-webpack-plugin -D
- Configuration
const HtmlWebpackPlugin = require('html-webpack-plugin');
const path = require('path');

module.exports = {


  entry: 'index.js',
  output: {


    path: path.resolve(__dirname, './dist'),
    filename: 'index_bundle.js',
  },
  plugins: [new HtmlWebpackPlugin({

     //plugin 插件配置
    template:'./public/index.html' // 告知webpack 使用插件时,以自己 html 文件作为模板生成 dist/html 文件
  })],
};
- Pack
yarn build
3. Package css files
- Install
yarn add css-loader style-loader -D
- Configuration
module.exports = {


  module: {

     // 加载器配置
    rules: [ // 规则
      {

     // 一个具体规则
        test: /\.css$/i, // 匹配 .css 结尾的文件
        use: ["style-loader", "css-loader"],
        // 让 webpack 使用两个 loader 处理 css 文件;
        // 从右向左执行,不能颠倒顺序;
        // css-loader:webpack 解析 css 文件,把css 代码一起打包进 js 中;
        // style-loader:css 代码插入 DOM 中
      },
    ],
  },
};
- Pack
yarn build
4. More
- More plug-in references webpack
(4) Development server
1. Advantages
- Packed in server memory, fast
- Automatically update the packaging change code and return it to the browser in real time
2. Use
- Install
yarn add webpack-dev-server -D
- package.json configuration
"scripts":{


    "build":"webpack",
    "server":"webpack server"
  }
- start up
yarn serve