Table of contents
1. Operating system initialization configuration
1. Operate on the master01 node
3. Deploy the Master component
2. Prepare binary files and tokens
3. Start the kube-apiserver service
4. Start the scheduler service
5. Start the controller-manager service
6. Generate the kubeconfig file for kubectl to connect to the cluster.
7. Check the current cluster component status through the kubectl tool
6. Deploy Worker node components
2. Generate the file scp on master01 to node01
3. Install kubelet service on node01
4. master01 verifies the CSR request
5. Install proxy service on node01
6. node2 starts and installs kubelet and proxy services
7. Deploy CNI network establishment
10. Load balancing deployment (lb01, lb02)
1. Deploy nginx service and configure four-layer load balancing
11. Deploy Dashboard (master01)
Preface
Minikube
- Minikube is a tool that can quickly run a single-node micro K8S locally. It is only used for learning and previewing some features of K8S.
- Deployment address: https://kubernetes.io/docs/setup/minikube
Cube admin
- Kubeadmin is also a tool that provides kubeadm init and kubeadm join for rapid deployment of K8S clusters, which is relatively simple.
- https://kubernetes.io/docs/reference/setup-tools/kubeadm/kubeadm/
Binary installation and deployment
- The first choice for production, download the binary package of the distribution version from the official, manually deploy each component and self-signed TLS certificate to form a K8S cluster, recommended for novices.
- https://github.com/kubernetes/kubernetes/releases
Summary:Kubeadm lowers the deployment threshold, but blocks many details, making it difficult to troubleshoot problems. If you want to make it easier and more controllable, it is recommended to use binary packages to deploy Kubernetes clusters. Although manual deployment is more troublesome, you can learn a lot of working principles during the process, which is also beneficial to later maintenance.
Port introduction
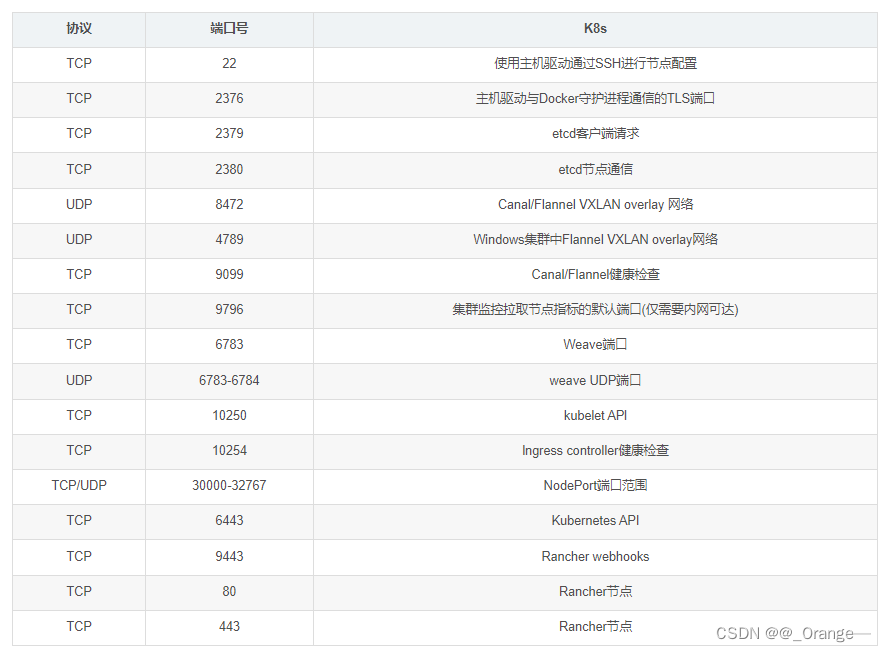
lab environment:
| CPU name | IP address | Required components |
|---|---|---|
| master01 | 192.168.247.10 | be apiserver、be controller-manager、be scheduler、etcd |
| master02 | 192.168.247.20 | be apiserver、be controller-manager、be scheduler |
| node01 | 192.168.247.30 | kubelet、kube-proxy、docker、flannel、etcd |
| node02 | 192.168.247.40 | kubelet、kube-proxy、docker、flannel、etcd |
| Load balancing 01 | 192.168.247.50 | nginx+keepalive |
| Load balancing 02 | 192.168.247.60 | nginx+keepalive |
1. Operating system initialization configuration
Deploy environment scripts with one click.
#!/bin/bash
# 关闭防火墙
systemctl stop firewalld
systemctl disable firewalld
iptables -F && iptables -t nat -F && iptables -t mangle -F && iptables -X

# 关闭selinux
# 永久关闭
sed -i 's/enforcing/disabled/' /etc/selinux/config
# 临时关闭
setenforce 0

# 关闭swap
# 临时
swapoff -a
# 永久关闭
sed -ri 's/.*swap.*/#&/' /etc/fstab


# 在master添加hosts
cat >> /etc/hosts << EOF
192.168.247.10 master01
192.168.247.20 master02
192.168.247.30 node01
192.168.247.40 node02
EOF


# 将桥接的IPv4流量传递到iptables的链
cat > /etc/sysctl.d/k8s.conf << EOF
#开启网桥模式,可将网桥的流量传递给iptables链
net.bridge.bridge-nf-call-ip6tables = 1
net.bridge.bridge-nf-call-iptables = 1
#关闭ipv6协议
net.ipv6.conf.all.disable_ipv6=1
net.ipv4.ip_forward=1
EOF


# 生效
sysctl --system

# 时间同步
yum install ntpdate -y
ntpdate time.windows.com

crontab -e
*/10 * * * * /usr/sbin/ntpdate/ntpdate time.windows.com
Manually modify the host name of each node
# 根据规划设置主机名【master01节点上操作】
hostnamectl set-hostname master01

# 根据规划设置主机名【node01节点操作】
hostnamectl set-hostname node01

# 根据规划设置主机名【node02节点操作】
hostnamectl set-hostname node02
2. Deploy etcd cluster
- etcd is a distributed key-value pair database with a service discovery system. Developed using the Go language and using the Raft consistency algorithm, the cluster requires an odd number of more than three machines.
- Port 2379 is the port for external (client) communication; port 2380 is the port for internal (cluster internal nodes) communication.
| Node name | IP address |
|---|---|
| etcd01 | 192.168.247.10 |
| etcd02 | 192.168.247.30 |
| etcd03 | 192.168.247.40 |
Note: In order to save machines, this is reused with K8s node machines. It can also be deployed independently of the k8s cluster, as long as the apiserver can be connected.
Prepare the environment for issuing certificates:
cfssl is an open source certificate management tool that uses configuration files to generate certificates. Therefore, before self-signing, you need to generate a configuration file in json format that it recognizes. CFSSL provides a convenient command line to generate configuration files.
CFSSL is used to provide TLS certificates for etcd. It supports signing three types of certificates:
- Client certificate, the certificate carried by the server when connecting to the client, is used by the client to verify the identity of the server, such as when kube-apiserver accesses etcd;
- server certificate, the certificate carried by the client when connecting to the server, used by the server to verify the client's identity, such as etcd providing external services;
- Peer certificate, the certificate used when connecting to each other, such as etcd nodes for verification and communication.
1. Operate on the master01 node
#Prepare the cfssl certificate generation tool
wget https://pkg.cfssl.org/R1.2/cfssl_linux-amd64 -O /usr/local/bin/cfssl
wget https://pkg.cfssl.org/R1.2/cfssljson_linux-amd64 -O /usr/local/bin/cfssljson
wget https://pkg.cfssl.org/R1.2/cfssl-certinfo_linux-amd64 -O /usr/local/bin/cfssl-certinfo

chmod +x /usr/local/bin/cfssl*


cfssl:证书签发的工具命令
cfssljson:将 cfssl 生成的证书(json格式)变为文件承载式证书
cfssl-certinfo:验证证书的信息
cfssl-certinfo -cert <证书名称>			#查看证书的信息
### Generate Etcd certificate ###
mkdir -p /opt/k8s

vim /opt/k8s/etcd-cert
#创建etcd证书的文件

#############自签CA,包含证书的过期时间10年 ###############
cat > ca-config.json << EOF
{
  "signing": {
    "default": {
      "expiry": "87600h"
    },
    "profiles": {
      "www": {
         "expiry": "87600h",
         "usages": [
            "signing",
            "key encipherment",
            "server auth",
            "client auth"
        ]
      }
    }
  }
}
EOF

cat > ca-csr.json<< EOF
{
    "CN": "etcd CA",
    "key": {
        "algo": "rsa",
        "size": 2048
    },
    "names": [
        {
            "C": "CN",
            "L": "Beijing",
            "ST": "Beijing"
        }
    ]
}
EOF

#######生成证书########################
cfssl gencert -initca ca-csr.json | cfssljson -bare ca
##当前目录下会生成 ca.pem和ca-key.pem文件

#-----------------------
#生成 etcd 服务器证书和私钥
cat > server-csr.json <<EOF
{
    "CN": "etcd",
    "hosts": [
    "192.168.247.10",
    "192.168.247.30",
    "192.168.247.40"
    ],
    "key": {
        "algo": "rsa",
        "size": 2048
    },
    "names": [
        {
            "C": "CN",
            "L": "BeiJing",
            "ST": "BeiJing"
        }
    ]
}
EOF

#hosts:将所有 etcd 集群节点添加到 host 列表,需要指定所有 etcd 集群的节点 ip 或主机名不能使用网段,新增 etcd 服务器需要重新签发证书。

cfssl gencert -ca=ca.pem -ca-key=ca-key.pem -config=ca-config.json -profile=www server-csr.json | cfssljson -bare server

#生成的文件:
#server.csr:服务器的证书请求文件
#server-key.pem:服务器的私钥
#server.pem:服务器的数字签名证书

#-config:引用证书生成策略文件 ca-config.json
#-profile:指定证书生成策略文件中的的使用场景,比如 ca-config.json 中的 www
vim /opt/k8s/etcd.sh

#!/bin/bash
#example: ./etcd.sh etcd01 192.168.247.10 etcd02=https://192.168.247.30:2380,etcd03=https://192.168.247.40:2380

#创建etcd配置文件/opt/etcd/cfg/etcd
ETCD_NAME=$1
ETCD_IP=$2
ETCD_CLUSTER=$3

WORK_DIR=/opt/etcd

cat > $WORK_DIR/cfg/etcd  <<EOF
#[Member]
ETCD_NAME="${ETCD_NAME}"
ETCD_DATA_DIR="/var/lib/etcd/default.etcd"
ETCD_LISTEN_PEER_URLS="https://${ETCD_IP}:2380"
ETCD_LISTEN_CLIENT_URLS="https://${ETCD_IP}:2379"

#[Clustering]
ETCD_INITIAL_ADVERTISE_PEER_URLS="https://${ETCD_IP}:2380"
ETCD_ADVERTISE_CLIENT_URLS="https://${ETCD_IP}:2379"
ETCD_INITIAL_CLUSTER="etcd01=https://${ETCD_IP}:2380,${ETCD_CLUSTER}"
ETCD_INITIAL_CLUSTER_TOKEN="etcd-cluster"
ETCD_INITIAL_CLUSTER_STATE="new"
EOF

#Member:成员配置
#ETCD_NAME:节点名称,集群中唯一。成员名字,集群中必须具备唯一性,如etcd01
#ETCD_DATA_DIR:数据目录。指定节点的数据存储目录,这些数据包括节点ID,集群ID>,集群初始化配置,Snapshot文件,若未指定-wal-dir,还会存储WAL文件;如果不指定
会用缺省目录
#ETCD_LISTEN_PEER_URLS:集群通信监听地址。用于监听其他member发送信息的地址。ip为全0代表监听本机所有接口
#ETCD_LISTEN_CLIENT_URLS:客户端访问监听地址。用于监听etcd客户发送信息的地址>。ip为全0代表监听本机所有接口

#Clustering:集群配置
#ETCD_INITIAL_ADVERTISE_PEER_URLS:集群通告地址。其他member使用,其他member通
过该地址与本member交互信息。一定要保证从其他member能可访问该地址。静态配置方>式下,该参数的value一定要同时在--initial-cluster参数中存在
#ETCD_ADVERTISE_CLIENT_URLS:客户端通告地址。etcd客户端使用,客户端通过该地址
与本member交互信息。一定要保证从客户侧能可访问该地址
#ETCD_INITIAL_CLUSTER:集群节点地址。本member使用。描述集群中所有节点的信息,
本member根据此信息去联系其他member
#ETCD_INITIAL_CLUSTER_TOKEN:集群Token。用于区分不同集群。本地如有多个集群要>设为不同
#ETCD_INITIAL_CLUSTER_STATE:加入集群的当前状态,new是新集群,existing表示加>入已有集群。


#创建etcd.service服务管理文件
cat > /usr/lib/systemd/system/etcd.service <<EOF
[Unit]
Description=Etcd Server
After=network.target
After=network-online.target
Wants=network-online.target

[Service]
Type=notify
EnvironmentFile=${WORK_DIR}/cfg/etcd
ExecStart=${WORK_DIR}/bin/etcd \
--cert-file=${WORK_DIR}/ssl/server.pem \
--key-file=${WORK_DIR}/ssl/server-key.pem \
--trusted-ca-file=${WORK_DIR}/ssl/ca.pem \
--peer-cert-file=${WORK_DIR}/ssl/server.pem \
--peer-key-file=${WORK_DIR}/ssl/server-key.pem \
--peer-trusted-ca-file=${WORK_DIR}/ssl/ca.pem \
--logger=zap \
--enable-v2
Restart=on-failure
LimitNOFILE=65536

[Install]
WantedBy=multi-user.target
EOF

#--enable-v2:开启 etcd v2 API 接口。当前 flannel 版本不支持 etcd v3 通信
#--logger=zap:使用 zap 日志框架。zap.Logger 是go语言中相对日志库中性能最高的
#--peer开头的配置项用于指定集群内部TLS相关证书(peer 证书),这里全部都使用同
一套证书认证
#不带--peer开头的的参数是指定 etcd 服务器TLS相关证书(server 证书),这里全部
都使用同一套证书认证


systemctl daemon-reload
systemctl enable etcd
systemctl restart etcd
chmod +x etcd-cert.sh etcd.sh
#Create a directory for generating CA certificates, etcd server certificates and private keys
mkdir /opt/k8s/etcd-cert
mv etcd-cert.sh etcd-cert/
cd /opt/k8s/etcd-cert/
./etcd-cert.sh			#生成CA证书、etcd 服务器证书以及私钥

ls
ca-config.json  ca-csr.json  ca.pem        server.csr       server-key.pem
ca.csr          ca-key.pem   etcd-cert.sh  server-csr.json  server.pem

#Upload etcd-v3.4.9-linux-amd64.tar.gz to the /opt/k8s directory and start the etcd service
https://github.com/etcd-io/etcd/releases/download/v3.4.9/etcd-v3.4.9-linux-amd64.tar.gz

cd /opt/k8s/
tar zxvf etcd-v3.4.9-linux-amd64.tar.gz
ls etcd-v3.4.9-linux-amd64
Documentation  etcd  etcdctl  README-etcdctl.md  README.md  READMEv2-etcdctl.md
------------------------------------------------------------------------------------------
etcd就是etcd 服务的启动命令,后面可跟各种启动参数
etcdctl主要为etcd 服务提供了命令行操作
#Create a directory for storing etcd configuration files, command files, and certificates
mkdir -p /opt/etcd/{cfg,bin,ssl}

cd /opt/k8s/etcd-v3.4.9-linux-amd64/
mv etcd etcdctl /opt/etcd/bin/
cp /opt/k8s/etcd-cert/*.pem /opt/etcd/ssl/

cd /opt/k8s/
./etcd.sh etcd01 192.168.247.10 etcd02=https://192.168.247.30:2380,etcd03=https://192.168.247.40:2380
#进入卡住状态等待其他节点加入,这里需要三台etcd服务同时启动,如果只启动其中一台后,服务会卡在那里,直到集群中所有etcd节点都已启动,可忽略这个情况

#可另外打开一个窗口查看etcd进程是否正常
ps -ef | grep etcd
#Copy all etcd related certificate files, command files and service management files to the other two etcd cluster nodes
scp -r /opt/etcd/ [email protected]:/opt/
scp -r /opt/etcd/ [email protected]:/opt/
scp /usr/lib/systemd/system/etcd.service [email protected]:/usr/lib/systemd/system/
scp /usr/lib/systemd/system/etcd.service [email protected]:/usr/lib/systemd/system/
2. Operate on node01 node
vim /opt/etcd/cfg/etcd
#[Member]
ETCD_NAME="etcd02"											#修改
ETCD_DATA_DIR="/var/lib/etcd/default.etcd"
ETCD_LISTEN_PEER_URLS="https://192.168.10.18:2380"			#修改
ETCD_LISTEN_CLIENT_URLS="https://192.168.10.18:2379"		#修改

#[Clustering]
ETCD_INITIAL_ADVERTISE_PEER_URLS="https://192.168.10.18:2380"		#修改
ETCD_ADVERTISE_CLIENT_URLS="https://192.168.10.18:2379"				#修改
ETCD_INITIAL_CLUSTER="etcd01=https://192.168.10.80:2380,etcd02=https://192.168.10.18:2380,etcd03=https://192.168.10.19:2380"
ETCD_INITIAL_CLUSTER_TOKEN="etcd-cluster"
ETCD_INITIAL_CLUSTER_STATE="new"

#启动etcd服务
systemctl start etcd
systemctl enable etcd     ##systemctl enable --now etcd
systemctl在enable、disable、mask子命令里面增加了--now选项,可以激活同时启动服务,激活同时停止服务等。

systemctl status etcd
3. Operate on the node02 node
vim /opt/etcd/cfg/etcd
#[Member]
ETCD_NAME="etcd03"											#修改
ETCD_DATA_DIR="/var/lib/etcd/default.etcd"
ETCD_LISTEN_PEER_URLS="https://192.168.10.19:2380"			#修改
ETCD_LISTEN_CLIENT_URLS="https://192.168.10.19:2379"		#修改

#[Clustering]
ETCD_INITIAL_ADVERTISE_PEER_URLS="https://192.168.10.19:2380"		#修改
ETCD_ADVERTISE_CLIENT_URLS="https://192.168.10.19:2379"				#修改
ETCD_INITIAL_CLUSTER="etcd01=https://192.168.10.80:2380,etcd02=https://192.168.10.18:2380,etcd03=https://192.168.10.19:2380"
ETCD_INITIAL_CLUSTER_TOKEN="etcd-cluster"
ETCD_INITIAL_CLUSTER_STATE="new"

#启动etcd服务
systemctl start etcd
systemctl enable etcd
systemctl status etcd
4. Check the cluster status
#Check etcd cluster status
ETCDCTL_API=3   /opt/etcd/bin/etcdctl --cacert=/opt/etcd/ssl/ca.pem --cert=/opt/etcd/ssl/server.pem --key=/opt/etcd/ssl/server-key.pem --endpoints="https://192.168.247.10:2379,https://192.168.247.30:2379,https://192.168.247.40:2379" endpoint health --write-out=table

ETCDCTL_API=3 /opt/etcd/bin/etcdctl --cacert=/opt/etcd/ssl/ca.pem --cert=/opt/etcd/ssl/server.pem --key=/opt/etcd/ssl/server-key.pem --endpoints="https://192.168.247.10:2379,https://192.168.247.30:2379,https://192.168.247.40:2379" endpoint status --write-out=table

------------------------------------------------------------------------------------------
--cert-file:识别HTTPS端使用SSL证书文件
--key-file:使用此SSL密钥文件标识HTTPS客户端
--ca-file:使用此CA证书验证启用https的服务器的证书
--endpoints:集群中以逗号分隔的机器地址列表
cluster-health:检查etcd集群的运行状况
#View etcd cluster member list
ETCDCTL_API=3 /opt/etcd/bin/etcdctl --cacert=/opt/etcd/ssl/ca.pem --cert=/opt/etcd/ssl/server.pem --key=/opt/etcd/ssl/server-key.pem --endpoints="https://192.168.247.10:2379,https://192.168.247.30:2379,https://192.168.247.40:2379" --write-out=table member list
2. Deploy docker engine
//All node nodes deploy docker engine
yum install -y yum-utils device-mapper-persistent-data lvm2
yum-config-manager --add-repo https://mirrors.aliyun.com/docker-ce/linux/centos/docker-ce.repo
yum install -y docker-ce docker-ce-cli containerd.io

systemctl start docker.service
systemctl enable docker.service
3. Deploy the Master component
Operation on master01 node:
#Upload master.zip and k8s-cert.sh to the /opt/k8s directory, and decompress the master.zip compressed package
cd /opt/k8s/
unzip master.zip
chmod +x *.sh

mkdir -p /opt/kubernetes/{bin,cfg,ssl,logs}
1. Prepare certificate
#Create a directory for generating CA certificates, certificates and private keys for related components
mkdir /opt/k8s/k8s-cert

vim /opt/k8s/k8s-cert/k8s-cert.sh

#!/bin/bash
#配置证书生成策略,让 CA 软件知道颁发有什么功能的证书,生成用来签发其他组件证书的根证书
cat > ca-config.json <<EOF
{
  "signing": {
    "default": {
      "expiry": "87600h"
    },
    "profiles": {
      "kubernetes": {
         "expiry": "87600h",
         "usages": [
            "signing",
            "key encipherment",
            "server auth",
            "client auth"
        ]
      }
    }
  }
}
EOF

#生成CA证书和私钥(根证书和私钥)
cat > ca-csr.json <<EOF
{
    "CN": "kubernetes",
    "key": {
        "algo": "rsa",
        "size": 2048
    },
    "names": [
        {
            "C": "CN",
            "L": "Beijing",
            "ST": "Beijing",
      	    "O": "k8s",
            "OU": "System"
        }
    ]
}
EOF

cfssl gencert -initca ca-csr.json | cfssljson -bare ca -


#-----------------------
#生成 apiserver 的证书和私钥(apiserver和其它k8s组件通信使用)
#hosts中将所有可能作为 apiserver 的 ip 添加进去,后面 keepalived 使用的 VIP 也要加入
cat > apiserver-csr.json <<EOF
{
    "CN": "kubernetes",
    "hosts": [
      "10.0.0.1",
      "127.0.0.1",
      "192.168.247.10",
      "192.168.247.20",
      "192.168.247.100",
      "192.168.247.50",
      "192.168.247.60",
      "kubernetes",
      "kubernetes.default",
      "kubernetes.default.svc",
      "kubernetes.default.svc.cluster",
      "kubernetes.default.svc.cluster.local"
    ],
    "key": {
        "algo": "rsa",
        "size": 2048
    },
    "names": [
        {
            "C": "CN",
            "L": "BeiJing",
            "ST": "BeiJing",
            "O": "k8s",
            "OU": "System"
        }
    ]
}
EOF
//

cfssl gencert -ca=ca.pem -ca-key=ca-key.pem -config=ca-config.json -profile=kubernetes apiserver-csr.json | cfssljson -bare apiserver

#-----------------------
#生成 kubectl 连接集群的证书和私钥,具有admin权限
cat > admin-csr.json <<EOF
{
  "CN": "admin",
  "hosts": [],
  "key": {
    "algo": "rsa",
    "size": 2048
  },
  "names": [
    {
      "C": "CN",
      "L": "BeiJing",
      "ST": "BeiJing",
      "O": "system:masters",
      "OU": "System"
    }
  ]
}
EOF

cfssl gencert -ca=ca.pem -ca-key=ca-key.pem -config=ca-config.json -profile=kubernetes admin-csr.json | cfssljson -bare admin


#-----------------------
#生成 kube-proxy 的证书和私钥
cat > kube-proxy-csr.json <<EOF
{
  "CN": "system:kube-proxy",
  "hosts": [],
  "key": {
    "algo": "rsa",
    "size": 2048
  },
  "names": [
    {
      "C": "CN",
      "L": "BeiJing",
      "ST": "BeiJing",
      "O": "k8s",
      "OU": "System"
    }
  ]
}
EOF

cfssl gencert -ca=ca.pem -ca-key=ca-key.pem -config=ca-config.json -profile=kubernetes kube-proxy-csr.json | cfssljson -bare kube-proxy

Be sure to check whether the generated certificate configuration file is in place here

2. Prepare binary files and tokens
Prepare binary files
cp ca*pem apiserver*pem /opt/kubernetes/ssl/

#Upload kubernetes-server-linux-amd64.tar.gz to the /opt/k8s/ directory and decompress the kubernetes compressed package
cd /opt/k8s/
tar zxvf kubernetes-server-linux-amd64.tar.gz

cd /opt/k8s/kubernetes/server/bin
cp kube-apiserver kubectl kube-controller-manager kube-scheduler /opt/kubernetes/bin/
ln -s /opt/kubernetes/bin/* /usr/local/bin/
Prepare token token
#Create a bootstrap token authentication file, which will be called when apiserver starts. Then it is equivalent to creating a user in the cluster, and then you can use RBAC to authorize him.
cd /opt/k8s/
vim token.sh
#!/bin/bash
#获取随机数前16个字节内容,以十六进制格式输出,并删除其中空格
BOOTSTRAP_TOKEN=$(head -c 16 /dev/urandom | od -An -t x | tr -d ' ')
#生成 token.csv 文件,按照 Token序列号,用户名,UID,用户组 的格式生成
cat > /opt/kubernetes/cfg/token.csv <<EOF
${BOOTSTRAP_TOKEN},kubelet-bootstrap,10001,"system:kubelet-bootstrap"
EOF

chmod +x token.sh
./token.sh

cat /opt/kubernetes/cfg/token.csv

3. Start the kube-apiserver service
Prepare startup script
vim /opt/k8s/k8s-cert/apiserver.sh

#!/bin/bash
#例子: apiserver.sh 192.168.247.10 https://192.168.247.10 :2379,https://192.168.247.30:2379,https://192.168.247.40:2379
#创建 kube-apiserver 启动参数配置文件
MASTER_ADDRESS=$1
ETCD_SERVERS=$2

cat >/opt/kubernetes/cfg/kube-apiserver <<EOF
KUBE_APISERVER_OPTS="--logtostderr=false  \\
--v=2 \\
--log-dir=/opt/kubernetes/logs \\
--etcd-servers=${ETCD_SERVERS} \\
--bind-address=${MASTER_ADDRESS} \\
--secure-port=6443 \\
--advertise-address=${MASTER_ADDRESS} \\
--allow-privileged=true \\
--service-cluster-ip-range=10.0.0.0/24 \\
--enable-admission-plugins=NamespaceLifecycle,LimitRanger,ServiceAccount,ResourceQuota,NodeRestriction \\
--authorization-mode=RBAC,Node \\
--enable-bootstrap-token-auth=true \\
--token-auth-file=/opt/kubernetes/cfg/token.csv \\
--service-node-port-range=30000-50000 \\
--kubelet-client-certificate=/opt/kubernetes/ssl/apiserver.pem \\
--kubelet-client-key=/opt/kubernetes/ssl/apiserver-key.pem \\
--tls-cert-file=/opt/kubernetes/ssl/apiserver.pem  \\
--tls-private-key-file=/opt/kubernetes/ssl/apiserver-key.pem \\
--client-ca-file=/opt/kubernetes/ssl/ca.pem \\
--service-account-key-file=/opt/kubernetes/ssl/ca-key.pem \\
--service-account-issuer=api \\
--service-account-signing-key-file=/opt/kubernetes/ssl/apiserver-key.pem \\
--etcd-cafile=/opt/etcd/ssl/ca.pem \\
--etcd-certfile=/opt/etcd/ssl/server.pem \\
--etcd-keyfile=/opt/etcd/ssl/server-key.pem \\
--requestheader-client-ca-file=/opt/kubernetes/ssl/ca.pem \\
--proxy-client-cert-file=/opt/kubernetes/ssl/apiserver.pem \\
--proxy-client-key-file=/opt/kubernetes/ssl/apiserver-key.pem \\
--requestheader-allowed-names=kubernetes \\
--requestheader-extra-headers-prefix=X-Remote-Extra- \\
--requestheader-group-headers=X-Remote-Group \\
--requestheader-username-headers=X-Remote-User \\
--enable-aggregator-routing=true \\
--audit-log-maxage=30 \\
--audit-log-maxbackup=3 \\
--audit-log-maxsize=100 \\
--audit-log-path=/opt/kubernetes/logs/k8s-audit.log"
EOF

#--logtostderr=true:启用日志。输出日志到标准错误控制台,不输出到文件
#--v=4:日志等级。指定输出日志的级别,v=4为调试级别详细输出
#--etcd-servers:etcd集群地址。指定etcd服务器列表(格式://ip:port),逗号分隔
#--bind-address:监听地址。指定 HTTPS 安全接口的监听地址,默认值0.0.0.0
#--secure-port:https安全端口。指定 HTTPS 安全接口的监听端口,默认值6443
#--advertise-address:集群通告地址。通过该 ip 地址向集群其他节点公布 api server 的信息,必须能够被其他节点访问
#--allow-privileged=true:启用授权。允许拥有系统特权的容器运行,默认值false
#--service-cluster-ip-range:Service虚拟IP地址段。指定 Service Cluster IP 地址段
#--enable-admission-plugins:准入控制模块。kuberneres集群的准入控制机制,各控制模块以插件的形式依次生效,集群时必须包含ServiceAccount,运行在认证(Authentication)、授权(Authorization)之后,Admission Control是权限认证链上的最后一环, 对请求API资源对象进行修改和校验
#--authorization-mode:认证授权,启用RBAC授权和节点自管理。在安全端口使用RBAC,Node授权模式,未通过授权的请求拒绝,默认值AlwaysAllow。RBAC是用户通过角色与权限进行关联的模式;Node模式(节点授权)是一种特殊用途的授权模式,专门授权由kubelet发出的API请求,在进行认证时,先通过用户名、用户分组验证是否是集群中的Node节点,只有是Node节点的请求才能使用Node模式授权
#--enable-bootstrap-token-auth:启用TLS bootstrap机制。在apiserver上启用Bootstrap Token 认证
#--token-auth-file=/opt/kubernetes/cfg/token.csv:指定bootstrap token认证文件路径
#--service-node-port-range:指定 Service  NodePort 的端口范围,默认值30000-32767
#–-kubelet-client-xxx:apiserver访问kubelet客户端证书
#--tls-xxx-file:apiserver https证书
#1.20版本必须加的参数:–-service-account-issuer,–-service-account-signing-key-file
#--etcd-xxxfile:连接Etcd集群证书
#–-audit-log-xxx:审计日志
#启动聚合层相关配置:–requestheader-client-ca-file,–proxy-client-cert-file,–proxy-client-key-file,–requestheader-allowed-names,–requestheader-extra-headers-prefix,–requestheader-group-headers,–requestheader-username-headers,–enable-aggregator-routing


#创建 kube-apiserver.service 服务管理文件
cat >/usr/lib/systemd/system/kube-apiserver.service <<EOF
[Unit]
Description=Kubernetes API Server
Documentation=https://github.com/kubernetes/kubernetes

[Service]
EnvironmentFile=-/opt/kubernetes/cfg/kube-apiserver
ExecStart=/opt/kubernetes/bin/kube-apiserver \$KUBE_APISERVER_OPTS
Restart=on-failure

[Install]
WantedBy=multi-user.target
EOF

systemctl daemon-reload
systemctl enable kube-apiserver
systemctl restart kube-apiserver
Execute the script and verify whether the startup is successful
cd /opt/k8s/k8s-cert
./apiserver.sh 192.168.247.10 https://192.168.247.10:2379,https://192.168.247.30:2379,https://192.168.247.40:2379
#执行创建的脚本,注意有两个位置变量,一个是确定本机的IP地址,一个是etcd集群的IP和端口

ps aux | grep kube-apiserver
#检查进程是否启动成功

netstat -natp | grep 6443
#安全端口6443用于接收HTTPS请求,用于基于Token文件或客户端证书等认证

4. Start the scheduler service
Prepare the startup script, which is placed in /opt/k8s
vim /opt/k8s/k8s-cert/scheduler.sh

#!/bin/bash
##创建 kube-scheduler 启动参数配置文件
MASTER_ADDRESS=$1

cat >/opt/kubernetes/cfg/kube-scheduler <<EOF
KUBE_SCHEDULER_OPTS="--logtostderr=false \\
--v=2 \\
--log-dir=/opt/kubernetes/logs \\
--leader-elect=true \\
--kubeconfig=/opt/kubernetes/cfg/kube-scheduler.kubeconfig \\
--bind-address=127.0.0.1"
EOF

#-–kubeconfig:连接 apiserver 用的配置文件,用于识别 k8s 集群
#--leader-elect=true:当该组件启动多个时,自动启动 leader 选举
#k8s中Controller-Manager和Scheduler的选主逻辑:k8s中的etcd是整个集群所有状态信息的存储,涉及数据的读写和多个etcd之间数据的同步,对数据的一致性要求严格,所以使用较复杂的 raft 算法来选择用于提交数据的主节点。而 apiserver 作为集群入口,本身是无状态的web服务器,多个 apiserver 服务之间直接负载请求并不需要做选主。Controller-Manager 和 Scheduler 作为任务类型的组件,比如 controller-manager 内置的 k8s 各种资源对象的控制器实时的 watch apiserver 获取对象最新的变化事件做期望状态和实际状态调整,调度器watch未绑定节点的pod做节点选择,显然多个这些任务同时工作是完全没有必要的,所以 controller-manager 和 scheduler 也是需要选主的,但是选主逻辑和 etcd 不一样的,这里只需要保证从多个 controller-manager 和 scheduler 之间选出一个 leader 进入工作状态即可,而无需考虑它们之间的数据一致和同步。


##生成kube-scheduler证书
cd /opt/k8s/k8s-cert/
#创建证书请求文件
cat > kube-scheduler-csr.json << EOF
{
  "CN": "system:kube-scheduler",
  "hosts": [],
  "key": {
    "algo": "rsa",
    "size": 2048
  },
  "names": [
    {
      "C": "CN",
      "L": "BeiJing",
      "ST": "BeiJing",
      "O": "system:masters",
      "OU": "System"
    }
  ]
}
EOF

#生成证书
cfssl gencert -ca=ca.pem -ca-key=ca-key.pem -config=ca-config.json -profile=kubernetes kube-scheduler-csr.json | cfssljson -bare kube-scheduler

#生成kubeconfig文件
KUBE_CONFIG="/opt/kubernetes/cfg/kube-scheduler.kubeconfig"
KUBE_APISERVER="https://$MASTER_ADDRESS:6443"

kubectl config set-cluster kubernetes \
  --certificate-authority=/opt/kubernetes/ssl/ca.pem \
  --embed-certs=true \
  --server=${KUBE_APISERVER} \
  --kubeconfig=${KUBE_CONFIG}
kubectl config set-credentials kube-scheduler \
  --client-certificate=./kube-scheduler.pem \
  --client-key=./kube-scheduler-key.pem \
  --embed-certs=true \
  --kubeconfig=${KUBE_CONFIG}
kubectl config set-context default \
  --cluster=kubernetes \
  --user=kube-scheduler \
  --kubeconfig=${KUBE_CONFIG}
kubectl config use-context default --kubeconfig=${KUBE_CONFIG}


##创建 kube-scheduler.service 服务管理文件
cat >/usr/lib/systemd/system/kube-scheduler.service <<EOF
[Unit]
Description=Kubernetes Scheduler
Documentation=https://github.com/kubernetes/kubernetes

[Service]
EnvironmentFile=-/opt/kubernetes/cfg/kube-scheduler
ExecStart=/opt/kubernetes/bin/kube-scheduler \$KUBE_SCHEDULER_OPTS
Restart=on-failure

[Install]
WantedBy=multi-user.target
EOF

systemctl daemon-reload
systemctl enable kube-scheduler
systemctl restart kube-scheduler
Execute the script and verify whether the startup is successful
cd /opt/k8s/k8s-cert

./scheduler.sh 192.168.247.10
#执行脚本,主要位置变量,需要写入本机的IP地址

ps aux | grep kube-scheduler
5. Start the controller-manager service
Prepare startup script
vim /opt/k8s/k8s-cert/controller-manager.sh

#!/bin/bash
##创建 kube-controller-manager 启动参数配置文件
MASTER_ADDRESS=$1

cat >/opt/kubernetes/cfg/kube-controller-manager <<EOF
KUBE_CONTROLLER_MANAGER_OPTS="--logtostderr=false \\
--v=2 \\
--log-dir=/opt/kubernetes/logs \\
--leader-elect=true \\
--kubeconfig=/opt/kubernetes/cfg/kube-controller-manager.kubeconfig \\
--bind-address=127.0.0.1 \\
--allocate-node-cidrs=true \\
--cluster-cidr=10.244.0.0/16 \\
--service-cluster-ip-range=10.0.0.0/24 \\
--cluster-signing-cert-file=/opt/kubernetes/ssl/ca.pem \\
--cluster-signing-key-file=/opt/kubernetes/ssl/ca-key.pem  \\
--root-ca-file=/opt/kubernetes/ssl/ca.pem \\
--service-account-private-key-file=/opt/kubernetes/ssl/ca-key.pem \\
--cluster-signing-duration=87600h0m0s"
EOF

#––leader-elect:当该组件启动多个时,自动选举(HA)
#-–kubeconfig:连接 apiserver 用的配置文件,用于识别 k8s 集群
#--cluster-cidr=10.244.0.0/16:pod资源的网段,需与pod网络插件的值设置一致。通常,Flannel网络插件的默认为10.244.0.0/16,Calico插件的默认值为192.168.0.0/16
#--cluster-signing-cert-file/–-cluster-signing-key-file:自动为kubelet颁发证书的CA,与apiserver保持一致。指定签名的CA机构根证书,用来签名为 TLS BootStrapping 创建的证书和私钥
#--root-ca-file:指定根CA证书文件路径,用来对 kube-apiserver 证书进行校验,指定该参数后,才会在 Pod 容器的 ServiceAccount 中放置该 CA 证书文件
#--experimental-cluster-signing-duration:设置为 TLS BootStrapping 签署的证书有效时间为10年,默认为1年


##生成kube-controller-manager证书
cd /opt/k8s/k8s-cert/
#创建证书请求文件
cat > kube-controller-manager-csr.json << EOF
{
  "CN": "system:kube-controller-manager",
  "hosts": [],
  "key": {
    "algo": "rsa",
    "size": 2048
  },
  "names": [
    {
      "C": "CN",
      "L": "BeiJing",
      "ST": "BeiJing",
      "O": "system:masters",
      "OU": "System"
    }
  ]
}
EOF

#生成证书
cfssl gencert -ca=ca.pem -ca-key=ca-key.pem -config=ca-config.json -profile=kubernetes kube-controller-manager-csr.json | cfssljson -bare kube-controller-manager

#生成kubeconfig文件
KUBE_CONFIG="/opt/kubernetes/cfg/kube-controller-manager.kubeconfig"
KUBE_APISERVER="https://$1:6443"

kubectl config set-cluster kubernetes \
  --certificate-authority=/opt/kubernetes/ssl/ca.pem \
  --embed-certs=true \
  --server=${KUBE_APISERVER} \
  --kubeconfig=${KUBE_CONFIG}
kubectl config set-credentials kube-controller-manager \
  --client-certificate=./kube-controller-manager.pem \
  --client-key=./kube-controller-manager-key.pem \
  --embed-certs=true \
  --kubeconfig=${KUBE_CONFIG}
kubectl config set-context default \
  --cluster=kubernetes \
  --user=kube-controller-manager \
  --kubeconfig=${KUBE_CONFIG}
kubectl config use-context default --kubeconfig=${KUBE_CONFIG}


##创建 kube-controller-manager.service 服务管理文件
cat >/usr/lib/systemd/system/kube-controller-manager.service <<EOF
[Unit]
Description=Kubernetes Controller Manager
Documentation=https://github.com/kubernetes/kubernetes

[Service]
EnvironmentFile=-/opt/kubernetes/cfg/kube-controller-manager
ExecStart=/opt/kubernetes/bin/kube-controller-manager \$KUBE_CONTROLLER_MANAGER_OPTS
Restart=on-failure

[Install]
WantedBy=multi-user.target
EOF

systemctl daemon-reload
systemctl enable kube-controller-manager
systemctl restart kube-controller-manager
Execute the script and verify whether the startup is successful
cd /opt/k8s/k8s-cert

./controller-manager.sh 192.168.247.10
#启动脚本,并带上位置变量,位置变量为本机IP

ps aux | grep kube-controller-manager
6. Generate the kubeconfig file for kubectl to connect to the cluster.
Prepare to execute script
vim /opt/k8s/k8s-cert/admin.sh

#!/bin/bash
mkdir /root/.kube
KUBE_CONFIG="/root/.kube/config"
KUBE_APISERVER="https://192.168.247.10:6443"

cd /opt/k8s/k8s-cert/

kubectl config set-cluster kubernetes \
  --certificate-authority=/opt/kubernetes/ssl/ca.pem \
  --embed-certs=true \
  --server=${KUBE_APISERVER} \
  --kubeconfig=${KUBE_CONFIG}
kubectl config set-credentials cluster-admin \
  --client-certificate=./admin.pem \
  --client-key=./admin-key.pem \
  --embed-certs=true \
  --kubeconfig=${KUBE_CONFIG}
kubectl config set-context default \
  --cluster=kubernetes \
  --user=cluster-admin \
  --kubeconfig=${KUBE_CONFIG}
kubectl config use-context default --kubeconfig=${KUBE_CONFIG}
Execute script
./admin.sh

kubectl create clusterrolebinding cluster-system-anonymous --clusterrole=cluster-admin --user=system:anonymous
7. Check the current cluster component status through the kubectl tool
kubectl get cs
#查看当前集群组件状态(都为健康状态即可,如果不健康,需要排错)

kubectl version
#查看版本信息(显示客户端和服务端的版本信息)

6. Deploy Worker node components
1. Operate on all node nodes
mkdir -p /opt/kubernetes/{bin,cfg,ssl,logs}
#创建kubernetes的工作目录(提前创建号两个node的k8s的工作目录)
2. Generate the file scp on master01 to node01
cd /opt/k8s/k8s-cert/kubernetes/server/bin
#在master01中进入到前面解压的用压缩文件,里面有node节点需要用到的两个组件,一个kubelet、一个lube-proxy组件

scp kubelet kube-proxy [email protected]:/opt/kubernetes/bin/
scp kubelet kube-proxy [email protected]:/opt/kubernetes/bin/
#把kubelet、kube-proxy 拷贝到 node 节点的工作目录中(因为是执行文件所以拷贝到bin目录下)
Prepare kubeconfig script file
vim /opt/k8s/k8s-cert/kubeconfig.sh

#!/bin/bash
#example: kubeconfig 192.168.247.10 /opt/k8s/k8s-cert/
#创建bootstrap.kubeconfig文件
#该文件中内置了 token.csv 中用户的 Token,以及 apiserver CA 证书;kubelet 首次启动会加载此文件,使用 apiserver CA 证书建立与 apiserver 的 TLS 通讯,使用其中的用户 Token 作为身份标识向 apiserver 发起 CSR 请求

BOOTSTRAP_TOKEN=$(awk -F ',' '{print $1}' /opt/kubernetes/cfg/token.csv)
#获取token令牌

APISERVER=$1   #位置变量,获取本机ip
SSL_DIR=$2     #获取存放路径。

export KUBE_APISERVER="https://$APISERVER:6443"

# 设置集群参数
kubectl config set-cluster kubernetes \
  --certificate-authority=$SSL_DIR/ca.pem \
  --embed-certs=true \
  --server=${KUBE_APISERVER} \
  --kubeconfig=bootstrap.kubeconfig
#--embed-certs=true:表示将ca.pem证书写入到生成的bootstrap.kubeconfig文件中

# 设置客户端认证参数,kubelet 使用 bootstrap token 认证
kubectl config set-credentials kubelet-bootstrap \
  --token=${BOOTSTRAP_TOKEN} \
  --kubeconfig=bootstrap.kubeconfig

# 设置上下文参数
kubectl config set-context default \
  --cluster=kubernetes \
  --user=kubelet-bootstrap \
  --kubeconfig=bootstrap.kubeconfig

# 使用上下文参数生成 bootstrap.kubeconfig 文件
kubectl config use-context default --kubeconfig=bootstrap.kubeconfig

#----------------------

#创建kube-proxy.kubeconfig文件
# 设置集群参数
kubectl config set-cluster kubernetes \
  --certificate-authority=$SSL_DIR/ca.pem \
  --embed-certs=true \
  --server=${KUBE_APISERVER} \
  --kubeconfig=kube-proxy.kubeconfig

# 设置客户端认证参数,kube-proxy 使用 TLS 证书认证
kubectl config set-credentials kube-proxy \
  --client-certificate=$SSL_DIR/kube-proxy.pem \
  --client-key=$SSL_DIR/kube-proxy-key.pem \
  --embed-certs=true \
  --kubeconfig=kube-proxy.kubeconfig

# 设置上下文参数
kubectl config set-context default \
  --cluster=kubernetes \
  --user=kube-proxy \
  --kubeconfig=kube-proxy.kubeconfig

# 使用上下文参数生成 kube-proxy.kubeconfig 文件
kubectl config use-context default --kubeconfig=kube-proxy.kubeconfig
Execute script file
cd /opt/k8s/k8s-cert/

chmod +x kubeconfig.sh

./kubeconfig.sh 192.168.247.10 /opt/k8s/k8s-cert/
#执行脚本,需要添加两个位置变量,一个本机IP,一个生成的文件所在的目录
cd /opt/k8s/k8s-cert/

scp bootstrap.kubeconfig kube-proxy.kubeconfig [email protected]:/opt/kubernetes/cfg/

scp bootstrap.kubeconfig kube-proxy.kubeconfig [email protected]:/opt/kubernetes/cfg/
#把配置文件 bootstrap.kubeconfig、kube-proxy.kubeconfig 拷贝到 node 节点

#RBAC授权,使用户 kubelet-bootstrap 能够有权限发起 CSR 请求
kubectl create clusterrolebinding kubelet-bootstrap --clusterrole=system:node-bootstrapper --user=kubelet-bootstrap

#如想重新配置CSR可kubectl delete clusterrolebinding kubelet-bootstrap清空CSR请求
3. Install kubelet service on node01
Prepare the execution script file for the kubelet service
mkdir /opt/k8s-cert/
#创建一个目录用来存储脚本文件

vim /opt/k8s-cert/kubelet.sh

#!/bin/bash
#例子:./kubelet.sh 192.168.247.30
NODE_ADDRESS=$1
DNS_SERVER_IP=${2:-"10.0.0.2"}

#创建 kubelet 启动参数配置文件
cat >/opt/kubernetes/cfg/kubelet <<EOF
KUBELET_OPTS="--logtostderr=false \\
--v=2 \\
--log-dir=/opt/kubernetes/logs \\
--hostname-override=${NODE_ADDRESS} \\
--network-plugin=cni \\
--kubeconfig=/opt/kubernetes/cfg/kubelet.kubeconfig \\
--bootstrap-kubeconfig=/opt/kubernetes/cfg/bootstrap.kubeconfig \\
--config=/opt/kubernetes/cfg/kubelet.config \\
--cert-dir=/opt/kubernetes/ssl \\
--pod-infra-container-image=registry.cn-hangzhou.aliyuncs.com/google-containers/pause-amd64:3.0"
EOF

#--hostname-override:指定kubelet节点在集群中显示的主机名或IP地址,默认使用主机hostname;kube-proxy和kubelet的此项参数设置必须完全一致
#--network-plugin:启用CNI
#--kubeconfig:指定kubelet.kubeconfig文件位置,当前为空路径,会自动生成,用于如何连接到apiserver,里面含有kubelet证书,master授权完成后会在node节点上生成 kubelet.kubeconfig 文件
#--bootstrap-kubeconfig:指定连接 apiserver 的 bootstrap.kubeconfig 文件
#--config:指定kubelet配置文件的路径,启动kubelet时将从此文件加载其配置
#--cert-dir:指定master颁发的kubelet证书生成目录
#--pod-infra-container-image:指定Pod基础容器(Pause容器)的镜像。Pod启动的时候都会启动一个这样的容器,每个pod之间相互通信需要Pause的支持,启动Pause需要Pause基础镜像


#----------------------
#创建kubelet配置文件(该文件实际上就是一个yml文件,语法非常严格,不能出现tab键,冒号后面必须要有空格,每行结尾也不能有空格)
cat >/opt/kubernetes/cfg/kubelet.config <<EOF
kind: KubeletConfiguration
apiVersion: kubelet.config.k8s.io/v1beta1
address: ${NODE_ADDRESS}
port: 10250
readOnlyPort: 10255
cgroupDriver: cgroupfs
clusterDNS:
- ${DNS_SERVER_IP}
clusterDomain: cluster.local
failSwapOn: false
authentication:
  anonymous:
    enabled: true
EOF

#PS:当命令行参数与此配置文件(kubelet.config)有相同的值时,就会覆盖配置文件中的该值。


#----------------------
#创建 kubelet.service 服务管理文件
cat >/usr/lib/systemd/system/kubelet.service <<EOF
[Unit]
Description=Kubernetes Kubelet
After=docker.service
Requires=docker.service

[Service]
EnvironmentFile=/opt/kubernetes/cfg/kubelet
ExecStart=/opt/kubernetes/bin/kubelet \$KUBELET_OPTS
Restart=on-failure
KillMode=process

[Install]
WantedBy=multi-user.target
EOF

systemctl daemon-reload
systemctl enable kubelet
systemctl restart kubelet
Execute script
cd /opt
chmod +x kubelet.sh
./kubelet.sh 192.168.247.30
#执行脚本,需要带上本机node节点的IP,此脚本,主要是触发关键kubelet的配置文件,启动kubelet的时候,也相当于给master01发送了CSR认证请求。

ps aux|grep kubelet
#查看是否启动
4. master01 verifies the CSR request
kubectl get csr
#检查到 node01 节点的 kubelet 发起的 CSR 请求,Pending 表示等待集群给该节点签发证书

kubectl certificate approve 【node-csr-duiobEzQ0R93HsULoS9NT9JaQylMmid_nBF3Ei3NtFE(这里面的根据实际的来)】
#通过CSR请求


kubectl get csr
#Approved,Issued 表示已授权 CSR 请求并签发证书

kubectl get node
#查看节点,由于网络插件还没有部署,节点会没有准备就绪,就会显示NotReady

5. Install proxy service on node01
Prepare to execute script
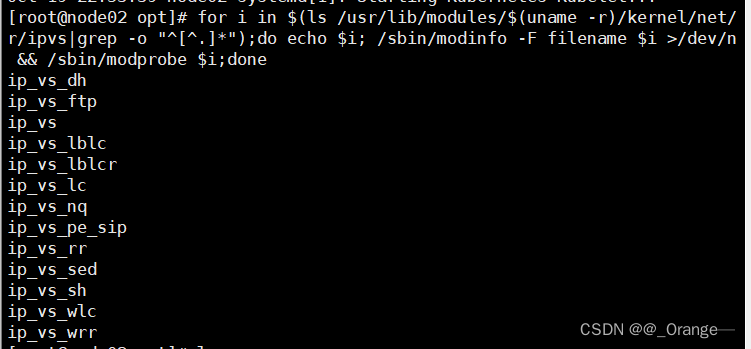
for i in $(ls /usr/lib/modules/$(uname -r)/kernel/net/netfilter/ipvs|grep -o "^[^.]*");do echo $i; /sbin/modinfo -F filename $i >/dev/null 2>&1 && /sbin/modprobe $i;done
#使用一个for循环,加载ip_vs模块
-------------------------------------------------------------------------------
vim /opt/k8s-cert/proxy.sh

#!/bin/bash
#例子: ./proxy.sh 192.168.247.30
NODE_ADDRESS=$1

#创建 kube-proxy 启动参数配置文件
cat >/opt/kubernetes/cfg/kube-proxy <<EOF
KUBE_PROXY_OPTS="--logtostderr=true \\
--v=4 \\
--hostname-override=${NODE_ADDRESS} \\
--cluster-cidr=172.17.0.0/16 \\
--proxy-mode=ipvs \\
--kubeconfig=/opt/kubernetes/cfg/kube-proxy.kubeconfig"
EOF

#--hostnameOverride: 参数值必须与 kubelet 的值一致,否则 kube-proxy 启动后会找不到该 Node,从而不会创建任何 ipvs 规则
#--cluster-cidr:指定 Pod 网络使用的聚合网段,Pod 使用的网段和 apiserver 中指定的 service 的 cluster ip 网段不是同一个网段。 kube-proxy 根据 --cluster-cidr 判断集群内部和外部流量,指定 --cluster-cidr 选项后 kube-proxy 才会对访问 Service IP 的请求做 SNAT,即来自非 Pod 网络的流量被当成外部流量,访问 Service 时需要做 SNAT。
#--proxy-mode:指定流量调度模式为ipvs模式,可添加--ipvs-scheduler选项指定ipvs调度算法(rr|wrr|lc|wlc|lblc|lblcr|dh|sh|sed|nq)
#--kubeconfig: 指定连接 apiserver 的 kubeconfig 文件


#----------------------
#创建 kube-proxy.service 服务管理文件
cat >/usr/lib/systemd/system/kube-proxy.service <<EOF
[Unit]
Description=Kubernetes Proxy
After=network.target

[Service]
EnvironmentFile=-/opt/kubernetes/cfg/kube-proxy
ExecStart=/opt/kubernetes/bin/kube-proxy \$KUBE_PROXY_OPTS
Restart=on-failure

[Install]
WantedBy=multi-user.target
EOF

systemctl daemon-reload
systemctl enable kube-proxy
systemctl restart kube-proxy
Execute script
cd /opt
chmod +x proxy.sh
./proxy.sh 192.168.247.30
#指向脚本,注意需要带入位置参数,为本机的IP地址,此脚本主要时配置proxy的配置文件,并启动它

ps aux |grep kube-proxy
6. node2 starts and installs kubelet and proxy services
#将node01节点的kubelet.sh、proxy.sh文件复制到node02节点
[root@node01 opt]# scp kubelet.sh proxy.sh [email protected]:/opt/

#node02上启动kubelet服务
[root@node02 opt]# ./kubelet.sh 192.168.247.40


#启动proxy服务
[root@node02 opt]# ./proxy.sh 192.168.247.40
[root@node02 opt]# ps -aux |grep kube-proxy
在 node02 节点上操作
#加载 ip_vs 模块

for i in $(ls /usr/lib/modules/$(uname -r)/kernel/net/netfilter/ipvs|grep -o "^[^.]*");do echo $i; /sbin/modinfo -F filename $i >/dev/null 2>&1 && /sbin/modprobe $i;done
kubectl get csr
#检查到 node02 节点的 kubelet 发起的 CSR 请求,Pending 表示等待集群给该节点签发证书

kubectl certificate approve 【node-csr-duiobEzQ0R93HsULoS9NT9JaQylMmid_nBF3Ei3NtFE(这里面的根据实际的来)】
#通过CSR请求


kubectl get csr
#Approved,Issued 表示已授权 CSR 请求并签发证书

kubectl get node
#查看节点,由于网络插件还没有部署,节点会没有准备就绪,就会显示NotReady
7. Deploy CNI network establishment
Three network modes of K8s:
- Pod Network:In this mode, each Pod has an independent IP address. And can be accessed directly between containers. This mode is typically implemented using Linux Bridge.
- Service network: service is a virtual IP, which is a load balancing cluster IP.This mode uses Kubernetes Service to expose application services and provide them with stable virtual IPs. address.
- Node Network:CNI mode usually manages container networking through CNI plugins.
- Communication between containers within a Pod:Use localhost addresses to access each other's ports.
- Communication between Pods in the same Node:Each Pod has a real global IP address, and can directly use the IP address of the other Pod to communicate, Pod1 and Pod2 They are all connected to the same docker0/cni0 bridge through Veth, and the network segment is the same, so they can communicate directly.
- Communication between Pods on different Nodes:
How Flannel UDP mode works:
After data is sent from the source container of the Pod on host A, it is forwarded to the flannel0 interface via the docker0/cni0 network interface of the host where it is located. The flanneld service is monitored on the other end of the flannel0 virtual network card.
Flannel maintains a routing table between nodes through the Etcd service. The flanneld service of source host A encapsulates the original data content into a UDP message, and delivers it to the flanneld service of destination node host B through the physical network card according to its own routing table. After the data arrives, it is unpacked and then directly enters flannel0 of the destination node. interface, and then forwarded to the docker0/cni0 bridge of the destination host, and finally forwarded by docker0/cni0 to the destination container just like native container communication.
How Flannel VXLAN mode works across hosts:
1. After the data frame is sent from the source container of the Pod on host A, it is forwarded to the flannel.1 interface via the docker0/cni0 network interface of the host.
2. flannel.1 After receiving the data frame, add the VXLAN header and encapsulate it in the UDP message
3. Host A sends the packet to the physical network card of host B through the physical network card
4. The physical network card of host B is forwarded to the flannel.1 interface through VXLAN default port 4789 for decapsulation
5. After decapsulation, the kernel sends the data frame to cni0, and finally cni0 sends it to Bridge to this interface in container B.
1. Deploy flannel
Operate on node01 node
cd /opt/k8s-cert
#上传 cni-plugins-linux-amd64-v0.8.6.tgz 和 flannel.tar 到 /opt 目录中
//一个为cni的各种执行文件,一个为docker镜像

docker load -i flannel.tar
#将镜像上传到容器本地中

mkdir  -p /opt/cni/bin
#创建一个存放cni插件的执行工作目录

tar zxvf cni-plugins-linux-amd64-v0.8.6.tgz -C /opt/cni/bin
#将有压缩包解压到cni的工作目录
Operate on master01 node
cd /opt/k8s/k8s-cert
#上传 kube-flannel.yml 文件到 /opt/k8s 目录中,部署 CNI 网络

kubectl apply -f kube-flannel.yml
#基于yml文件创建pod。

kubectl get pods -n kube-system
#查看此pod是否正常运行(runing即可)

kubectl get nodes
#再次查看node节点的状态是否为就绪状态(ready即可)
------------------------------------------------------------
此步骤如果pod一直无法变成runing状态
可以使用 kubectl delete -f kube-flannel.yml  #删除然后重新创建,大部分原因是镜像问题,需要重新下
2. Deploy calico
Comparison of k8s networking solutions (comparison between flannel and calico):
flannel
It is easy to configure and has simple functions. It implements the network based on ouverlay overlay. Due to the process of encapsulation and decapsulation, it will have a certain impact on performance. At the same time, it does not have the ability to configure network policies.
Three network modes: UDP VXLAN HOST-GW Default network segment: 10.244.0.0/16
calico
It is powerful, has no encapsulation and decapsulation process, has a relatively small impact on performance, and has the ability to configure network policies, but the routing table maintenance is more complicated. Default network segment: 192.168.0.0/16 Mode: BGP
Calico mainly consists of three parts:
- Calico CNI plug-in: Mainly responsible for docking with kubernetes for kubelet calling.
- Felix: Responsible for maintaining routing rules, FIB forwarding information database, etc. on the host.
- BIRD: Responsible for distributing routing rules, similar to a router.
- Confd: configuration management component.
How Calico works:
Calico maintains communication for each pod through routing tables. Calico's CNI plug-in will set up a veth pair device for each container, and then connect the other end to the host network space. Since there is no network bridge, the CNI plug-in also needs to configure a veth pair device for each container on the host machine. Routing rules for receiving incoming IP packets.
With such a veth pair device, the IP packets sent by the container will reach the host through the veth pair device, and then the host will send it to the correct gateway based on the next hop address of the routing rules. , then reaches the target host, and then reaches the target container.
These routing rules are maintained and configured by Felix, and the routing information is distributed by the Calico BIRD component based on BGP.
calico actually treats all nodes in the cluster as border routers. Together they form a fully interconnected network and exchange routes with each other through BGP. We call these nodes BGP Peer. .
cd /opt/k8s/k8s-cert/
#上传 calico.yaml 文件到 /opt/k8s 目录中,部署 CNI 网络

vim calico.yaml
//修改里面定义 Pod 的网络(CALICO_IPV4POOL_CIDR),需与前面 kube-controller-manager 配置文件指定的 cluster-cidr 网段一样
    - name: CALICO_IPV4POOL_CIDR
      value: "10.244.0.0/16"      #(3878行)Calico 默认使用的网段为 192.168.0.0/16

kubectl apply -f calico.yaml
#基于calico.yml文件创建pod

kubectl get pods -n kube-system
#查看状态

kubectl get nodes
##等 Calico Pod 都 Running,节点也会准备就绪

--------------------------------------------------------------
此步骤如果pod一直无法变成runing状态
可以使用 kubectl delete -f calico.yml  #删除然后重新创建,大部分原因是镜像问题,需要重新下
3. node02 node deployment
- Operate on node01 node
cd /opt/k8s-cert/
scp kubelet.sh proxy.sh [email protected]:/opt/
#将node01上面的两个组件的安装脚本拷贝到node02上面进行安装组件

scp -r /opt/cni [email protected]:/opt/
#将node01的cni里面的插件拷贝到node02上面
- Operate on node02 node
cd /opt/

chmod +x kubelet.sh
./kubelet.sh 192.168.247.40
#执行kubelet.sh脚本,带入本机的IP地址,进行安装kubelet组件,这里也是相当于申请了CSR认证,需要在master01上进行认证。

systemctl status  kubelet
#查看kube组件是否启动
- Operate on master01 node
kubectl get csr

kubectl certificate approve 【node-csr-BbqEh6LvhD4R6YdDUeEPthkb6T_CJDcpVsmdvnh81y0】
#通过请求(两台都要通过,前面node01的已经通过)

kubectl get csr
- Operate on node02 node
for i in $(ls /usr/lib/modules/$(uname -r)/kernel/net/netfilter/ipvs|grep -o "^[^.]*");do echo $i; /sbin/modinfo -F filename $i >/dev/null 2>&1 && /sbin/modprobe $i;done
#使用for循环,加载 ipvs 模块

cd /opt
chmod +x proxy.sh

./proxy.sh 192.168.247.40
##使用proxy.sh脚本启动proxy服务,位置变量为本机IP地址。

systemctl status kube-proxy
#查看kube-proxy组件服务是否启动
- Operate on the master node
kubectl get nodes
#查看群集中的节点状态

kubectl get pods -n kube-system
#需要等里面的几个pod都启动起来,变成running(显示init可以稍微等下,或者PodInitializing,如果显示pullimage失败,可以安装上述办法重新创建)
8. Deploy core DNS
CoreDNS: You can create a domain name and IP resolution for the service resources in the cluster.
- Operate on all node nodes
cd /opt/
#上传coredns.tar 到/opt目录上

docker load -i coredns.tar
#上传到docker中
- Operate on the master01 node
cd /opt/k8s
#上传 coredns.yaml 文件到 /opt/k8s 目录中,部署 CoreDNS

kubectl apply -f coredns.yaml
#根据coredns.yml文件创建pod

kubectl get pods -n kube-system
#再次查看创建的dns的pod是否运行成功

#DNS 解析测试
kubectl run -it --rm dns-test --image=busybox:1.28.4 sh
#运行一个容器,镜像为busybos:1.28.4,并且直接运行(网不好就多等会),然后解析kubernetes成功即可
If you don't see a command prompt, try pressing enter.
/ # nslookup kubernetes
Server:    10.0.0.2
Address 1: 10.0.0.2 kube-dns.kube-system.svc.cluster.local

Name:      kubernetes
Address 1: 10.0.0.1 kubernetes.default.svc.cluster.local

#出现上述即测试成功
Note:
If the following error occurs
[root@master01 k8s]# kubectl run -it  --image=busybox:1.28.4 sh
If you don't see a command prompt, try pressing enter.
Error attaching, falling back to logs: unable to upgrade connection: Forbidden (user=system:anonymous, verb=create, resource=nodes, subresource=proxy)
Error from server (Forbidden): Forbidden (user=system:anonymous, verb=get, resource=nodes, subresource=proxy) ( pods/log sh)

需要添加 rbac的权限  直接使用kubectl绑定  clusteradmin 管理员集群角色  授权操作权限

[root@master01 k8s]# kubectl create clusterrolebinding cluster-system-anonymous --clusterrole=cluster-admin --user=system:anonymous
clusterrolebinding.rbac.authorization.k8s.io/cluster-system-anonymous created
9. Master02 node deployment
The system initialization script in step 1 needs to be installed and renamed to master02
- Operate on master01
scp -r /opt/etcd/ [email protected]:/opt/
#拷贝matser01上面的etcd证书到master02上面

scp -r /opt/kubernetes/ [email protected]:/opt
#拷贝master01上的整个kubernetes工作目录

scp -r /root/.kube [email protected]:/root
#拷贝运行master01上面的.kube运行文件kubect命令文件到master02上面

scp /usr/lib/systemd/system/{kube-apiserver,kube-controller-manager,kube-scheduler}.service [email protected]:/usr/lib/systemd/system/
#从 master01 节点上拷贝三大组件到master02上面
master02 node modification
vim /opt/kubernetes/cfg/kube-apiserver

KUBE_APISERVER_OPTS="--logtostderr=true \
--v=4 \
--etcd-servers=https://192.168.247.10:2379,https://192.168.247.30:2379,https://192.168.247.40:2379 \
--bind-address=192.168.247.20 \                 #修改
--secure-port=6443 \
--advertise-address=192.168.247.20 \			#修改
......

###修改apiserver组件指向的IP地址,修改监听地址为本即IP地址
systemctl start kube-apiserver.service
systemctl enable kube-apiserver.service
systemctl start kube-controller-manager.service
systemctl enable kube-controller-manager.service
systemctl start kube-scheduler.service
systemctl enable kube-scheduler.service
#在 master02 节点上启动各服务并设置开机自启

ln -s /opt/kubernetes/bin/* /usr/local/bin/


kubectl get nodes
kubectl get nodes -o wide			#-o=wide:输出额外信息;对于Pod,将输出Pod所在的Node名

##此时在master02节点查到的node节点状态仅是从etcd查询到的信息,而此时node节点实际上并未与master02节点建立通信连接,因此需要使用一个VIP把node节点与master节点都关联起来
At this point, the above two masters and two slaves have been installed. Next, load balancing will be configured to balance the load to the two master hosts through nginx.
10. Load balancing deployment (lb01, lb02)
1. Deploy nginx service and configure four-layer load balancing
systemctl stop firewalld
systemctl disable firewalld
setenforce 0
#关闭防火墙

cat > /etc/yum.repos.d/nginx.repo << 'EOF'
[nginx]
name=nginx repo
baseurl=http://nginx.org/packages/centos/7/$basearch/
gpgcheck=0
EOF
#配置nginx的官方在线源,配置本地nginx的yum源

yum -y install nginx
#下载nginx

-----#修改nginx配置文件,配置四层反向代理负载均衡,指定k8s群集2台master的节点ip和6443端口-----
vim /etc/nginx/nginx.conf
events {
    worker_connections  1024;
}
#添加
stream {
    log_format  main  '$remote_addr $upstream_addr - [$time_local] $status $upstream_bytes_sent';

	access_log  /var/log/nginx/k8s-access.log  main;

    upstream k8s-apiserver {
        server 192.168.247.50:6443;
        server 192.168.247.60:6443;
    }
    server {
        listen 6443;
        proxy_pass k8s-apiserver;
    }
}

http {
......
---------------------------------------------------------------------
nginx -t
#检查语法

systemctl start nginx.service
systemctl enable nginx.service
netstat -natp |grep nginx
#启动nginx服务,查看自己的监听6443端口
- Create nginx status check script
vim /etc/nginx/check_nginx.sh
#!/bin/bash
#egrep -cv "grep|$$" 用于过滤掉包含grep 或者 $$ 表示的当前Shell进程ID,即脚本运行的当前进程ID号
count=$(ps -ef | grep nginx | egrep -cv "grep|$$")

if [ "$count" -eq 0 ];then
    systemctl stop keepalived
fi


chmod +x /etc/nginx/check_nginx.sh
2. Deploy keepalived service
yum install keepalived -y
#下载keepalived服务

#修改配置文件
vim /etc/keepalived/keepalived.conf
! Configuration File for keepalived

global_defs {
   # 接收邮件地址
   notification_email {
     [email protected]
     [email protected]
     [email protected]
   }
   # 邮件发送地址
   notification_email_from [email protected]
   smtp_server 127.0.0.1
   smtp_connect_timeout 30
   router_id NGINX_MASTER	#lb01节点的为 NGINX_MASTER,lb02节点的为 NGINX_BACKUP
}

#添加一个周期性执行的脚本
vrrp_script check_nginx {
    script "/etc/nginx/check_nginx.sh"	#指定检查nginx存活的脚本路径
}

vrrp_instance VI_1 {
    state MASTER			#lb01节点的为 MASTER,lb02节点的为 BACKUP
    interface ens33			#指定网卡名称 ens33
    virtual_router_id 51	#指定vrid,两个节点要一致
    priority 100			#lb01节点的为 100,lb02节点的为 90
    advert_int 1
    authentication {
        auth_type PASS
        auth_pass 1111
    }
    virtual_ipaddress {
       192.168.247.100/24	#指定 VIP
    }
    track_script {
        check_nginx			#指定vrrp_script配置的脚本
    }
}
- Start the keepalived service (be sure to start the nginx service first, and then start the keepalived service)
systemctl start keepalived
systemctl enable keepalived
ip a				#查看VIP是否生成
- Modify the bootstrap.kubeconfig and kubelet.kubeconfig configuration files on the node node to VIP
cd /opt/kubernetes/cfg/
vim bootstrap.kubeconfig
server: https://192.168.10.100:6443

vim kubelet.kubeconfig
server: https://192.168.10.100:6443

vim kube-proxy.kubeconfig
server: https://192.168.10.100:6443

//重启kubelet和kube-proxy服务
systemctl restart kubelet.service
systemctl restart kube-proxy.service
- Check the connection status of nginx and node and master nodes on lb01
netstat -natp | grep nginx
tcp        0      0 0.0.0.0:6443            0.0.0.0:*               LISTEN      84739/nginx: master
tcp        0      0 0.0.0.0:80              0.0.0.0:*               LISTEN      84739/nginx: master
tcp        0      0 192.168.10.21:60382     192.168.10.20:6443      ESTABLISHED 84741/nginx: worker
tcp        0      0 192.168.10.100:6443     192.168.10.18:41650     ESTABLISHED 84741/nginx: worker
tcp        0      0 192.168.10.100:6443     192.168.10.19:49726     ESTABLISHED 84741/nginx: worker
tcp        0      0 192.168.10.21:35234     192.168.10.80:6443      ESTABLISHED 84741/nginx: worker
tcp        0      0 192.168.10.100:6443     192.168.10.18:41648     ESTABLISHED 84741/nginx: worker
tcp        0      0 192.168.10.100:6443     192.168.10.19:49728     ESTABLISHED 84742/nginx: worker
tcp        0      0 192.168.10.100:6443     192.168.10.18:41646     ESTABLISHED 84741/nginx: worker
tcp        0      0 192.168.10.21:32786     192.168.10.20:6443      ESTABLISHED 84741/nginx: worker
tcp        0      0 192.168.10.100:6443     192.168.10.18:41656     ESTABLISHED 84741/nginx: worker
tcp        0      0 192.168.10.21:60378     192.168.10.20:6443      ESTABLISHED 84741/nginx: worker
tcp        0      0 192.168.10.21:32794     192.168.10.20:6443      ESTABLISHED 84741/nginx: worker
tcp        0      0 192.168.10.100:6443     192.168.10.19:49724     ESTABLISHED 84741/nginx: worker
tcp        0      0 192.168.10.21:35886     192.168.10.80:6443      ESTABLISHED 84741/nginx: worker
tcp        0      0 192.168.10.100:6443     192.168.10.19:51372     ESTABLISHED 84742/nginx: worker
tcp        0      0 192.168.10.100:6443     192.168.10.19:49722     ESTABLISHED 84741/nginx: worker
tcp        0      0 192.168.10.100:6443     192.168.10.19:49702     ESTABLISHED 84741/nginx: worker
- Operating on master01 node
//测试创建pod
kubectl run nginx --image=nginx

//查看Pod的状态信息
kubectl get pods
NAME                    READY   STATUS              RESTARTS   AGE
nginx-dbddb74b8-nf9sk   0/1     ContainerCreating   0          33s   #正在创建中

kubectl get pods
NAME                    READY   STATUS    RESTARTS   AGE
nginx-dbddb74b8-nf9sk   1/1     Running   0          80s  			#创建完成,运行中

kubectl get pods -o wide
NAME                    READY   STATUS    RESTARTS   AGE   IP            NODE            NOMINATED NODE
nginx-dbddb74b8-26r9l   1/1     Running   0          10m   172.17.36.2   192.168.80.15   <none>
//READY为1/1,表示这个Pod中有1个容器- Operate on the node node of the corresponding network segment, you can directly use the browser or curl command to access
curl 172.17.36.2
- Now check the nginx log on the master01 node
kubectl logs nginx-dbddb74b8-nf9sk
11. Deploy Dashboard (master01)
Dashboard Introduction
Dashboard is a web-based Kubernetes user interface. You can use the dashboard to deploy containerized applications to a Kubernetes cluster, troubleshoot containerized applications, and manage the cluster itself and its accompanying resources. You can use the dashboard to get an overview of the applications running on the cluster, as well as create or modify individual Kubernetes resources (such as deployments, jobs, daemonsets, etc.). For example, you can use the deployment wizard to extend your deployment, initiate rolling updates, restart Pods, or deploy new applications. The dashboard also provides information about the status of Kubernetes resources in the cluster and any errors that may have occurred.
Upload files and expose ports
cd /opt/k8s/k8s-cert/
#上传 recommended.yaml 文件到 /opt/k8s 目录中

------------------------------------------------------------
vim recommended.yaml
#默认Dashboard只能集群内部访问,修改Service为NodePort类型,暴露到外部:
kind: Service
apiVersion: v1
metadata:
  labels:
    k8s-app: kubernetes-dashboard
  name: kubernetes-dashboard
  namespace: kubernetes-dashboard
spec:
  ports:
    - port: 443
      targetPort: 8443
      nodePort: 30001     #添加
  type: NodePort          #添加
  selector:
    k8s-app: kubernetes-dashboard
------------------------------------------------------------------

kubectl apply -f recommended.yaml
#基于yml文件创建pod

kubectl get pods -n kubernetes-dashboard
#查看是否创建成功
Create a service account and bind the default cluster-admin administrator cluster role
kubectl create serviceaccount dashboard-admin -n kube-system
#创建资源,并指定账号

kubectl create clusterrolebinding dashboard-admin --clusterrole=cluster-admin --serviceaccount=kube-system:dashboard-admin
#

kubectl describe secrets -n kube-system $(kubectl -n kube-system get secret | awk '/dashboard-admin/{print $1}')
#查看信息
eyJhbGciOiJSUzI1NiIsImtpZCI6ImRyOUpLNnZNaUxfbHAySGpiV0xKdHlZaTJGU192V3VUX2RieXdqT1RRb2MifQ.eyJpc3MiOiJrdWJlcm5ldGVzL3NlcnZpY2VhY2NvdW50Iiwia3ViZXJuZXRlcy5pby9zZXJ2aWNlYWNjb3VudC9uYW1lc3BhY2UiOiJrdWJlLXN5c3RlbSIsImt1YmVybmV0ZXMuaW8vc2VydmljZWFjY291bnQvc2VjcmV0Lm5hbWUiOiJkYXNoYm9hcmQtYWRtaW4tdG9rZW4tOWNodjciLCJrdWJlcm5ldGVzLmlvL3NlcnZpY2VhY2NvdW50L3NlcnZpY2UtYWNjb3VudC5uYW1lIjoiZGFzaGJvYXJkLWFkbWluIiwia3ViZXJuZXRlcy5pby9zZXJ2aWNlYWNjb3VudC9zZXJ2aWNlLWFjY291bnQudWlkIjoiZTE2ZWIwYzUtMDg2NC00MGIyLTg4MzAtZjAyODYxOTQxMTFiIiwic3ViIjoic3lzdGVtOnNlcnZpY2VhY2NvdW50Omt1YmUtc3lzdGVtOmRhc2hib2FyZC1hZG1pbiJ9.HV7CM-5NFqzz99250Pou_qXrpDdzNbA7kUmYnl3gdcXHSLeUpAQXbrEH_JEkS5LTwp62Q_QCZlrYkO_wKXIzUpQI9_3Th3zZUec76SWlIVXf6rqEh2VZj45jdYXVqpZzwhI-FJ6NQ5H5sIxOQlyP1wKqwtb8XNB6Oj2uQsWEHuJFnKfm7wzF5n8-4WKQ0RVHWPcrCkScgY_POYv1utK55kVgrPk2dFH97eUDOuOv7ZaqiYJqupOluRpoVAqeks0z0i4BZNoZL_nxvuRlN-KBvuTkeWrr5Fb3WyI-BUZNurYFuIDhM6vNjSHuDyTQL2LQbkK2DRPepBFbniZWjMiu-w
Last page to log in
https://NodeIP:30001
Example: https://192.168.247.30:30001