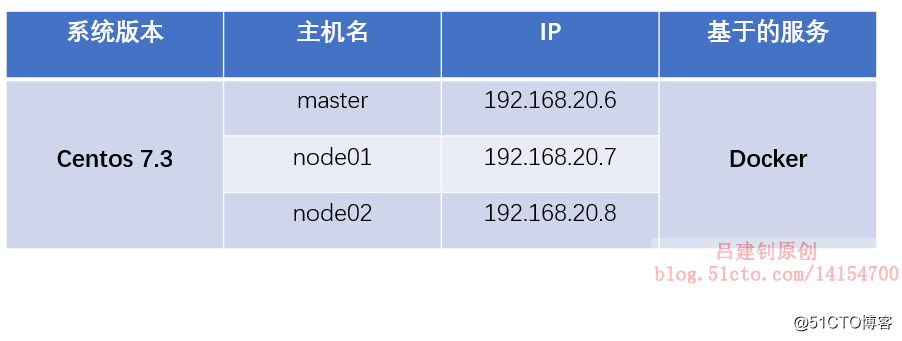
Preface:
K8S Kubernetes is short, because there are between 8 letters K and S, so will be referred k8s.
k8s originally used inside Google's 10 years of technology, its predecessor was called the Borg (Borg), until 2015 was only Google donated to open source projects.
If before we had contact with OpenStack, you should know how to manage VM virtual machine resources can be used OpenStack. So what Management container corresponding open source platform is it? k8s is one of them, before k8s there are many container management platform, docker own docker swarm, there are apache launched Mesos and so on. In comparison, although k8s than others launched a little late, but did not affect its popular level, in addition to its powerful outside, not to mention it also has a good dad.
For a more detailed description k8s, venue to be k8s Chinese documents or k8s official website to see more information.
Then start the installation deployment k8s.
Bowen outline:
First, prepare the environment
Second, pre-deployment preparation
- 1. Check docker version, turn off the firewall and Selinux, empty iptables rule, disable the swap Swap
- 2, configure ssh login-free secret, host name resolution and yum sources
- 3, open iptables bridging and routing forward
three cluster configuration k8s- 1, installation and deployment tools k8s
- 2, initialize the cluster k8s
- 3, the configuration master node status
- 4, arranged node01 node02 added and the cluster master
- 5, after the deployment of optimal allocation
First, prepare the environment
Note: The above three centos 7.3 server, are running docker service, if a test environment, the least memory 2G, CPU dual-core at least, and the version docker services do not recommend too high, the best is 18.09 and below.
To deploy docker service, refer to Bowen: Docker detailed configuration of installation
Second, pre-deployment preparation
1. Check docker version, turn off the firewall and Selinux, empty iptables rule, disable the swap Swap
Note: The following operation requires three docker on the host are configured once, even in a production environment, we need to do the following, as k8s has its own security policy.
[root@master ~]# docker -v       #确认docker版本
Docker version 18.09.0, build 4d60db4
#关闭防火墙
[root@master ~]# systemctl stop firewalld
[root@master ~]# systemctl disable firewalld
#关闭Selinux
[root@master ~]# setenforce 0
[root@master ~]# vim /etc/sysconfig/selinux
SELINUX=disabled          #将此处改为disabled
[root@master ~]# iptables -F    #清空iptables规则
#重启docker服务
[root@master ~]# systemctl daemon-reload
[root@master ~]# systemctl restart docker
#禁用swap交换分区
[root@master ~]# swapoff -a   #临时禁用swap
[root@master ~]# vim /etc/fstab     #打开自动挂载的配置文件,将swap配置项注释掉
#/dev/mapper/cl-swap     swap                    swap    defaults        0 0
#就注释掉上面那行
[root@node02 ~]# mount -a    #重新加载挂载的配置文件
[root@node02 ~]# free -h     #确认输出的swap行如下(都为0):
Swap:            0B          0B          0B
2, configure ssh login-free secret, host name resolution and yum sources
Note: The following operation is not particularly described, can operate on the master host
[root@master ~]# tail -3 /etc/hosts        #在该文件添加三台主机的解析
192.168.20.6 master
192.168.20.7 node01
192.168.20.8 node02
#配置ssh免密登录(为了方便在主机间复制配置文件,可不做)
[root@master ~]# ssh-keygen -t rsa
[root@master ~]# ssh-copy-id node01
[root@master ~]# ssh-copy-id node02
#将更改后的hosts文件发送到node01及node02
[root@master ~]# scp /etc/hosts node01:/etc/
[root@master ~]# scp /etc/hosts node02:/etc/
#接下来配置yum源
[root@master ~]# vim /etc/yum.repos.d/kubernetes.repo  #编辑yum文件
[kubernetes]
name=kubneters
baseurl=https://mirrors.aliyun.com/kubernetes/yum/repos/kubernetes-el7-x86_64/
enabled=1
gpgcheck=0
#以上url是阿里开源镜像站,可复制网址自行查看
[root@master yum.repos.d]# yum repolist    #查看刚刚配置的yum源中有没有可用的包
kubernetes               kubneters                      421  #返回的这一行不可为0
[root@master yum.repos.d]# yum makecache    #制作yum元数据缓存
#将yum源的配置文件复制到另外两台节点主机上
[root@master ~]# scp /etc/yum.repos.d/kubernetes.repo node01:/etc/yum.repos.d/
[root@master ~]# scp /etc/yum.repos.d/kubernetes.repo node02:/etc/yum.repos.d/
#在另外两台主机上,都需执行以下两条命令
[root@node01 ~]# yum repolist
kubernetes               kubneters                      421  #返回的这一行不可为0
[root@node01 ~]# yum makecache
3, open iptables bridging and routing and forwarding
Similarly, the configuration is not specifically described, can be disposed on the master.
#打开iptables桥接功能
[root@master ~]# vim /etc/sysctl.d/k8s.conf    #写入以下配置
net.bridge.bridge-nf-call-iptables = 1
net.bridge.bridge-nf-call-ip6tables = 1
[root@master ~]# sysctl -p /etc/sysctl.d/k8s.conf   #刷新配置
net.bridge.bridge-nf-call-iptables = 1
net.bridge.bridge-nf-call-ip6tables = 1
# PS:如果报错“找不到文件”,需要执行下面的命令以便加载一个模块。
[root@master ~]# modprobe br_netfilter    #加载br_netfileter模块
#将配置的k8s.conf文件复制到另外两台节点
#将配置文件复制到另外两台节点后,需要在node01及02上分别执行下面的命令进行刷新
[root@node02 ~]# sysctl -p /etc/sysctl.d/k8s.conf     #刷新配置文件
#接下来开启路由转发(三台docker主机上都需要进行以下操作)
[root@master ~]# echo "net.ipv4.ip_forward = 1" >> /etc/sysctl.conf
#开启路由转发
[root@master ~]# sysctl -p    #刷新配置
net.ipv4.ip_forward = 1
Configuring this point, the work prior to the deployment is complete.
Before performing the next operation, you need to download the image I provided.
Third, the cluster configuration k8s
1, installation and deployment tools k8s
Note: The following operations are performed on the master host
[root@master ~]# yum -y install kubelet-1.15.0-0 kubeadm-1.15.0-0 kubectl-1.15.0-0
#安装k8s的master所需组件
[root@master ~]# systemctl enable kubelet
#将kubelet加入开机自启,但现在不要启动
[root@master ~]# mkdir images
[root@master ~]# cd images/
[root@master images]# rz   #上传我提供的所有镜像包,共8个镜像包
[root@master images]# ls   #确认上传的镜像包
coredns-1-3-1.tar         kube-proxy-1-15.tar
etcd-3-3-10.tar           kube-scheduler-1-15.tar
kube-apiserver-1-15.tar   myflannel-11-0.tar
kube-controller-1-15.tar  pause-3-1.tar
#接下来导入上传的镜像包到docker镜像中
[root@master images]# docker load < coredns-1-3-1.tar
[root@master images]# docker load < etcd-3-3-10.tar
[root@master images]# docker load < kube-apiserver-1-15.tar
[root@master images]# docker load < kube-controller-1-15.tar
[root@master images]# docker load < kube-proxy-1-15.tar
[root@master images]# docker load < kube-scheduler-1-15.tar
[root@master images]# docker load < pause-3-1.tar
[root@master images]# docker load < myflannel-11-0.tar
2, initialize the cluster k8s
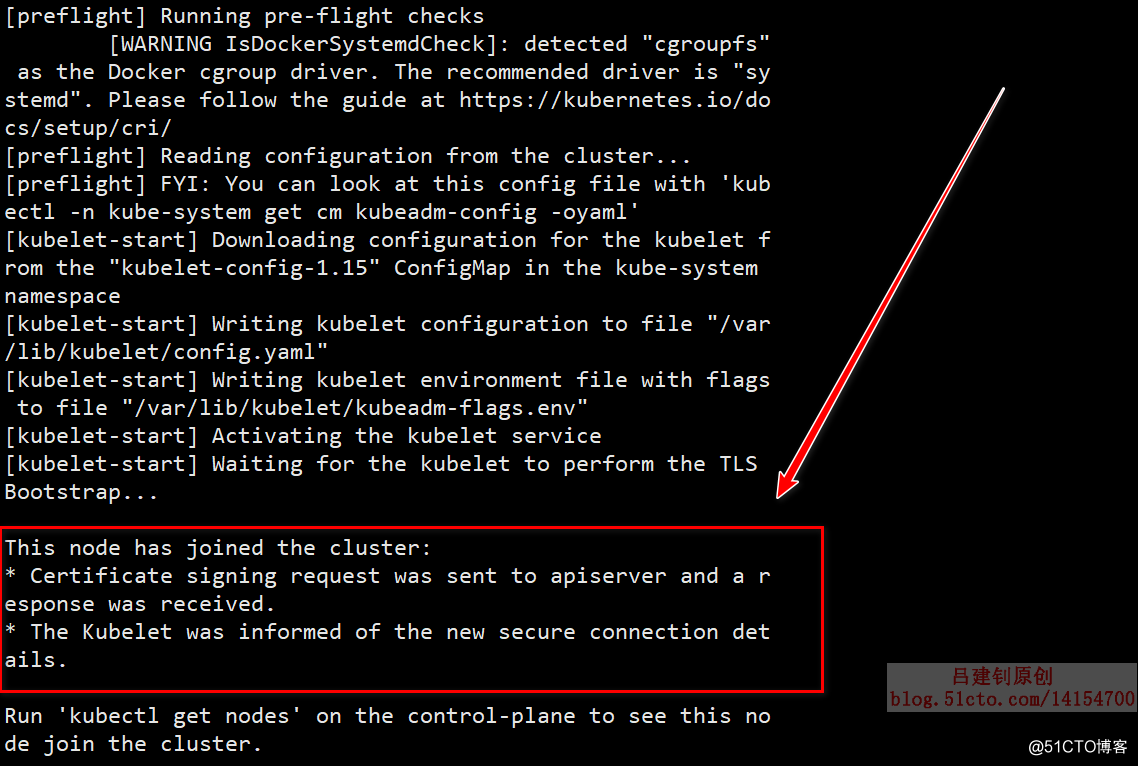
[root@master images]# kubeadm init --kubernetes-version=v1.15.0 --pod-network-cidr=10.224.0.0/16 --service-cidr=10.96.0.0/12 --ignore-preflight-errors=Swap
<!--
这里指定的版本必须和前面yum安装的版本一致。指定的两个网络则是官方建议使用的网段
如果执行上述命令后,返回CPU相关的报错信息,那么需要调大CPU的核心数
初始化成功后,首先复制下面返回的这条命令,并妥善保存
-->
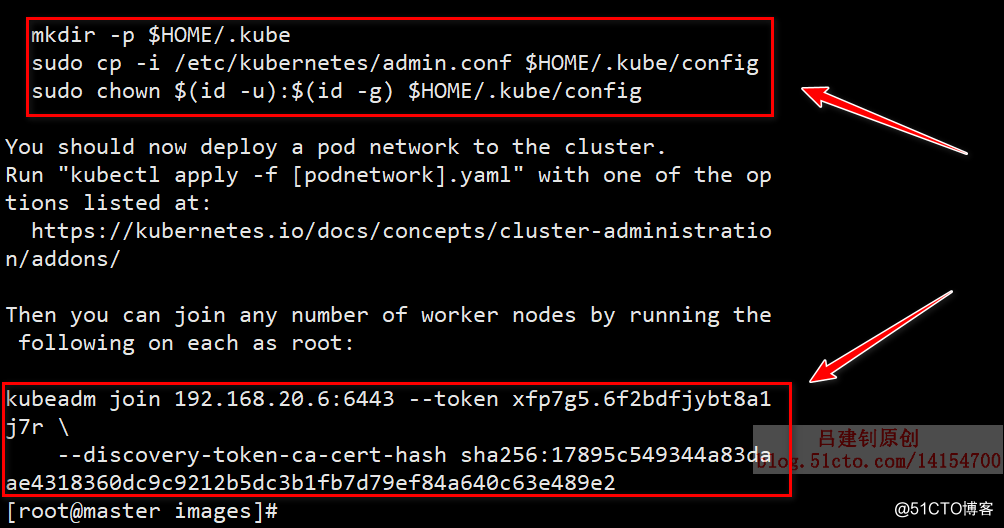
kubeadm join 192.168.20.6:6443 --token xfp7g5.6f2bdfjybt8a1j7r \
--discovery-token-ca-cert-hash sha256:17895c549344a83daae4318360dc9c9212b5dc3b1fb7d79ef84a640c63e489e2
<!--
上面这条命令是用来其他节点加入到当前k8s群集中需要执行的
一旦丢失,特别麻烦,并且只有24小时有效期,每次初始化群集后产生的都不一样
-->
<!--
接下来呢,依次执行返回的其他指令,如下(由于我是root用户,所以就省略了sudo指令):
-->
[root@master images]# mkdir -p $HOME/.kube
[root@master images]# cp -i /etc/kubernetes/admin.conf $HOME/.kube/config
[root@master images]# chown $(id -u):$(id -g) $HOME/.kube/configInformation returned screenshot below for reference:
3, the configuration master node status
[root@master images]# kubectl get nodes    #查看群集节点信息
NAME     STATUS     ROLES    AGE   VERSION
master   NotReady   master   14m   v1.15.0
#可以看到master当前状态为未准备
Then you can go to github official website to do the following in order to see the commands:
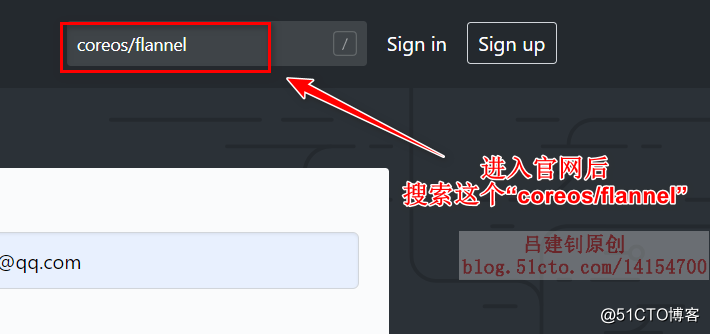
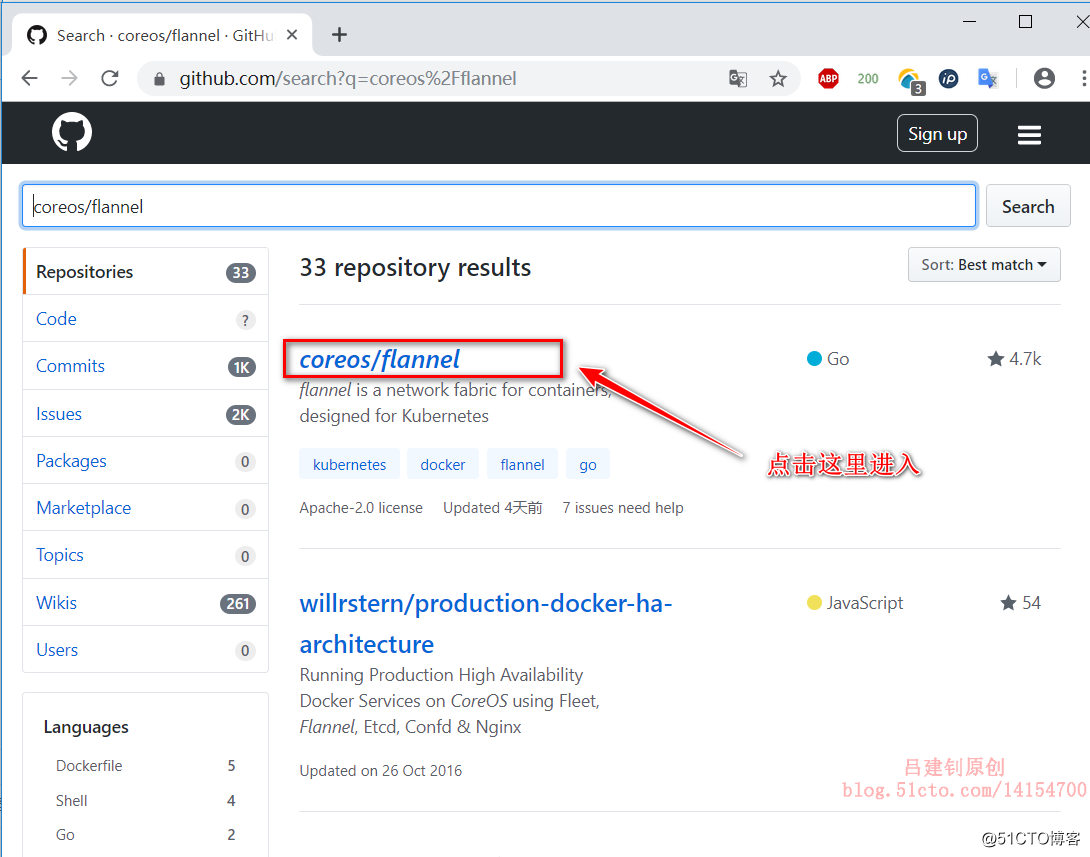
Click to enter, scroll down to the following location and copy the specified command to the master node to perform it: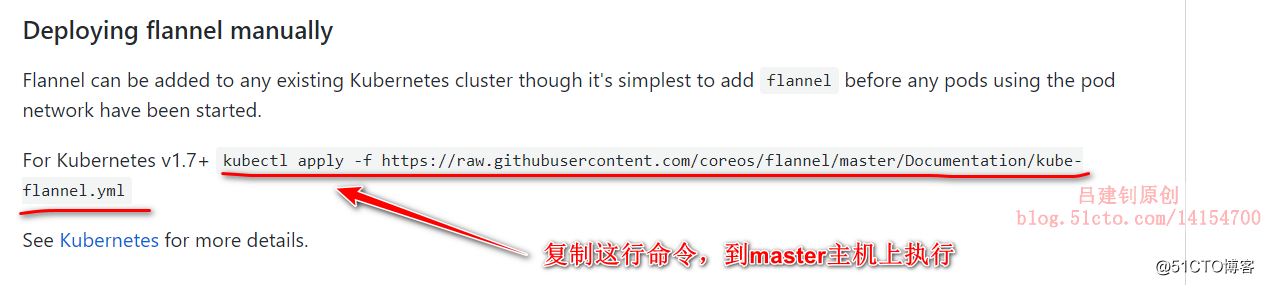
[root@master images]# kubectl apply -f https://raw.githubusercontent.com/coreos/flannel/master/Documentation/kube-flannel.yml
#执行在github官网复制的命令
These are just one way, we recommend using the above method (call about the implementation of remote files) in the case of the network in good condition, if speed is poor, we recommend using the following method:
[root@master images]# wget https://raw.githubusercontent.com/coreos/flannel/master/Documentation/kube-flannel.yml
#将github官网指定的.yml配置文件下载到本地
[root@master images]# ls | grep flannel.yml   #确定下载到了当前目录
kube-flannel.yml
[root@master images]# kubectl apply -f kube-flannel.yml  #指定下载的.yml文件执行相应命令
The method described above, a configuration can be selected from the two.
[root@master images]# kubectl get nodes   #再次查看master状态,发现已经成为了“Ready”
NAME     STATUS   ROLES    AGE   VERSION
master   Ready    master   30m   v1.15.0
[root@master images]# ls /etc/kubernetes/    #k8s的配置文件目录
[root@master images]# ls /etc/kubernetes/manifests/   #k8s的.yaml文件存放目录
4, arranged node01 node02 added and the cluster master
The following operations need to be performed once respectively in node01 and node02
[root@node01 ~]# yum -y install kubelet-1.15.0-0 kubeadm-1.15.0-0
#安装k8s相关组件
[root@node01 ~]# systemctl enable kubelet.service    #设置为开机自启
[root@node01 ~]# mkdir images
[root@node01 ~]# cd images/
[root@node01 images]# rz   #上传我提供的镜像文件,共三个,是下面 ls 命令查看的三个

[root@node01 images]# ls    #需要上传的镜像文件如下
kube-proxy-1-15.tar  myflannel-11-0.tar  pause-3-1.tar
[root@node01 images]# docker load < kube-proxy-1-15.tar
[root@node01 images]# docker load < myflannel-11-0.tar
[root@node01 images]# docker load < pause-3-1.tar
[root@node01 images]# kubeadm join 192.168.20.6:6443 --token xfp7g5.6f2bdfjybt8a1j7r --discovery-token-ca-cert-hash sha256:17895c549344a83daae4318360dc9c9212b5dc3b1fb7d79ef84a640c63e489e2
#执行master初始化群集时返回的命令,以便加入到master的群集中
Returns the following information, then join Success:
The above configuration on its own host configuration once node02
When the configuration node01 and node02 order to view it on the node status master, as follows:
[root@master images]# kubectl get nodes    #在master上查看节点信息都为“Ready”
NAME     STATUS   ROLES    AGE     VERSION
master   Ready    master   51m     v1.15.0
node01   Ready    <none>   4m19s   v1.15.0
node02   Ready    <none>   4m13s   v1.15.0
5, after the deployment of optimal allocation
In fact, the configuration At this point, K8s has been completed, but more convenient for later use k8s, we recommended to optimize the following:
- The default table setting pitch bonds;
- Set kubectl command auto-completion;
- Optimize boot from Kai configurations.
1) Set the default table spacing (this optimization can only be configured on the master, because often need to write .yml file it becomes necessary to change the table spacing)
[root@master images]# cd           #切换至宿主目录
[root@master ~]# echo "set tabstop=2" >> .vimrc   #将此参数写入.vimrc文件
[root@master ~]# bash    #切换shell环境,使更改生效
2) Set kubectl auto-completion command (master node and the node can be configured)
[root@master ~]# yum -y install bash-completion
[root@master ~]# source /usr/share/bash-completion/bash_completion
[root@master ~]# source <(kubectl completion bash)
[root@master ~]# echo "source <(kubectl completion bash)" >> ~/.bashrc
3) Confirm k8s cluster is no problem, and is set to boot from Kai
Host master operates as follows:
[root@master ~]# kubectl get pod -n kube-system
#查看pod资源,类似于docker中的容器,确保返回的信息都是running
#“-n kube-system”:是k8s的名称空间
Returns information of the command is as follows: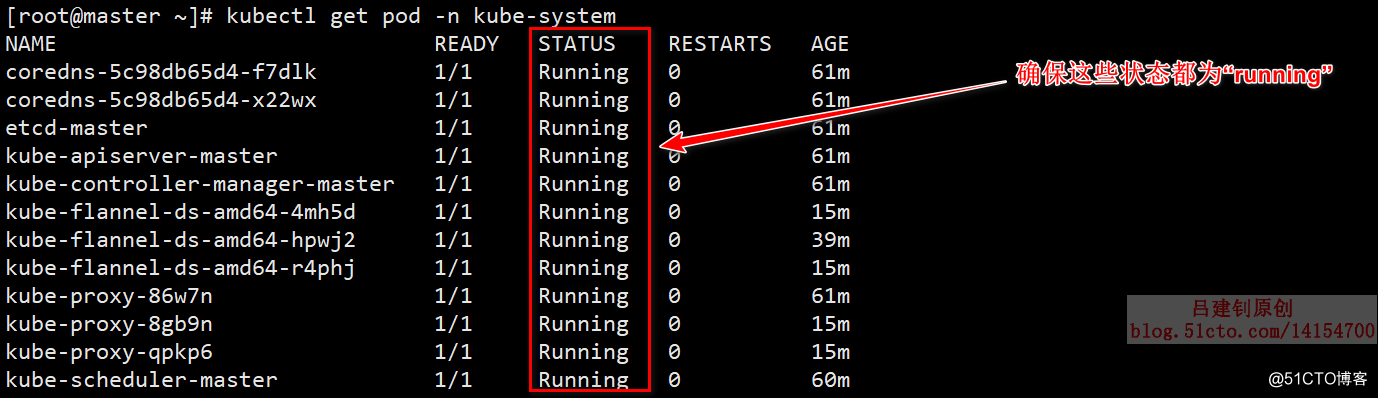
The following operations are required on the master node and the node to set to boot from rev:
[root@master ~]# systemctl enable kubelet
[root@master ~]# systemctl enable docker
Is set to boot from Kai, k8s cluster configuration basically completed, you can now restart the three servers, after restarting, execute the following command, states are still running, it means absolutely no problem.
[root@master ~]# kubectl get pod -n kube-system #重启后验证状态是否还都是running-------- end of this article so far, thanks for reading --------