Article directory
- Weight _ requires both images to be the same size.
- logic operation
- mask (also called mask)
- bit plane decomposition
Weight _ requires both images to be the same size.
If you make a normal watermark, just watermark it directly.
Regarding the understanding of addition operations in the previous article, we should think about it. In the case of giving priority to retaining more effective information of the image, we should impose additive saturation or modular operation restrictions on a certain area of the image, or limit certain types of and channels for special restrictions.
Require
Input images: Two input images are required, they must be the same size and type.
Weights: Each input image requires a corresponding weight. These weights determine the contribution each pixel gets from each input image.
Gamma Correction: This is an optional parameter used to adjust the brightness of the output image.
dst = cv2.addWeighted(src1, alpha, src2, beta, gamma)
- src1: The first input image.
- alpha: the weight of the first image.
- src2: The second input image.
- beta: the weight of the second image.
- gamma: A scalar value added to the output image (required, cannot be omitted, 0 must also be specified in the function).
Note that alpha and beta usually have values between 0 and 1, and gamma is usually set to 0 or so.
[ 1 ] Let data speak
用Jupyter notebookDo
If you use floating-point weights for integer operations in a
cv.addweighted()function, the result will be rounded to the nearest integer.
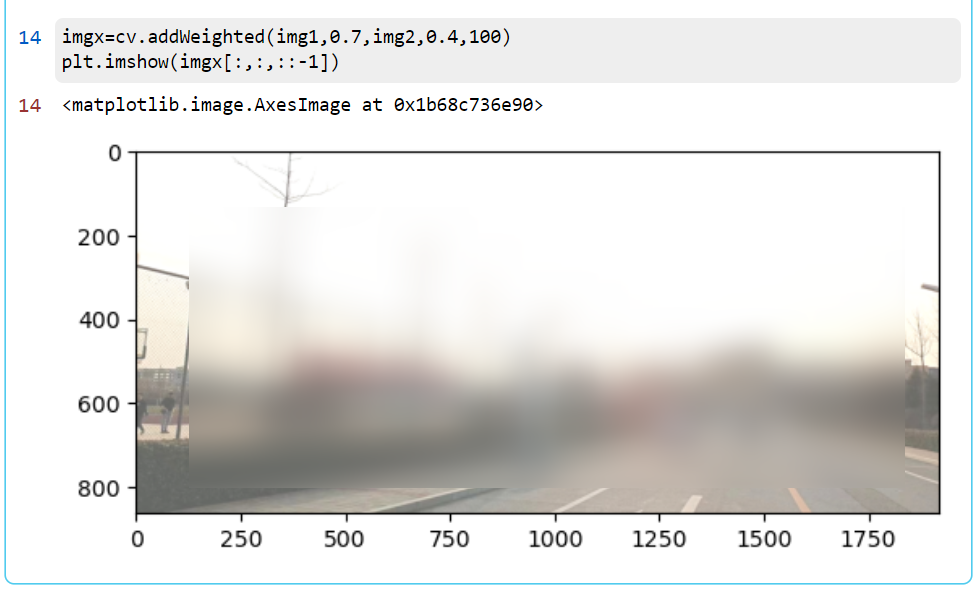
If one image is weighted more than another, the image with the greater weight will be more prominent in the output image. In other words, images with greater weight have a greater impact on the output image. For example, if you have two images img1 and img2, you can use cv.addweighted(img1, 0.7,img2,0.3,0) to create a new image where the content of img1 will be more visible than the content of img2 because img1 The weight (0.7) is greater than the weight of img2 (0.3).
import numpy as np
import cv2 as cv
import matplotlib.pyplot as plt
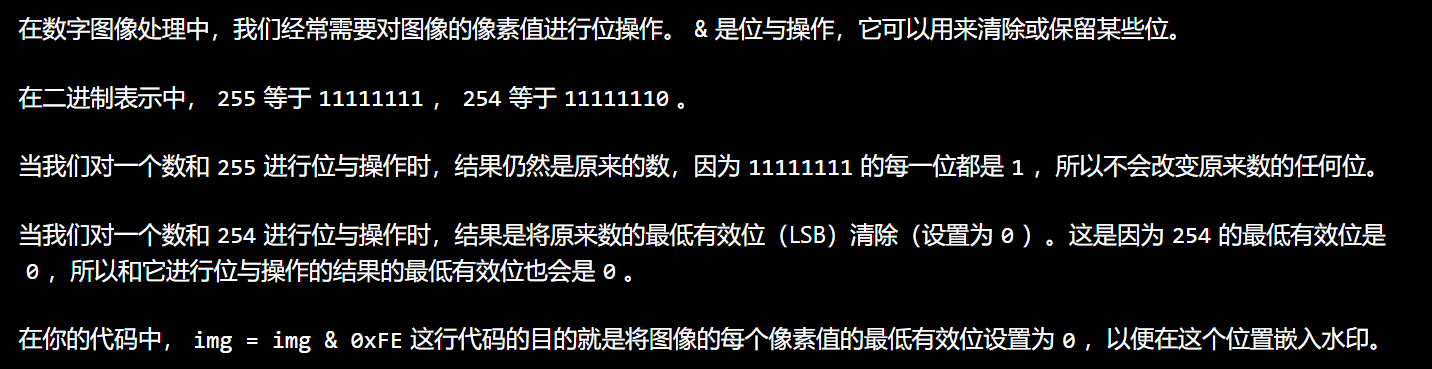
img1 = np.random.randint(0,255,(3,3),dtype=np.uint8)
img1
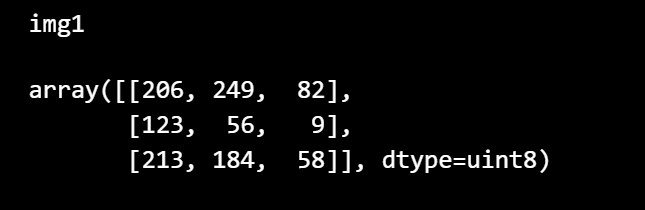
img2 = np.random.randint(0,255,(3,3),dtype=np.uint8)
img2
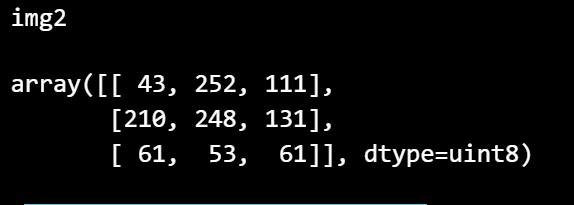
imgx=cv.addWeighted(img1,0.3,img2,0.7,0)
imgx
(1) Finally:
If you use floating point weights in thecv.addweighted() function, the result will be rounded to the nearest integer.

(2) gamma _ scalar value of the output image
In the cv.addweighted() function, gamma is a scalar value that is added to the final weighted sum. The complete formula of this function is: dst = src1*alpha + src2*beta +gaa
In this formula, src1 and src2 are the input images, α and β are their weights, and γ is a scalar value.
gamma 的主要作用是调整输出图像的亮度。
如果 gamma 的值大于0,输出图像会变亮;
如果 gamma 的值小于0,输出图像会变暗;
如果 gamma 的值等于0,输出图像的亮度不变。
So, you can adjust the brightness of the output image by adjusting the gamma value.
[ 2 ] The expressive power of images
Gamma does not equate to increased exposure
Although increasing the gamma value can make the image appear brighter, it is not the same as increasing the exposure.
In photography, exposure refers to the amount of light received by the camera sensor. Increasing exposure usually means a longer shutter speed or a wider aperture, allowing more light to enter the camera.
The adjustment of the gamma value is more like post-adjustment of the brightness of the image after the image has been captured and processed.
Increasing the gamma value will make all pixel values brighter, but it will not change the contrast or color balance of the image, which is different from the effect of increasing exposure.
So, while increasing the gamma value can make the image look brighter, it is not the same as increasing the exposure.
( 1 )gamma=100
( 2 )gamma = -100

logic operation
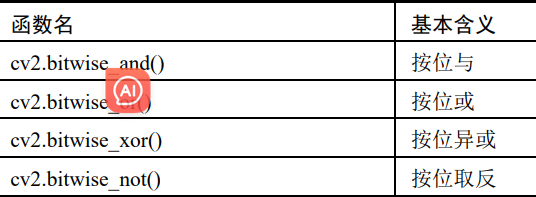
【1】Use cv2.bitwise_and() function to implement bitwise AND operation
dst = cv2.bitwise_and( src1, src2[, mask]]
dst represents an array output value with the same size as the input value.
src1 represents the first input value of array or scalar type.
src2 represents the second input value of array or scalar type.
mask represents an optional operation mask, an 8-bit single-channel array.
The bitwise AND operation has the following characteristics:
(1) Performing a bitwise AND operation on any value N and the value 0 will result in the value 0.
(2) Perform a bitwise AND operation on any value N (only 8-bit values are considered here) and the value 255 (8-bit binary number is 1111 1111), and you will get the value N itself
[ 1 ] Compare functions and logical operators
(1) Speed
import cv2
import numpy as np
import timeit

a = np.random.randint(0,255,(1000,1000),dtype=np.uint8)
b = np.zeros((1000,1000),dtype=np.uint8)
b[0:500,0:500] = 255
b[999,999] = 255

start = timeit.default_timer()
c = cv2.bitwise_and(a,b)
end = timeit.default_timer()
print("cv2.bitwise_and time: ", end - start)

start = timeit.default_timer()
d = a & b
end = timeit.default_timer()
print("& operation time: ", end - start)

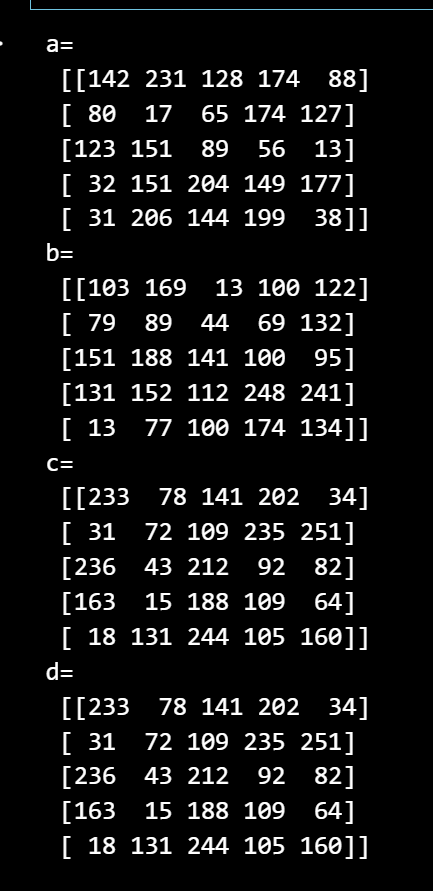
(2)array display
import cv2
import numpy as np
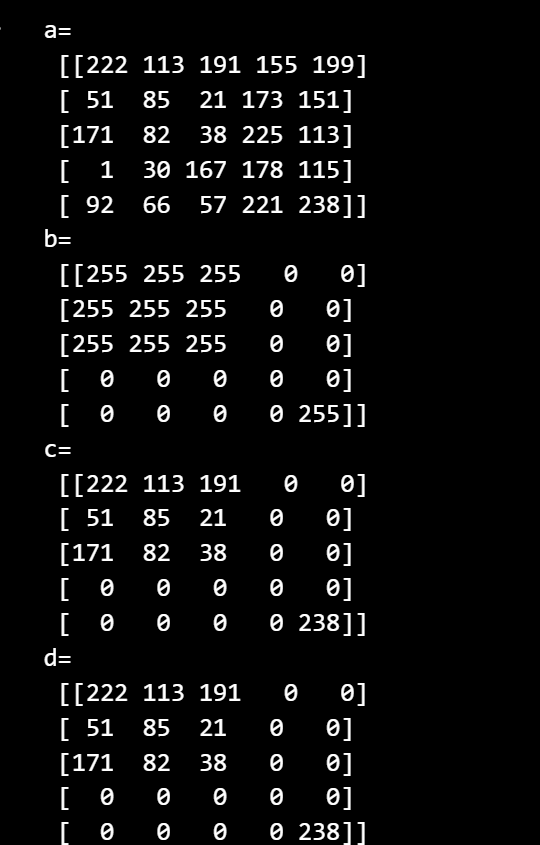
a=np.random.randint(0,255,(5,5),dtype=np.uint8)
b=np.zeros((5,5),dtype=np.uint8)
b[0:3,0:3]=255
b[4,4]=255
c=cv2.bitwise_and(a,b)
d=a&b
print("a=\n",a)
print("b=\n",b)
print("c=\n",c)
print("d=\n",d)
[2] Create a mask
import numpy as np
import cv2 as cv
import matplotlib.pyplot as plt
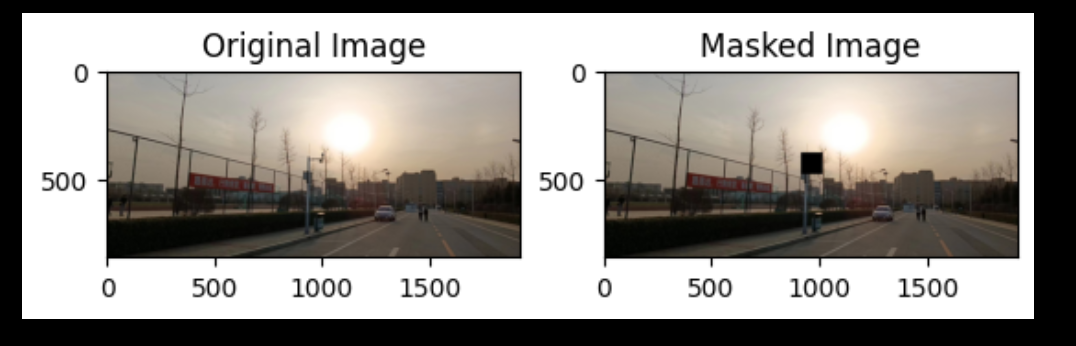
# 读取图像
imgx = cv.imread("Pic/test_img.jpg")
# 创建一个掩码,大小和图像一样,类型为uint8,初始值全为255
mask = np.ones(imgx.shape[:2], dtype="uint8") * 255
# 获取图像的中心坐标
h, w = imgx.shape[:2]
center_h, center_w = h // 2, w // 2
# 将掩码的中心部分设置为0,创建一个小的黑色方块
size = 50 # 方块的大小
mask[center_h - size:center_h + size, center_w - size:center_w + size] = 0
# 使用掩码
masked = cv.bitwise_and(imgx, imgx, mask=mask)
# 显示原图和添加掩码后的图像
plt.subplot(1, 2, 1)
plt.imshow(cv.cvtColor(imgx, cv.COLOR_BGR2RGB))
plt.title('Original Image')
plt.subplot(1, 2, 2)
plt.imshow(cv.cvtColor(masked, cv.COLOR_BGR2RGB))
plt.title('Masked Image')
plt.show()
plt.subplot() is a function in the matplotlib library
The format of the function isplt.subplot(nrows, ncols, index)
-
nrows and ncols are the number of rows and columns of the subgraph. For example, nrows=1 and ncols=2 means creating a subgraph grid with 1 row and 2 columns.
-
index is the index of the subgraph, used to specify the currently active subgraph. Indexing starts from 1 and goes from left to right and top to bottom. For example, index=1 represents the first subgraph, and index=2 represents the second subgraph.
Therefore, plt.subplot(1, 2, 1) means creating a subplot grid with 1 row and 2 columns, and selecting the first subplot as the currently active subplot. You can perform drawing operations on this subgraph, such as plt.plot() or plt.imshow(), etc.
masked = cv.bitwise_and(imgx, imgx, mask=mask)
The bitwise_and function performs a bitwise AND operation on two images. The mask parameter specifies a mask. Only the non-zero parts of the mask will be calculated.
Mask is usually used in image processing to specify operations on certain parts of the image and ignore other parts.
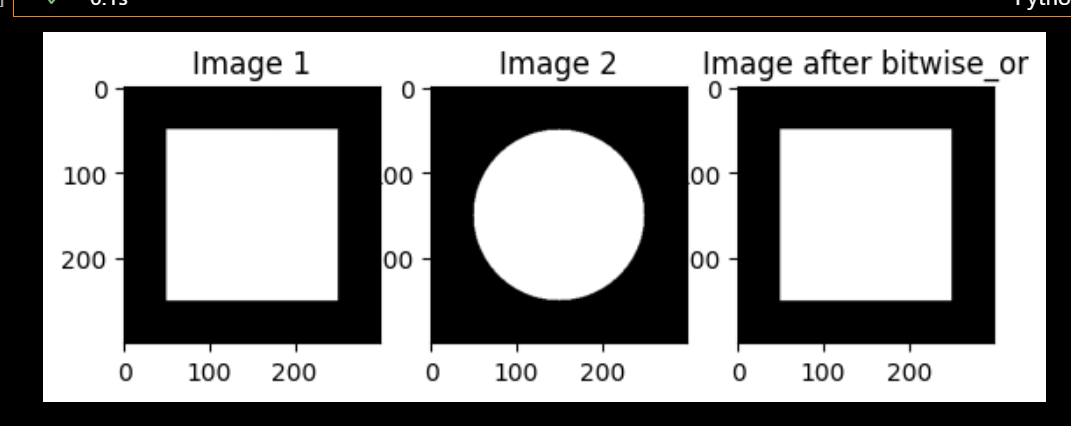
【2】Use cv2.bitwise_or() function to implement bitwise OR operation
dst = cv2.bitwise_or( src1, src2[, mask]] )
where:
dst represents the array output value with the same size as the input value.
src1 represents the first input value of array or scalar type.
src2 represents the second input value of array or scalar type.
mask represents an optional operation mask, an 8-bit single-channel array value
import numpy as np
import cv2 as cv
import matplotlib.pyplot as plt

# 创建两个简单的图像
img1 = np.zeros((300, 300), dtype="uint8")
cv.rectangle(img1, (50, 50), (250, 250), 255, -1)
img2 = np.zeros((300, 300), dtype="uint8")
cv.circle(img2, (150, 150), 100, 255, -1)

# 使用cv2.bitwise_or()函数将两个图像合并
bitwise_or = cv.bitwise_or(img1, img2)

# 显示原图和合并后的图像
plt.subplot(1, 3, 1)
plt.imshow(img1, cmap='gray')
plt.title('Image 1')

plt.subplot(1, 3, 2)
plt.imshow(img2, cmap='gray')
plt.title('Image 2')

plt.subplot(1, 3, 3)
plt.imshow(bitwise_or, cmap='gray')
plt.title('Image after bitwise_or')

plt.show()
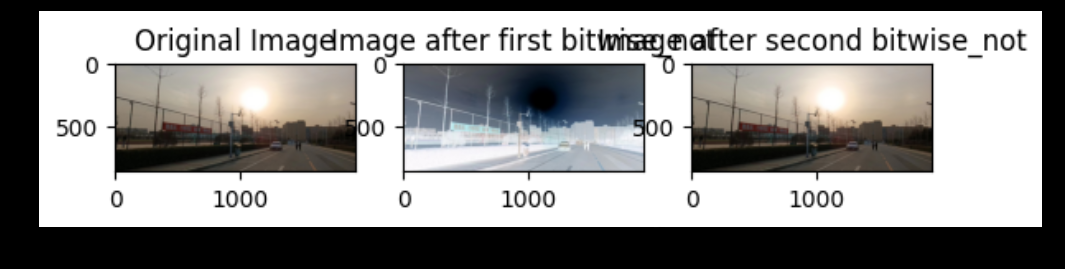
【3】cv2.bitwise_not() to implement bitwise inversion operation
dst = cv2.bitwise_not( src[, mask]] )
dst represents an array output value with the same size as the input value.
src represents the input value of array type.
mask represents an optional operation mask, an 8-bit single-channel array value
If you have a binary number 1101, after bitwise negation, it will become 0010.
import numpy as np
import cv2 as cv
import matplotlib.pyplot as plt

# 读取图像
imgx = cv.imread("Pic/test_img.jpg")

# 对图像进行按位取反操作
imgx_not = cv.bitwise_not(imgx)

# 再次对图像进行按位取反操作
imgx_not_not = cv.bitwise_not(imgx_not)

# 显示原图、第一次取反后的图像和第二次取反后的图像
plt.subplot(1, 3, 1)
plt.imshow(cv.cvtColor(imgx, cv.COLOR_BGR2RGB))
plt.title('Original Image')

plt.subplot(1, 3, 2)
plt.imshow(cv.cvtColor(imgx_not, cv.COLOR_BGR2RGB))
plt.title('Image after first bitwise_not')

plt.subplot(1, 3, 3)
plt.imshow(cv.cvtColor(imgx_not_not, cv.COLOR_BGR2RGB))
plt.title('Image after second bitwise_not')

plt.show()
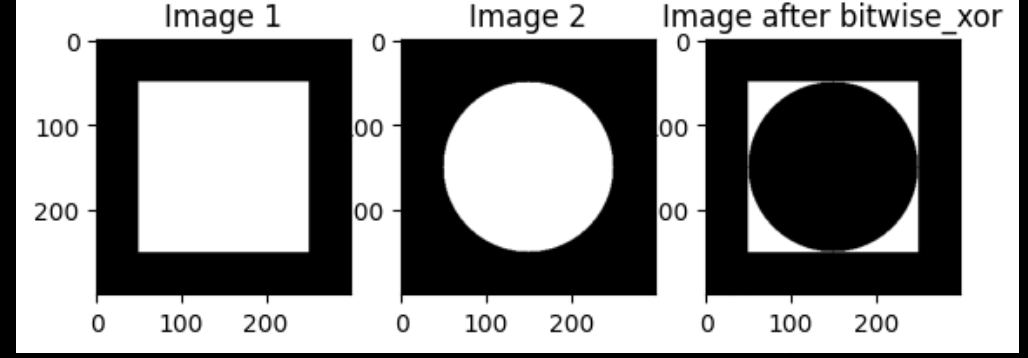
【4】cv2.bitwise_xor() to implement bitwise XOR operation
dst = cv2.bitwise_xor( src1, src2[, mask]] )
Where:
dst represents the array output value with the same size as the input value.
src1 represents the first input value of array or scalar type.
src2 represents the second input value of array or scalar type.
mask represents an optional operation mask, an 8-bit single-channel array value
import cv2
import numpy as np
a=np.random.randint(0,255,(5,5),dtype=np.uint8)
b=np.random.randint(0,255,(5,5),dtype=np.uint8)
b[0:3,0:3]=255
b[4,4]=255
c=cv2.bitwise_xor(a,b)
d=a^b


print("a=\n",a)
print("b=\n",b)
print("c=\n",c)
print("d=\n",d)
import numpy as np
import cv2 as cv
import matplotlib.pyplot as plt

# 创建两个简单的图像
img1 = np.zeros((300, 300), dtype="uint8")
cv.rectangle(img1, (50, 50), (250, 250), 255, -1)
img2 = np.zeros((300, 300), dtype="uint8")
cv.circle(img2, (150, 150), 100, 255, -1)

# 使用cv2.bitwise_xor()函数将两个图像合并
bitwise_xor = cv.bitwise_xor(img1, img2)

# 显示原图和合并后的图像
plt.subplot(1, 3, 1)
plt.imshow(img1, cmap='gray')
plt.title('Image 1')

plt.subplot(1, 3, 2)
plt.imshow(img2, cmap='gray')
plt.title('Image 2')

plt.subplot(1, 3, 3)
plt.imshow(bitwise_xor, cmap='gray')
plt.title('Image after bitwise_xor')

plt.show()
Can use its simple encryption
Find the appropriate "password"
One XOR operation is the encryption rabbit
Decode the encrypted password twice
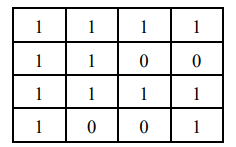
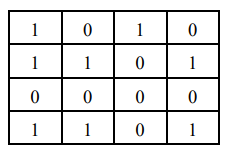
mask (also called mask)
Grayscale image for masking template
# ,操作只会在掩模值为非空的像素点上执行,并将其他像素点的值置为0。
计算结果=cv2.add(参数 1 , 参数 2 , 掩模)
The cv2.add(img1, img2, mask=mask) function adds the corresponding pixel values in img1 and img2, and the result is stored in img3. However, only positions with a value of 1 in the mask will be calculated, and positions with a value of 0 in the mask will be ignored.
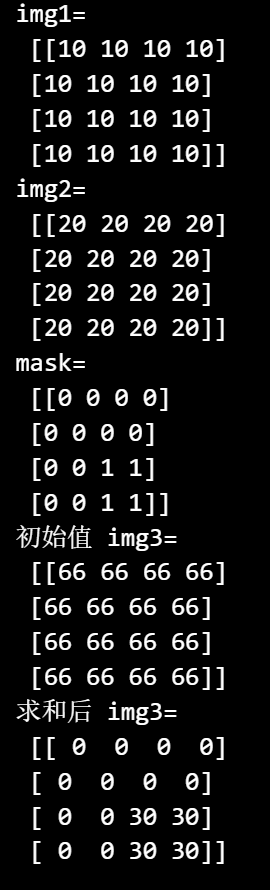
import cv2
import numpy as np

# 创建两个图像和一个掩码
img1 = np.ones((4,4), dtype=np.uint8) * 10
img2 = np.ones((4,4), dtype=np.uint8) * 20
mask = np.zeros((4,4), dtype=np.uint8)
mask[2:4, 2:4] = 1

# 创建一个初始值全为66的图像
img3 = np.ones((4,4), dtype=np.uint8) * 66

print("img1=\n", img1)
print("img2=\n", img2)
print("mask=\n", mask)
print("初始值 img3=\n", img3)

# 使用掩码将img1和img2中对应的像素值相加,结果存储在img3中
img3 = cv2.add(img1, img2, mask=mask)

print("求和后 img3=\n", img3)
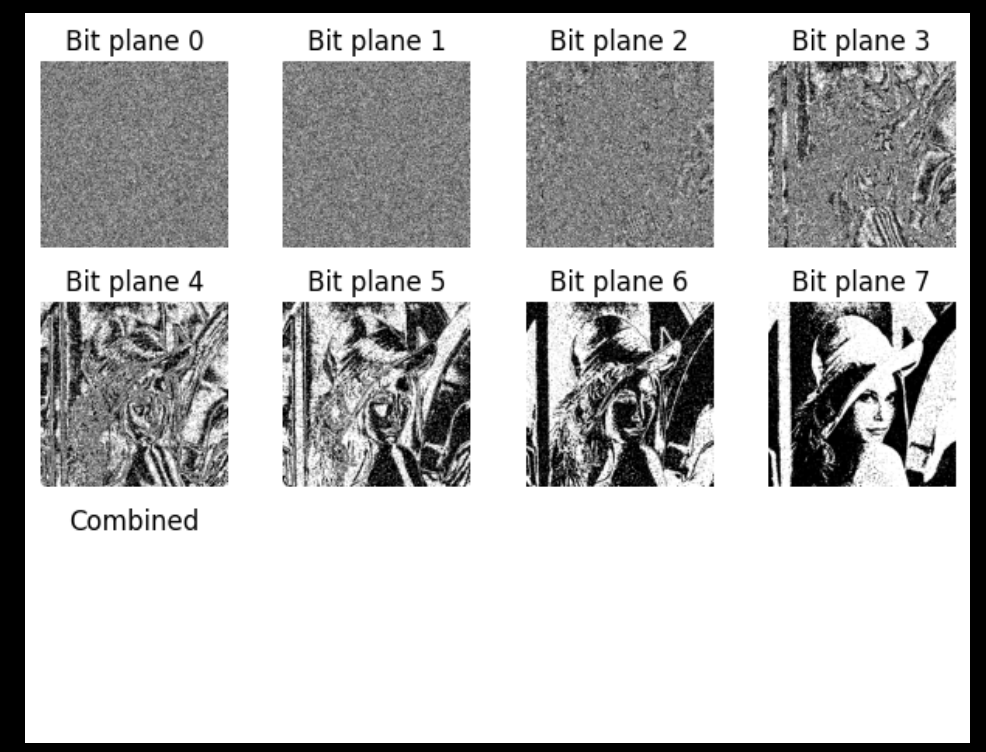
bit plane decomposition
Bitplane decomposition is a method of breaking a digital image into multiple binary bitplanes. In digital images, each pixel is typically represented by several bytes, each consisting of 8 binary bits. Bit plane decomposition extracts the different bit information of each pixel in the image by splitting the binary representation of each pixel into individual bits, or binary planes.

For grayscale images, bit-plane decomposition is commonly used for grayscale images. Each pixel has only an 8-bit intensity value. The value is an integer between 0 and 255. Bit plane decomposition is to decompose this 8-bit binary number into 8 separate bits. Each bit plane is a binary Value image, representing the value of the corresponding bit in the original image.
For color images, each pixel has three 8-bit intensity values (usually the red, green, and blue channels). The value is a vector containing three integers between 0 and 255. You can bit-plane decompose these three channels separately to get three sets of bit-planes. Each set of bit planes is a binary image that represents the value of the corresponding channel and corresponding bit in the original image [You can perform bit plane decomposition on each channel separately, but this will result in 24 bit planes instead of 8. 】
【1】Use:

【2】Disassemble a photo and decompose the weights
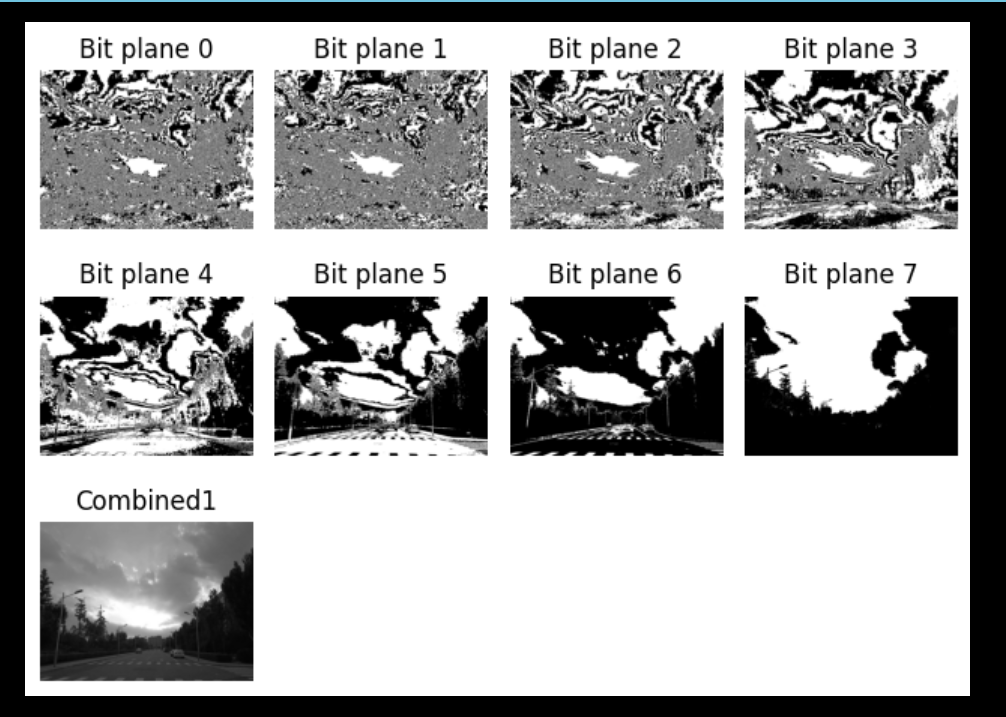
(1) Visualize the contents of the bit plane
import cv2
import numpy as np
import matplotlib.pyplot as plt

# 读取图像
img = cv2.imread('./img/c1c.jpg', 1)
if img is None:
    print('Failed to load image.')
else:
    # 进行位平面分解
    bit_planes = []
    for i in range(8):
        plane = ((img >> i) & 1) * 255
        bit_planes.append(plane)


    # 显示各个位平面的图像
    for i, plane in enumerate(bit_planes):
        plt.subplot(3, 4, i + 1)
        plt.imshow(plane[:,:,::-1], cmap='gray')
        plt.title(f'Bit plane {

      i}')
        plt.axis('off')

    # 显示所有位平面的和
    plt.subplot(3, 4, 9)
    plt.axis('off')
    plt.imshow(img[:,:,::-1])
    plt.title('Combined1')
plt.tight_layout()
plt.show()
(2) Retain the original weight of the bit plane.
import cv2
import numpy as np
import matplotlib.pyplot as plt

# 读取图像
img = cv2.imread('./img/cc.jpg', 1)
if img is None:
    print('Failed to load image.')
else:
    # 进行位平面分解
    bit_planes = []
    for i in range(8):
        plane = ((img >> i) & 1) * (2**i)
        bit_planes.append(plane)

    # 复原位平面
    reconstructed = np.sum(bit_planes, axis=0).astype(np.uint8)

    # 显示各个位平面的图像
    for i, plane in enumerate(bit_planes):
        plt.subplot(3, 4, i + 1)
        plt.imshow(plane[:,:,::-1], cmap='gray')
        plt.title(f'Bit plane {

      i}')
        plt.axis('off')

    # 显示复原的图像
    plt.subplot(3, 4, 9)
    plt.axis('off')
    plt.imshow(reconstructed[:,:,::-1])
    plt.title('Reconstructed')

plt.tight_layout()
plt.show()

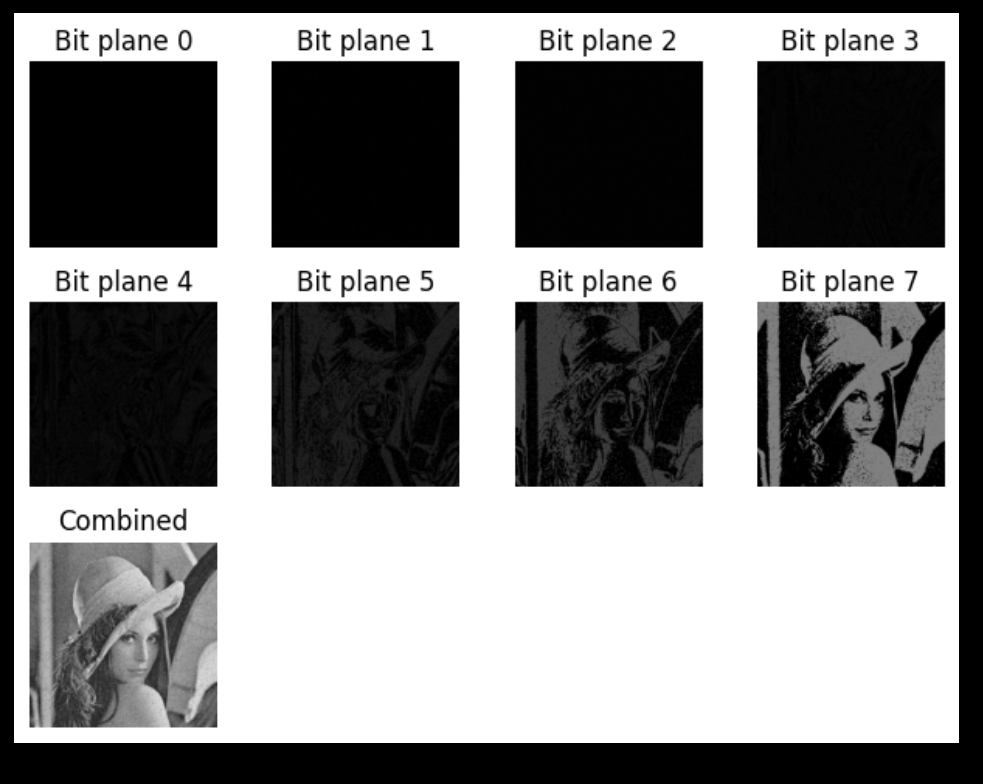
(3) Difference point: plane = ((img >> i) & 1) * [255 or (2**i)] They are handled differently.
plane = ((img >> i) & 1) * 255This line of code shifts each pixel value of the image to the right by i bits and then performs a bitwise AND operation with 1. This way you can get the i-th bit of each pixel value. This bit value is then multiplied by 255, so each pixel value in the resulting image is either 0 (if the i-th bit of the original pixel value was 0), or 255 (if the i-th bit of the original pixel value was 1). This allows you to clearly see the contents of each bitplane.
plane = ((img >> i) & 1) * (2**i)This line of code works similarly, but it multiplies the bit value by2**i instead of 255. This means that each pixel value of the resulting image is either 0 or 2**i. This preserves the original weight of each bit plane, but may make the content of the lower bit plane difficult to see because the pixel value of the lower bit plane is either 0, or a smaller number such as 1, 2, 4, etc.
In general, plane = ((img >> i) & 1) * 255 is more suitable for visualizing the contents of the bit plane and is not suitable for reconstructing the image; and plane = ((img >> i) & 1) * (2**i) is more suitable for retaining bit planes. The original weight of the plane.
【3】Digital watermark
If you are making a normal watermark, just use the watermark mentioned above.
The least significant bit (LSB) is the lowest bit of a binary number, which is bit 0, and is used to represent the minimum value of a binary number. In image processing, least significant bit information hiding is a technique that embeds a binary image into the least significant bits of a carrier image.
This method makes full use of the characteristics of the least significant bit. When we embed a binary image into the least significant bit layer, the changes in these bits are so weak that they are almost imperceptible to the naked eye for the carrier image. Since the hidden binary image is located at the least significant bit, the impact on the carrier image is very insignificant, thus achieving a high degree of concealment.
The least significant bit information hiding technology is widely used in the field of image steganography and can be used to protect the secure transmission of sensitive information. However, it should be noted that least significant bit information hiding is a relatively simple hiding method and is easily detected by some steganalysis algorithms. Therefore, in practical applications, more complex steganography techniques may be needed to improve concealment and security.
(1) Embedding process: Replace the 0th bit plane of the carrier image with digital watermark information (a binary image), extract the 0th bit plane composed of the least significant bits of the carrier image, and obtain the digital watermark information
(1) Image
"Least Significant Bit" bit plane
(2) Watermark processing
In a grayscale binary image, there are only two pixel values: 0 and 255. Two type values are used to represent black and white respectively. 255 of them can be converted to 1, thus obtaining a binary binary image. . In a binary image, only one bit is used to represent a pixel value, and the pixel value has only two possible values: 0 and 1.

(3) Embed
Since the least significant bit of the information has a limited impact on the size of the value, after replacing the value of the least significant bit of the carrier image with the watermark information, the value of the pixel of the carrier image does not change much, which is not enough for the human eye. You can see the difference. Watermark has higher concealment
(2) Realization
Taking the pixel value modulo 2 (or &1 can also be judged), you can obtain the least significant bit of the pixel value. Therefore, the "least significant bit" bit plane of the image can be obtained by taking the modulo 2 of the watermarked carrier image, and the extracted bit plane is the watermark information
In digital image processing, the value of a pixel is usually an integer ranging from 0 to 255, which is represented as an 8-bit binary number. In this binary number, the highest bit (the leftmost bit) is the most important and contains most of the pixel information. In contrast, the lowest bit (the rightmost bit) is the least important and contains only a small portion of the pixel information.
When we need to hide some information in an image (such as a digital watermark), we usually choose to hide it in the least significant bits (LSB) because this has little impact on the original image and is almost invisible.
We will use the number 254 (11111110 in binary) as a mask to set the lowest bit of the pixel value to 0. This can be achieved using bitwise AND operations. The rule of bitwise AND operation is that if both bits are 1, the result is 1, otherwise it is 0. So when a pixel value (an integer in the range 0 to 255) is bitwise ANDed with 254, the lowest bit of the result is always 0, while the other bits remain unchanged. This achieves the purpose of setting the lowest bit of the pixel value to 0.
You can embed information you want to hide, such as a digital watermark, into this lowest bit. This can be achieved using a bitwise OR operation. The rule of bitwise OR operation is that if at least one of the two bits is 1, the result is 1, otherwise it is 0. So, bitwise OR your watermark value (0 or 1) with the pixel value that has been set to 0, if the watermark value is 1, the lowest bit of the result is 1, otherwise the lowest bit of the result is still 0. This achieves the purpose of embedding the watermark into the lowest bit of the pixel value.
The number 254 is used here as a mask to clear the lowest bit of the pixel value so that the watermark can be embedded at that location.
(3) Comparison
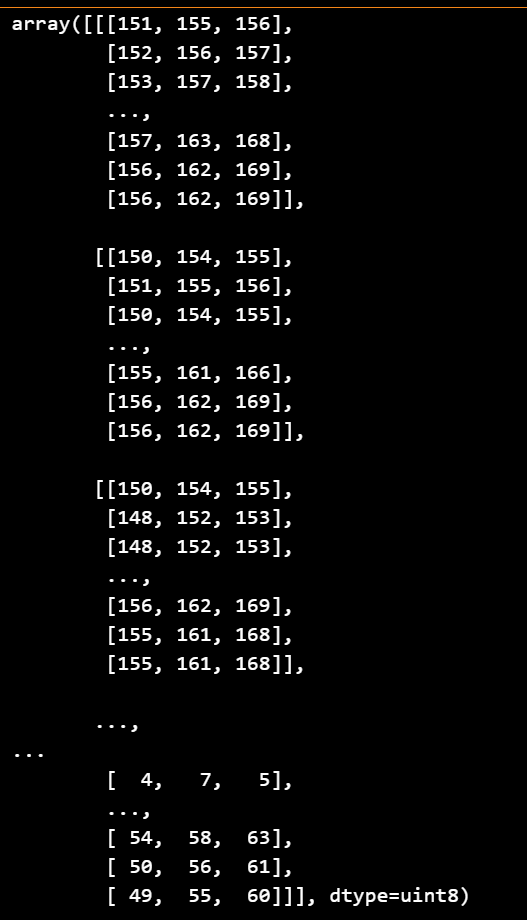
(1) Original picture:
import cv2
import numpy as np
import matplotlib.pyplot as plt
# 读取图像
img = cv2.imread('./Pic/test_img.jpg', 1)
img
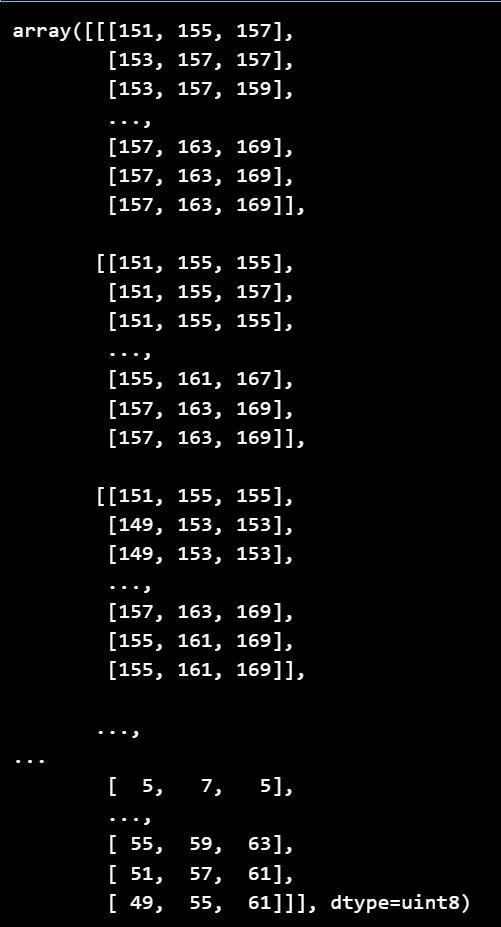
(2) After digital watermarking
import cv2
import numpy as np

# 读取图像
img = cv2.imread('./Pic/test_img.jpg', 1)
if img is None:
    print('Failed to load image.')
else:
    # 创建一个简单的水印
    watermark = np.zeros_like(img)
    watermark[:50, :50] = 255  # 前50行和前50列的像素设置为255

    # 将原图像的最低有效位设置为0
    img = img & 0xFE  # 0xFE = 11111110

    # 将水印的最高有效位嵌入到原图像的最低有效位
    img = img | (watermark >> 7)

    # 显示带有水印的图像
    cv2.imshow('Watermarked Image', img)
    cv2.waitKey(0)
    cv2.destroyAllWindows()
(3) Generate an array whose element values are all 254