Containerized operation and maintenance: Docker Compose guide to building a highly available RabbitMQ cluster
Preface
In the computer world, messaging is like a magical journey, with messages flying back and forth between systems as if they were magically transported. Today, we will enter a field full of fantasy adventures-the implementation of RabbitMQ cluster.
Imagine that RabbitMQ is our messenger rabbit. They are not only smart and flexible, but also able to quickly deliver messages from one place to another. The RabbitMQ cluster is like a powerful rabbit family. They work closely to ensure that messages are never lost, just like a rabbit magic show.
In this fantastic journey, we will unveil the RabbitMQ cluster and explore together how to build a powerful messaging system that can handle high loads and is fault-tolerant, like an omnipotent magic army.
So get ready to follow our bunny friends on this fun and challenging messaging adventure! In this wonderful world, you will discover that the magic of messaging is endless.
For RabbitMQ, you can first explain a few knowledge points.
RabbitMQ related knowledge points
❓: What is the difference between types in Exchanges
-
Direct Exchange:
- Send the message to the queue that exactly matches the message's routing key.
- A message is sent to a queue only if its routing key exactly matches the routing key of the queue bound to the exchange.
- Suitable for situations where exact matching of routing keys is required.
-
Topic Exchange:
- Use wildcards to match the message's routing key to the bound queue.
- You can use the wildcard characters "*" (matches one word) and "#" (matches multiple words) to define patterns for routing keys.
- It is suitable for situations where flexible matching of routing keys is required and supports complex message routing.
-
Fanout Exchange:
- Broadcasts received messages to all bound queues, ignoring the message's routing key.
- All queues bound to the exchange receive the same copy of the message.
- Suitable for situations where messages need to be broadcast to all queues.
-
Headers Exchange:
- Use the header attributes of the message for matching rather than using routing keys.
- You can set key-value pair attributes in the header of the message, and then set the matching header attributes when binding to the queue.
- Suitable for routing based on message header attributes.
Choosing the appropriate exchange type depends on your application architecture and messaging needs. Typically, using direct-connect switches and topic switches can satisfy most scenarios. If you need to broadcast messages between multiple queues, you can use a fanout exchanger. If you need to match based on message header attributes, you can use a header exchanger.
Note that once the switch type is set, it usually cannot be changed. Therefore, you need to make trade-offs and planning based on actual needs when choosing a switch type.
❓:policieswhat is
In RabbitMQ, "policies" are a mechanism for automating the management and configuration of the behavior of exchanges, queues, and bindings. Policies allow you to define a set of rules in your RabbitMQ cluster that are automatically applied to exchanges, queues, and bindings to perform predefined actions when specific conditions are met. This simplifies management, increases efficiency, and ensures consistency.
Policies can be used in many ways, including queue mirroring, expiration time, maximum message length, dead letter queues, etc. By setting policies, you can automatically apply the same configuration across multiple nodes in a cluster without having to make manual configuration changes for each node.
Here are some common uses of strategies:
-
Mirror queue policy: Allows you to automatically set the queue as a mirror queue when the queue is declared, thereby achieving message redundancy backup and high availability.
-
Queue expiration policy: Allows you to set the expiration time of messages in the queue. When the message expires, RabbitMQ will automatically delete it from the queue.
-
Message maximum length policy: allows you to limit the maximum length of messages in the queue. When the number of messages in the queue reaches the set maximum length, new messages will be discarded or processed as dead letters.
-
Dead letter queue strategy: Allows you to automatically send messages that cannot be consumed in the queue to the dead letter queue for further processing.
-
Priority Queue Policy: Allows you to set priorities for messages and put messages into different queues based on priority.
etc.
To set policies, you can use the management interface of the RabbitMQ Management plugin, or you can use a command line tool such as rabbitmqctl. By setting policies, you can automate management and configuration, reduce the need for manual operations, and improve system reliability and maintainability.
❓: How to set the policy
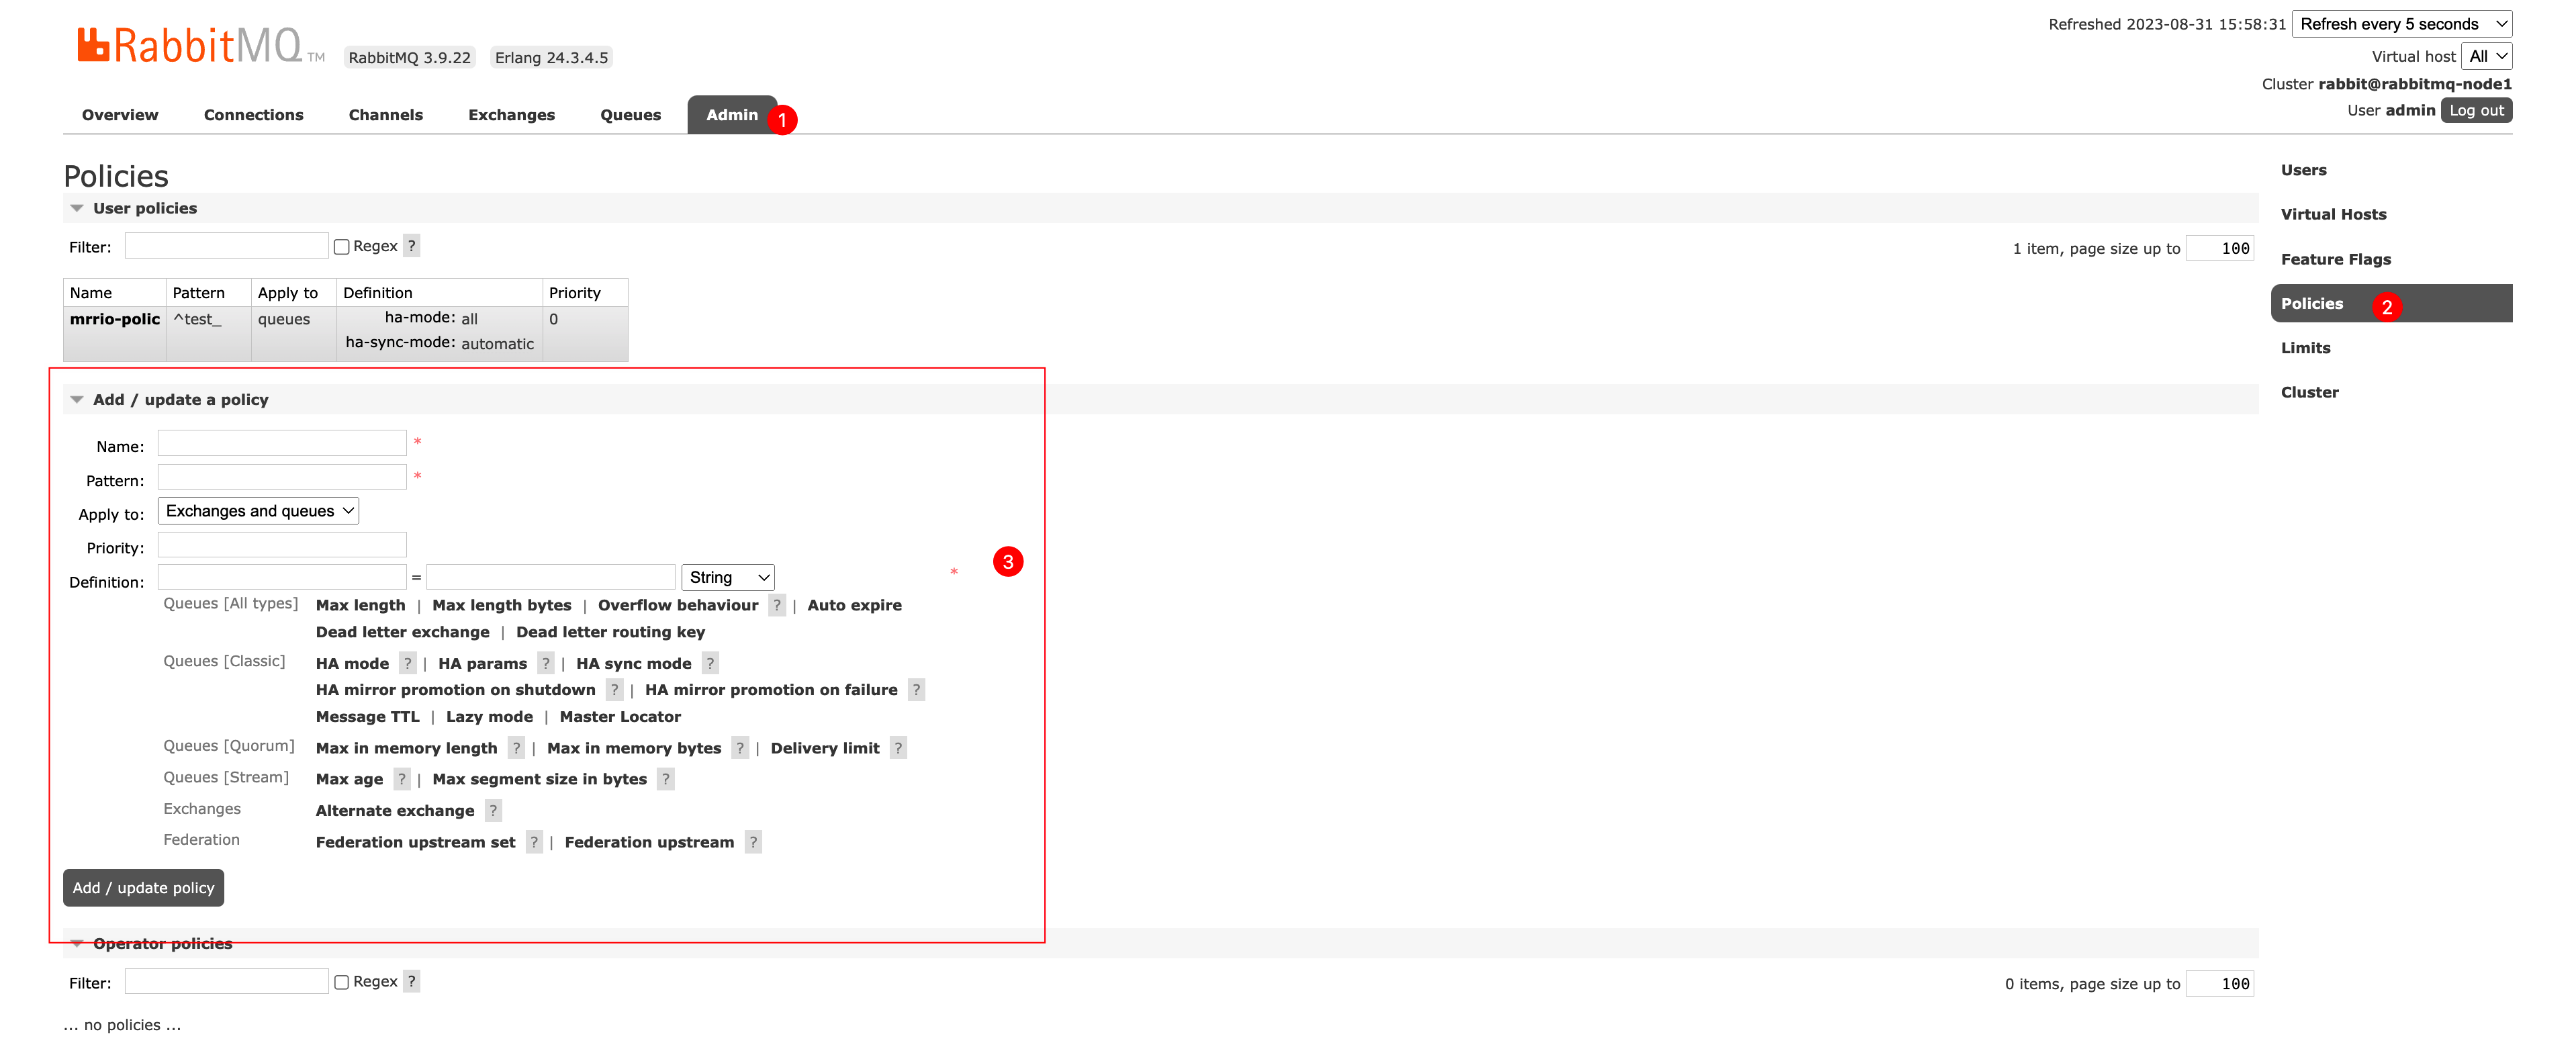
Parameter Description:
-
Pattern:
- This is a pattern used to match exchangers, queues, and bindings. You can use wildcard characters
*and#. - For example, you can use to
amq.*match allamq.exchangers starting with .
- This is a pattern used to match exchangers, queues, and bindings. You can use wildcard characters
-
Definition:
- This is a JSON object containing the policy definition. The specific parameters and values depend on the type of policy you want to configure.
- For example, if you are creating a mirror queue policy, you can define
ha-modeand other related parameters.
-
ha-mode (mirror queue mode):
- Usage:
ha-mode = allorha-mode = exactlyorha-mode = nodes - Function: Define whether the queue is a mirror queue to achieve message redundancy backup and high availability.
all: Set the queue as a mirror queue and create a mirror of the queue on all nodes.exactly: Set the queue as a mirror queue and specify the number of mirror nodes to be created.nodes: Set the queue as a mirror queue and specify the nodes on which the mirror is to be created.
- Usage:
-
ha-params (mirror queue parameters):
- usage:
ha-params = ["node1", "node2"] - Function: Used to
ha-mode = nodesspecify the node list to create queue mirroring.
- usage:
-
expires (message expiration time):
- Usage:
expires = 3600000(milliseconds) - Function: Define the expiration time of messages in the queue, and expired messages will be automatically deleted.
- Usage:
-
message-ttl (message survival time):
- Usage:
message-ttl = 60000(milliseconds) - Function: Define the survival time of messages in the queue. Messages that exceed this time will be automatically deleted.
- Usage:
-
max-length (maximum number of messages):
- usage:
max-length = 1000 - Function: Limit the maximum number of messages in the queue. When the number of messages in the queue reaches the specified value, new messages will be discarded or processed as dead letters.
- usage:
-
dead-letter-exchange (dead letter exchanger):
- usage:
dead-letter-exchange = dlx_exchange - Function: Specify the exchange to which messages in the dead letter queue should be sent.
- usage:
-
dead-letter-routing-key (dead letter routing key):
- usage:
dead-letter-routing-key = dlx_routing_key - Function: Specify the routing key that messages in the dead letter queue should use.
- usage:
-
max-length-bytes (maximum number of message bytes):
- usage:
max-length-bytes = 102400 - Function: Limit the total number of bytes of messages in the queue. When the total number of bytes of messages in the queue reaches the specified value, new messages will be discarded or processed as dead letters.
- usage:
-
lazy-mode (delay mode):
- Usage:
lazy-mode = onorlazy-mode = off - Function: Enable or disable delay mode, which is used to save messages in the queue to disk to reduce memory usage.
- Usage:
-
queue-mode (queue mode):
- Usage:
queue-mode = lazyorqueue-mode = default - Function: Define the working mode of the queue,
lazyindicating delay mode anddefaultindicating default mode.
- Usage:
-
Priority:
- Used to specify the priority of the policy. When multiple policies match, the policy with higher priority will override the lower policy.
- Priority is usually expressed as an integer, with smaller values indicating higher priority.
-
Apply to:
- Used to specify which objects (exchanges, queues, bindings) the policy should apply to.
- You can choose "exchanges", "queues" or "all".
The reason why I say the above is mainly to implement our cluster, which is the strategy I added, because if the queue is created separately, it only belongs to the current node by default, so it needs to rely on mirroring, or this strategy to achieve
docker-compose builds a RabbitMQ cluster
Create docker-compose.yml file
version: '3'
services:
  rabbitmq-node1:
    image: rabbitmq:3.9.22-management
    container_name: rabbitmq-node1
    hostname: rabbitmq-node1
    # command: rabbitmq-server --erlang-cookie=97c78681-3394-208f-9d04-b86cb68f9c60
    entrypoint: /bin/bash -c "rabbitmq-server rabbitmqctl wait /var/lib/rabbitmq/mnesia/rabbit@rabbitmq-node1.pid"
    ports:
      - "5672:5672"
      - "15672:15672"
    volumes:
      - ./rabbitmq_delayed_message_exchange-3.9.0.ez:/plugins/rabbitmq_delayed_message_exchange-3.9.0.ez
      - ./.erlang.cookie:/var/lib/rabbitmq/.erlang.cookie
      - ./rabbitmq.conf:/etc/rabbitmq/rabbitmq.conf
    environment:
      - RABBITMQ_DELAYED_MESSAGE_ENABLED=true
      - RABBITMQ_DEFAULT_USER=admin
      - RABBITMQ_DEFAULT_PASS=123456
      - RABBITMQ_PLUGINS=--offline rabbitmq_delayed_message_exchange
      - RABBITMQ_NODENAME=rabbit@rabbitmq-node1  # 节点名称
      # - RABBITMQ_USE_LONGNAME=true #它用于告诉 RabbitMQ 是否使用长节点名称。
    networks:
      - rabbitmq-network
  rabbitmq-node2:
    image: rabbitmq:3.9.22-management
    container_name: rabbitmq-node2
    hostname: rabbitmq-node2
    entrypoint: /bin/bash -c "rabbitmq-server rabbitmqctl wait /var/lib/rabbitmq/mnesia/rabbit@rabbitmq-node2.pid && rabbitmqctl join_cluster rabbit@rabbitmq-node1"
    # command: rabbitmq-server --erlang-cookie=97c78681-3394-208f-9d04-b86cb68f9c60
    ports:
      - "5673:5672"
      - "15673:15672"
    volumes:
      - ./rabbitmq_delayed_message_exchange-3.9.0.ez:/plugins/rabbitmq_delayed_message_exchange-3.9.0.ez
      - ./.erlang.cookie:/var/lib/rabbitmq/.erlang.cookie
      - ./rabbitmq.conf:/etc/rabbitmq/rabbitmq.conf
    environment:
      - RABBITMQ_DELAYED_MESSAGE_ENABLED=true
      - RABBITMQ_DEFAULT_USER=admin
      - RABBITMQ_DEFAULT_PASS=123456
      - RABBITMQ_PLUGINS=--offline rabbitmq_delayed_message_exchange
      - RABBITMQ_NODENAME=rabbit@rabbitmq-node2  # 节点名称
      # - RABBITMQ_USE_LONGNAME=true #它用于告诉 RabbitMQ 是否使用长节点名称。
    networks:
      - rabbitmq-network
    depends_on:
      - rabbitmq-node1
  rabbitmq-node3:
    image: rabbitmq:3.9.22-management
    container_name: rabbitmq-node3
    hostname: rabbitmq-node3
    # command: rabbitmq-server --erlang-cookie=97c78681-3394-208f-9d04-b86cb68f9c60
    entrypoint: /bin/bash -c "rabbitmq-server rabbitmqctl wait /var/lib/rabbitmq/mnesia/rabbit@rabbitmq-node3.pid && rabbitmqctl join_cluster rabbit@rabbitmq-node1"
    ports:
      - "5674:5672"
      - "15674:15672"
    volumes:
      - ./rabbitmq_delayed_message_exchange-3.9.0.ez:/plugins/rabbitmq_delayed_message_exchange-3.9.0.ez
      - ./.erlang.cookie:/var/lib/rabbitmq/.erlang.cookie
      - ./rabbitmq.conf:/etc/rabbitmq/rabbitmq.conf
    environment:
      - RABBITMQ_DELAYED_MESSAGE_ENABLED=true
      - RABBITMQ_DEFAULT_USER=admin
      - RABBITMQ_DEFAULT_PASS=123456
      - RABBITMQ_PLUGINS=--offline rabbitmq_delayed_message_exchange
#被废弃了  - RABBITMQ_ERLANG_COOKIE=97c78681-3394-208f-9d04-b86cb68f9c60 # 为了确保集群节点通信,需要设置相同的 erlang-cookie
      - RABBITMQ_NODENAME=rabbit@rabbitmq-node3  # 节点名称
      # - RABBITMQ_USE_LONGNAME=true #它用于告诉 RabbitMQ 是否使用长节点名称。
    networks:
      - rabbitmq-network
    depends_on:
      - rabbitmq-node1
networks:
  rabbitmq-network:
    driver: bridge
⚠: The mount used here, the first is the implemented delay queue plug-in, the second is required for mount cookie, this cookiecan be arbitrary, the third is the configuration file
Some of the above statements are explained as follows
entrypoint: /bin/bash -c "rabbitmq-server rabbitmqctl wait /var/lib/rabbitmq/mnesia/[email protected] && rabbitmqctl join_cluster rabbit@rabbitmq-node1": Wait and join the clusterRABBITMQ_PLUGINS=--offline rabbitmq_delayed_message_exchange: Specify the plug-in to be loaded, and load the pre-downloaded oneRABBITMQ_DELAYED_MESSAGE_ENABLED=true: Start message delay function
Create rabbitmq.conf file
# 配置内容
# 这个配置的作用是禁用 "guest" 用户对本地(loopback)的访问。
loopback_users.guest = false
listeners.tcp.default = 5672
# 这个配置指定了集群节点之间的发现机制。`rabbit_peer_discovery_classic_config` 表示使用经典配置方式来进行节点发现。
cluster_formation.peer_discovery_backend = rabbit_peer_discovery_classic_config
# 这个配置指定了集群中的节点,`rabbit@rabbitmq-node1` 表示第一个节点的名称和主机地址。
cluster_formation.classic_config.nodes.1 = rabbit@rabbitmq-node1
cluster_formation.classic_config.nodes.2 = rabbit@rabbitmq-node2
cluster_formation.classic_config.nodes.3 = rabbit@rabbitmq-node3
⚠: The above files must be in the same directory
How to implement cluster connection in the project
If it is to implement cluster connection, this is still different in go and java, but we can use nginx to do load balancing, or RabbitMQ also has its own implementation
⚠: The stream module needs to be added to the nginx module to achieve this. It is the same as connecting to mysql.