1. zookeeper introduction
Zookeeper is an open source distributed coordination service middleware. It provides a distributed data management service, which can realize distributed locks, naming services, configuration management, cluster management and other functions, thereby helping users build highly available and high-performance Distributed Systems. Following are some of the main features and functions of Zookeeper:
Distributed coordination service: Zookeeper has complete distributed coordination services, such as distributed locks, leader election, naming service, configuration management, etc., which can help users build highly available and high-performance distributed systems.
High availability : Zookeeper uses a variety of mechanisms to ensure high availability of services, including master-slave replication, data version control, loop logs, etc., thus building a highly reliable and highly available distributed service.
Fast response : Zookeeper has a very fast response capability, can quickly process a large number of requests and provide efficient data access services.
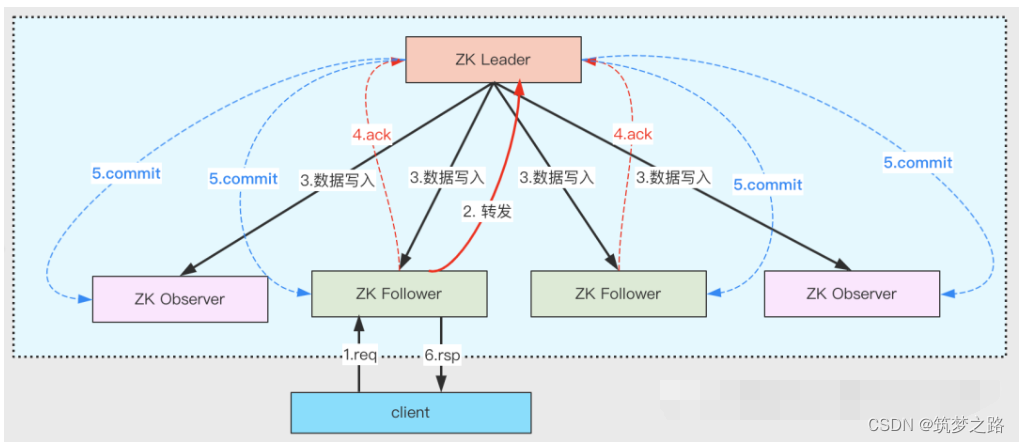
Data consistency : Zookeeper ensures that all clients see the consistency of server-side data. It uses a series of protocols and algorithms, such as ZAB protocol, Paxos algorithm, etc., to ensure data synchronization and coordination on all nodes.
Open API : Zookeeper provides numerous APIs, including Java, C, C++ and other programming languages, which can easily integrate and interact with other software systems.
In short, Zookeeper is a reliable, efficient, and easy-to-use distributed coordination service middleware. It has powerful distributed coordination and management functions, which can help users easily build high-availability and high-performance distributed systems.
2. docker create network
docker network create hadoop-network

# 查看创建的网络

docker network ls
3. Prepare zookeeper image and deployment
1) Download the zookeeper binary
wget https://dlcdn.apache.org/zookeeper/zookeeper-3.8.1/apache-zookeeper-3.8.1-bin.tar.gz --no-check-certificate2) Prepare configuration files and required directories
mkdir conf data/{zookeeper-node1,zookeeper-node2,zookeeper-node3}/data -p

# zookeeper 主配置文件
cat > conf/zoo.cfg <<EOF
# tickTime:Zookeeper 服务器之间或客户端与服务器之间维持心跳的时间间隔,也就是每个 tickTime 时间就会发送一个心跳。tickTime以毫秒为单位。session最小有效时间为tickTime*2
tickTime=2000

# Zookeeper保存数据的目录,默认情况下,Zookeeper将写数据的日志文件也保存在这个目录里。不要使用/tmp目录
dataDir=/opt/apache/zookeeper/data

# 端口,默认就是2181
clientPort=2181

# 集群中的follower服务器(F)与leader服务器(L)之间初始连接时能容忍的最多心跳数(tickTime的数量),超过此数量没有回复会断开链接
initLimit=10

# 集群中的follower服务器与leader服务器之间请求和应答之间能容忍的最多心跳数(tickTime的数量)
syncLimit=5

# 最大客户端链接数量,0不限制,默认是0
maxClientCnxns=0

# zookeeper集群配置项,server.1,server.2,server.3是zk集群节点;zookeeper-node1,zookeeper-node2,zookeeper-node3是主机名称;2888是主从通信端口;3888用来选举leader
server.1=zookeeper-node1:2888:3888
server.2=zookeeper-node2:2888:3888
server.3=zookeeper-node3:2888:3888
EOF

# 在刚创建好的zk data数据目录下面创建一个文件 myid
# 里面内容是server.N中的N,会通过挂载的方式添加
echo 1 > ./data/zookeeper-node1/data/myid
echo 2 > ./data/zookeeper-node2/data/myid
echo 3 > ./data/zookeeper-node3/data/myid


# 对外暴露的端口
cat << EOF > .env
ZOOKEEPER_HOME=/opt/apache/zookeeper
ZOOKEEPER_NODE1_SERVER_PORT=31181
ZOOKEEPER_NODE2_SERVER_PORT=32181
ZOOKEEPER_NODE3_SERVER_PORT=33181
EOF
3) Service startup script
cat > bootstrap.sh << EOF
#!/usr/bin/env sh

${ZOOKEEPER_HOME}/bin/zkServer.sh start

tail -f ${ZOOKEEPER_HOME}/logs/*.out

EOF
4) Dockerfile file
FROM centos:7.9

RUN rm -f /etc/localtime && \
    ln -sv /usr/share/zoneinfo/Asia/Shanghai /etc/localtime && \
    echo "Asia/Shanghai" > /etc/timezone

RUN export LANG=zh_CN.UTF-8

# 创建用户和用户组,跟yaml编排里的user: 10000:10000
RUN groupadd --system --gid=10000 hadoop && \
    useradd --system --home-dir /home/hadoop --uid=10000 --gid=hadoop hadoop -m

# 安装sudo和常用工具
RUN yum -y install sudo net-tools telnet wget nc less curl ; chmod 640 /etc/sudoers

# 给hadoop添加sudo权限
RUN echo "hadoop ALL=(ALL) NOPASSWD: ALL" >> /etc/sudoers

RUN mkdir /opt/apache/

# 添加配置 JDK
ADD jdk-8u212-linux-x64.tar.gz /opt/apache/
ENV JAVA_HOME /opt/apache/jdk1.8.0_212
ENV PATH $JAVA_HOME/bin:$PATH

# 添加配置 trino server
ENV ZOOKEEPER_VERSION 3.8.1
ADD apache-zookeeper-${ZOOKEEPER_VERSION}-bin.tar.gz /opt/apache/
ENV ZOOKEEPER_HOME /opt/apache/zookeeper
RUN ln -s /opt/apache/apache-zookeeper-${ZOOKEEPER_VERSION}-bin $ZOOKEEPER_HOME

# 创建数据存储目录
RUN mkdir ${ZOOKEEPER_HOME}/data
# copy 配置文件
RUN cp ${ZOOKEEPER_HOME}/conf/zoo_sample.cfg ${ZOOKEEPER_HOME}/conf/zoo.cfg
# 这里的值会根据挂载的而修改
RUN echo 1 >${ZOOKEEPER_HOME}/data/myid

# copy bootstrap.sh
COPY bootstrap.sh /opt/apache/
RUN chmod +x /opt/apache/bootstrap.sh

RUN chown -R hadoop:hadoop /opt/apache

WORKDIR $ZOOKEEPER_HOME
5) Build a mirror image
docker build -t zookeeper:3.8.1 . --no-cache

### 参数解释
# -t:指定镜像名称
# . :当前目录Dockerfile
# -f:指定Dockerfile路径
#  --no-cache:不缓存
6) Write docker-compose.yml
version: '3'
services:
  zookeeper-node1:
    image: zookeeper:3.8.1
    user: "hadoop:hadoop"
    container_name: zookeeper-node1
    hostname: zookeeper-node1
    restart: always
    environment:
      - TZ=Asia/Shanghai
      - privileged=true
    env_file:
      - .env
    volumes:
      - ./conf/zoo.cfg:${ZOOKEEPER_HOME}/conf/zoo.cfg
      - ./data/zookeeper-node1/data/myid:${ZOOKEEPER_HOME}/data/myid
    ports:
      - "${ZOOKEEPER_NODE1_SERVER_PORT}:2181"
    expose:
      - 2888
      - 3888
    command: ["sh","-c","/opt/apache/bootstrap.sh"]
    networks:
      - hadoop-network
    healthcheck:
      test: ["CMD-SHELL", "netstat -tnlp|grep :2181 || exit 1"]
      interval: 10s
      timeout: 10s
      retries: 5
  zookeeper-node2:
    image: zookeeper:3.8.1
    user: "hadoop:hadoop"
    container_name: zookeeper-node2
    hostname: zookeeper-node2
    restart: always
    environment:
      - TZ=Asia/Shanghai
      - privileged=true
    env_file:
      - .env
    volumes:
      - ./conf/zoo.cfg:${ZOOKEEPER_HOME}/conf/zoo.cfg
      - ./data/zookeeper-node2/data/myid:${ZOOKEEPER_HOME}/data/myid
    ports:
      - "${ZOOKEEPER_NODE2_SERVER_PORT}:2181"
    expose:
      - 2888
      - 3888
    command: ["sh","-c","/opt/apache/bootstrap.sh"]
    networks:
      - hadoop-network
    healthcheck:
      test: ["CMD-SHELL", "netstat -tnlp|grep :2181 || exit 1"]
      interval: 10s
      timeout: 10s
      retries: 5
  zookeeper-node3:
    image: zookeeper:3.8.1
    user: "hadoop:hadoop"
    container_name: zookeeper-node3
    hostname: zookeeper-node3
    restart: always
    environment:
      - TZ=Asia/Shanghai
      - privileged=true
    env_file:
      - .env
    volumes:
      - ./conf/zoo.cfg:${ZOOKEEPER_HOME}/conf/zoo.cfg
      - ./data/zookeeper-node3/data/myid:${ZOOKEEPER_HOME}/data/myid
    ports:
      - "${ZOOKEEPER_NODE3_SERVER_PORT}:2181"
    expose:
      - 2888
      - 3888
    command: ["sh","-c","/opt/apache/bootstrap.sh"]
    networks:
      - hadoop-network
    healthcheck:
      test: ["CMD-SHELL", "netstat -tnlp|grep :2181 || exit 1"]
      interval: 10s
      timeout: 10s
      retries: 5

# 连接外部网络
networks:
  hadoop-network:
    external: true
7) Deployment starts
# 启动

docker-compose up -d

# 查看

docker-compose ps

# 检查日志

docker-compose logs -f
8) Check Validation
# 检查节点状态,服务是否启动
docker exec -it zookeeper-node1 bash
${ZOOKEEPER_HOME}/bin/zkServer.sh status
exit

docker exec -it zookeeper-node2 bash
${ZOOKEEPER_HOME}/bin/zkServer.sh status
exit

docker exec -it zookeeper-node3 bash
${ZOOKEEPER_HOME}/bin/zkServer.sh status
4. Zookeeper common commands
In Zookeeper, there are four types of nodes: persistent nodes , temporary nodes , ordered nodes and ordered temporary nodes .
Persistent node : Once created, a persistent node exists in Zookeeper until it is actively deleted . It can store any type of data, and in the path of the node, the path of the data must exist.
Temporary node : Temporary node means that once the session between the client and Zookeeper fails or is closed, the node will be deleted from Zookeeper . Its creation and deletion are maintained by the client. When the client goes offline or the session expires, all temporary nodes related to the client will be deleted.
Ordered node : Ordered node refers to adding a sequence of natural numbers after the created node path , and each value represents the order of a node. It is numbered in the order in which the nodes were created, which helps the nodes to be sorted and queried in Zookeeper. Ordered nodes need to be implemented through self-incrementing sequences, and can maintain complete path information at the same time.
Ordered ephemeral nodes : Ordered ephemeral nodes refer to nodes that have both characteristics of ephemeral nodes and ordered nodes . Once it is created, it will remain in Zookeeper for a period of time until the client connection is disconnected or the session expires. Its serial number will be sorted from small to large according to the order in which the node was created, and it will also be deleted when the node is deleted.
In short, different types of Zookeeper nodes have different life cycles and functions. Reasonable use of these node types can help users build more efficient and reliable distributed application systems.
1) Create a node
# 随便登录一个容器节点
docker exec -it zookeeper-node1 bash

# 登录
${ZOOKEEPER_HOME}/bin/zkCli.sh -server zookeeper-node1:2181

# 【持久节点】数据节点创建后,一直存在,直到有删除操作主动清除,示例如下:
create /zk-node data

# 【持久顺序节点】节点一直存在,zk自动追加数字后缀做节点名,后缀上限 MAX(int),示例如下:
create -s /zk-node data

# 【临时节点】生命周期和会话相同,客户端会话失效,则临时节点被清除,示例如下:
create -e /zk-node-temp data

# 【临时顺序节点】临时节点+顺序节点后缀,示例如下:
create -s -e /zk-node-temp data
2) View nodes
# 随便登录一个容器节点
docker exec -it zookeeper-node1 bash

# 登录
${ZOOKEEPER_HOME}/bin/zkCli.sh -server zookeeper-node1:2181

# 列出zk执行节点的所有子节点,只能看到第一级子节点
ls /
# 获取zk指定节点数据内容和属性
get /zk-node
3) Update the node
# 表达式:set ${path} ${data} [version]
set /zk-node hello

get /zk-node
4) Delete the node
# 对于包含子节点的节点,该命令无法成功删除,使用deleteall /zk-node
delete /zk-node

# 删除非空目录
deleteall /zk-node
5) Exit interactive mode
#帮助
help

# 退出
quit
6) Non-interactive mode
# 直接后面接上命令执行即可
${ZOOKEEPER_HOME}/bin/zkCli.sh -server zookeeper-node1:2181 ls /
References:
[Middleware] Quickly deploy Zookeeper nanny level tutorial through docker-compose