Practical chapter: Segmentation of adherent objects - using watershed algorithm to achieve segmentation and detection of jelly beans
1. Introduction to watershed algorithm

Installing the space-time gate
problem through pycharm: Let’s talk about the principle, implementation steps, and application of the watershed algorithm.
answer:
The watershed algorithm is an image analysis algorithm based on image transformation and segmentation, and is mainly used for image segmentation. This algorithm can solve many problems in the field of image processing, such as medical image analysis, facial recognition, digital watermarking, etc. The basic principles and implementation steps of the watershed algorithm will be introduced in detail below. The watershed algorithm is based on a mathematical concept - the gray level of the image is regarded as the height of the water surface, the point with high brightness in the image is equivalent to the high water level, and the point with low brightness in the image is equivalent to the low water level. When segmenting the image, the seed point will be regarded as the origin of the river. Land, rivers converge in the direction where they flow most easily, and the final convergence points are the parts of the image that need to be segmented. This process can be called "raining" in the entire picture. The black area is the water catchment area, the white area is the snow mountainous area, and the water level flows to lower places. When two black catchments meet, they merge into one. The basic implementation process of the watershed algorithm is as follows: 1. Preprocess the image. First, filter and binarize the original image to obtain a binary image. Then, open and close operations are performed on the binary image to fill holes, smooth transitions, eliminate noise, etc. 2. Find the seed points of the image. According to the application requirements, set the initial seed points, and for each seed point, a watershed will be generated. 3. Calculate the distance transformed image. The distance transform image calculates the distance between each foreground point in the binary image and the nearest background point. This distance is the gray value of the point. 4. Calculate the gradient image. The gradient image is an image obtained by applying Sobel and Prewitt operators to the distance transformation image, which reflects the edge information of the image, that is, the rate of change of the pixel value in the vertical and horizontal directions. 5. Multiply the distance transformed image and the gradient image to obtain a new image. 6. Perform threshold processing on the new image to uniquely define the area to which each pixel of the image belongs. The threshold here can be adjusted according to the needs of the image. 7. Watershed transformation operation. For the thresholded image, the final segmentation result is obtained through watershed transformation.
一、基本原理
二、实现步骤
8. Post-process the segmentation results. Perform post-processing operations such as refining, merging, and eliminating outliers on the segmentation results to obtain better results. 1. Road extraction based on watershed algorithm This application introduces image processing into the field of highway construction to achieve intelligent and automated monitoring of traffic roads. The image is segmented through the watershed algorithm, then filtered based on road characteristics, and finally the highway is extracted. This method has shown good results in practice and can automatically identify a variety of complex road topologies. 2. Liver image segmentation based on watershed algorithm This application applies the watershed algorithm to medical image processing, and achieves the location and diagnosis of diseased areas by segmenting liver CT images. The advantages of this method are high computational efficiency and good segmentation accuracy, which can well support real-world medical models. 3. Infrared image segmentation based on watershed algorithm This application applies the watershed algorithm to infrared image segmentation, and is mainly used for positioning and monitoring of infrared images of spacecraft and drones. This method divides the image into different areas according to the different intensity of the heat source, thereby achieving target positioning and tracking. This method has high robustness and accuracy and can effectively handle complex infrared images. In summary, the watershed algorithm is a powerful image segmentation technique that is widely used in different fields. It can help us solve many image processing problems and improve production efficiency and effects. With the continuous development of computer technology, it is believed that the watershed algorithm will be more widely used and researched in the future.
三、应用
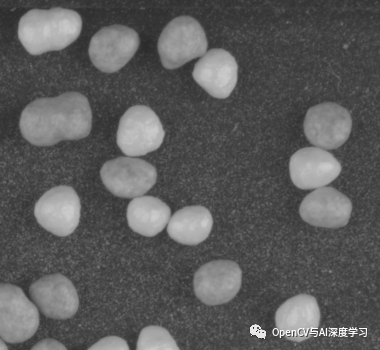
2. Practice pictures (pictures are from the Internet, are only for academic exchange and sharing, and will be deleted for infringement)
3. Code
# -*- coding:utf-8 -*-
import cv2 as cv
import numpy as np
import cv2
def stackImages(scale,imgArray):
rows = len(imgArray)
cols = len(imgArray[0])
# & 输出一个 rows * cols 的矩阵(imgArray)
# print(rows,cols)
# & 判断imgArray[0] 是不是一个list
rowsAvailable = isinstance(imgArray[0], list)
# & imgArray[][] 是什么意思呢?
# & imgArray[0][0]就是指[0,0]的那个图片(我们把图片集分为二维矩阵,第一行、第一列的那个就是第一个图片)
# & 而shape[1]就是width,shape[0]是height,shape[2]是
width = imgArray[0][0].shape[1]
height = imgArray[0][0].shape[0]
# & 例如,我们可以展示一下是什么含义
# cv2.imshow("img", imgArray[0][1])
if rowsAvailable:
for x in range (0, rows):
for y in range(0, cols):
# & 判断图像与后面那个图像的形状是否一致,若一致则进行等比例放缩;否则,先resize为一致,后进行放缩
if imgArray[x][y].shape[:2] == imgArray[0][0].shape [:2]:
imgArray[x][y] = cv2.resize(imgArray[x][y], (0, 0), None, scale, scale)
else:
imgArray[x][y] = cv2.resize(imgArray[x][y], (imgArray[0][0].shape[1], imgArray[0][0].shape[0]), None, scale, scale)
# & 如果是灰度图,则变成RGB图像(为了弄成一样的图像)
if len(imgArray[x][y].shape) == 2: imgArray[x][y]= cv2.cvtColor( imgArray[x][y], cv2.COLOR_GRAY2BGR)
# & 设置零矩阵
imageBlank = np.zeros((height, width, 3), np.uint8)
hor = [imageBlank]*rows
hor_con = [imageBlank]*rows
for x in range(0, rows):
hor[x] = np.hstack(imgArray[x])
ver = np.vstack(hor)
# & 如果不是一组照片,则仅仅进行放缩 or 灰度转化为RGB
else:
for x in range(0, rows):
if imgArray[x].shape[:2] == imgArray[0].shape[:2]:
imgArray[x] = cv2.resize(imgArray[x], (0, 0), None, scale, scale)
else:
imgArray[x] = cv2.resize(imgArray[x], (imgArray[0].shape[1], imgArray[0].shape[0]), None,scale, scale)
if len(imgArray[x].shape) == 2: imgArray[x] = cv2.cvtColor(imgArray[x], cv2.COLOR_GRAY2BGR)
hor= np.hstack(imgArray)
ver = hor
return ver
def watershed_demo(img):
# 图像预处理
# 二值化前先进性灰度化、其实也可以通过其他通道,这里用灰度图就足够了
gray = cv.cvtColor(img,cv.COLOR_BGR2GRAY)
# 固定阈值二值化,将大于thresh得像素点设置为maxval,
ret,binary = cv.threshold(gray,thresh=110,maxval=255,type = cv.THRESH_BINARY)
# 形态学开操作,先腐蚀后膨胀,去掉一些小噪声
kernel = cv.getStructuringElement(cv.MORPH_ELLIPSE,(11,11))
open = cv.morphologyEx(binary,cv.MORPH_OPEN,kernel,iterations=1)
# 对二值化图像进行膨胀、用来后面于masker相减
kernel_dilate = cv.getStructuringElement(cv.MORPH_ELLIPSE,(40,40))
dilate = cv.dilate(open,kernel,iterations=1)
# distance transform
dist = cv.distanceTransform(open,cv.DIST_L2,3) # 距离变换,可以认为中间部分距离越大、边缘越小
dist_output = cv.normalize(dist,0,1.0,cv.NORM_MINMAX)*50 # 进行归一化
ret,surface = cv.threshold(dist,dist.max()*0.6,255,cv.THRESH_BINARY) # 对归化的图片再进行二值化,对中间部分进行截断
surface_fg = np.uint8(surface) # 将图片的格式转为8位
unknown = cv.subtract(dilate,surface_fg) # 用膨胀之后的图片于距离变换后二值化图片进行减操作
ret,markers = cv.connectedComponents(surface_fg) # 连通域操作
# watershed transform
markers = markers +1 #
markers[unknown ==255] =0
markers = cv.watershed(img,markers = markers)
# 去掉边缘,因为经过分水岭操作之后,多出了一个边界
markers[0] = 1
markers[-1] = 1
markers[0:img.shape[0],0] = 1
markers[0:img.shape[0],-1] = 1
# 进行连通域操作
open[markers ==-1] = 0 # 利用分水岭出来的线条进行分割
k3 = np.ones((4,4),np.uint8) # 进行稍微的腐蚀
open = cv.erode(open,k3)
# num_labels:连通域数量、labels:大小和原图一样大,每一个连通域会及进行标记,stats:x,y,wh,s,centroid:中心
num_labels, labels, stats, centers = cv2.connectedComponentsWithStats(open, connectivity=8)
# 利用连通域进行不同轮廓画出不同颜色
output = np.zeros((img.shape[0], img.shape[1], 3), np.uint8)
for i in range(1, num_labels):
mask = labels == i
output[:, :, 0][mask] = np.random.randint(0, 255)
output[:, :, 1][mask] = np.random.randint(0, 255)
output[:, :, 2][mask] = np.random.randint(0, 255)
# 因为dist没有转换为8位,保存图片打开之后是黑色的话就需要进行格式转换。
dist_output= cv2.normalize(dist_output, None, 0, 255, cv2.NORM_MINMAX, cv2.CV_8U)
dist= cv2.normalize(dist, None, 0, 255, cv2.NORM_MINMAX, cv2.CV_8U)
#为了图片更加好看,对所有图片转化为3通道
gray = cv.cvtColor(gray,cv.COLOR_GRAY2BGR)
binary = cv.cvtColor(binary,cv.COLOR_GRAY2BGR)
open = cv.cvtColor(open,cv.COLOR_GRAY2BGR)
dilate = cv.cvtColor(dilate,cv.COLOR_GRAY2BGR)
dist = cv.cvtColor(dist,cv.COLOR_GRAY2BGR)
dist_output = cv.cvtColor(dist_output,cv.COLOR_GRAY2BGR)
surface = cv.cvtColor(surface,cv.COLOR_GRAY2BGR)
surface_fg = cv.cvtColor(surface_fg,cv.COLOR_GRAY2BGR)
unknown = cv.cvtColor(unknown,cv.COLOR_GRAY2BGR)
gray[markers ==-1] =[0,0,255]
binary[markers == -1] = [0, 0, 255]
open[markers == -1] = [0, 0, 255]
dilate[markers == -1] = [0, 0, 255]
dist[markers ==-1] =[0,0,255]
dist_output[markers ==-1] =[0,0,255]
# 下面语句就没有影响,因为surface的时候进行了8位的转换
surface[markers == -1] = [0,0,255]
surface_fg[markers == -1] = [255, 0, 255]
unknown[markers == -1] = [255, 0,255]
img[markers == -1] = [255, 0, 255]
imgStack = stackImages(1, ([gray,binary,open], [dilate,dist,dist_output], [surface,surface_fg,unknown]))
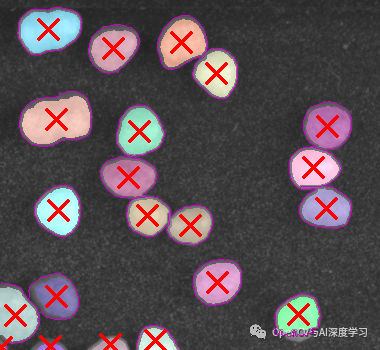
result = cv2.addWeighted(img, 0.8, output, 0.5, 0) # 图像权重叠加
for i in range(1, len(centers)):
cv2.drawMarker(result, (int(centers[i][0]), int(centers[i][1])), (0, 0, 255), 1, 20, 2)
cv.namedWindow("stack",0)
cv.imshow("stack",imgStack)
cv.namedWindow("out",0)
cv.imshow("out",result)
cv.imwrite("save_03.png",imgStack)
cv.imwrite("binary.png",open)
cv.imwrite("save_04.png", result)
img = cv.imread("1.png")
watershed_demo(img)
cv.namedWindow("img",0)
cv.imshow("img",img)
cv.waitKey(0)
cv.destroyAllWindows()
4. Effect
5. Opencv column
1.理论系列:
Chapter 1: Summary of pycharm, anaconda, opencv, pytorch, tensorflow, paddlex and other environment configurations [Image processing py version] Chapter 2:
Basic introduction and application of OpenCv algorithm
Chapter 3: OpenCv image and video reading and writing operations and basics Application
Chapter 4: Summary of OpenCv threshold segmentation/binarization (single-channel, multi-channel images)
2.项目系列:
Project 1: Grade 4 and 6 Rewriting System
Project 2: Practical Combat: Adhesive Object Segmentation - Bottle Cap Segmentation Detection Using Geometric Segmentation
Project 3: Practical Combat: Adhesive Object Segmentation - Coin Segmentation Detection Using Geometric Segmentation
Project 4: Practical Combat Chapter: Segmentation of Adhesive Objects—Using Geometric Segmentation to Realize Cell Segmentation Detection
==》Project Five: Practical Chapter: Segmentation of Adhesive Objects—Using Watershed Algorithm to Realize Segmentation and Detection of Sugar Beans