Practical chapter: Adhesive object segmentation - using corner detection, ROI area determination, perspective transformation, and geometric segmentation to achieve bottle cap segmentation and counting
1. Background
In the process of learning opencv last year, I did a bottle cap segmentation exercise. The purpose is to segment each bottle cap. At that time, I was thinking, in addition to the Hough circle detection idea, can it be segmented based on the characteristics of the connected bottle caps? So I thought of detecting their connected positions based on the corner points, and then connecting them. Draw a line between locations for excision. Is the idea very simple and easy to implement? In fact, many problems were encountered during the implementation process. There were many corner points detected. How to filter out the remaining corner points with adhesion? With so many corner points, how to ensure that one point and another point are exactly two points connected to each other? The overall implementation idea of the code is attached below. This article is simply made to share. It will be updated when there is time to gradually simplify the implementation process and principles.

2. Ideas
一、基于****Harrs****的角点检测
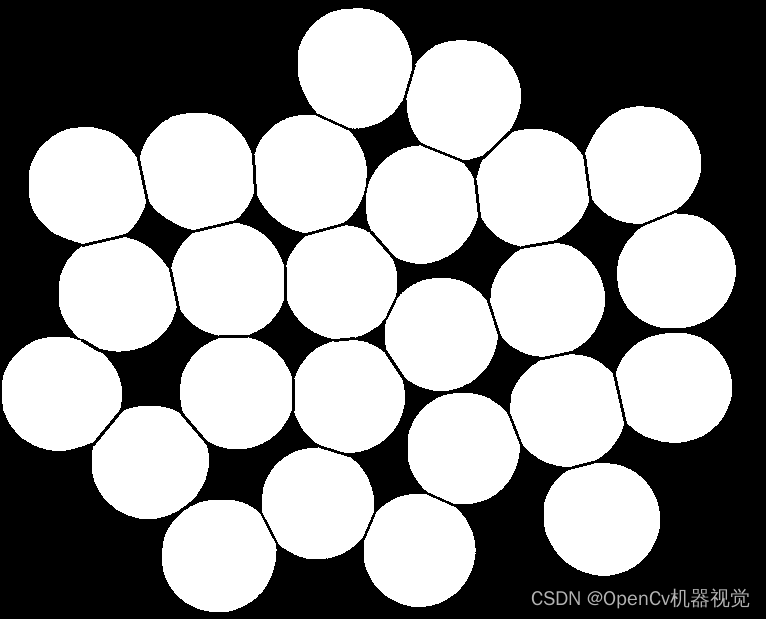
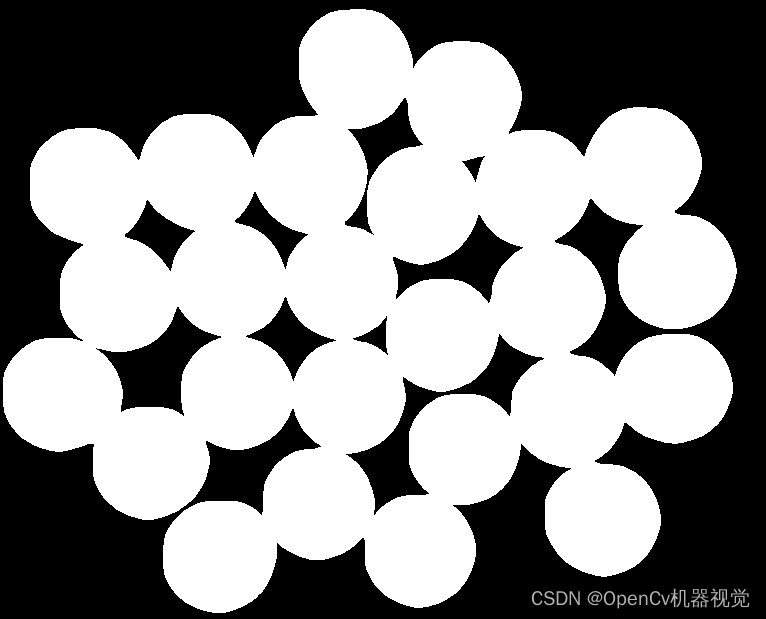
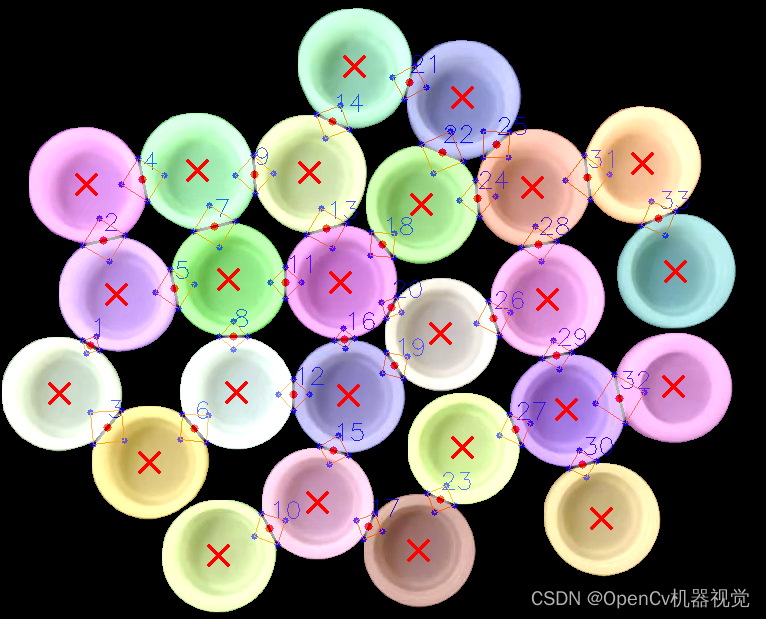
There will be concave and convex areas between circular sticky objects. Corner point detection or concave and convex point detection can be performed on the connected areas. Whether the detection points are complete determines the accuracy of segmentation. In order to ensure the segmentation effect, the corner detection stage may detect more corner points. Find the minimum Euclidean distance to the nearest point of all points by calculating the mean and median of the distances. The mean indicator is suitable for situations where there are many noise points and large distances. For situations where there are many noise points and large distances. Some noise can be removed through the mean indicator or median indicator. In order to further filter out some noise points and better judge whether the two points are connected parts of the object, because the two corners of the connected parts are rotated 90° to obtain a positive ROI area, assuming that the ROI area is The connected part has a larger filling rate in the ROI area. Therefore, this feature is used for ROI sampling. Of these, only the square ROI provides a better measure of its fill rate. When calculating image coordinates, coordinate transformation needs to be performed to move the origin of the coordinates to the center of the image. After obtaining two corner points, through coordinate transformation and acquisition of rotation matrix, any point in the image can be rotated by a certain angle around a point. Because the filling rate needs to be calculated, perspective transformation is required to find the ratio of the ROI outline area to the ROI area. Because the angles of different quadrilaterals are different, all points need to be sorted. At the same time, a special case is that if the diagonal of the quadrilateral is vertical If it is straight, there is no need to sort, otherwise correction errors will occur. Calculate the ratio of the binarized contour area to the ROI area through the sampled ROI, obtain the filling rate, and set a value. If it is greater than the threshold, segmentation is performed.
二、均值去噪点
三、ROI取样
四、坐标变换
五、旋转矩阵获取
六、透视变换
七、填充率计算
3. Code
将下面代码放在.py文件当中,读取图片,运行之后,便会在当前路径自动创建文件夹将所有图片保存里面。
"""
作者:冯耿鑫
时间:2021/1/9
功能:对相连的圆形物体进行分割
思路:
=>>创新:形态学操作的小技巧可以定义一个卷积核、然后在本卷积核上画圆,就是一个圆形的卷积了
=>>基于Harris角点检测、得出dist图像,因为再拐角处会有很多个角点,为了只求一个,所以进行二值化,膨胀,求拐点的形心。
=>>对角点进行x方向的排序
=>>进行坐标变换、以及旋转矩阵求出垂直的另一条直线
=>>进行透视变换,矫正ROI区域,需要通过透视变换来求得,其中ROI的透视变换用到了坐标排序,其中需要注意一种对角线竖直的情况,然后求包含物体的饱和率,从而进行筛选。
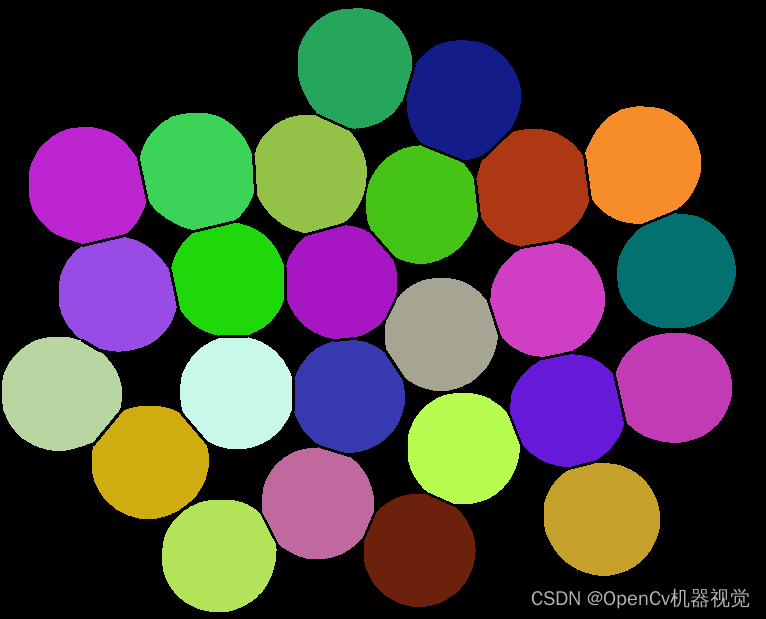
=>>利用连通域进行颜色显示
"""
# -*- coding:utf-8 -*-
import cv2 as cv
import numpy as np
import cv2
import math
import os
class SegmentationConnectObject(object):
def __init__(self,img,binary):
self.img = img # 原图
self.binary = binary # 二值化图片
self.number = 0 # 第几个轮廓
self.answer = False # 一开始默认是不是相连的
self.H,self.W,self.C = img.shape
# 寻找距离最小的两个点
def main_find_mindist_points(self):
"""
:function: 用来寻找两个最近的点,用来进行区域分析
:return:
"""
"""=>>圆形卷积核进行形态学操作,消除杂点噪声、以及光滑变换<<="""
k2 = np.zeros((24, 24), np.uint8) # <==定义一个卷24x24的卷积核
cv2.circle(k2, (12, 12), 12, (1, 1, 1), -1, cv2.LINE_AA) # <==在这个卷积核上进行画一个鹃形的卷积核
open = cv.morphologyEx(self.binary, cv.MORPH_OPEN, k2) # 进行开操作,也就是先腐蚀后膨胀
"""=>>利用Harris进行角点检测<<= """
harris = cv2.cornerHarris(open, 2, 5, 0.04) #<== 进行角点检测,blockSize:角点检测中要考虑的领域大小||ksize - Sobel:求导中使用的窗口大小||k - Harris:角点检测方程中的自由参数, 取值参数为[0, 04, 0.06]
harris = cv2.dilate(harris, None) # 对角点进行一个简单的膨胀、不然的话轮廓会不好寻找
# img[harris > 0.2 * harris.max()] = [0, 0, 255] #<== 通过角点检测之后只有边缘像素是有值的,拐角的地方是比较大,所以利用这个条件进行显示
pix_max = 0.2 * harris.max() # <==获取选择角点的阈值
ret, binary_p = cv.threshold(harris, pix_max, 255, cv.THRESH_BINARY) # 因为选择出来的像素太多了,又类似与轮廓,所以我们直接进行阈值分割发现轮廓
binary_p = np.uint8(binary_p) # 二值化前需要对位数进行转换
contours = cv2.findContours(binary_p, cv2.RETR_TREE, cv2.CHAIN_APPROX_SIMPLE)[0] # 发现角点的轮廓,用来发现其角点的质心
"""=>>找到所有的可能坐标点<<= """
points = [] # 用来储存所有的角点坐标
for c in contours: # 横向
# 获取矩形框的四个参数
mm = cv.moments(c) # 几何重心的获取
cx, cy = int(mm['m10'] / mm['m00']), int(mm['m01'] / mm['m00'])
points.append((int(cx), int(cy))) # 将坐标保留在points列表中
cv.circle(self.img, (int(cx), int(cy)), 3, (0, 0, 255), -1)
"""=>>对所有的角点排序,方向为x从小到大<<= """
points_sorted_x = self.sort_x(points)
# for i, p in enumerate(points_sorted_x):
# cv.circle(self.img, p, 4, (255, 0, 0), -1) # 画出点
# cv.putText(self.img,str(i) , p, cv.FONT_HERSHEY_SIMPLEX, 0.5, (0, 100, 255), 2)
"""=>>因为有很多角点,如何获得最小相连的两个点呢,通过遍历所有点,获取最小距离用来求平均值,用来作为指标作为阈值,筛选太远的点<<= """
points_sorted_x_2 = points_sorted_x.copy() # 因为要遍历两次,所以赋值一份方便后面更改
distance_1 = [] # 所有点都进行遍历、储存每个点相连做近的点
for p1 in points_sorted_x: # p1作为父点
x1, y1 = p1 # p1的坐标
distance_2 = [] # 用来储存所有子点p2到p1的距离,然后获取最小距离给diatance_1
for p2 in points_sorted_x_2: # p2作为父点
x2, y2 = p2 # p2的坐标
if x1 == x2 and y1 == y2: # 因为两个列表是一样的,所以会有遇到相同的点,需要跳过,不然distance_2中最小的都是0
continue # 循环到原来的带点就不进行计算
else:
l = pow(abs(x1 - x2) ** 2 + abs(y1 - y2) ** 2, 0.5) # 计算父点与子点的欧式距离
distance_2.append(l) # 将所有欧式距离保存在distance_2中
distance_1.append(min(distance_2)) # 获取每个父点到子点的最小欧式距离
mean_dist = np.mean(distance_1) # 这里设置了两个指标,一个是平均值,适合密集点
median_dist = np.median(distance_1) # 一个是中间数,适合杂点较少情况
"""=>>上面根据模型求出距离指标,下面将通过设定阈值进行求解<<= """
choose = [] # choose列表使用来记录已经检测完毕的两个点,用来判断,如果没有检测成功,就继续检测,如果检测成功,那就跳过避免重复检测
for number, p1 in enumerate(points_sorted_x): # 遍历父点
x1, y1 = p1 # 父点坐标
for p2 in points_sorted_x: # 遍历子点
x2, y2 = p2 # 子点坐标
if x1 == x2 and y1 == y2: # 过滤相同的点
continue
else: # 求欧式距离
l = pow(abs(x1 - x2) ** 2 + abs(y1 - y2) ** 2, 0.5)
if l > mean_dist * 0.3 and l < mean_dist * 1.6: #<<== 设定约束条件,如果在这个阈值范围就可以进行后续的分割功能
if p1 in choose or p2 in choose: # 如果点在choose中就代表这两个点已经检测成功
continue
self.check_connect(x1, y1, x2, y2) #<<==判断是否连接函数
if self.answer: # 当分割成功的时候,用来记录p1,p2这两个点
choose.append(p1)
choose.append(p2)
self.answer = False # 需要重新赋值,不然边True之后就会一直默认正确
color,result = self.connect_domain()
return self.img,self.binary, open,color,result
# 冒泡排序对角点坐标进行排序
def sort_x(self,points):
"""
function:冒泡排序算法实现对x方向进行排序
"""
l = len(points)
for i in range(l - 1):
for j in range(l - 1 - i):
# if points[j][1]>points[j+1][1]:
# temp = points[j]
# points[j] = points[j+1]
# points[j+1] = temp
if points[j][0] > points[j + 1][0]:
temp = points[j]
points[j] = points[j + 1]
points[j + 1] = temp
return points
# 通过旋转矩阵,实现任一点的旋转
def rota(self,x1, y1, x2, y2):
"""
:function:以任意点为中线,通过坐标平移,然后通过旋转,再平移回来,最终完成旋转。
:return:
"""
# 获取直线的中点
cx, cy = (x1 + x2) / 2, (y1 + y2) / 2
# 偏移矩阵
C = np.array([[cx], [cy]])
# 旋转角度
degree = math.radians(90)
# 旋转矩阵
A = np.array([[math.cos(degree), -math.sin(degree)],
[math.sin(degree), math.cos(degree)]])
# 输入坐标
X1 = np.array([[x1], [y1]])
X2 = np.array([[x2], [y2]])
# 进行偏移,将中间点转换为中间坐标
X1 = X1 - C
X2 = X2 - C
# 利用矩阵的乘积求出旋转坐标
Y1 = np.dot(A, X1)
Y2 = np.dot(A, X2)
# 转换绝对坐标的形式
Y1 = Y1 + C
Y2 = Y2 + C
out_x1, out_y1, out_x2, out_y2 = int(Y1.ravel()[0]), int(Y1.ravel()[1]), int(Y2.ravel()[0]), int(Y2.ravel()[1])
return out_x1, out_y1, out_x2, out_y2
# 检查是否为相连物体
def check_connect(self,x1, y1, x2, y2):
"""
:function:检查这两个点是否为相连接的两个点
"""
"""==>>因为后面需要用到图像坐标的各种运算,所以需要先进行坐标变换<<=="""
x1, y1 = self.change_coordinate_lt_center(x1, y1) # 将第一个点也就是父点转换为笛卡尔坐标系
x2, y2 = self.change_coordinate_lt_center(x2, y2) # 将第二个点也就是子点转换为笛卡尔坐标系
"""==>>进行旋转90°,分别获得父、子的旋转坐标<<=="""
x3, y3, x4, y4 = self.rota(x1, y1, x2, y2) #x3,y3是父点的逆时针旋转点、x4,y4是子点的旋转坐标点
"""==>>转为图像坐标系<<=="""
x1, y1 = self.change_coordinate_center_lt(x1, y1) # 将父点坐标转为图像坐标
x2, y2 = self.change_coordinate_center_lt(x2, y2) # 将子点坐标转为图像坐标
x3, y3 = self.change_coordinate_center_lt(x3, y3) # 将父点坐标旋转坐标转为图像坐标
x4, y4 = self.change_coordinate_center_lt(x4, y4) # 将子点坐标旋转坐标转为图像坐标
"""==>>进行透视变换、因为是倾斜的矩形,必须透视变换,不然的话没办法求比例<<=="""
pts = [(x1, y1), (x3, y3), (x2, y2), (x4, y4)]
"""==>>进行透视变换、因为是倾斜的矩形,必须透视变换,不然的话没办法求比例<<=="""
self.Perspective_transformation(pts)
"""==>>answer表示的是,检测区域为相连接部分,<<=="""
if self.answer:
arrPt = np.array(pts, np.int32).reshape((-1, 1, 2)) # 将坐标转换为n行两列的形式
cv.polylines(img, [arrPt], True, (0, 100, 255), 1)
# 图片坐标系转为笛卡尔坐标系
def change_coordinate_lt_center(self,x_in, y_in):
"""
x_out = x_in-1/2W
y_out = -(y_in-1/2H) = 1/2H-y_in
"""
x_out = x_in - 1 / 2 * self.W
y_out = 1 / 2 * self.H - y_in
return x_out, y_out
# 笛卡尔坐标系转为图片的坐标系
def change_coordinate_center_lt(self,x_in, y_in):
"""
x_out = x_in+1/2W
y_out = -(y_in-1/2H) = 1/2H-y_in =>>y_in = 1/2H-y_out ==>> y_out = 1/2H-yin
"""
x_out = x_in + 1 / 2 * self.W
y_out = 1 / 2 * self.H - y_in
return int(x_out), int(y_out)
def order_points(self,pts):
# initialzie a list of coordinates that will be ordered
# such that the first entry in the list is the top-left,
# the second entry is the top-right, the third is the
# bottom-right, and the fourth is the bottom-left
rect = np.zeros((4, 2), dtype="float32")
# the top-left point will have the smallest sum, whereas
# the bottom-right point will have the largest sum
s = pts.sum(axis=1)
rect[0] = pts[np.argmin(s)]
rect[2] = pts[np.argmax(s)]
# now, compute the difference between the points, the
# top-right point will have the smallest difference,
# whereas the bottom-left will have the largest difference
diff = np.diff(pts, axis=1)
rect[1] = pts[np.argmin(diff)]
rect[3] = pts[np.argmax(diff)]
# return the ordered coordinates
return rect
# 进行透视变换
def Perspective_transformation(self,pts):
"""==>>获取四个点的坐标,依次是父点、父点旋转点、子点、子点旋转点、同时对对角线竖直的情况进行单独分析<<=="""
(x1, y1), (x2, y2), (x3, y3), (x4, y4) = pts[0], pts[1], pts[2], pts[3]
pts1 = np.float32(pts) # 透视变换前坐标需要转换为32位
if x1 == x3 or x2 == x4: # 有一张特殊情况,就是对角线是竖直线,这样的经过排序之后就会出现变形,漏检测,
rect = pts1
else:
rect = self.order_points(pts1)
(tl, tr, br, bl) = rect
"""==>>计算ROI区域的长宽<<=="""
widthA = np.sqrt(((br[0] - bl[0]) ** 2) + ((br[1] - bl[1]) ** 2))
widthB = np.sqrt(((tr[0] - tl[0]) ** 2) + ((tr[1] - tl[1]) ** 2))
maxWidth = max(int(widthA), int(widthB))
heightA = np.sqrt(((tr[0] - br[0]) ** 2) + ((tr[1] - br[1]) ** 2))
heightB = np.sqrt(((tl[0] - bl[0]) ** 2) + ((tl[1] - bl[1]) ** 2))
maxHeight = max(int(heightA), int(heightB))
"""==>>获取变换后图片的坐标点、获得旋转矩阵、同时进行透视变换<<=="""
dst = np.array([[0, 0],[maxWidth - 1, 0],[maxWidth - 1, maxHeight - 1],[0, maxHeight - 1]], dtype="float32") # in the top-left, top-right, bottom-right, and bottom-left
matrix = cv2.getPerspectiveTransform(rect, dst) # 获得旋转矩阵
roi = cv.warpPerspective(self.binary, matrix, (maxHeight, maxWidth)) # 获取roi区域
"""==>>对获取到的目标区域进行面积统计<<=="""
contours = cv2.findContours(roi, cv2.RETR_TREE, cv2.CHAIN_APPROX_SIMPLE)[0] # 发现最外边轮廓
area_list = [] #定义一个列表用来储存所有的面积
for cnt in contours:
area_list.append(cv.contourArea(cnt))
if len(area_list) == 0:
max_cnts = 0 # 如果区域没有面积,sum会报错,所以需要单独赋值为0
else:
max_cnts = sum(area_list) # 获取面积综合
area = maxWidth * maxHeight # ROI的一个面积
ratio = max_cnts / area # 二值化面积比
if ratio > 0.8:
self.number +=1
cv.circle(self.img, ((x1 + x3) // 2, int(y1 + y3) // 2), 4, (0, 0, 255), -1)
cv.circle(self.img, (x1, y1), 3, (255, 0, 0), -1)
cv.circle(self.img, (x2, y2), 3, (255, 0, 0), -1)
cv.circle(self.img, (x3, y3), 3, (255, 0, 0), -1)
cv.circle(self.img, (x4, y4), 3, (255, 0, 0), -1)
cv.line(self.img, (x1, y1), (x2, y2), (0, 255, 255), 1)
cv.line(self.img, (x3, y3), (x4, y4), (0, 255, 255), 1)
cv.line(self.binary, (x1, y1), (x3, y3), (0, 0, 0), 2)
cv.putText(self.img, str(self.number), ((x1 + x3) // 2, int(y1 + y3) // 2 - 10), cv.FONT_HERSHEY_SIMPLEX, 0.8,(255, 0, 0), 1)
roi_img = cv.warpPerspective(self.img, matrix, (maxHeight, maxWidth))
cv.imwrite(".\\roi\\" +name+"\\"+ str(self.number) + ".png", roi_img)
self.answer = True
def connect_domain(self):
# # 连通域分析
num_labels, labels, stats, centers = cv2.connectedComponentsWithStats(self.binary, connectivity=8)
# 利用连通域进行不同轮廓画出不同颜色
color = np.zeros((self.H, self.W, 3), np.uint8)
for i in range(1, num_labels):
mask = labels == i
color[:, :, 0][mask] = np.random.randint(0, 255)
color[:, :, 1][mask] = np.random.randint(0, 255)
color[:, :, 2][mask] = np.random.randint(0, 255)
result = cv2.addWeighted(img, 0.8, color, 0.5, 0) # 图像权重叠加
for i in range(1, len(centers)):
cv2.drawMarker(result, (int(centers[i][0]), int(centers[i][1])), (0, 0, 255), 1, 20, 2)
return color,result
def get_binary(img):
# 图像预处理
blurred = cv.pyrMeanShiftFiltering(img, 10, 100) # 边缘保留滤波能够进行去噪是同时有效地保留边缘
gray = cv.cvtColor(blurred, cv.COLOR_BGR2GRAY) # 进行灰度化为二值化做准备
ret, binary = cv.threshold(gray, thresh=70, maxval=255, type=cv.THRESH_BINARY) # 固定阈值二值化,将大于thresh得像素点设置为maxval,
return binary
# 创建文件进行图片保存
def make_dir_save_img(path,img, binary,open,color,result ):
if not os.path.exists(name): # 判断是否存在
os.makedirs( name) # 不存在就创建文件夹
if not os.path.exists("roi\\"+name): # 判断是否存在
os.makedirs("roi\\" +name) # 不存在就创建文件夹
cv.imwrite(name+"\\img.png",img)
cv.imwrite(name+"\\binary.png",binary)
cv.imwrite(name+"\\open.png",open)
cv.imwrite(name+"\\color.png",color)
cv.imwrite(name+"\\result.png",result)
if __name__ == '__main__':
path = "001.png"
name = os.path.splitext(path)[0] # 文件名
img = cv.imread(path) # 读取图片
# 获取二值化图片
binary = get_binary(img)
# 创建实例
seg = SegmentationConnectObject(img,binary)
# 调用第一个函数开始执行功能,返回二值化、开操作、黑底颜色、结果、原图
img, binary,open,color,result = seg.main_find_mindist_points()
# 进行图片保存
make_dir_save_img(path,img, binary,open,color,result )
cv.namedWindow("img",0)
cv.imshow("img",img)
cv.namedWindow("binary",0)
cv.imshow("binary",binary)
cv.namedWindow("open",0)
cv.imshow("open",open)
cv.namedWindow("color",0)
cv.imshow("color",color)
cv.namedWindow("result",0)
cv.imshow("result",result)
cv.waitKey(0)
cv.destroyAllWindows()
4. Effect


5. Statement
- Because multiple bottle cap images at the same resolution are not used, this code does not perform batch measurements. At the same time, due to limited personal ability, there are many needs in the algorithm and code. This sharing is mainly for code sharing. If you have time, I will I will sort it out and explain each step. Thank you for your support. If you have any questions, please leave them in the comment area and let’s discuss progress together! ! !
6. Other articles
1.理论系列:
Chapter 1: Summary of pycharm, anaconda, opencv, pytorch, tensorflow, paddlex and other environment configurations [Image processing py version] Chapter 2:
Basic introduction and application of OpenCv algorithm
Chapter 3: OpenCv image and video reading and writing operations and basics Application
Chapter 4: Summary of OpenCv threshold segmentation/binarization (single-channel, multi-channel images)
2.项目系列:
Project 1: Level 4 and 6 Rewriting System
==》Project 2: Practical Part: Segmentation of Adhesive Objects - Using Geometric Segmentation to Realize Bottle Cap Segmentation and Detection
Project 3: Practical Part: Segmentation of Adhesive Objects - Using Geometric Segmentation to Realize Coin Segmentation and Detection
Project Four: Practical Combat: Adhesive Object Segmentation - Using Geometric Segmentation to Realize Cell Segmentation and Detection
Project Five: Practical Combat: Adhesive Object Segmentation - Using Watershed Algorithm to Realize Sugar Bean Segmentation and Detection